1. Hystrix简介
在微服务架构中,根据业务来拆分成一个个的服务,服务与服务之间可以相互调用(RPC),在Spring Cloud可以用RestTemplate+Ribbon和Feign来调用。为了保证其高可用,单个服务通常会集群部署。由于网络原因或者自身的原因,服务并不能保证100%可用,如果单个服务出现问题,调用这个服务就会出现线程阻塞,此时若有大量的请求涌入,Servlet容器的线程资源会被消耗完毕,导致服务瘫痪。服务与服务之间的依赖性,故障会传播,会对整个微服务系统造成灾难性的严重后果,这就是服务故障的“雪崩”效应。
为了解决这个问题,业界提出了断路器模型。
Netflix开源了Hystrix组件,实现了断路器模式,SpringCloud对这一组件进行了整合。 在微服务架构中,一个请求需要调用多个服务是非常常见的,如下图:

较底层的服务如果出现故障,会导致连锁故障。当对特定的服务的调用的不可用达到一个阀值(Hystric 是5秒20次) 断路器将会被打开。

断路打开后,可用避免连锁故障,fallback方法可以直接返回一个固定值。
这篇文章基于上一篇文章的工程,首先启动上一篇文章的工程,启动eureka-server 工程;启动service-hi工程,它的端口为8762。
2. 在Ribbon中使用断路器
改造service-ribbon 工程的代码,首先在pox.xml文件中加入spring-cloud-starter-netflix-hystrix的起步依赖:
<dependency>
            <groupId>org.springframework.cloud</groupId>
            <artifactId>spring-cloud-starter-netflix-hystrix</artifactId>
  </dependency>
在程序的启动类ServiceRibbonApplication 加@EnableHystrix注解开启Hystrix:
import org.springframework.boot.SpringApplication;
import org.springframework.boot.autoconfigure.SpringBootApplication;
import org.springframework.cloud.client.discovery.EnableDiscoveryClient;
import org.springframework.cloud.client.loadbalancer.LoadBalanced;
import org.springframework.cloud.netflix.eureka.EnableEurekaClient;
import org.springframework.cloud.netflix.hystrix.EnableHystrix;
import org.springframework.context.annotation.Bean;
import org.springframework.web.client.RestTemplate;

@SpringBootApplication
@EnableEurekaClient
@EnableDiscoveryClient
@EnableHystrix
public class ServiceRibbonApplication {

    public static void main(String[] args) {
        SpringApplication.run( ServiceRibbonApplication.class, args );
    }

    @Bean
    @LoadBalanced
    RestTemplate restTemplate() {
        return new RestTemplate();
    }

}
改造HelloService类,在hiService方法上加上@HystrixCommand注解。该注解对该方法创建了熔断器的功能,并指定了fallbackMethod熔断方法,熔断方法直接返回了一个字符串,字符串为”hi,”+name+”,sorry,error!”,代码如下:
import com.netflix.hystrix.contrib.javanica.annotation.HystrixCommand;
import org.springframework.beans.factory.annotation.Autowired;
import org.springframework.stereotype.Service;
import org.springframework.web.client.RestTemplate;

@Service
public class HelloService {

    @Autowired
    RestTemplate restTemplate;

    @HystrixCommand(fallbackMethod = "hiError")
    public String hiService(String name) {
        return restTemplate.getForObject("http://SERVICE-HI/hi?name="+name,String.class);
    }

    public String hiError(String name) {
        return "hi,"+name+",sorry,error!";
    }

}
启动:service-ribbon 工程,当我们访问http://localhost:8764/hi?name=zang,浏览器显示:

此时关闭 service-hi 工程,当我们再访问http://localhost:8764/hi?name=forezp,浏览器会显示:
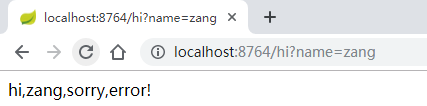
这就说明当 service-hi 工程不可用的时候,service-ribbon调用 service-hi的API接口时,会执行快速失败,直接返回一组字符串,而不是等待响应超时,这很好的控制了容器的线程阻塞。
3. Feign中使用断路器
Feign是自带断路器的,在D版本的Spring Cloud之后,它没有默认打开。需要在配置文件中配置打开它,在配置文件加以下代码:
feign.hystrix.enabled: true
基于service-feign工程进行改造,只需要在FeignClient的SchedualServiceHi接口的注解中加上fallback的指定类就行了:
import com.zang.servicefeign.clients.fallback.SchedualServiceHiHystric;
import org.springframework.cloud.openfeign.FeignClient;
import org.springframework.web.bind.annotation.RequestMapping;
import org.springframework.web.bind.annotation.RequestMethod;
import org.springframework.web.bind.annotation.RequestParam;

@FeignClient(value = "service-hi",fallback = SchedualServiceHiHystric.class)
public interface SchedualServiceHi {
    @RequestMapping(value = "/hi",method = RequestMethod.GET)
    String sayHiFromClientOne(@RequestParam(value = "name") String name);
}
SchedualServiceHiHystric需要实现SchedualServiceHi 接口,并注入到Ioc容器中,代码如下:
import com.zang.servicefeign.clients.SchedualServiceHi;
import org.springframework.stereotype.Component;

@Component
public class SchedualServiceHiHystric implements SchedualServiceHi {
    @Override
    public String sayHiFromClientOne(String name) {
        return "sorry, you are fail,"+name;
    }
}
启动servcie-feign工程,浏览器打开http://localhost:8765/hi?name=zang,注意此时service-hi工程没有启动,网页显示:
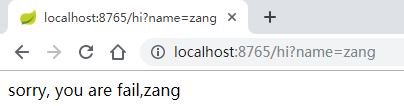
打开service-hi工程,再次访问,浏览器显示:

这证明断路器起到作用了。
4. Hystrix Dashboard
Hystrix Dashboard是作为断路器状态的一个组件,提供了数据监控和友好的图形化界面。
下面对【2. 在Ribbon中使用断路器】中的代码进行改造,添加熔断的图形化界面监控。
4.1 添加依赖
添加 spring-cloud-starter-netflix-hystrix-dashboard 等的依赖,如下
<dependency>
    <groupId>org.springframework.cloud</groupId>
    <artifactId>spring-cloud-starter-netflix-hystrix</artifactId>
</dependency>
<dependency>
    <groupId>org.springframework.cloud</groupId>
    <artifactId>spring-cloud-starter-netflix-hystrix-dashboard</artifactId>
</dependency>
<dependency>
    <groupId>org.springframework.boot</groupId>
    <artifactId>spring-boot-starter-actuator</artifactId>
</dependency>
4.2 开启注解
在程序的入口ServiceHiApplication类,加上@EnableHystrix注解开启断路器,这个已存在,并且需要在程序中声明断路点HystrixCommand;加上@EnableHystrixDashboard注解,开启HystrixDashboard。
import org.springframework.boot.SpringApplication;
import org.springframework.boot.autoconfigure.SpringBootApplication;
import org.springframework.cloud.client.discovery.EnableDiscoveryClient;
import org.springframework.cloud.client.loadbalancer.LoadBalanced;
import org.springframework.cloud.netflix.eureka.EnableEurekaClient;
import org.springframework.cloud.netflix.hystrix.EnableHystrix;
import org.springframework.cloud.netflix.hystrix.dashboard.EnableHystrixDashboard;
import org.springframework.context.annotation.Bean;
import org.springframework.web.client.RestTemplate;

@SpringBootApplication
@EnableEurekaClient
@EnableDiscoveryClient
@EnableHystrix
@EnableHystrixDashboard
public class ServiceRibbonApplication {

    public static void main(String[] args) {
        SpringApplication.run( ServiceRibbonApplication.class, args );
    }

    @Bean
    @LoadBalanced
    RestTemplate restTemplate() {
        return new RestTemplate();
    }
}
运行程序: 依次开启eureka-server (port:8761),service-hi(port:8762)和 service-ribbon(port:8764)工程。
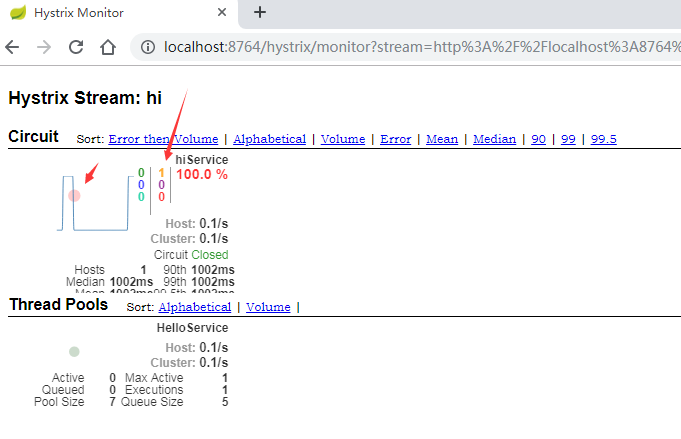
4.3 Hystrix Dashboard图形展示
打开http://localhost:8764/actuator/hystrix.stream,可以看到一些具体的数据:

打开locahost:8764/hystrix 可以看见以下界面:
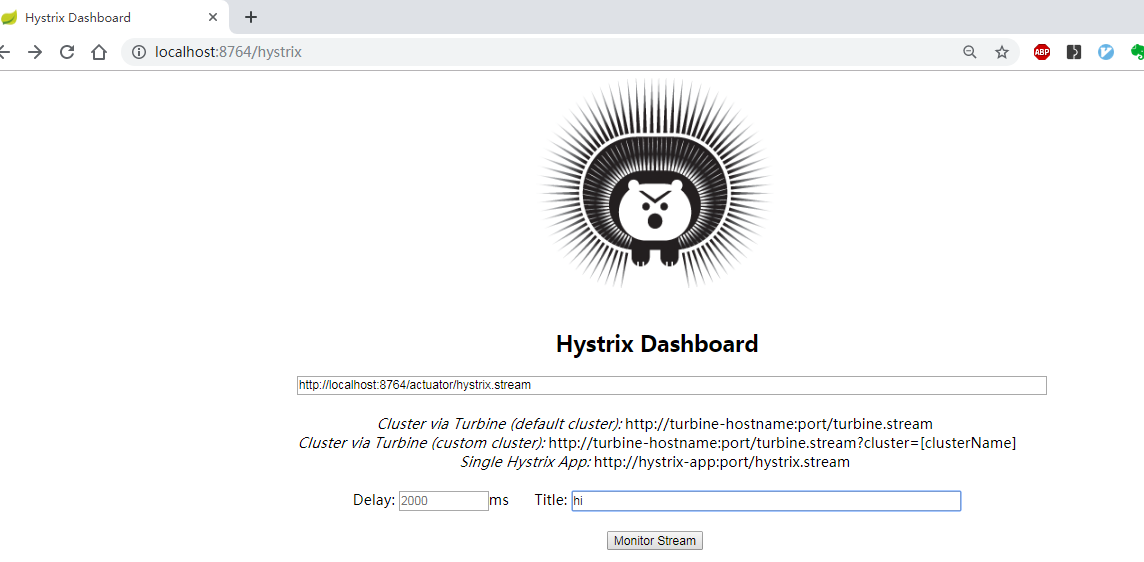
在界面依次输入:http://localhost:8764/actuator/hystrix.stream 、2000 、hi;点确定。
在另一个窗口访问: http://localhost:8764/hi?name=zang,重新刷新hystrix.stream网页,你会看到良好的图形化界面:

关闭service-hi(port:8762)服务,再次访问 http://localhost:8764/hi?name=zang,使其进入断路fallbackMethod,可以在监控平台上观察到此次断路。