CRM : custom releation manager 客户关系管理系统,用于维护客户和公司之间关系
学校 和 大家 之间关系
需要完成的功能:
员工管理:登陆(登陆拦截器,服务器端校验),查询,编辑员工(标签回显,ajax二级联动)
课程类别:查询(查询所有+条件+分页),添加和编辑
班级管理:查询,课表上传下载
1,环境搭建:需要导入39个jar包,在之前的博文中有详细介绍
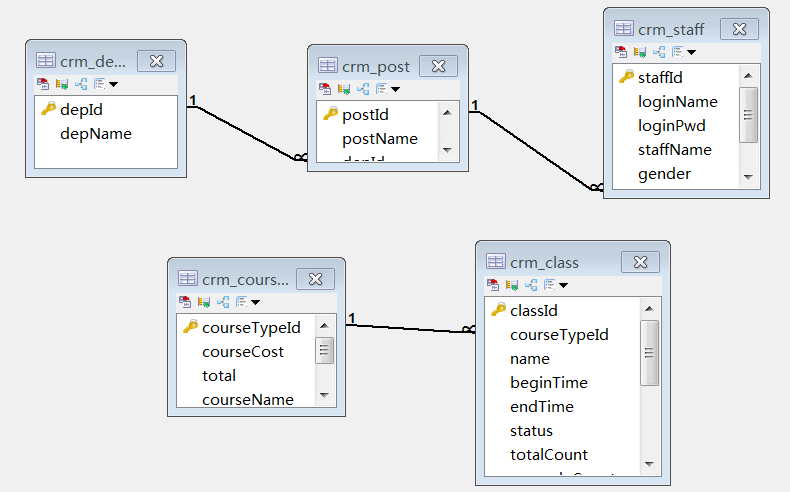
2,需要创建5个数据库表:创建的数据库名为ee19_crmdb
5个表如下:注由于在编码中密码采用了加密机制,导致我们看到的密码是经过加密后的密码
create database if not exists `ee19_crmdb`;
USE `ee19_crmdb`;

CREATE TABLE `crm_department` (
  `depId` varchar(255) NOT NULL PRIMARY KEY,
  `depName` varchar(50) DEFAULT NULL
);

insert  into `crm_department`(`depId`,`depName`)
    values ('2c9091c14c78e58b014c78e67de10001','java学院'),
            ('2c9091c14c78e58b014c78e68ded0002','咨询部');

CREATE TABLE `crm_post` (
  `postId` varchar(255) NOT NULL PRIMARY KEY,
  `postName` varchar(100) DEFAULT NULL,
  `depId` varchar(255) DEFAULT NULL,
  CONSTRAINT FOREIGN KEY (`depId`) REFERENCES `crm_department` (`depId`)
);

insert  into `crm_post`(`postId`,`postName`,`depId`)
    values ('2c9091c14c78e58b014c78e6b34a0003','总监','2c9091c14c78e58b014c78e67de10001'),
            ('2c9091c14c78e58b014c78e6d4510004','讲师','2c9091c14c78e58b014c78e67de10001'),
            ('2c9091c14c78e58b014c78e6f2340005','主管','2c9091c14c78e58b014c78e68ded0002');

CREATE TABLE `crm_staff` (
  `staffId` varchar(255) NOT NULL PRIMARY KEY,
  `loginName` varchar(100) DEFAULT NULL,
  `loginPwd` varchar(100) DEFAULT NULL,
  `staffName` varchar(100) DEFAULT NULL,
  `gender` varchar(20) DEFAULT NULL,
  `onDutyDate` datetime DEFAULT NULL,
  `postId` varchar(255) DEFAULT NULL,
  CONSTRAINT FOREIGN KEY (`postId`) REFERENCES `crm_post` (`postId`)
);

insert  into `crm_staff`(`staffId`,`loginName`,`loginPwd`,`staffName`,`gender`,`onDutyDate`,`postId`)
    values ('2c9091c14c78e58b014c78e5c32a0000','jack','81dc9bdb52d04dc20036dbd8313ed055','管理员',NULL,NULL,NULL),
            ('2c9091c14c78e58b014c78e759b40006','rose','81dc9bdb52d04dc20036dbd8313ed055','肉丝','女','2013-04-16 00:00:00','2c9091c14c78e58b014c78e6f2340005'),
            ('2c9091c14c78e58b014c78e7ecd90007','tom','81dc9bdb52d04dc20036dbd8313ed055','汤姆','男','2014-04-24 00:00:00','2c9091c14c78e58b014c78e6d4510004');

CREATE TABLE `crm_course_type` (
  `courseTypeId` varchar(255) NOT NULL PRIMARY KEY,
  `courseCost` double DEFAULT NULL,
  `total` int(11) DEFAULT NULL,
  `courseName` varchar(500) DEFAULT NULL,
  `remark` varchar(5000) DEFAULT NULL
);


insert  into `crm_course_type`(`courseTypeId`,`courseCost`,`total`,`courseName`,`remark`)
    values ('2c9091c14c78e58b014c78e829b70008',2000,1000,'java基础',''),
        ('2c9091c14c78e58b014c78e867b80009',18000,4000,'java就业','');

CREATE TABLE `crm_class` (
  `classId` varchar(50) NOT NULL PRIMARY KEY,
  `courseTypeId` varchar(255) DEFAULT NULL,
  `name` varchar(50) DEFAULT NULL,
  `beginTime` datetime DEFAULT NULL,
  `endTime` datetime DEFAULT NULL,
  `status` varchar(20) DEFAULT NULL,
  `totalCount` int(11) DEFAULT NULL,
  `upgradeCount` int(11) DEFAULT NULL,
  `changeCount` int(11) DEFAULT NULL,
  `runoffCount` int(11) DEFAULT NULL,
  `remark` varchar(500) DEFAULT NULL,
  `uploadTime` datetime DEFAULT NULL,
  `uploadPath` varchar(200) DEFAULT NULL,
  `uploadFilename` varchar(100) DEFAULT NULL,
  CONSTRAINT FOREIGN KEY (`courseTypeId`) REFERENCES `crm_course_type` (`courseTypeId`)
) ;

insert  into `crm_class`(`classId`,`courseTypeId`,`name`,`beginTime`,`endTime`,`status`,`totalCount`,`upgradeCount`,`changeCount`,`runoffCount`,`remark`,`uploadTime`,`uploadPath`,`uploadFilename`)
    values ('2c9091c14c78e58b014c78e8cc62000a','2c9091c14c78e58b014c78e829b70008','1期','2015-03-10 00:00:00','2015-04-30 00:00:00',NULL,80,2,0,2,'','2015-04-02 16:33:09','/WEB-INF/upload/0d7a042741544da988b2d2462c683e57','(第173期)2015年01月22日 JavaEE就业班.xls'),
    ('2c9091c14c78e58b014c78e9106e000b','2c9091c14c78e58b014c78e829b70008','2期','2015-04-28 00:00:00','2015-05-27 00:00:00',NULL,67,0,0,0,'',NULL,NULL,NULL),
    ('2c9091c14c78e58b014c78e9601a000c','2c9091c14c78e58b014c78e867b80009','1期ee','2015-03-29 00:00:00','2015-07-13 00:00:00',NULL,120,0,0,0,'',NULL,NULL,NULL);
上述表存在如下外键关系

3,编写PO类
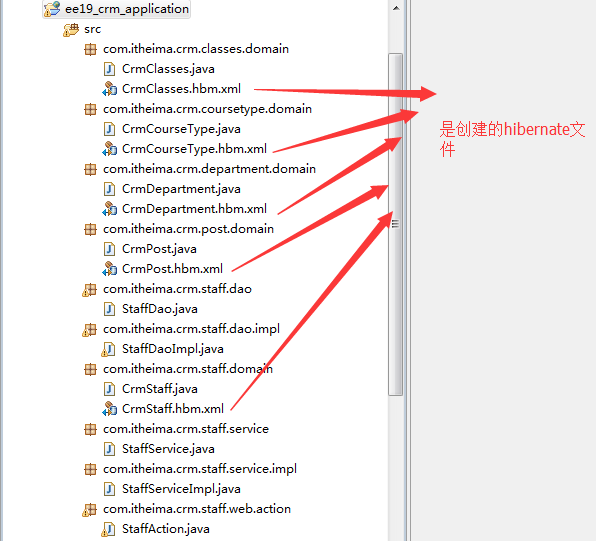

3.1下面来看我们具体编写的代码
首先从部门--职位--员工 这条路线走,我们知道部门与职位是一对多关系,职位与员工是一对多关系,在此,我省略每个PO类中的set,get生成函数
先分析department类,我们用CrmDepartment类名来表示,在该类中根据crm_department表来设置对应的属性,由于一个部门对应多个职位,即每一个职位都有所在部门,可能多个职位的部门编号相同,
所以在职位表中是存在部门编号这个属性列的,但在部门表中并不存在职位编号,这点理解很关键,我们在部门表中用集合来表示职位的集合(因为一个部门对应多个职位,我们将这多个职位用集合来表示)
CrmDepartment类如下:
package com.itheima.crm.department.domain;
import java.util.HashSet;
import java.util.Set;
import com.itheima.crm.post.domain.CrmPost;
/**
 * CREATE TABLE `crm_department` (
  `depId` VARCHAR(255) NOT NULL PRIMARY KEY,
  `depName` VARCHAR(50) DEFAULT NULL
);
 * @author Administrator
 *
 */
public class CrmDepartment {
       private String depId;
       private String depName;
       //一个部门对应多个职务,一对多,选择集合set--》不重复,没有顺序
       private Set<CrmPost> postSet = new HashSet<CrmPost>();
      //此处先省略get,set方法,在myeclipse中有自动生成
}
CrmDepartment.hbm.xml如下
<?xml version="1.0" encoding="UTF-8"?>
<!DOCTYPE hibernate-mapping PUBLIC
    "-//Hibernate/Hibernate Mapping DTD 3.0//EN"
    "http://www.hibernate.org/dtd/hibernate-mapping-3.0.dtd">
<hibernate-mapping>
   <class  name="com.itheima.crm.department.domain.CrmDepartment" table="crm_department" >
        <id name="depId">
            <generator class="uuid"></generator>
        </id>
        <property name="depName"></property>
      <!-- 一对多,一个部门有多个职务,外键为depId-->
        <set name="postSet">    //此处代表的是set集合的名字
            <key column ="depId"></key>   //此处代表的是部门在职位表中的外键,
            <one-to-many class="com.itheima.crm.post.domain.CrmPost"></one-to-many>
        </set>
   </class>
</hibernate-mapping>
CrmPost类如下
package com.itheima.crm.post.domain;
import java.util.HashSet;
import java.util.Set;
import com.itheima.crm.department.domain.CrmDepartment;
import com.itheima.crm.staff.domain.CrmStaff;

/**
 * CREATE TABLE `crm_post` (
  `postId` VARCHAR(255) NOT NULL PRIMARY KEY,
  `postName` VARCHAR(100) DEFAULT NULL,
  `depId` VARCHAR(255) DEFAULT NULL,
  CONSTRAINT FOREIGN KEY (`depId`) REFERENCES `crm_department` (`depId`)
);
public class CrmPost {
    private String postId;
    private String postName;//多对一,多个职务对应一个部门,此处与crm_post中的属性depId不一致,因为depId是该表的外键,它是部门表的主键
    private CrmDepartment department;
    //职务和员工之间的关系,一个职务有多个员工,一对多关系
    private Set<CrmStaff> staffSet =  new HashSet<CrmStaff>();

}
CrmPost.hbm.xml如下所示:
<?xml version="1.0" encoding="UTF-8"?>
<!DOCTYPE hibernate-mapping PUBLIC
    "-//Hibernate/Hibernate Mapping DTD 3.0//EN"
    "http://www.hibernate.org/dtd/hibernate-mapping-3.0.dtd">
<hibernate-mapping>
   <class  name="com.itheima.crm.post.domain.CrmPost" table="Crm_Post" >
        <id name="postId">
            <generator class="uuid"></generator>
        </id>
        <property name="postName"></property>
        <!-- 多对一,多个职位对应一个部门-->
        <many-to-one name="department" class="com.itheima.crm.department.domain.CrmDepartment"  column="depId"></many-to-one>
        <!-- 一对多,一个职位有多个员工,外键为depId-->
        <set name="staffSet">
            <key column ="postId"></key>
            <one-to-many class="com.itheima.crm.staff.domain.CrmStaff" ></one-to-many>
        </set>
   </class>
</hibernate-mapping>
**********************************************************************************************************************************************************************************************************************************
我们在此处分析主外键关系,由于一个部门对应多个职位,一个职位对应多个员工,我们需要讨论one-to-many和many-to-one的关系以及使用方法
部门与职位是一对多关系,在部门表中,属性设置并没有postId,但我们知道,一个部门对应多个职位,depId是部门表的主键,是职位表的外键,在部门表中我们使用集合set来存储职位(一个部门对应多个职位)
<!-- 一对多,一个部门有多个职务,外键为depId-->
<set name="postSet"> //此处代表的是set集合的名字
<key column ="depId"></key> //此处代表的是部门在职位表中的外键,
<one-to-many class="com.itheima.crm.post.domain.CrmPost"></one-to-many> //此处的类是多的一方,即职位类
</set>
在CrmDepartment.hbm.xml使用上述语句来表示该set集合,从而表述了一对多的关系
在职位表中,由于本身存在depId属性,由于我们知道该属性是作为职位表的外键与部门表相联系的,且在职位表中是多个职位对应一个部门,因此,我们在职位表中将depId封装到一个部门类对象中
//多对一,多个职务对应一个部门,此处与crm_post中的属性depId不一致,因为depId是该表的外键,它是部门表的主键
private CrmDepartment department;
在CrmPost.hbm.xml中我们用以下语句表示多对一关系
<!-- 多对一,多个职位对应一个部门-->
<many-to-one name="department" class="com.itheima.crm.department.domain.CrmDepartment" column="depId"></many-to-one>
上述的name表示的是我们在职位表中所显示的部门类对象department,class对应的是部门类,column指的是外键
以上讲述了一对多和多对一的关系,以及在编写代码时该如何写
下文在写职位与员工的关系也与上述类似,在此不在描述
**********************************************************************************************************************************************************************************************************************************
CrmStaff类如下所示:
package com.itheima.crm.staff.domain;
import java.util.Date;
import com.itheima.crm.post.domain.CrmPost;
/**
 *
CREATE TABLE `crm_staff` (
  `staffId` VARCHAR(255) NOT NULL PRIMARY KEY,
  `loginName` VARCHAR(100) DEFAULT NULL,
  `loginPwd` VARCHAR(100) DEFAULT NULL,
  `staffName` VARCHAR(100) DEFAULT NULL,
  `gender` VARCHAR(20) DEFAULT NULL,
  `onDutyDate` DATETIME DEFAULT NULL,
  `postId` VARCHAR(255) DEFAULT NULL,
  CONSTRAINT FOREIGN KEY (`postId`) REFERENCES `crm_post` (`postId`)
);
 * @author Administrator
 *
 */
public class CrmStaff {
     private String staffId;
     private String loginName;//登陆
     private String loginPwd;  //登陆密码
     private String staffName;  //员工名
     private String gender;   //性别
     private Date onDutyDate;  //入职时间
     // 多对一,多为员工属于一个职务,相当于,这位员工有一个职务
     private CrmPost  post;
}
CrmStaff.hbm.xml如下:
<?xml version="1.0" encoding="UTF-8"?>
<!DOCTYPE hibernate-mapping PUBLIC
    "-//Hibernate/Hibernate Mapping DTD 3.0//EN"
    "http://www.hibernate.org/dtd/hibernate-mapping-3.0.dtd">
<hibernate-mapping>
   <class  name="com.itheima.crm.staff.domain.CrmStaff" table="Crm_Staff" >
        <id name="staffId">
            <generator class="uuid"></generator>
        </id>
        <property name="loginName"></property>
        <property name="loginPwd"></property>
        <property name="staffName"></property>
        <property name="gender"></property>
        <property name="onDutyDate">
          <column name="onDutyDate" sql-type="datetime"></column>
        </property>
        <!-- 多对一,多个员工对应一个职务-->
        <many-to-one name="post" class="com.itheima.crm.post.domain.CrmPost"  column="postId"></many-to-one>
   </class>
</hibernate-mapping>
由于,该博客是完成登陆功能,与课程和班级暂时没有关系,关于课程和班级的PO类,在后文写其他功能时再做描述
下面我们先来配置spring,代码还没有全,暂时只可完成登陆功能

下面来放代码:
applicationContext-staff.xml文件内容如下:
<?xml version="1.0" encoding="UTF-8"?>
<beans xmlns="http://www.springframework.org/schema/beans"
       xmlns:xsi="http://www.w3.org/2001/XMLSchema-instance"
       xmlns:aop="http://www.springframework.org/schema/aop"
       xmlns:tx="http://www.springframework.org/schema/tx"
       xmlns:context="http://www.springframework.org/schema/context"
       xsi:schemaLocation="http://www.springframework.org/schema/beans
                              http://www.springframework.org/schema/beans/spring-beans.xsd
                              http://www.springframework.org/schema/tx
                              http://www.springframework.org/schema/tx/spring-tx.xsd
                              http://www.springframework.org/schema/aop
                              http://www.springframework.org/schema/aop/spring-aop.xsd
                              http://www.springframework.org/schema/context
                              http://www.springframework.org/schema/context/spring-context.xsd">

    <!-- 员工配置项:dao、service -->

    <bean id="staffDao" class="com.itheima.crm.staff.dao.impl.StaffDaoImpl">
        <property name="sessionFactory" ref="sessionFactory"></property>
    </bean>
    <bean id="staffService" class="com.itheima.crm.staff.service.impl.StaffServiceImpl">
        <property name="staffDao" ref="staffDao"></property>
    </bean>
</beans>
applicationContext.xml内容如下:
<?xml version="1.0" encoding="UTF-8"?>
<beans xmlns="http://www.springframework.org/schema/beans"
       xmlns:xsi="http://www.w3.org/2001/XMLSchema-instance"
       xmlns:aop="http://www.springframework.org/schema/aop"
       xmlns:tx="http://www.springframework.org/schema/tx"
       xmlns:context="http://www.springframework.org/schema/context"
       xsi:schemaLocation="http://www.springframework.org/schema/beans
                              http://www.springframework.org/schema/beans/spring-beans.xsd
                              http://www.springframework.org/schema/tx
                              http://www.springframework.org/schema/tx/spring-tx.xsd
                              http://www.springframework.org/schema/aop
                              http://www.springframework.org/schema/aop/spring-aop.xsd
                              http://www.springframework.org/schema/context
                              http://www.springframework.org/schema/context/spring-context.xsd">

    <!-- 公共配置项 -->
    <!-- 1.1 加载properties文件 -->
    <context:property-placeholder location="classpath:jdbcInfo.properties"/>

    <!-- 1.2 配置数据源 -->
    <bean id="dataSource" class="com.mchange.v2.c3p0.ComboPooledDataSource">
        <property name="driverClass" value="${jdbc.driverClass}"></property>
        <property name="jdbcUrl" value="${jdbc.jdbcUrl}"></property>
        <property name="user" value="${jdbc.user}"></property>
        <property name="password" value="${jdbc.password}"></property>
    </bean>

    <!-- 2. 配置SessionFactory -->
    <bean id="sessionFactory" class="org.springframework.orm.hibernate3.LocalSessionFactoryBean">
        <property name="dataSource" ref="dataSource"></property>
        <property name="hibernateProperties">
            <props>
                <prop key="hibernate.dialect">org.hibernate.dialect.MySQL5Dialect</prop>
                <prop key="hibernate.show_sql">true</prop>
                <prop key="hibernate.format_sql">true</prop>
            </props>
        </property>
        <property name="mappingLocations" value="classpath:com/itheima/crm/*/domain/*.hbm.xml"></property>
    </bean>

    <!-- 3.事务管理 -->
    <!-- 3.1 事务管理器 -->
    <bean id="txManager" class="org.springframework.orm.hibernate3.HibernateTransactionManager">
        <property name="sessionFactory" ref="sessionFactory"></property>
    </bean>
    <!-- 3.2 事务详情
        * 增删改:读写;查询:只读
    -->
    <tx:advice id="txAdvice" transaction-manager="txManager">
        <tx:attributes>
            <tx:method name="add*"/>
            <tx:method name="update*"/>
            <tx:method name="delete*"/>
            <tx:method name="login" read-only="true"/>
            <tx:method name="find*" read-only="true"/>
        </tx:attributes>
    </tx:advice>
    <!-- 3.3 aop编程
        * 强制cglib :  proxy-target-class="true"
    -->
    <aop:config>
        <aop:advisor advice-ref="txAdvice" pointcut="execution(* com.itheima.crm.*.service..*.*(..))"/>
    </aop:config>


    <!-- 4 导入其他配置文件 -->
    <!-- 4.1 员工 -->
    <import resource="applicationContext-staff.xml"/>
</beans>
/ee19_crm_application/config/struts/struts-staff.xml内容如下:
<?xml version="1.0" encoding="UTF-8"?>
<!DOCTYPE struts PUBLIC
    "-//Apache Software Foundation//DTD Struts Configuration 2.3//EN"
    "http://struts.apache.org/dtds/struts-2.3.dtd">
<struts>
    <!-- 员工配置 -->
    <package name="sta" namespace="/" extends="common">
        <action name="staffAction_*" class="com.itheima.crm.staff.web.action.StaffAction" method="{1}">
            <!-- 1 登录成功 -->
            <result name="success" type="redirectAction">staffAction_home</result>
            <!-- 2 没有登录成,需要登录 -->
            <result name="login">/WEB-INF/pages/login.jsp</result>
            <!-- 3 首页 -->
            <result name="home">/WEB-INF/pages/frame.jsp</result>
        </action>
    </package>
</struts>
/ee19_crm_application/config/struts.xml内容如下:
<?xml version="1.0" encoding="UTF-8"?>
<!DOCTYPE struts PUBLIC
    "-//Apache Software Foundation//DTD Struts Configuration 2.3//EN"
    "http://struts.apache.org/dtds/struts-2.3.dtd">
<struts>
    <!-- 1 常量 -->
    <!-- 1.1开发模式 -->
    <constant name="struts.devMode" value="true"></constant>
    <!-- 1.2标签主题,简单风格 -->
    <constant name="struts.ui.theme" value="simple"></constant>

    <!-- 2 公共项 -->
    <package name="common" namespace="/" extends="struts-default">

    </package>

    <!-- 3 加载其他配置文件 -->
    <include file="struts/struts-staff.xml"></include>

</struts>
web.xml配置
<?xml version="1.0" encoding="UTF-8"?>
<web-app version="2.5"
    xmlns="http://java.sun.com/xml/ns/javaee"
    xmlns:xsi="http://www.w3.org/2001/XMLSchema-instance"
    xsi:schemaLocation="http://java.sun.com/xml/ns/javaee
    http://java.sun.com/xml/ns/javaee/web-app_2_5.xsd">
  <!-- 1.1 spring配置文件位置
      * 方式1: 【建议】
          <param-value>classpath:spring/applicationContext.xml</param-value>
          需要在applicationContext.xml 配置<import> 导入其他
      * 方式2:
          <param-value>classpath:spring/applicationContext*.xml</param-value>
          加载所有,不需要配置<import>
  -->
  <context-param>
      <param-name>contextConfigLocation</param-name>
      <param-value>classpath:spring/applicationContext.xml</param-value>
  </context-param>
  <!-- 1.2 加载spring配置文件使用监听器 -->
  <listener>
      <listener-class>org.springframework.web.context.ContextLoaderListener</listener-class>
  </listener>


  <!-- 2 struts 前端控制器 -->
  <filter>
      <filter-name>struts2</filter-name>
      <filter-class>org.apache.struts2.dispatcher.ng.filter.StrutsPrepareAndExecuteFilter</filter-class>
  </filter>
  <filter-mapping>
      <filter-name>struts2</filter-name>
      <url-pattern>/*</url-pattern>
  </filter-mapping>

</web-app>
编写思路:

员工登陆:
1.编写dao层:通过账号和密码查询
2.编写service层:主要事务管理(已经配置)
3.配置spring
4.jsp 登录表单
5.struts-staff.xml 配置
6.StaffAction编写
通过service查询
查询到:将信息保存session作用域,重定向首页(action方法直接return,重定向在xml完成)
没有结果:在request作用域保存提示信息,请求转发显示信息。(request作用域 == 值栈)
dao层:
l 之后在spring配置dao层时,需要注入SessionFactory
package com.itheima.crm.staff.dao.impl;

import java.util.List;

import org.springframework.orm.hibernate3.support.HibernateDaoSupport;

import com.itheima.crm.staff.dao.StaffDao;
import com.itheima.crm.staff.domain.CrmStaff;

public class StaffDaoImpl extends HibernateDaoSupport implements StaffDao {

    @Override
    public CrmStaff find(String loginName, String loginPwd) {
        // TODO Auto-generated method stub
        List<CrmStaff> allStaff =  this.getHibernateTemplate().find("from CrmStaff where loginName=? and loginPwd=? ", loginName,loginPwd);
        if(allStaff.size()==1){
            return allStaff.get(0);
        }
        return null;
    }

}
servic层:
package com.itheima.crm.staff.service.impl;

import com.itheima.crm.staff.dao.StaffDao;
import com.itheima.crm.staff.domain.CrmStaff;
import com.itheima.crm.staff.service.StaffService;

public class StaffServiceImpl implements StaffService {

     private StaffDao staffDao;

    public void setStaffDao(StaffDao staffDao) {
        this.staffDao = staffDao;
    }

    @Override
    public CrmStaff login(CrmStaff staff) {
        //密码需要加密
        // TODO Auto-generated method stub
        return staffDao.find(staff.getLoginName(), staff.getLoginPwd());
    }

}
<!-- 员工配置项:dao、service --> ,这是在员工的spring中需要配置,上文已经给出
 <bean id="staffDao" class="com.itheima.crm.staff.dao.impl.StaffDaoImpl">

           <property name="sessionFactory" ref="sessionFactory"></property>

    </bean>

    <bean id="staffService" class="com.itheima.crm.staff.service.impl.StaffServiceImpl">

           <property name="staffDao" ref="staffDao"></property>

    </bean>
在员工的struts中也需要配置
    <package name="sta" namespace="/" extends="common">
        <action name="staffAction_*" class="com.itheima.crm.staff.web.action.StaffAction" method="{1}">
            <!-- 1 登录成功 -->
            <result name="success" type="redirectAction">staffAction_home</result>
            <!-- 2 没有登录成,需要登录 -->
            <result name="login">/WEB-INF/pages/login.jsp</result>
            <!-- 3 首页 -->
            <result name="home">/WEB-INF/pages/frame.jsp</result>
        </action>
    </package>
编写action类:
package com.itheima.crm.staff.web.action;

import com.itheima.crm.staff.domain.CrmStaff;
import com.itheima.crm.staff.service.StaffService;
import com.opensymphony.xwork2.ActionContext;
import com.opensymphony.xwork2.ActionSupport;
import com.opensymphony.xwork2.ModelDriven;

public class StaffAction extends ActionSupport implements ModelDriven<CrmStaff> {

    private CrmStaff staff = new CrmStaff();
    @Override
    public CrmStaff getModel() {
        // TODO Auto-generated method stub
        return staff;
    }
    //默认按照名称注入进来
    private StaffService staffService;
    public void setStaffService(StaffService staffService){
        this.staffService = staffService;
    }
    /**
     * 员工登陆
     * @return
     */
   public String Login(){
       //查询员工
       CrmStaff findStaff = staffService.login(staff);
       //是否成功
       if(findStaff !=null){
           //成功
           //3.1 session作用域保存数据
           ActionContext.getContext().getSession().put("loginStaff", findStaff);
          //3.2重定向到首页--xml中配置
           return "success";
       }
       //不成功
       this.addFieldError("", "用户名或密码错误");
       //返回,请求转发
       return "login";
   }

   public String home(){
       return "home";
   }
}
需要修改登陆表单:
<!-- 表单 --> <s:form namespace="/" action="staffAction_login" > <img src="${pageContext.request.contextPath}/images/title.png" width="185" height="26"/> <br/> <font color="#ff0000"> <s:fielderror></s:fielderror> </font> <br/> 用户名:<s:textfield name="loginName" cssClass="msg"></s:textfield><br/><br/> 密 码:<s:password name="loginPwd" cssClass="msg" showPassword="true"></s:password><br/><br/> <s:submit value="登录" cssClass="btn"></s:submit> </s:form>
2017-09-0315:59:43