一、Vue的状态管理模式
学习Vuex之前,先用一个简单计数应用为例来说明一下Vue的状态管理模式。
new Vue({

    // state

    data() {

        return {

            count: 0

        }

    },

    // view

    template: `

    <div>{{ count }}</div>

  `,

    // actions

    methods: {

        increment() {

            this.count++

        }

    }

})
这个状态管理应用包含以下几个部分
- state,驱动应用的数据源;
- view,以声明方式将 state 映射到视图;
- actions,响应在 view 上的用户输入导致的状态变化。
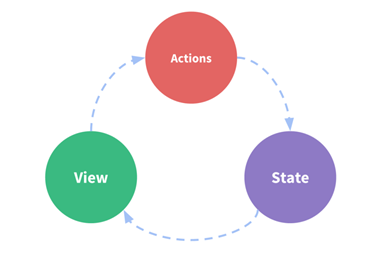
单向数据流理念的示意图
当遇到多个组件共享状态时,单向数据流的简洁性容易被破坏:
- 多个视图依赖于同一状态。
- 来自不同视图的行为需要变更同一状态。
把组件的共同状态抽取出来,用全局单例模式管理,不管在组件树的那个位置,任何组件都能获取状态或触发行为。

Vuex的核心就是store。store中包含了需要在组件之间共享的状态state。
store就像一个全局对象,但和全局对象又有所不同:
1、 Vuex 的状态存储是响应式的。当 Vue 组件从 store 中读取状态的时候,若 store 中的状态发生变化,那么相应的组件也会相应地得到高效更新。
2、 你不能直接改变 store 中的状态。改变 store 中的状态的唯一途径就是显式地提交 (commit) mutation。这样使得我们可以方便地跟踪每一个状态的变化,从而让我们能够实现一些工具帮助我们更好地了解我们的应用。
二、核心概念
1、State
const state ,这个就是我们说的访问状态对象,它就是我们SPA(单页应用程序)中的共享值。
在Vue组件中获得Vuex状态
由于Vuex的状态存储是响应式的,从 store 实例中读取状态最简单的方法就是在计算属性中返回某个状态:
// 创建一个 Counter 组件

const Counter = {

    template: `<div>{{ count }}</div>`,

    computed: {

        count() {

            return store.state.count

        }

    }

}
每当 store.state.count 变化的时候, 都会重新求取计算属性,并且触发更新相关联的 DOM。
然而,这种模式导致组件依赖全局状态单例。在模块化的构建系统中,在每个需要使用 state 的组件中需要频繁地导入,并且在测试组件时需要模拟状态。
Vuex 通过 store 选项,提供了一种机制将状态从根组件“注入”到每一个子组件中(需调用 Vue.use(Vuex)):
const app = new Vue({

    el: '#app',

    // 把 store 对象提供给 “store” 选项,这可以把 store 的实例注入所有的子组件

    store,

    components: { Counter },

    template: `

    <div class="app">

      <counter></counter>

    </div>

  `

})
通过在根实例中注册 store 选项,该 store 实例会注入到根组件下的所有子组件中,且子组件能通过 this.$store访问到。让我们更新下 Counter 的实现:
const Counter = {

    template: `<div>{{ count }}</div>`,

    computed: {

        count() {

            return this.$store.state.count

        }

    }

}
mapState辅助函数
当一个组件需要获取多个状态时候,将这些状态都声明为计算属性会有些重复和冗余。为了解决这个问题,我们可以使用 mapState 辅助函数帮助我们生成计算属性,让你少按几次键。
当映射的计算属性的名称与 state 的子节点名称相同时,我们也可以给 mapState 传一个字符串数组。
computed: mapState([

    // 映射 this.count 为 store.state.count

    'count'

])
…mapState
mapState 函数返回的是一个对象。我们如何将它与局部计算属性混合使用呢?通常,我们需要使用一个工具函数将多个对象合并为一个,以使我们可以将最终对象传给 computed 属性。但是自从有了对象展开运算符,我们可以极大地简化写法:
computed: {

    localComputed() { /* ... */ },

  // 使用对象展开运算符将此对象混入到外部对象中

  ...mapState({

        // ...

    })

}
2、Getter
getters
可以把getters看作获取State之前对state进行再编辑的操作。
Getter接受state作为第一个参数:
const store = new Vuex.Store({

    state: {

        todos: [

            { id: 1, text: '...', done: true },

            { id: 2, text: '...', done: false }

        ]

    },

    getters: {

        doneTodos: state => {

            return state.todos.filter(todo => todo.done)

        }

    }

})
Getter会暴露为store.getters对象:
store.getters.doneTodos // -> [{ id: 1, text: '...', done: true }]
mapGetters辅助函数
mapGetters 辅助函数仅仅是将 store 中的 getter 映射到局部计算属性:
export default {

    // ...

    computed: {

        // 使用对象展开运算符将 getter 混入 computed 对象中

        ...mapGetters([

            'doneTodosCount',

            'anotherGetter',

            // ...

        ])

    }

}
3、Mutaion
mutations
更改Vuex的store中的状态唯一的方法就提交mutation。
Vuex中的mutation非常类似于事件,每个 mutation 都有一个字符串的 事件类型 (type) 和 一个 回调函数 (handler)。这个回调函数就是我们实际进行状态更改的地方,并且它会接受 state 作为第一个参数:
const store = new Vuex.Store({

    state: {

        count: 1

    },

    mutations: {

        increment(state) {

            // 变更状态

            state.count++

        }

    }

})
不能直接调用一个 mutation 的回调函数。这个选项更像是事件注册:“当触发一个类型为 increment 的 mutation 时,调用此函数。”要唤醒 mutation回调函数,你需要以相应的 type 调用 store.commit 方法:
store.commit('increment')
提交载荷
向store.commit传入额外的参数,即mutation的载荷。
// ...

mutations: {

    increment(state, n) {

        state.count += n

    }

}

store.commit('increment', 10)
大多数情况下,载荷是一个对象。
mutations: {

    increment(state, payload) {

        state.count += payload.amount

    }

}

store.commit('increment', {

    amount: 10

})
对象风格的提交方式
提交的另一种方法使直接使用包含type属性的对象:
store.commit({

    type: 'increment',

    amount: 10

})
整个对象作为载荷传给mutation函数,因此回调函数保持不变。
Mutation必须是同步函数
当mutation触发时,回调函数还没调用,devtools不知道回调函数什么时候调用,事实上任何回调函数进行的状态改变都是不可追踪的。
在组件中提交mutaion
可以在组件中使用 this.$store.commit('xxx') 提交 mutation,或者使用 mapMutations 辅助函数将组件中的 methods 映射为 store.commit 调用(需要在根节点注入 store)。
import { mapMutations } from 'vuex'


export default {

    // ...

    methods: {

        ...mapMutations([

            'increment',

// 将 `this.increment()` 映射为`this.$store.commit('increment')`


            // `mapMutations` 也支持载荷:

            'incrementBy' // 将 `this.incrementBy(amount)` 映射为 `this.$store.commit('incrementBy', amount)`

        ]),

        ...mapMutations({

            add: 'increment' // 将 `this.add()` 映射为 `this.$store.commit('increment')`

        })

    }

}
4、Action
actions
与mutation的基本功能一样,但不同点在于:
Action提交的是mutation而不是直接变更状态。
Action可以包含异步操作。
const store = new Vuex.Store({

    state: {

        count: 0

    },

    mutations: {

        increment(state) {

            state.count++

        }

    },

    actions: {

        increment(context) {

            context.commit('increment')

        }

    }

})
Action接收一个与store实例具有相同方法和属性的 context 对象,因此你可以调用 context.commit 提交一个 mutation,或者通过 context.state 和 context.getters 来获取 state 和 getters。
分发action
Action通过store.dispatch方法分发
store.dispatch('increment')
而为什么不直接分发mutation?因为mutation必须同步执行,而action内部可以执行异步操作,mutation不可以。
在组件中分发action
import { mapActions } from 'vuex'


export default {

    // ...

    methods: {

        ...mapActions([

            'increment', // 将 `this.increment()` 映射为 `this.$store.dispatch('increment')`


            // `mapActions` 也支持载荷:

            'incrementBy' // 将 `this.incrementBy(amount)` 映射为 `this.$store.dispatch('incrementBy', amount)`

        ]),

        ...mapActions({

            add: 'increment' // 将 `this.add()` 映射为 `this.$store.dispatch('increment')`

        })

    }

}
5、Module
modules
由于使用单一状态树,应用的所有状态会集中到一个比较大的对象。当应用变得非常复杂时,store 对象就有可能变得相当臃肿。
因此Vuex允许将store分割成模块mudule,每个模块都可以拥有自己的state、mutation、action、getter。
const moduleA = {

    state: { ... },

    mutations: { ... },

    actions: { ... },

    getters: { ... }

}


const moduleB = {

    state: { ... },

    mutations: { ... },

    actions: { ... }

}


const store = new Vuex.Store({

    modules: {

        a: moduleA,

        b: moduleB

    }

})


store.state.a // -> moduleA 的状态
模块的局部状态
模块内部的mutation和getter,接收的第一个参数是模块的局部状态对象,即模块内部的state。
模块内部的action,局部状态通过context.state暴露出来,根节点状态为context.rootState.
模块内部的getter,根节点状态rootState作为第三个参数暴露出来。
命名空间
可以通过添加 namespaced: true 的方式使其成为命名空间模块。当模块被注册后,它的所有 getter、action 及 mutation 都会自动根据模块注册的路径调整命名。例如:
const store = new Vuex.Store({

    modules: {

        account: {

            namespaced: true,


            // 模块内容(module assets)

            state: { ... }, // 模块内的状态已经是嵌套的了,使用 `namespaced` 属性不会对其产生影响

            getters: {

                isAdmin() { ... } // -> getters['account/isAdmin']

            },

            actions: {

                login() { ... } // -> dispatch('account/login')

            },

            mutations: {

                login() { ... } // -> commit('account/login')

            }

        }

    }

})
启用了命名空间的 getter 和 action 会收到局部化的 getter,dispatch 和 commit。换言之,你在使用模块内容(module assets)时不需要在同一模块内额外添加空间名前缀。更改 namespaced 属性后不需要修改模块内的代码。
在命名空间模块访问全局内容
如果需要在使用全局 state 和 getter,rootState 和 rootGetter 会作为第三和第四参数传入 getter,也会通过 context 对象的属性传入 action。
若需要在全局命名空间内分发 action 或提交 mutation,将 { root: true } 作为第三参数传给 dispatch 或 commit即可。
*带命名空间的绑定函数
当使用 mapState, mapGetters, mapActions 和 mapMutations 这些函数来绑定命名空间模块时,写起来可能比较繁琐,因此可以将模块的空间名称字符串作为第一个参数传递给上述函数,这样所有绑定都会自动将该模块作为上下文。于是简化为:
computed: {

  ...mapState('some/nested/module', {

        a: state => state.a,

        b: state => state.b

    })

},

methods: {

  ...mapActions('some/nested/module', [

        'foo',

        'bar'

    ])

}
这个写法是项目中使用的写法。