【步骤】
1.创建web项目
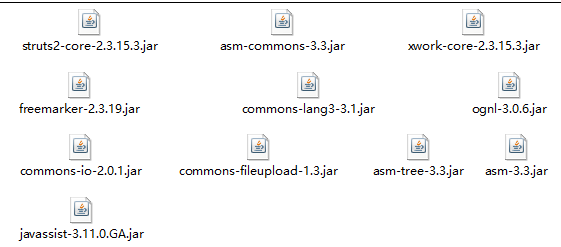
2.导入相关jar包
3.配置核心过滤器
web app libraris ---> struts-core ---> org.apache.struts2.dispatcher.ng.filter ---> StrutsPrepareAndExecuteFilter(Struts2的核心过滤器)
1     <!-- 过滤器 -->
2     <filter>
3         <filter-name>StrutsPrepareAndExecuteFilter</filter-name>
4         <filter-class>org.apache.struts2.dispatcher.ng.filter.StrutsPrepareAndExecuteFilter</filter-class>
5     </filter>
6     <filter-mapping>
7         <filter-name>StrutsPrepareAndExecuteFilter</filter-name>
8         <url-pattern>/*</url-pattern>
9     </filter-mapping>
4.添加Struts2的配置文件
src ---> struts.xml --->复制struts-default.xml内容(web app libraris >> struts-core >> META-INF >> struts-default.xml) --->粘贴到struts2 配置文件 >> 去掉注释
1 <?xml version="1.0" encoding="UTF-8"?>
2 <!DOCTYPE struts PUBLIC
3     "-//Apache Software Foundation//DTD Struts Configuration 2.3//EN"
4     "http://struts.apache.org/dtds/struts-2.3.dtd">
5
6 <struts>
7
8
9 </struts>
5.创建Action类
 1 public class HelloAction {
 2     /**
 3      * 请求处理方法
 4      * 相当于Servlet中的Service
 5      * @return
 6      */
 7     public String execute(){
 8         System.out.println("execute is do......");
 9
10         return "success";
11     }
12 }
6. 配置Action类
修改struts.xml中的内容。
 1 <struts>
 2     <!--
 3         name    :包名
 4         extends    :表示继承于struts-default
 5     -->
 6     <package name="hello" extends="struts-default">
 7         <!--
 8             name    :Action的名称,相当于servlet的映射名
 9             class    :Action的完整名称(包名 + 类名)
10         -->
11         <action name="hello" class="cn.hl.action.HelloAction">
12             <!--
13                 控制跳转结果
14             -->
15             <result>index.jsp</result>
16         </action>
17     </package>
18
19 </struts>
7.布署项目
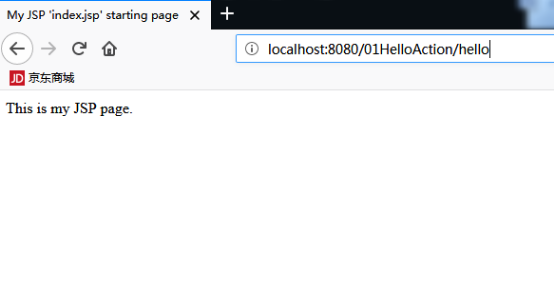
8.访问action