61.索引管理_快速上机动手实战创建、修改以及删除索引
课程大纲
1、为什么我们要手动创建索引?
2、创建索引
创建索引的语法
PUT /my_index
{
"settings": { ... any settings ... },
"mappings": {
"type_one": { ... any mappings ... },
"type_two": { ... any mappings ... },
...
}
}
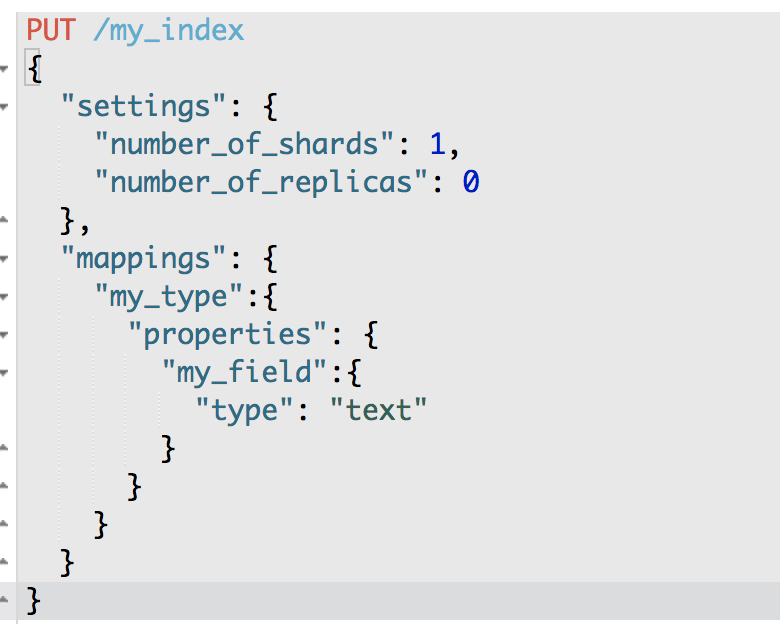
创建索引的示例
PUT /my_index
{
"settings": {
"number_of_shards": 1,
"number_of_replicas": 0
},
"mappings": {
"my_type": {
"properties": {
"my_field": {
"type": "text"
}
}
}
}
}
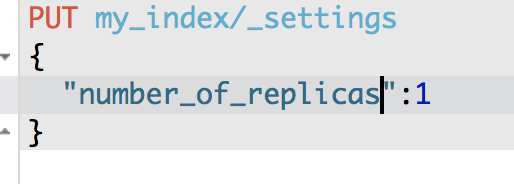
3、修改索引
analysis设置分词器
es_std 分词器的名称
PUT /my_index/_settings
{
"number_of_replicas": 1
}
4、删除索引
DELETE /my_index
DELETE /index_one,index_two
DELETE /index_*
DELETE /_all
elasticsearch.yml
action.destructive_requires_name: true
62.索引管理_快速上机动手实战修改分词器以及定制自己的分词器
课程大纲
1、默认的分词器
standard
standard tokenizer:以单词边界进行切分
standard token filter:什么都不做
lowercase token filter:将所有字母转换为小写
stop token filer(默认被禁用):移除停用词,比如a the it等等
2、修改分词器的设置
启用english停用词token filter
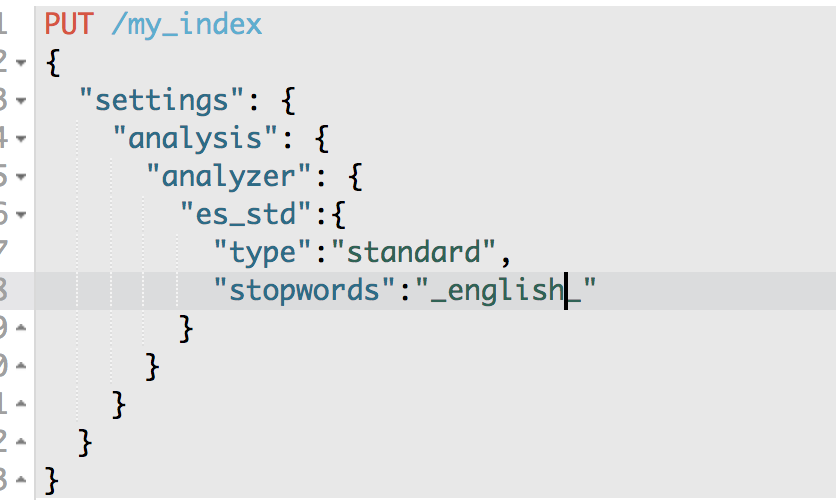
PUT /my_index
{
"settings": {
"analysis": {
"analyzer": {
"es_std": {
"type": "standard",
"stopwords": "_english_"
}
}
}
}
}
GET /my_index/_analyze
{
"analyzer": "standard",
"text": "a dog is in the house"
}
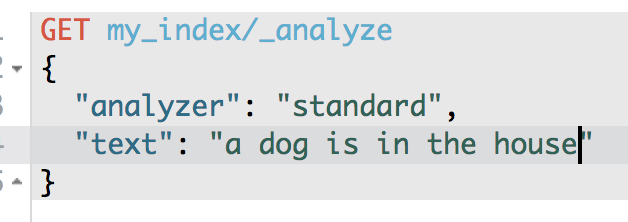
使用标准分词器 将每个单词全部分词
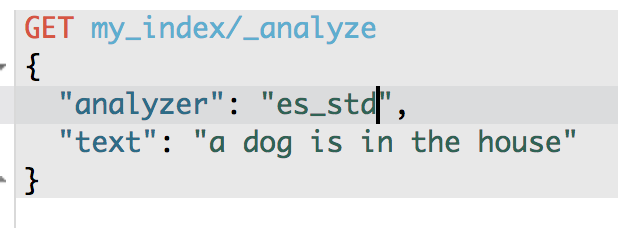
使用es_std分词器 只分出 dog 和house
GET /my_index/_analyze
{
"analyzer": "es_std",
"text":"a dog is in the house"
}
3、定制化自己的分词器
PUT /my_index
{
"settings": {
"analysis": {
"char_filter": {
"&_to_and": {
"type": "mapping",
"mappings": ["&=> and"]
}
},
"filter": {
"my_stopwords": {
"type": "stop",
"stopwords": ["the", "a"]
}
},
"analyzer": {
"my_analyzer": {
"type": "custom",
"char_filter": ["html_strip", "&_to_and"],
"tokenizer": "standard",
"filter": ["lowercase", "my_stopwords"]
}
}
}
}
}
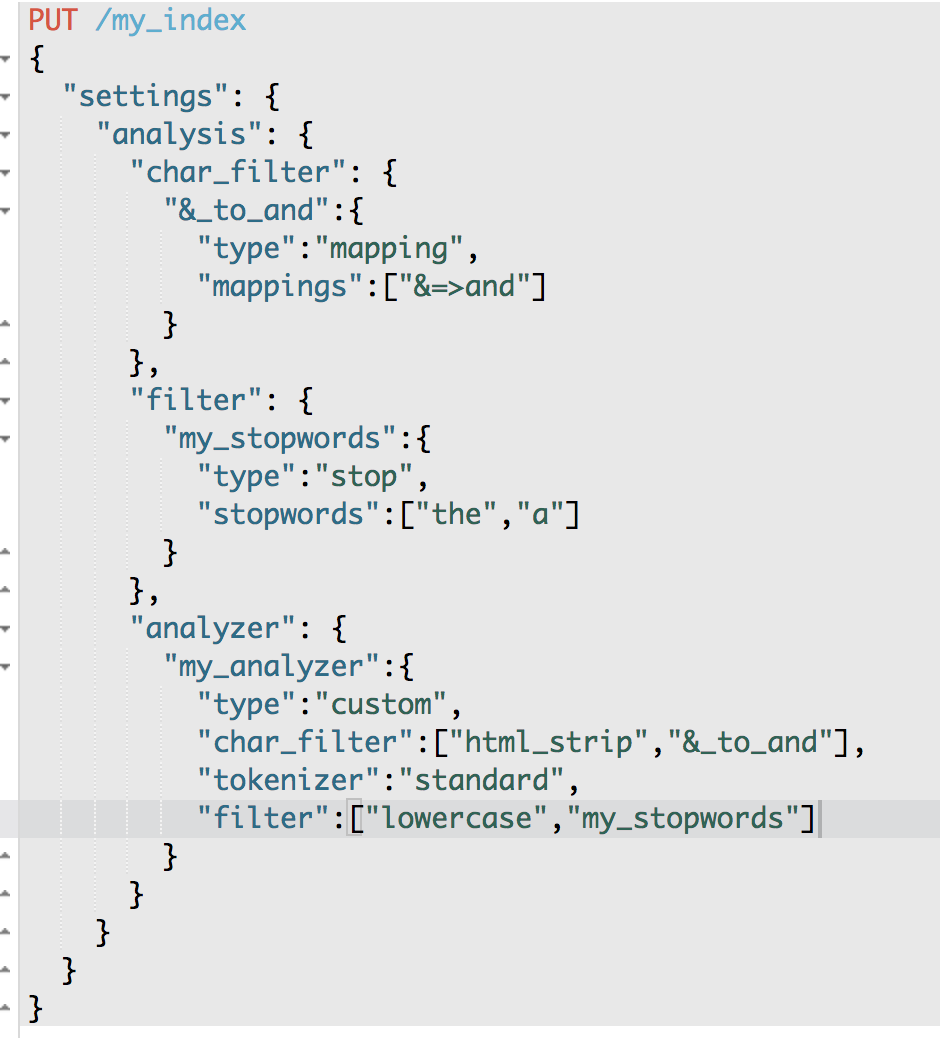
GET /my_index/_analyze
{
"text": "tom&jerry are a friend in the house, <a>, HAHA!!",
"analyzer": "my_analyzer"
}

使用my_analyzer分词后的结果为 tomandjerry are friend in house haha
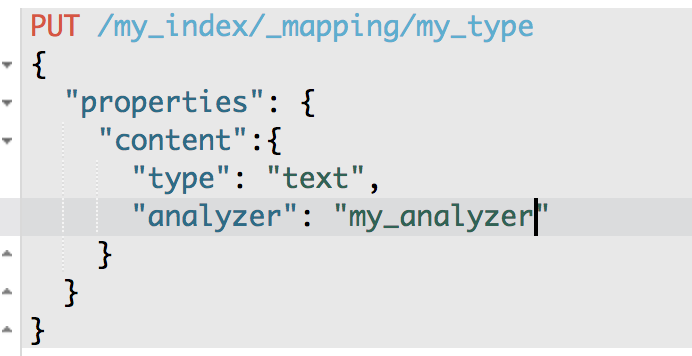
设置在index中使用自定义的分词器
PUT /my_index/_mapping/my_type
{
"properties": {
"content": {
"type": "text",
"analyzer": "my_analyzer"
}
}
}
63.索引管理_内核级知识点:深入探秘type底层数据结构
课程大纲
type,是一个index中用来区分类似的数据的,类似的数据,但是可能有不同的fields,而且有不同的属性来控制索引建立、分词器
field的value,在底层的lucene中建立索引的时候,全部是opaque bytes类型,不区分类型的
lucene是没有type的概念的,在document中,实际上将type作为一个document的field来存储,即_type,es通过_type来进行type的过滤和筛选
一个index中的多个type,实际上是放在一起存储的,因此一个index下,不能有多个type重名,而类型或者其他设置不同的,因为那样是无法处理的
{
"ecommerce": {
"mappings": {
"elactronic_goods": {
"properties": {
"name": {
"type": "string",
},
"price": {
"type": "double"
},
"service_period": {
"type": "string"
}
}
},
"fresh_goods": {
"properties": {
"name": {
"type": "string",
},
"price": {
"type": "double"
},
"eat_period": {
"type": "string"
}
}
}
}
}
}
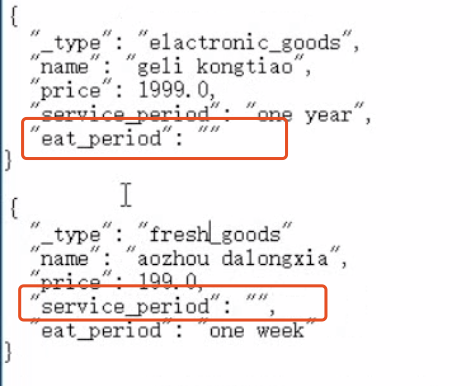
{
"name": "geli kongtiao",
"price": 1999.0,
"service_period": "one year"
}
{
"name": "aozhou dalongxia",
"price": 199.0,
"eat_period": "one week"
}
在底层的存储是这样子的。。。。
{
"ecommerce": {
"mappings": {
"_type": {
"type": "string",
"index": "not_analyzed"
},
"name": {
"type": "string"
}
"price": {
"type": "double"
}
"service_period": {
"type": "string"
}
"eat_period": {
"type": "string"
}
}
}
}
{
"_type": "elactronic_goods",
"name": "geli kongtiao",
"price": 1999.0,
"service_period": "one year",
"eat_period": ""
}
{
"_type": "fresh_goods",
"name": "aozhou dalongxia",
"price": 199.0,
"service_period": "",
"eat_period": "one week"
}
最佳实践,将类似结构的type放在一个index下,这些type应该有多个field是相同的
假如说,你将两个type的field完全不同,放在一个index下,那么就每条数据都至少有一半的field在底层的lucene中是空值,会有严重的性能问题
64.索引管理_mapping root object深入剖析
课程大纲
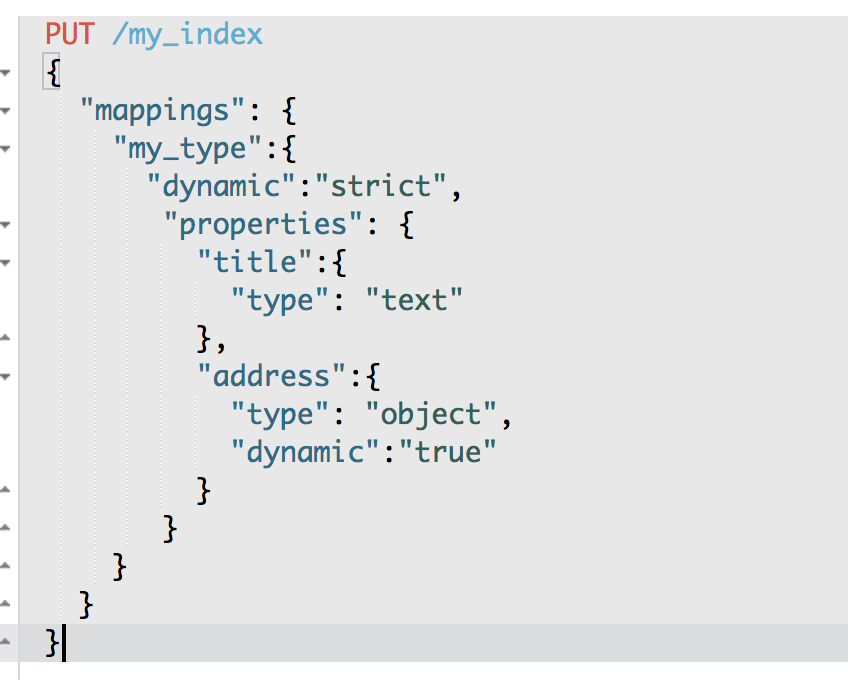
1、root object
就是某个type对应的mapping json,包括了properties,metadata(_id,_source,_type),settings(analyzer),其他settings(比如include_in_all)
PUT /my_index
{
"mappings": {
"my_type": {
"properties": {}
}
}
}
2、properties
修改properties
type,index,analyzer
PUT /my_index/_mapping/my_type
{
"properties": {
"title": {
"type": "text"
}
}
}
3、_source
好处
(1)查询的时候,直接可以拿到完整的document,不需要先拿document id,再发送一次请求拿document
(2)partial update基于_source实现
(3)reindex时,直接基于_source实现,不需要从数据库(或者其他外部存储)查询数据再修改
(4)可以基于_source定制返回field
(5)debug query更容易,因为可以直接看到_source
如果不需要上述好处,可以禁用_source
PUT /my_index/_mapping/my_type2
{
"_source": {"enabled": false}
}
4、_all
将所有field打包在一起,作为一个_all field,建立索引。没指定任何field进行搜索时,就是使用_all field在搜索。
禁用_all
PUT /my_index/_mapping/my_type3
{
"_all": {"enabled": false}
}
也可以在field级别设置include_in_all field,设置是否要将field的值包含在_all field中
PUT /my_index/_mapping/my_type4
{
"properties": {
"my_field": {
"type": "text",
"include_in_all": false
}
}
}
5、标识性metadata
_index,_type,_id
document的metadata
65.索引管理_定制化自己的dynamic mapping策略
课程大纲
1、定制dynamic策略
true:遇到陌生字段,就进行dynamic mapping
false:遇到陌生字段,就忽略
strict:遇到陌生字段,就报错
PUT /my_index
{
"mappings": {
"my_type": {
"dynamic": "strict",
"properties": {
"title": {
"type": "text"
},
"address": {
"type": "object",
"dynamic": "true"
}
}
}
}
}
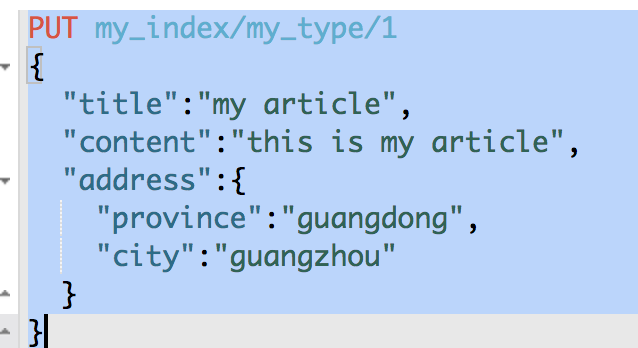
PUT /my_index/my_type/1
{
"title": "my article",
"content": "this is my article",
"address": {
"province": "guangdong",
"city": "guangzhou"
}
}
{
"error": {
"root_cause": [
{
"type": "strict_dynamic_mapping_exception",
"reason": "mapping set to strict, dynamic introduction of [content] within [my_type] is not allowed"
}
],
"type": "strict_dynamic_mapping_exception",
"reason": "mapping set to strict, dynamic introduction of [content] within [my_type] is not allowed"
},
"status": 400
}
PUT /my_index/my_type/1
{
"title": "my article",
"address": {
"province": "guangdong",
"city": "guangzhou"
}
}
GET /my_index/_mapping/my_type
{
"my_index": {
"mappings": {
"my_type": {
"dynamic": "strict",
"properties": {
"address": {
"dynamic": "true",
"properties": {
"city": {
"type": "text",
"fields": {
"keyword": {
"type": "keyword",
"ignore_above": 256
}
}
},
"province": {
"type": "text",
"fields": {
"keyword": {
"type": "keyword",
"ignore_above": 256
}
}
}
}
},
"title": {
"type": "text"
}
}
}
}
}
}
2、定制dynamic mapping策略
(1)date_detection
默认会按照一定格式识别date,比如yyyy-MM-dd。但是如果某个field先过来一个2017-01-01的值,就会被自动dynamic mapping成date,后面如果再来一个"hello world"之类的值,就会报错。可以手动关闭某个type的date_detection,如果有需要,自己手动指定某个field为date类型。
PUT /my_index/_mapping/my_type
{
"date_detection": false
}
(2)定制自己的dynamic mapping template(type level)
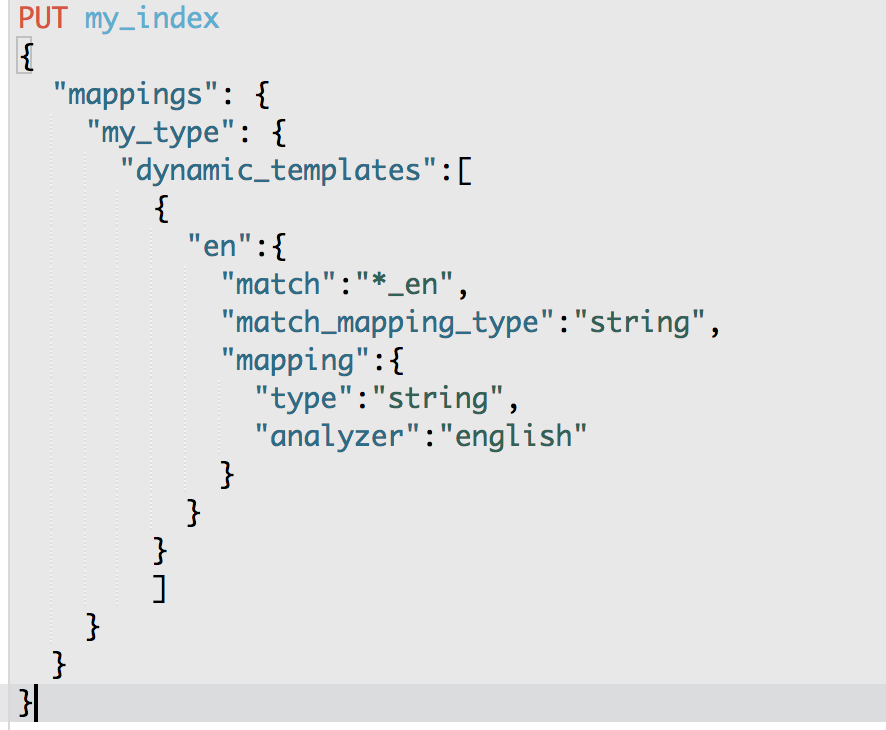
PUT /my_index
{
"mappings": {
"my_type": {
"dynamic_templates": [
{ "en": {
"match": "*_en",
"match_mapping_type": "string",
"mapping": {
"type": "string",
"analyzer": "english"
}
}}
]
}}}
PUT /my_index/my_type/1
{
"title": "this is my first article"
}
PUT /my_index/my_type/2
{
"title_en": "this is my first article"
}
title没有匹配到任何的dynamic模板,默认就是standard分词器,不会过滤停用词,is会进入倒排索引,用is来搜索是可以搜索到的
title_en匹配到了dynamic模板,就是english分词器,会过滤停用词,is这种停用词就会被过滤掉,用is来搜索就搜索不到了
(3)定制自己的default mapping template(index level)
PUT /my_index
{
"mappings": {
"_default_": {
"_all": { "enabled": false }
},
"blog": {
"_all": { "enabled": true }
}
}
}
66.索引管理_复杂上机实验:基于scoll+bulk+索引别名实现零停机重建索引
课程大纲
1、重建索引
一个field的设置是不能被修改的,如果要修改一个Field,那么应该重新按照新的mapping,建立一个index,然后将数据批量查询出来,重新用bulk api写入index中
批量查询的时候,建议采用scroll api,并且采用多线程并发的方式来reindex数据,每次scoll就查询指定日期的一段数据,交给一个线程即可
(1)一开始,依靠dynamic mapping,插入数据,但是不小心有些数据是2017-01-01这种日期格式的,所以title这种field被自动映射为了date类型,实际上它应该是string类型的
PUT /my_index/my_type/3
{
"title": "2017-01-03"
}
{
"my_index": {
"mappings": {
"my_type": {
"properties": {
"title": {
"type": "date"
}
}
}
}
}
}
(2)当后期向索引中加入string类型的title值的时候,就会报错
PUT /my_index/my_type/4
{
"title": "my first article"
}
{
"error": {
"root_cause": [
{
"type": "mapper_parsing_exception",
"reason": "failed to parse [title]"
}
],
"type": "mapper_parsing_exception",
"reason": "failed to parse [title]",
"caused_by": {
"type": "illegal_argument_exception",
"reason": "Invalid format: "my first article""
}
},
"status": 400
}
(3)如果此时想修改title的类型,是不可能的 field 不能修改
PUT /my_index/_mapping/my_type
{
"properties": {
"title": {
"type": "text"
}
}
}
{
"error": {
"root_cause": [
{
"type": "illegal_argument_exception",
"reason": "mapper [title] of different type, current_type [date], merged_type [text]"
}
],
"type": "illegal_argument_exception",
"reason": "mapper [title] of different type, current_type [date], merged_type [text]"
},
"status": 400
}
(4)此时,唯一的办法,就是进行reindex,也就是说,重新建立一个索引,将旧索引的数据查询出来,再导入新索引
(5)如果说旧索引的名字,是old_index,新索引的名字是new_index,终端java应用,已经在使用old_index在操作了,难道还要去停止java应用,修改使用的index为new_index,才重新启动java应用吗?这个过程中,就会导致java应用停机,可用性降低
(6)所以说,给java应用一个别名,这个别名是指向旧索引的,java应用先用着,java应用先用goods_index alias来操作,此时实际指向的是旧的my_index
PUT /my_index/_alias/goods_index
(7)新建一个index,调整其title的类型为string
PUT /my_index_new
{
"mappings": {
"my_type": {
"properties": {
"title": {
"type": "text"
}
}
}
}
}

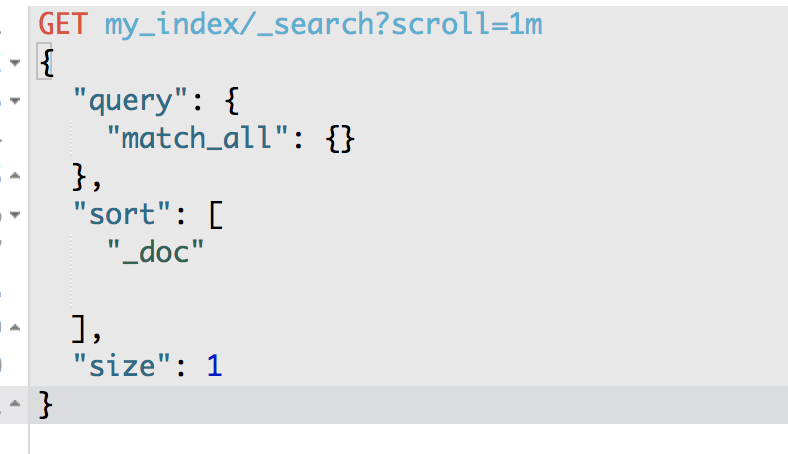
(8)使用scroll api将数据批量查询出来
GET /my_index/_search?scroll=1m
{
"query": {
"match_all": {}
},
"sort": ["_doc"],
"size": 1
}
{
"_scroll_id": "DnF1ZXJ5VGhlbkZldGNoBQAAAAAAADpAFjRvbnNUWVZaVGpHdklqOV9zcFd6MncAAAAAAAA6QRY0b25zVFlWWlRqR3ZJajlfc3BXejJ3AAAAAAAAOkIWNG9uc1RZVlpUakd2SWo5X3NwV3oydwAAAAAAADpDFjRvbnNUWVZaVGpHdklqOV9zcFd6MncAAAAAAAA6RBY0b25zVFlWWlRqR3ZJajlfc3BXejJ3",
"took": 1,
"timed_out": false,
"_shards": {
"total": 5,
"successful": 5,
"failed": 0
},
"hits": {
"total": 3,
"max_score": null,
"hits": [
{
"_index": "my_index",
"_type": "my_type",
"_id": "2",
"_score": null,
"_source": {
"title": "2017-01-02"
},
"sort": [
0
]
}
]
}
}
(9)采用bulk api将scoll查出来的一批数据,批量写入新索引
POST /_bulk
{ "index": { "_index": "my_index_new", "_type": "my_type", "_id": "2" }}
{ "title": "2017-01-02" }
(10)反复循环8~9,查询一批又一批的数据出来,采取bulk api将每一批数据批量写入新索引
(11)将goods_index alias切换到my_index_new上去,java应用会直接通过index别名使用新的索引中的数据,java应用程序不需要停机,零提交,高可用
POST /_aliases
{
"actions": [
{ "remove": { "index": "my_index", "alias": "goods_index" }},
{ "add": { "index": "my_index_new", "alias": "goods_index" }}
]
}
(12)直接通过goods_index别名来查询,是否ok
GET /goods_index/my_type/_search
2、基于alias对client透明切换index
PUT /my_index_v1/_alias/my_index
client对my_index进行操作
reindex操作,完成之后,切换v1到v2
POST /_aliases
{
"actions": [
{ "remove": { "index": "my_index_v1", "alias": "my_index" }},
{ "add": { "index": "my_index_v2", "alias": "my_index" }}
]
}
67.内核原理探秘_倒排索引组成结构以及其索引 不 可变原因揭秘
课程大纲
倒排索引,是适合用于进行搜索的
倒排索引的结构
(1)包含这个关键词的document list
(2)包含这个关键词的所有document的数量:IDF(inverse document frequency)
(3)这个关键词在每个document中出现的次数:TF(term frequency)
(4)这个关键词在这个document中的次序
(5)每个document的长度:length norm
(6)包含这个关键词的所有document的平均长度

倒排索引不可变的好处
(1)不需要锁,提升并发能力,避免锁的问题
(2)数据不变,一直保存在os cache中,只要cache内存足够
(3)filter cache一直驻留在内存,因为数据不变
(4)可以压缩,节省cpu和io开销
倒排索引不可变的坏处:每次都要重新构建整个索引
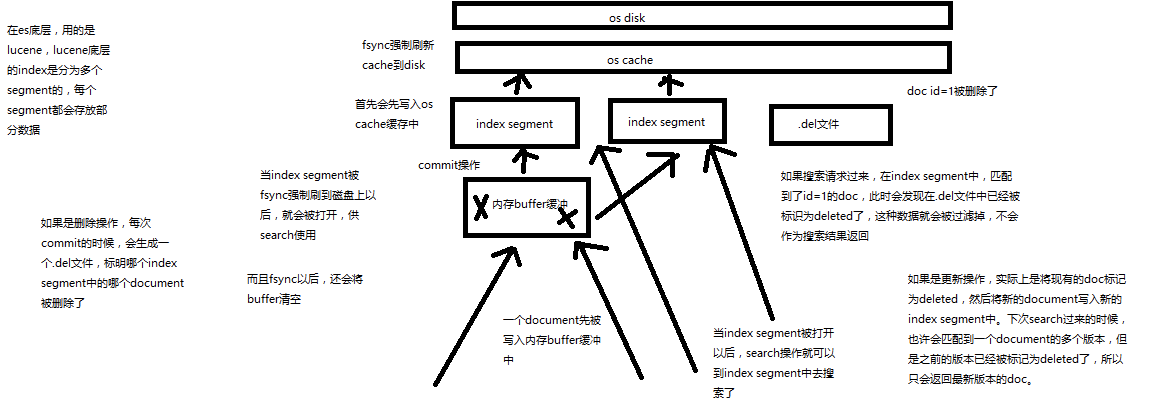
68.内核原理探秘_深度图解剖析document写入原理(buffer,segment,commit)
课程大纲
(1)数据写入buffer
(2)commit point
(3)buffer中的数据写入新的index segment commit操作
(4)等待在os cache中的index segment被fsync强制刷到磁盘上
(5)新的index sgement被打开,供search使用
(6)buffer被清空
每次commit point时,会有一个.del文件,标记了哪些segment中的哪些document被标记为deleted了
搜索的时候,会依次查询所有的segment,从旧的到新的,比如被修改过的document,在旧的segment中,会标记为deleted,在新的segment中会有其新的数据
69.内核原理探秘_优化写入流程实现NRT近实时(filesystem cache,refresh)
课程大纲
现有流程的问题,每次都必须等待fsync将segment刷入磁盘,才能将segment打开供search使用,这样的话,从一个document写入,到它可以被搜索,可能会超过1分钟!!!这就不是近实时的搜索了!!!主要瓶颈在于fsync实际发生磁盘IO写数据进磁盘,是很耗时的。
写入流程别改进如下:
(1)数据写入buffer
(2)每隔一定时间,buffer中的数据被写入segment文件,但是先写入os cache
(3)只要segment写入os cache,那就直接打开供search使用,不立即执行commit
数据写入os cache,并被打开供搜索的过程,叫做refresh,默认是每隔1秒refresh一次。也就是说,每隔一秒就会将buffer中的数据写入一个新的index segment file,先写入os cache中。所以,es是近实时的,数据写入到可以被搜索,默认是1秒。
POST /my_index/_refresh,可以手动refresh,一般不需要手动执行,没必要,让es自己搞就可以了
比如说,我们现在的时效性要求,比较低,只要求一条数据写入es,一分钟以后才让我们搜索到就可以了,那么就可以调整refresh interval
PUT /my_index
{
"settings": {
"refresh_interval": "30s"
}
}
commit。。。稍后就会讲。。。
70.内核原理探秘_继续优化写入流程实现durability可靠存储(translog,flush)
课程大纲
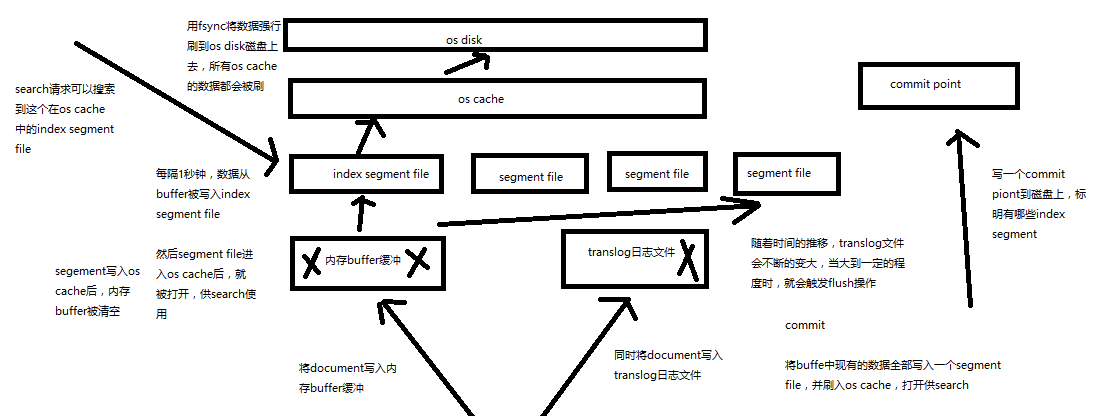
再次优化的写入流程 最终版本
(1)数据写入buffer缓冲和translog日志文件
(2)每隔一秒钟,buffer中的数据被写入新的segment file,并进入os cache,此时segment被打开并供search使用
(3)buffer被清空
(4)重复1~3,新的segment不断添加,buffer不断被清空,而translog中的数据不断累加
(5)当translog长度达到一定程度的时候,commit操作发生
(5-1)buffer中的所有数据写入一个新的segment,并写入os cache,打开供使用
(5-2)buffer被清空
(5-3)一个commit ponit被写入磁盘,标明了所有的index segment
(5-4)filesystem cache中的所有index segment file缓存数据,被fsync强行刷到磁盘上
(5-5)现有的translog被清空,创建一个新的translog
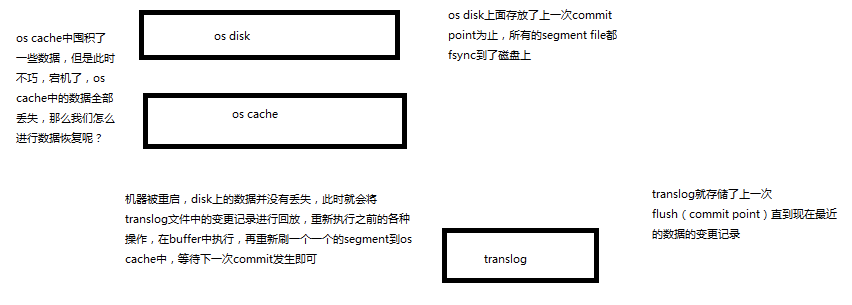
基于translog和commit point,如何进行数据恢复
fsync+清空translog,就是flush,默认每隔30分钟flush一次,或者当translog过大的时候,也会flush
POST /my_index/_flush,一般来说别手动flush,让它自动执行就可以了
translog,每隔5秒被fsync一次到磁盘上。在一次增删改操作之后,当fsync在primary shard和replica shard都成功之后,那次增删改操作才会成功
但是这种在一次增删改时强行fsync translog可能会导致部分操作比较耗时,也可以允许部分数据丢失,设置异步fsync translog
PUT /my_index/_settings
{
"index.translog.durability": "async",
"index.translog.sync_interval": "5s"
}
最终版本的es写入流程
commit point + translog进行数据恢复