什么是 SPA?
SPA就是单页面应用,即single page application,通过看代码就可以发现,整个网站就只有一个Html文件。
WHY SPA?
- 减小服务器压力。 如果不用SPA,那么我们每次切换页面的时候,就会向服务器发送一个请求,服务器返回一个html文件;但是如果使用了SPA,在切换时,不需要请求服务器,只要通过本地的js来切换即可。并且服务器端就不需要配置路由,完全做到了前后端分离,这对于分工合作的意义可想而知。
- 增强用户体验,增加app的使用流畅性。 做过spa的同学都知道,使用spa之后,页面在切换的时候非常流畅,完全没有那种不断刷新的感觉,而是非常快的就有了响应,因为js运行速度很快,所以js在做本地路由的时候,就会非常快。
SPA路由的实现方式有哪些?
目前来说,无论是vue,还是react,spa的路由实现方式无非就是以下两者:
- hash方式。 使用location.hash和hashchange事件实现路由。
- history api。使用html5的history api实现,主要就是popState事件等。
hash用的还是比较多的,但是这种方式的url会比较丑陋,会出现 #; 而history api就可以很好的解决这个问题,但是需要后端配置,并且由于是html5中的api,所以兼容性还不是很好,用的时候需要确定你的用户,再做决定。
SPA路由实现之hash
自己动手,丰衣足食! 我们自己来写一个router,也许对齐理解就会更加明白了。一般,我们在使用vue和react的router的时候,不难发现他们都是构造函数,然后生成一个实例,即面向对象的方式。
这里当然也需要使用面向对象的方式来实现,这种方式的可扩展性、可维护性都会比较好一些。
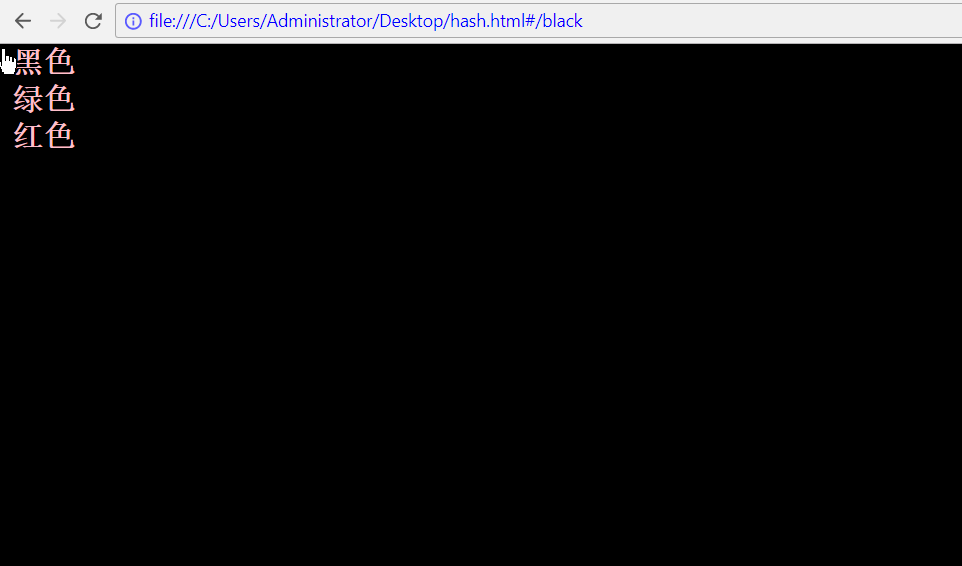
<!DOCTYPE html>
<html lang="en">
<head>
    <meta charset="UTF-8">
    <title>router</title>
    <style>
        html, body {
             100%;
            height: 100%;
            margin: 0;
        }
        div.router-wrap {
             100%;
            height: 100%;
            background: #fefefe;
        }
        a {
            padding: 10px;
            color: pink;
            font-size: 25px;
            font-weight: bold;
            text-decoration: none;
        }
    </style>
</head>
<body>
    <div class="router-wrap">
        <a href="#/black">黑色</a><br>
        <a href="#/green">绿色</a><br>
        <a href="#/red">红色</a>
    </div>
    <script>
        // 创建Router构造函数
        // currentHash为当前hash值,routes为路径对象
        function Router() {
            this.currentHash = '/';
            this.routes = {};
        }

        // 注册路径,每个路径对应一个回调函数。
        Router.prototype.route = function (path, callback) {
            this.routes[path] = callback || function () {
                alert('未定义回调函数!');
            }
        }

        // 更新页面函数
        Router.prototype.refresh = function () {
            this.currentHash = location.hash.slice(1) || '/';
            this.routes[this.currentHash]();
        }

        // 初始化
        Router.prototype.init = function () {
            var self = this;
            window.addEventListener('load', function () {
                self.refresh();
            }, false);

            window.addEventListener('hashchange', function () {
                self.refresh();
            });
        }
    </script>

    <script>
        var wrap = document.querySelector('.router-wrap');

        window.Router = new Router();
        Router.route('/', function () {
            wrap.style.backgroundColor = '#fefefe';
        });

        Router.route('/black', function () {
            wrap.style.backgroundColor = 'black';
        });

        Router.route('/green', function () {
            wrap.style.backgroundColor = 'green';
        });

        Router.route('/red', function () {
            wrap.style.backgroundColor = 'red';
        });

        Router.init();

    </script>
</body>
</html>
上面这段代码的思路并不难理解。
首先创建一个Router构造函数,初始化当前的url和一个routes对象。
接着定义了三个方法:
- route方法 --- 该方法用于在实例化router对象之后,注册路由,对于不同的路由,执行不同的回调函数 。
- refresh方法 --- 在路由切换时,执行该方法刷新页面。
- init方法 --- 在注册完路由之后,执行该方法,该方法主要注册了两个事件,尤其是hashchange事件,非常重要。
效果如下:
SPA路由实现之history API
上面使用的hash方法实现路由固然不错,但是也是存在一定的问题的,就是太丑~ 如果在微信中使用,看不到url倒也无所谓,但是如果在一般的浏览器中使用就会遇到问题了。所以这里使用 history api来实现。
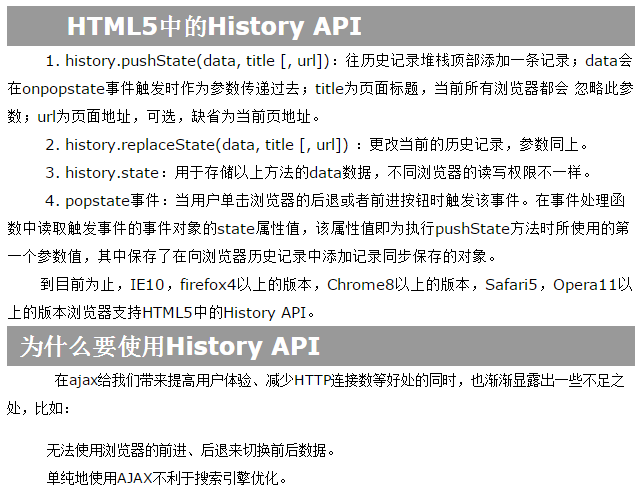
在html5中的history api包括两个方法history.pushState()和history.replaceState(),包含一个事件history.onpopstate,我们先进行简单的介绍:
history.pushState(stateObj, title, url)
- stateObj为一个状态对象,这个对象可以被popstate事件读取到,也可以在history对象中获取。
- title为标题,但是浏览器目前还没能实现,由于其本身是一个字符串,所以我们使用‘’来代替即可。
- url为路径。一般设定为相对的url,绝对路径需要保证同源。
pushState向浏览器的历史记录栈中压入一个历史记录,所以这里的push和pop就比较好理解了。
history.replaceState()
这个就比较好理解了,接受的参数都是一样的,作用就是替换当前历史记录栈中的记录。
onpopstate事件
在浏览器前进、后退时触发,一般就是历史记录栈中的指针改变的时候就会触发这个事件了。
在测试之前呢,需要知道这样一个事情: 测试必须使用本地服务器上进行测试,如果使用file://的方式打开页面,就会出现下面的情况:
Uncaught SecurityError: A history state object with URL 'file:///C:/xxx/xxx/xxx/xxx.html' cannot be created in a document with origin 'null'.
因为pushState的url和当前的Url必须是同源的,而file://的形式是不存在同源的说法的,所以我们必须用http://localhost的方式。
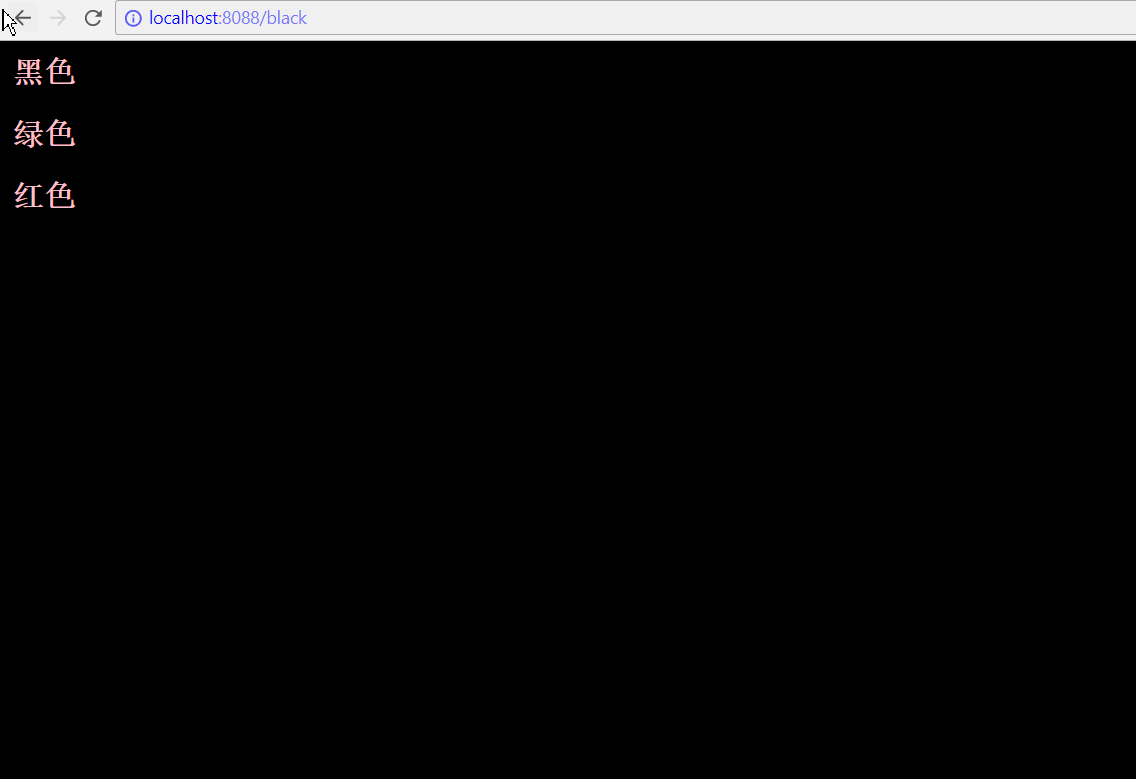
<!DOCTYPE html>
<html lang="en">
<head>
    <meta charset="UTF-8">
    <title>router</title>
    <style>
        html, body {
             100%;
            height: 100%;
            margin: 0;
        }
        div.router-wrap {
             100%;
            height: 100%;
            background: #efefef;
        }
        a {
            display: inline-block;
            padding: 10px;
            color: pink;
            font-size: 25px;
            font-weight: bold;
            text-decoration: none;
        }
    </style>
</head>
<body>
    <div class="router-wrap">
        <a href="/black" class="history-link">黑色</a><br>
        <a href="/green" class="history-link">绿色</a><br>
        <a href="/red" class="history-link">红色</a>
    </div>

    <script>
        // 创建Router构造函数
        function Router() {
            this.currentRoute = '';
            this.routes = {};
            this.init();
        }

        // 注册路由函数
        Router.prototype.route = function (path, callback) {

            // 根据type类型,选择相应的history api。
            this.routes[path] = function (type) {
                if (type == 1) {
                    history.pushState({path: path}, '', path);
                } else if (type == 2) {
                    history.replaceState({path: path}, '', path);
                }
                callback();
            }
        }

        // 更新页面
        Router.prototype.refresh = function (path, type) {
            this.routes[path](type);
        }

        // 初始化
        Router.prototype.init = function () {

            var self = this;

            // 重新加载函数,这里使用的主机是http://localhost:8088/
            window.addEventListener('load', function () {
                self.currentRoute = location.href.slice(location.href.indexOf('/', 8));
                console.log(self.currentRoute);
                self.refresh(self.currentRoute);
            });

            // 当用户点击前进后退按钮时触发函数
            window.addEventListener('popstate', function () {
                console.log('history.state.path:', history.state.path);
                self.currentRoute = history.state.path;
                self.refresh(self.currentRoute, 2);
            }, false);

            // 对所有的link标签进行绑定事件
            var historyLinks = document.querySelectorAll('.history-link');
            for (var i = 0, len = historyLinks.length; i < len; i++) {
                historyLinks[i].onclick = function(e) {
                    // 阻止默认
                    e.preventDefault();
                    self.currentRoute = e.target.getAttribute('href');
                    self.refresh(self.currentRoute, 1);
                }
            }
        }
    </script>

    <script>
        var wrap = document.querySelector('.router-wrap');

        // 实例化Router
        window.Router = new Router();


        // 注册路由,实现相应功能

        Router.route('/', function () {
            wrap.style.backgroundColor = '#efefef'
        });

        Router.route('/black', function () {
            wrap.style.backgroundColor = 'black';
        });

        Router.route('/green', function () {
            wrap.style.backgroundColor = 'green';
        });

        Router.route('/red', function () {
            wrap.style.backgroundColor = 'red';
        });
    </script>
</body>
</html>
node部分的代码如下:
var express = require('express');
var path = require('path')
var app = express();

app.get('/', function (req, res) {
   res.sendFile(path.resolve(__dirname,  './www/history.html'));
})

app.get('*', function (req, res) {
   res.sendFile(path.resolve(__dirname,  './www/history.html'));
});

const port = 8088;

var server = app.listen(port, function () {
  console.log("访问地址为 http://localhost:" + port)
});
最终效果如下:
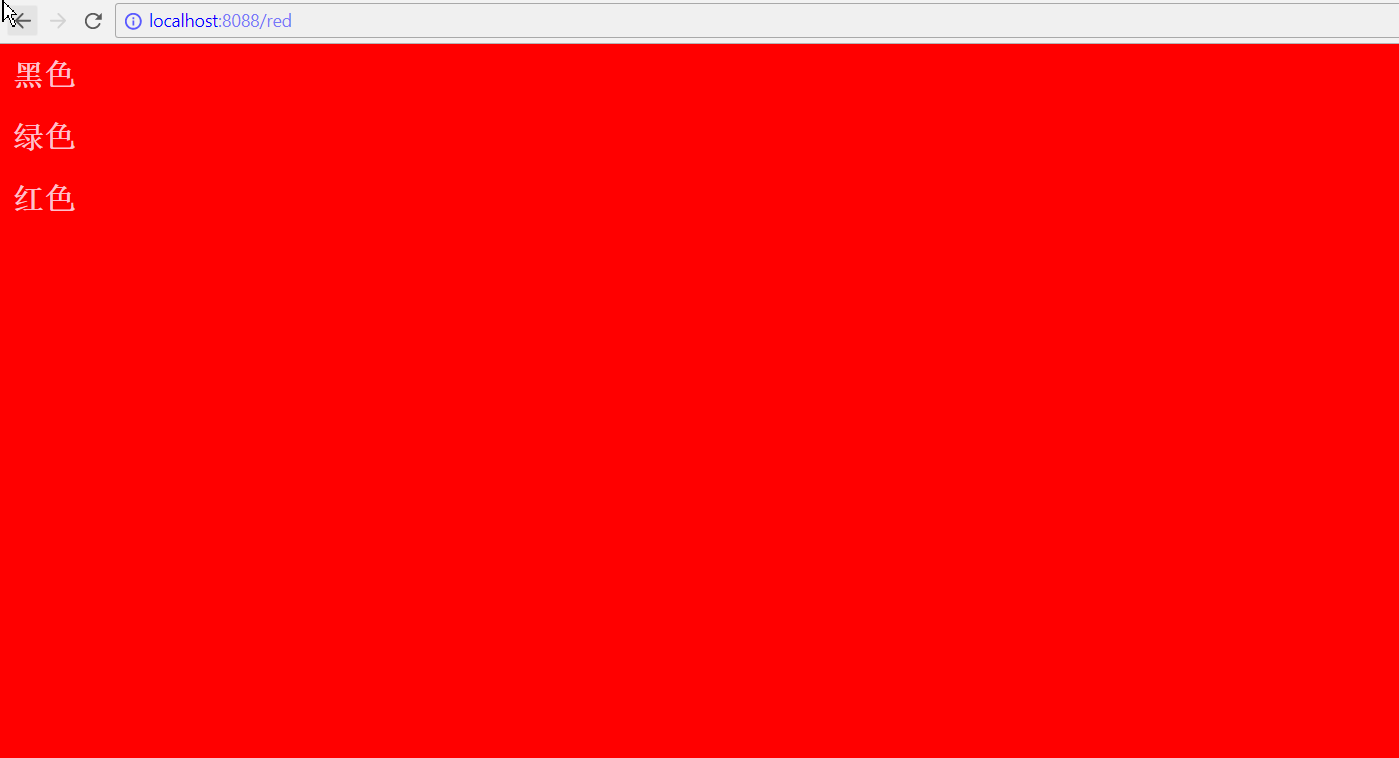
并且可以实现基本的前进后退功能。
原创文章,未经允许,不得转载!