1.依赖注入方法
手动装配和自动装配
2.手动装配
2.1 基于xml装配
2.1.1 构造方法
<!-- 构造方法注入
    <constructor-arg>
        name:参数名
        type:类型
        value:
-->
<bean id="user" class="g_xml.constructor.User">
    <constructor-arg name="id" type="java.lang.Integer" value="11"></constructor-arg>
    <constructor-arg name="username" type="java.lang.String" value="张三"></constructor-arg>
    <constructor-arg name="age" type="java.lang.Integer" value="10"></constructor-arg>
</bean>
2.1.2 setter方法
<bean id="addr" class="g_xml.setter.Address" >
    <property name="addr" value="上海浦东"></property>
    <property name="tel" value="138234324"></property>
</bean>
<bean id="user" class="g_xml.setter.User">
    <property name="id" value="1"></property>
    <property name="username" value="张三"></property>
    <property name="age" value="12"></property>
    <property name="homeAddr" ref="addr"></property>
    <property name="companryAddr" ref="addr"></property>
</bean>
2.1.3 p命名空间
对setter方法注入进行简化,替换<property>为:

但是需要加入schame命名空间
2.1.4 spEL
对<property>进行了统一编程,所有的内容都是用value
<property name="" value="#{EL表达式}">
EL:
#{123}
#{"hello"}
#{beanId} :另一个bean的引用
#{beanId.propName}
#{beanId.toString()}
#{T(类).静态方法|字段}
2.1.5 集合注入
<bean id="users" class="g_xml.collections.Users">
    <property name="strArr">
        <array>
            <value>战三</value>
            <value>李四</value>
            <value>王五</value>
        </array>
    </property>
    <property name="list">
        <list>
            <value>111</value>
            <value>222</value>
            <value>333</value>
        </list>
    </property>
    <property name="set">
        <set>
            <value>set1</value>
            <value>set2</value>
            <value>set3</value>
        </set>
    </property>
    <property name="map">
        <map>
            <entry key="key1" value="value1"></entry>
            <entry key="key2" value="value2"></entry>
        </map>
    </property>
    <property name="properties">
        <props>
            <prop key="k1">value1</prop>
            <prop key="k2">value2</prop>
        </props>
    </property>
</bean>
2.2 基于注解
注解就是一个类,使用@注解名称,取代xml配置
2.2.1 @Component == <bean id="" class="">
@Component("id")
使用注解之前,必须添加命名空间,让spring扫描带有注解的Bean
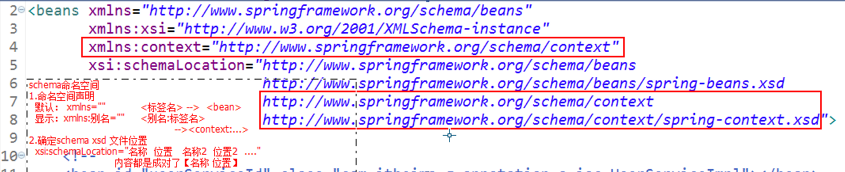
<?xml version="1.0" encoding="UTF-8"?>
<beans xmlns="http://www.springframework.org/schema/beans"
       xmlns:xsi="http://www.w3.org/2001/XMLSchema-instance"
       xmlns:context="http://www.springframework.org/schema/context"
       xsi:schemaLocation="http://www.springframework.org/schema/beans
                             http://www.springframework.org/schema/beans/spring-beans.xsd
                              http://www.springframework.org/schema/context
                              http://www.springframework.org/schema/context/spring-context.xsd">

    <!-- bean definitions here
    配置所需要创建的实例对象,放入spring容器中
    -->
    <!--<bean id="userService" class="a_IoC.UserServiceImp"></bean>-->
    <context:component-scan base-package="h_annotation"></context:component-scan>
</beans>
2.2.2 在web开发中,提供了三个Component衍生出的注解
@Repository DAO层
@Service Service层
@Controller Web层
2.2.3 依赖注入 (可以给私有属性注入,也可以给setter方法注入)
普通值:@Value()
引用值:
方式1:按照类型注入-->@Autowired
方式2:按照名称注入 -->
@Autowired
@Qualifier("名称")
方式2:按照名称注入 -->
@Resource("名称")