1在pom.xml中添加freemark的依赖jar
<!-- 引入freemark的模板引擎的依赖 -->
<dependency>
<groupId>org.springframework.boot</groupId>
<artifactId>spring-boot-starter-freemarker</artifactId>
</dependency>
2在application.properties中添加配置文件

#Freemarker的基础配置
#是否开启thymeleaf缓存,本地为flase,生产改为true
spring.freemarker.cache=false
spring.freemarker.charset=UTF-8
spring.freemarker.allow-request-override=false
spring.freemarker.check-template-location=true
#Freemarker类型
spring.freemarker.content-type=text/html; charset=utf-8
spring.freemarker.expose-request-attributes=true
spring.freemarker.expose-session-attributes=true
#Freemarker文件后缀
spring.freemarker.suffix=.ftl
#Freemarker路径
spring.freemarker.template-loader-path=classpath:/templates/
3在src/main/resources/templates下新建文件夹fm,fm文件夹下新建user和index.ftl
如果未安装 freemarker ftl插件,可以看https://www.cnblogs.com/zhushilai/p/13565892.html
index.ftl代码:
<!DOCTYPE html>
<html>
<head>
<meta charset="UTF-8">
<title>Insert title here</title>
</head>
<body>
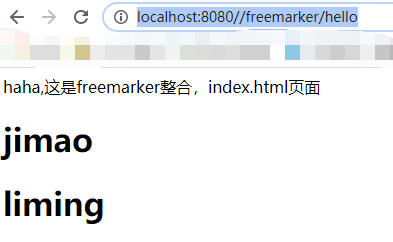
haha,这是freemarker整合,index.html页面
<h1>${serviceSetting.name}</h1>
<h1>${serviceSetting.domain}</h1>
</body>
</html>
4新建类ServiceSetting

然后在application.properties中加入注解

5新建freemarker包,包中新建FreeMarkerController类

代码:
package com.example.demo.controller.freemarker;
import org.springframework.beans.factory.annotation.Autowired;
import org.springframework.stereotype.Controller;
import org.springframework.ui.ModelMap;
import org.springframework.web.bind.annotation.GetMapping;
import org.springframework.web.bind.annotation.RequestMapping;
import com.example.demo.domain.ServiceSetting;
@Controller
@RequestMapping("/freemarker")
public class FreemarkerController {
@Autowired
private ServiceSetting serviceSetting;
@GetMapping("hello")
public String index(ModelMap modelMap) {
modelMap.addAttribute("serviceSetting",serviceSetting);
return "fm/index";
}
}
7run as application ,访问地址:http://localhost:8080//freemarker/hello,即可取到对应的值