关于九宫格的布局以及坐标的计算,对于大多数的iOS初学者甚至有一定能力的学者来说都是一大难题,在此写者通过自己的开发经验以及多次应用,把自己的所学所得分享给大家,就通过应用管理来进行浅谈一二。
 1、 功能分析:通过九宫格的样式添加相应的应用;当点击“下载”按钮时会执行相应的操作
2、实现步骤:1>.首先加载相应的应用信息;2>.根据应用的个数添加相对应的view;3>.实现按钮的点击事件,完成相应的后续操作
分析:格局布局的规律,每一个UIView的x坐标 和 y坐标与布局的行列有关
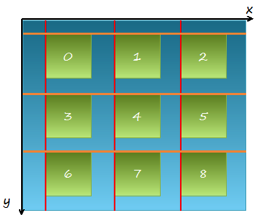 每一行的 y 值都相同,y 由行号决定
每一列的 x 值都相同,x 值由列号决定
3、实现的思路:
1>.首先要明确每一个模块是用的是什么view;
2>.明确每个view之间的父子关系,一个父view可以有多个子view,而每个试图则只有一个父视图
3>在添加格子的时候,首先可以先添加一个格子,然后在尝试着使用 for 循环进行循环添加
4>.在加载app数据的时候,首先要明确加载数据的长度,而后根据加载数据的长度来决定创建多少个格子
5>.逐步添加格子内部的各个子控件
6>.给各自内部的子控件加载相应的数据,即,给子控件赋值
7>.实例化 UIScrollView 的对象,并设置相应的属性,而后把scrollView添加到控制器的view上,最后把布局好的九宫格添加到scrollView上
3、xib视图分析:
通过多种方法的测试发现,使用xib会使九宫格布变得更为简单易懂,因此,xib布局如下图所示
 分析:在一个xib 视图中共包含三个子控件:imageView、label 和button
4、代码展示:
1>.首先创建模型,声明plist文件中的数据信息
Model:
 1 //  GWFAppListModel.h
 2 //  应用管理(xib 版)
 8 #import <Foundation/Foundation.h>
 9
10 @interface GWFAppListModel : NSObject
11
12 @property (nonatomic,copy) NSString *name;
13 @property (nonatomic,copy) NSString *icon;
14
15 +(instancetype)getGWFAppListModelWithDict:(NSDictionary *)dict;
16
17 @end
 1 //  GWFAppListModel.m
 2 //  应用管理(xib 版)
 3
 4 #import "GWFAppListModel.h"
 5
 6 @implementation GWFAppListModel
 7
 8 +(instancetype)getGWFAppListModelWithDict:(NSDictionary *)dict {
 9     GWFAppListModel *appModel = [[GWFAppListModel alloc] init];
10
11     [appModel setValuesForKeysWithDictionary:dict];
12
13     return appModel;
14 }
15
16 @end
View:
 1 //  GWFAppListView.h
 2 //  应用管理(xib 版)
 3
 4 #import <UIKit/UIKit.h>
 5 @class GWFAppListModel;
 6
 7 @interface GWFAppListView : UIView
 8
 9 @property (nonatomic,strong) GWFAppListModel *appModel;
10
11 @end
 1 //  GWFAppListView.m
 2 //  应用管理(xib 版)
 3
 4 #import "GWFAppListView.h"
 5 #import "GWFAppListModel.h"
 6
 7 @interface GWFAppListView ()
 8 @property (weak, nonatomic) IBOutlet UIImageView *iconView;
 9 @property (weak, nonatomic) IBOutlet UILabel *nameLabel;
10 @property (weak, nonatomic) IBOutlet UIButton *downloadBtn;
11
12 @end
13
14 @implementation GWFAppListView
15
16 //下载按钮的点击事件
17 - (IBAction)downLoadBtnClick:(id)sender {
18
19     //获取 appView 的superView
20     UIView *superView = self.superview;
21
22     //计算 superView 的尺寸
23     CGSize superViewSize = superView.frame.size;
24
25     //添加蒙版
26     UIView *coverView = [[UIView alloc] initWithFrame:superView.bounds];
27
28     //设置coverView 的颜色
29     coverView.backgroundColor = [UIColor blackColor];
30
31     //设置 coverView 的透明度
32     coverView.alpha = 0;
33
34     //把 coverView 添加到 superView 上
35     [superView addSubview:coverView];
36
37     //添加一个 label
38     CGFloat labelY = superViewSize.height / 2;
39
40     //实例化 label
41     UILabel *label = [[UILabel alloc] initWithFrame:CGRectMake(0, labelY, superViewSize.width, 20)];
42
43     //设置 label 的文本
44     label.text = @"正在下载,请稍后...";
45     //设置文本对齐方式
46     label.textAlignment = NSTextAlignmentCenter;
47
48     //设置文本字体颜色
49     label.textColor = [UIColor whiteColor];
50
51     //设置文本字体大小
52     label.font = [UIFont boldSystemFontOfSize:20];
53
54     //添加到 coverView 上
55     [coverView addSubview:label];
56
57      // completion 完成之后, 会调用block中的代码
58     [UIView animateWithDuration:1 animations:^{
59         //设置蒙版的透明度
60         coverView.alpha = 0.6;
61
62     } completion:^(BOOL finished) {
63         [UIView animateWithDuration:1 delay:1 options:UIViewAnimationOptionCurveEaseInOut animations:^{
64
65             coverView.alpha = 0;
66
67         } completion:^(BOOL finished) {
68
69             //销毁 coverView
70             [coverView removeFromSuperview];
71
72             //关闭按钮的交互,并显示 已安装
73             UIButton *button = sender;
74
75             button.enabled = NO;
76
77             [button setTitle:@"已安装" forState:UIControlStateNormal];
78
79             //设置按钮的 title 的颜色
80             [button setTitleColor:[UIColor grayColor] forState:UIControlStateDisabled];
81
82         }];
83
84     }];
85 }
86
87 -(void)setAppModel:(GWFAppListModel *)appModel {
88     _appModel = appModel;
89
90     //给子控件赋值
91     self.iconView.image = [UIImage imageNamed:appModel.icon];
92     self.nameLabel.text = appModel.name;
93 }
94
95 @end
Controller:
  1 //  ViewController.m
  2 //  应用管理(xib 版)
  3 #import "ViewController.h"
  4 #import "GWFAppListModel.h"
  5 #import "GWFAppListView.h"
  6
  7 @interface ViewController ()
  8
  9 @property (nonatomic,strong) NSArray *dataArray;
 10
 11 @property (nonatomic,strong) UIScrollView *scrollView;
 12
 13 @end
 14
 15 @implementation ViewController
 16
 17 //懒加载
 18 -(NSArray *)dataArray {
 19     if (_dataArray == nil) {
 20         //读取 plist 文件路径
 21         NSString *path = [[NSBundle mainBundle] pathForResource:@"app.plist" ofType:nil];
 22         //创建一个数组接收文件内容
 23         NSArray *dictArr = [NSArray arrayWithContentsOfFile:path];
 24
 25         //创建一个可变数组
 26         NSMutableArray *tempArr = [NSMutableArray arrayWithCapacity:dictArr.count];
 27
 28         //遍历数组 dictArr
 29         [dictArr enumerateObjectsUsingBlock:^(id  _Nonnull obj, NSUInteger idx, BOOL * _Nonnull stop) {
 30             NSDictionary *dict = obj;
 31
 32             //字典转模型
 33             GWFAppListModel *appModel = [GWFAppListModel getGWFAppListModelWithDict:dict];
 34
 35             //将数据模型 添加到可变数组
 36             [tempArr addObject:appModel];
 37         }];
 38         //赋值
 39         _dataArray = tempArr;
 40     }
 41     return _dataArray;
 42 }
 43
 44 - (void)viewDidLoad {
 45     [super viewDidLoad];
 46
 47     self.view.backgroundColor = [UIColor lightGrayColor];
 48
 49     _scrollView = [[UIScrollView alloc] initWithFrame:self.view.bounds];
 50
 51     //背景颜色
 52     [_scrollView setBackgroundColor:[UIColor grayColor]];
 53
 54     //添加到 view上
 55     [self.view addSubview:_scrollView];
 56
 57     //更新 UI 界面
 58     [self setUpdateUI];
 59 }
 60
 61
 62 //九宫格 布局 UI 界面
 63 -(void)setUpdateUI {
 64     //定义显示的列数
 65     int column = 3;
 66
 67     //定义 appView 的宽高
 68     CGFloat appViewWidth = 80;
 69     CGFloat appViewHeight = 95;
 70
 71     //计算 appView 之间的间距
 72     CGFloat margin = (self.view.frame.size.width - column * appViewWidth) / (column + 1);
 73
 74     //计算显示的 appView 的总数
 75     NSInteger count = self.dataArray.count;
 76
 77     for (int i = 0; i < count; i++) {
 78         //计算 行索引 和 列索引
 79         int colnumIndex = i % column;
 80         int rowIndex = i / column;
 81
 82         //计算appView 的x y
 83         CGFloat appViewX = (colnumIndex + 1) * margin + colnumIndex * appViewWidth;
 84         CGFloat appViewY = (rowIndex + 1) *margin + rowIndex * appViewHeight;
 85
 86         //通过 xib 安装目录添加 appView
 87         GWFAppListView *appView = [[[NSBundle mainBundle] loadNibNamed:@"GWFAppListView" owner:nil options:nil] lastObject];
 88         //设置 appView 的frame
 89         appView.frame = CGRectMake(appViewX, appViewY, appViewWidth, appViewHeight);
 90
 91         //设置背景颜色
 92         [appView setBackgroundColor:[UIColor yellowColor]];
 93
 94         //添加到 _scrollView 上
 95         [_scrollView addSubview:appView];
 96
 97         //取出模型中的数据,并进行赋值
 98         GWFAppListModel *appModel = self.dataArray[i];
 99
100         appView.appModel = appModel;
101     }
102
103     //获取 scrollView DE 最后一个子 view
104     UIView *view = _scrollView.subviews.lastObject;
105
106     //设置 scrollView 的contentSize
107     _scrollView.contentSize = CGSizeMake(0, CGRectGetMaxY(view.frame));
108 }
109 @end
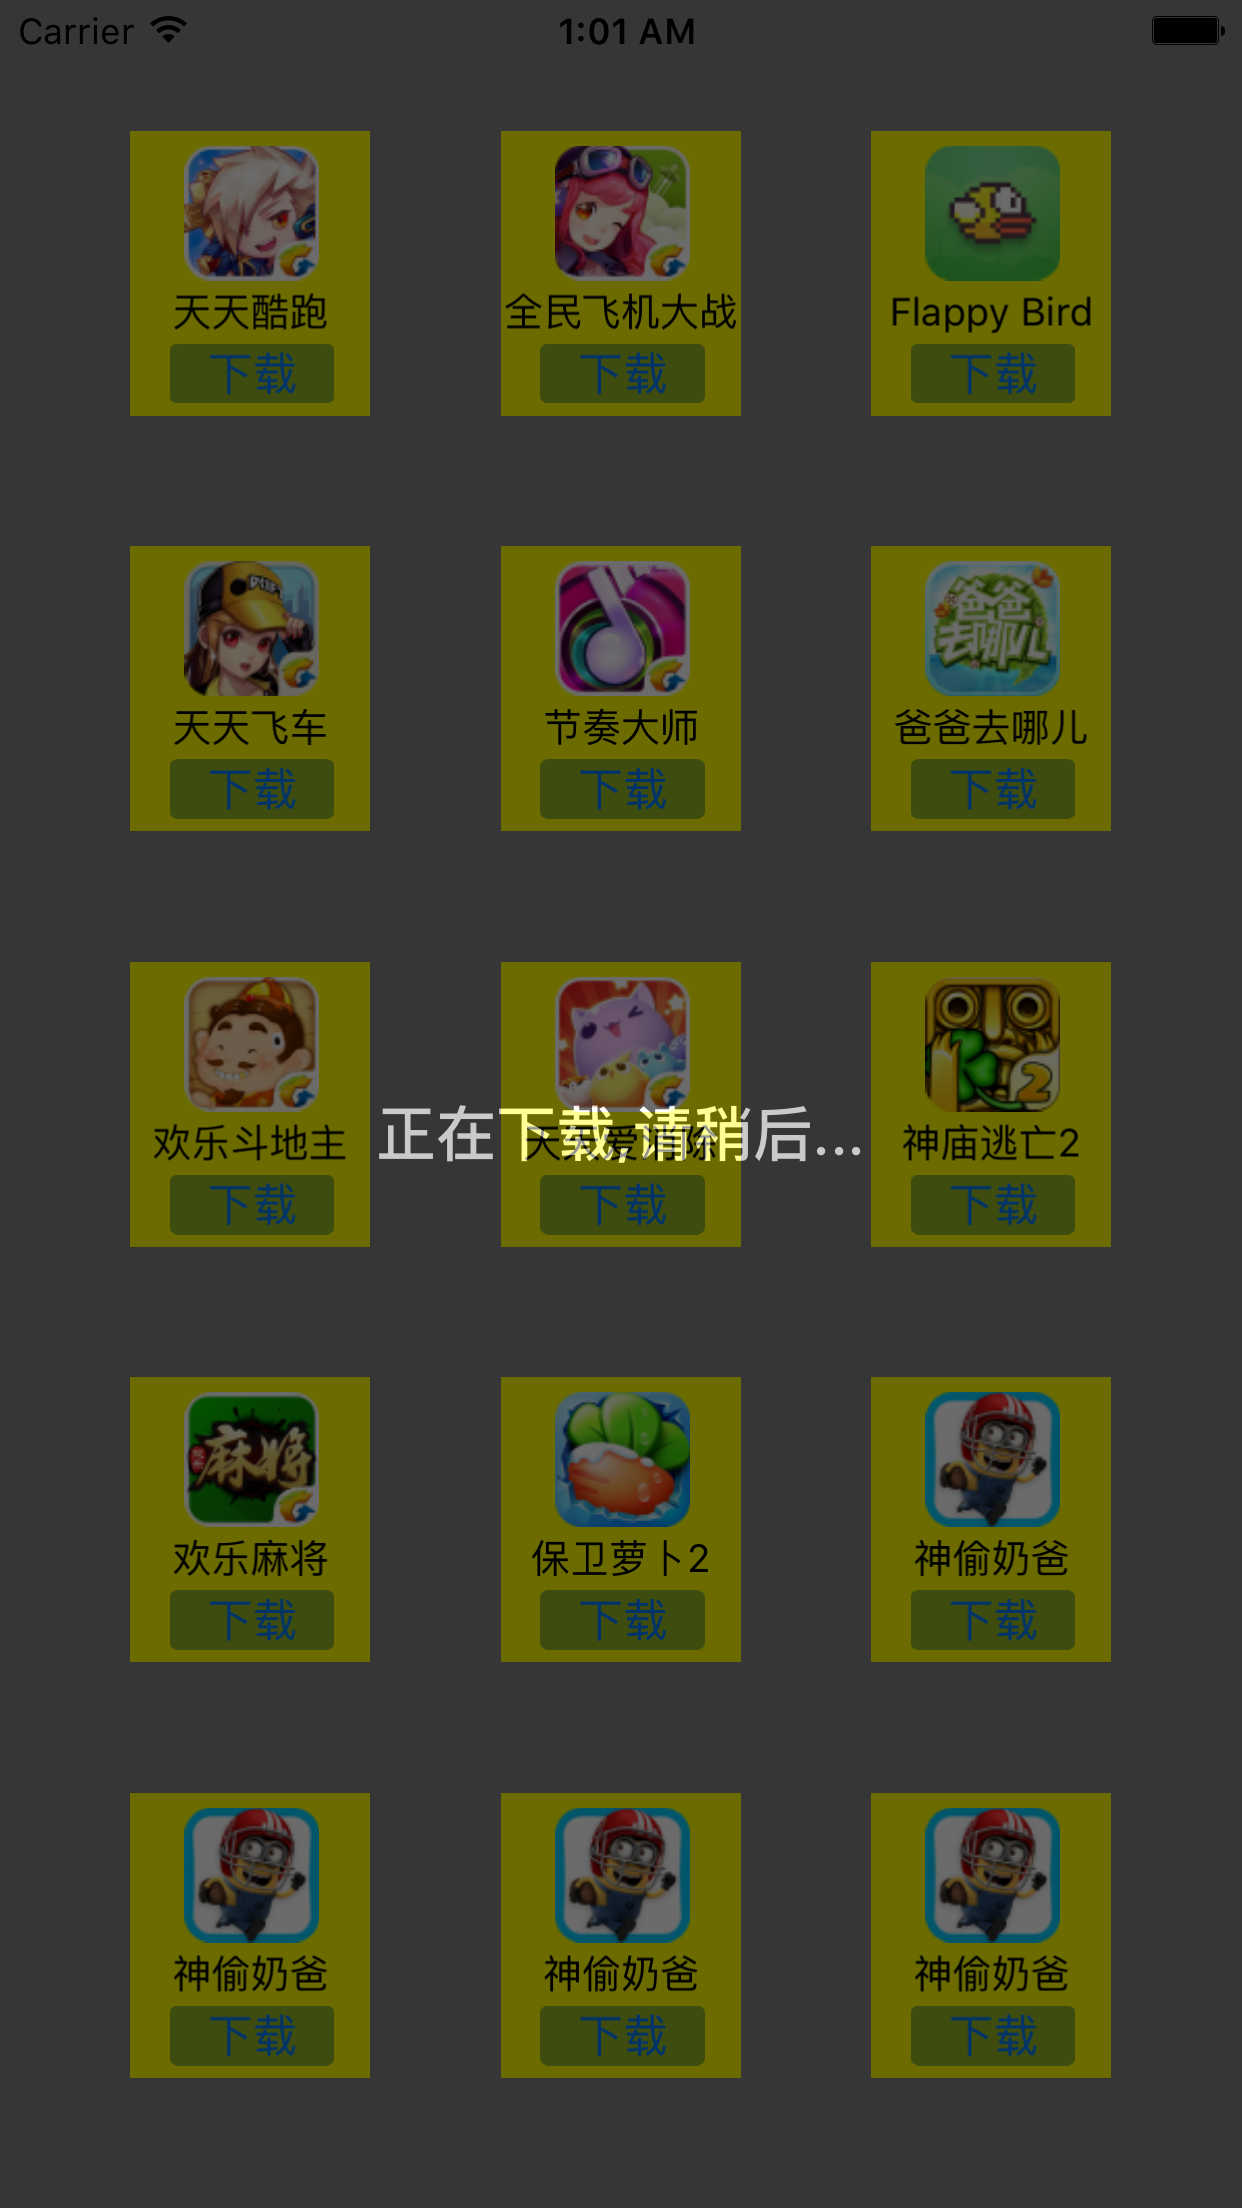
5、成果展示:随着数据长度的变化,九宫格视图的view个数随着变化,由于添加了 scrollView 应用可以上下滑动