1.输入子系统概念介绍
内核的输入子系统是对分散的、多种不同类别的输入设备(如键盘、鼠标、跟踪球、触摸屏、加速计和手写板等)进行统一处理的驱动程序。
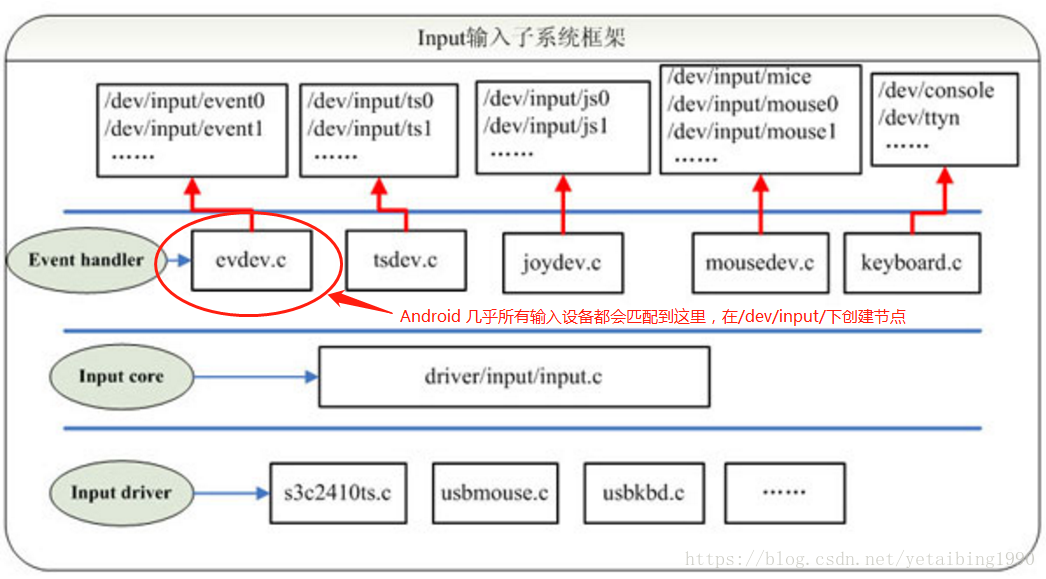
linux输入子系统(linux input subsystem)从上到下由三层实现,分别为:输入子系统事件处理层(EventHandler)、输入子系统核心层(InputCore)和输入子系统设备驱动层。
- 设备驱动层:主要实现对硬件设备的读写访问,中断设置,并把硬件产生的事件转换为核心层定义的规范提交给事件处理层。
- 核心层:为设备驱动层提供了规范和接口。设备驱动层只要关心如何驱动硬件并获得硬件数据(例如按下的按键数据),然后调用核心层提供的接口,核心层会自动把数据提交给事件处理层。
- 事件处理层:则是用户编程的接口(设备节点),并处理驱动层提交的数据处理。
以前我们的驱动程序打开了一个特定的设备文件“/dev/buttons”。而一般写的应用程序不会去打开这个“/dev/buttons”。一般打开的都是原有的文件,如“ dev/tty* ” ,还有可能是不需要打开什么tty,而 是直接“scanf()”就去获得了按键的输入。以前写的那些驱动程序只能自已使用而非通用。要写一个通用的驱动程序,让其他应用程序“无缝”的使用, 就是说不需要修改人家的应用程序。这需要使用现成的驱动,把自已的设备相关的驱动放到内核中这种驱动架构中去。这个现成的驱动就是“输入子系统--input子系统”。
输入子系统的优点:
1.统一了物理形态各异的相似的输入设备的处理功能。例如,各种鼠标、不论是PS/2、USB还是蓝牙,都做同样处理。
2.提供了用于分发输入报告给用户应用程序的简单的事件(event)接口。你的驱动程序不必创建、管理/dev节点以及相关的访问方法,因此它能很方便地调用输入API以发送鼠标移动、键盘按键或触摸事件给用户空间。
3.抽取出了输入驱动程序的通用部分,简化了驱动程序,并引入了一致性。例如,输入子系统提供了一个底层驱动程序(称为serio)的集合,支持对串行端口和键盘控制器等硬件输入设备的访问。
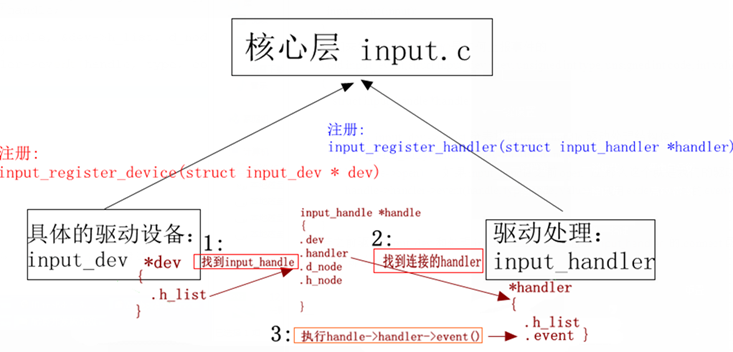
2.输入子系统框架
2.1.系统核心层(对应图中的input core 层)
- 注册主设备号
- 对于系统调用经过虚拟文件系统进入的open函数进行第一层处理,并通过次设备号选择handler进入第二层open,也就是真正的open所在的file_operation,并返回该file_opration的fd
- 提供input_register_device跟input_register_handler函数分别用于注册device跟handler
2.2.handler层(对应图中的Event handler 层)
device是纯硬件操作层,包含不同的硬件接口处理,如gpio等
对于每种不同的具体硬件操作,都对应着不同的input_dev结构体
该结构体内部也包含着一个h_list

3.输入子系统源码解析
subsys_initcall(input_init);   //修饰入口函数
module_exit(input_exit);     //修饰出口函数
通过以上两个函数,可以看出:输入子系统其实也是一个驱动程序。先来分析一下input_init这个入口函数。
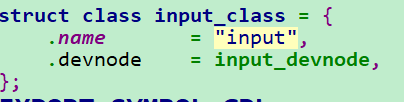
 1 static int __init input_init(void)
 2 {
 3     int err;
 4
 5     input_init_abs_bypass();
 6
 7     err = class_register(&input_class);  //注册类,放在/sys/class
 8     if (err) {
 9         printk(KERN_ERR "input: unable to register input_dev class
");
10         return err;
11     }
12
13     err = input_proc_init();      //在/proc下面建立相关的文件
14     if (err)
15         goto fail1;
16
17     err = register_chrdev(INPUT_MAJOR, "input", &input_fops);  //向内核注册驱动
18     if (err) {
19         printk(KERN_ERR "input: unable to register char major %d", INPUT_MAJOR);
20         goto fail2;
21     }
22
23     return 0;
24
25  fail2:    input_proc_exit();
26  fail1:    class_unregister(&input_class);
27     return err;
28 }
err = class_register(&input_class),这个函数是在/sys/class里创建了一个叫“input”的类。
如下图,我们启动内核,再启动一个input子系统的驱动后,也可以看到创建了个"input"类 :
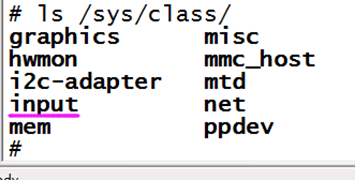
注意:这里只创建类,并没用使用class_create()创建设备节点。这里简单描述:当注册input子系统的驱动后,才会有驱动设备,此时这里的代码是没有驱动的。(后面需要补充)
err = register_chrdev(INPUT_MAJOR, "input", &input_fops),创建INPUT_MAJOR=13即主设备号为13的“input”设备。并且向内核注册了file_operations结构体类型的变量input_fops。

可以看到在file_operations中就定义了一个.open = input_open_file。接下里分析一下这个函数。
static int input_open_file(struct inode *inode, struct file *file)
{
    struct input_handler *handler;
    const struct file_operations *old_fops, *new_fops = NULL;
    int err;

    lock_kernel();
    /* No load-on-demand here? */
    handler = input_table[iminor(inode) >> 5];
    if (!handler || !(new_fops = fops_get(handler->fops))) {
        err = -ENODEV;
        goto out;
    }

    /*
     * That's _really_ odd. Usually NULL ->open means "nothing special",
     * not "no device". Oh, well...
     */
    if (!new_fops->open) {
        fops_put(new_fops);
        err = -ENODEV;
        goto out;
    }
    old_fops = file->f_op;
    file->f_op = new_fops;

    err = new_fops->open(inode, file);

    if (err) {
        fops_put(file->f_op);
        file->f_op = fops_get(old_fops);
    }
    fops_put(old_fops);
out:
    unlock_kernel();
    return err;
}
handler = input_table[iminor(inode) >> 5]:其中iminor (inode)函数调用了MINOR(inode->i_rdev);读取子设备号,然后将子设备除以32,找到新挂载的input驱动的数组号,然后放在input_handler 驱动处理函数handler中。
if (!handler || !(new_fops = fops_get(handler->fops))):若handler有值,说明挂载有这个驱动,就将handler结构体里的成员file_operations * fops赋到新的file_operations *new_fops里面。
file->f_op = new_fops:再将新的file_operations *new_fops赋到file-> file_operations *f_op里, 此时input子系统的file_operations就等于新挂载的input驱动的file_operations结构体。
err = new_fops->open(inode, file):然后调用新挂载的input驱动的*new_fops里面的成员.open函数。
总结:input_open_file函数就是一个输入子系统得统一接口,应用程序只需要通过调用这个接口。input_open_file函数就会根据传递里面得设备号获取次设备号,找到该设备对应得file_operations,去执行该设备驱动得open函数。
接下来就来分析一下input_table[ ]是怎么被赋值得。
在input.c函数(drivers/input/input.c)中搜索input_table,找到它在input_register_handler()函数中被赋值,代码如下:
int input_register_handler(struct input_handler *handler)
{
... ...
input_table[handler->minor >> 5] = handler;   //input_table[]被赋值
... ...
list_add_tail(&handler->node, &input_handler_list); //然后将这个input_handler放到input_handler_list链表中
... ...
}
就是将驱动处理程序input_handler注册到input_table[]中,然后放在input_handler_list链表中,后面会讲这个链表。
继续来搜索input_register_handler,看看这个函数被谁来调用。
如下图所示,有evdev.c(事件设备),joydev.c(joystick操作杆设备),keyboard.c(键盘设备),mousedev.c(鼠标设备)
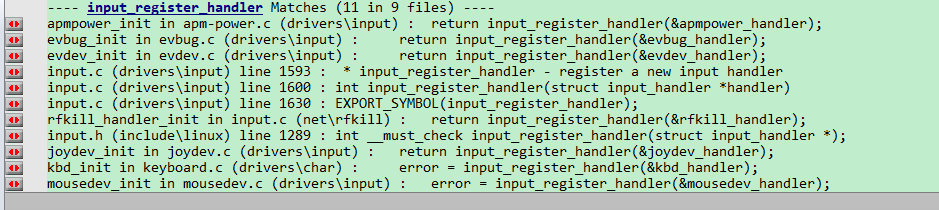
我们以evdev.c为例,它在evdev_ini()函数中注册
static int __init evdev_init(void)
{
    return input_register_handler(&evdev_handler);
}
我们来看看这个evdev_handler变量是什么结构体,
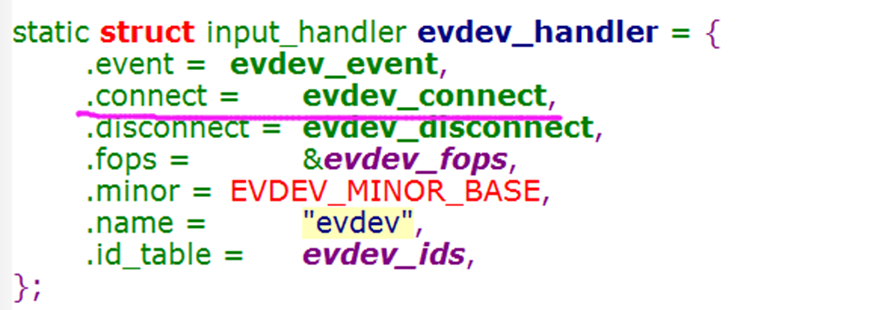
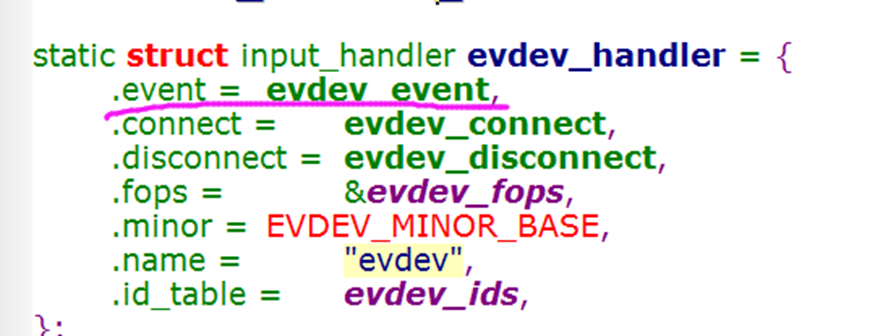
static struct input_handler evdev_handler = {
    .event        = evdev_event,
    .connect    = evdev_connect,
    .disconnect    = evdev_disconnect,
    .fops        = &evdev_fops,
    .minor        = EVDEV_MINOR_BASE,
    .name        = "evdev",
    .id_table    = evdev_ids,
};
.fops:文件操作结构体,其中evdev_fops函数就是自己的写的操作函数,然后赋到.fops中。
.id_table : 表示能支持哪些输入设备,比如某个驱动设备的input_dev->的id和某个input_handler的id_table相匹配,就会调用.connect连接函数,如下图
.minor:用来存放次设备号。
其中EVDEV_MINOR_BASE=64, 然后调用input_register_handler(&evdev_handler)后,由于EVDEV_MINOR_BASE/32=2,所以存到input_table[2]中
所以当open打开这个input设备,就会进入 input_open_file()函数,执行evdev_handler-> evdev_fops -> .open函数,如下图所示:
static struct input_handler evdev_handler = {
    .event        = evdev_event,
    .connect    = evdev_connect,
    .disconnect    = evdev_disconnect,
    .fops        = &evdev_fops,
    .minor        = EVDEV_MINOR_BASE,
    .name        = "evdev",
    .id_table    = evdev_ids,
};
.connect:连接函数,将设备input_dev和某个input_handler建立连接,如下图

我们先来看看上图的input_register_device()函数,如何创建驱动设备的。
查看一下可以看到很多地方都调用了这个函数,说明内核自己也注册了很多设备。
int input_register_device(struct input_dev *dev)   //*dev:要注册的驱动设备
{
 ... ...
       list_add_tail(&dev->node, &input_dev_list);   //(1)放入链表中
 ... ...
       list_for_each_entry(handler, &input_handler_list, node)  //(2)
       input_attach_handler(dev, handler);
 ... ...
}
list_add_tail(&dev->node, &input_dev_list)将要注册的input_dev驱动设备放在input_dev_list链表中。
list_for_each_entry(handler, &input_handler_list, node)其中input_handler_list在前面讲过,就是存放每个input_handle驱动处理结构体,然后list_for_each_entry()函数会将每个input_handle从链表中取出,放到handler中,最后会调用input_attach_handler()函数,将每个input_handle的id_table进行判断,若两者支持便进行连接。
然后我们在回过头来看注册input_handler的input_register_handler()函数,如下图所示
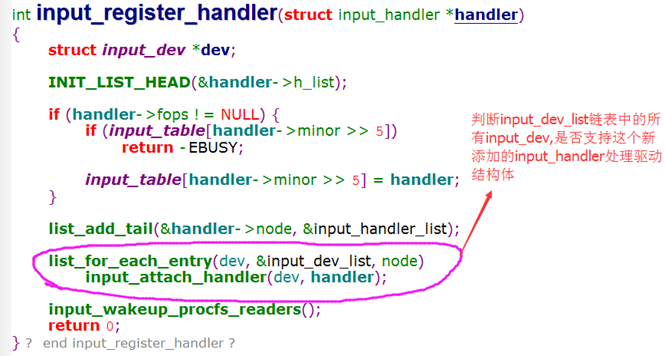
所以,不管新添加input_dev还是input_handler,都会进入input_attach_handler()判断两者id是否有支持, 若两者支持便进行连接。
我们来看看input_attach_handler()如何实现匹配两者id的:
static int input_attach_handler(struct input_dev *dev, struct input_handler *handler)
{
... ...
id = input_match_device(handler->id_table, dev);  //匹配两者

if (!id)                                     //若不匹配,return退出
return -ENODEV;

error = handler->connect(handler, dev, id);  //调用input_handler ->connect函数建立连接
... ...

}
若两者匹配成功,就会自动进入input_handler 的connect函数建立连接。
我们还是以evdev.c(事件驱动) 的evdev_handler->connect函数来分析是怎样建立连接的
evdev_handler的.connect函数是evdev_connect(),代码如下:
static int evdev_connect(struct input_handler *handler, struct input_dev *dev, const struct input_device_id *id)
{
... ...
for (minor = 0; minor < EVDEV_MINORS && evdev_table[minor]; minor++); //查找驱动设备的子设备号
    if (minor == EVDEV_MINORS) {  // EVDEV_MINORS=32,所以该事件下的驱动设备最多存32个,
        printk(KERN_ERR "evdev: no more free evdev devices
");
        return -ENFILE;                //没找到驱动设备
    }
 ... ...
 evdev = kzalloc(sizeof(struct evdev), GFP_KERNEL);   //分配一个input_handle全局结构体(没有r)
 ... ...
 evdev->handle.dev = dev;              //指向参数input_dev驱动设备
evdev->handle.name = evdev->name;
evdev->handle.handler = handler;    //指向参数 input_handler驱动处理结构体
evdev->handle.private = evdev;
sprintf(evdev->name, "event%d", minor);    //(1)保存驱动设备名字, event%d
... ...
devt = MKDEV(INPUT_MAJOR, EVDEV_MINOR_BASE + minor),  //(2) 将主设备号和次设备号转换成dev_t类型
cdev = class_device_create(&input_class, &dev->cdev, devt,dev->cdev.dev, evdev->name);
                                                           // (3)在input类下创建驱动设备

... ...
error = input_register_handle(&evdev->handle); //(4)注册这个input_handle结构体

... ...
}
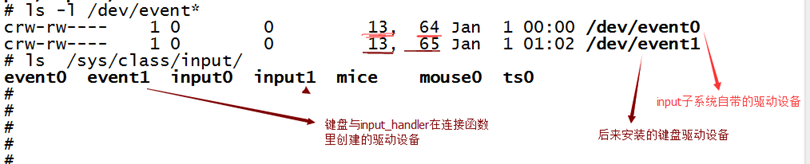
(1) 是在保存驱动设备名字,名为event%d, 比如下图(键盘驱动)event1: 因为没有设置子设备号,默认从小到大排列,其中event0是表示这个input子系统,所以这个键盘驱动名字就是event1。
(2)是在保存驱动设备的主次设备号,其中主设备号INPUT_MAJOR=13,因为EVDEV_MINOR_BASE=64,所以此设备号=64+驱动程序本事子设备号, 比如下图(键盘驱动)event1: 主次设备号就是13,65
(3)在之前在开头就分析了input_class类结构,所以cdev = class_device_create(&input_class, &dev->cdev, devt,dev->cdev.dev, evdev->name);会在/sys/class/input类下创建驱动设备event%d,比如下图(键盘驱动)event1:
(4)最终会进入input_register_handle()函数来注册,代码在下面
int input_register_handle(struct input_handle *handle)
{
      struct input_handler *handler = handle->handler; //handler= input_handler驱动处理结构体

      list_add_tail(&handle->d_node, &handle->dev->h_list); //(1)
      list_add_tail(&handle->h_node, &handler->h_list);    // (2)

      if (handler->start)
             handler->start(handle);
      return 0;
}
(1)因为handle->dev指向input_dev驱动设备,所以就是将handle->d_node放入到input_dev驱动设备的h_list链表中,即input_dev驱动设备的h_list链表就指向handle->d_node。
(2) 同样, input_handler驱动处理结构体的h_list也指向了handle->h_node。最终如下图所示:
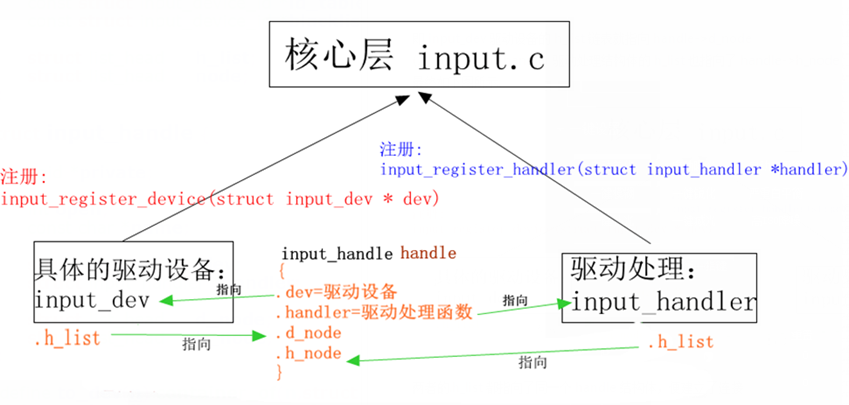
两者的.h_list都指向了同一个handle结构体,然后通过.h_list 来找到handle的成员.dev和handler,便能找到对方,便建立了连接。
建立了连接后,又如何读取evdev.c(事件驱动) 的evdev_handler->.fops->.read函数?
事件驱动的.read函数是evdev_read()函数,我们来分析下:
static ssize_t evdev_read(struct file *file, char __user *      buffer, size_t count, loff_t *ppos)
{
 ... ...
/*判断应用层要读取的数据是否正确*/
if (count < evdev_event_size())
return -EINVAL;

/*在非阻塞操作情况下,若client->head == client->tail|| evdev->exist时(没有数据),则return返回*/
 if (client->head == client->tail && evdev->exist && (file->f_flags & O_NONBLOCK))
return -EAGAIN;

/*若client->head == client->tail|| evdev->exist时(没有数据),等待中断进入睡眠状态  */
  retval = wait_event_interruptible(evdev->wait,client->head != client->tail || !evdev->exist);

  ... ...           //上传数据

}
若read函数进入了休眠状态,又是谁来唤醒?
我们搜索这个evdev->wait这个等待队列变量,找到evdev_event函数里唤醒:
static void evdev_event(struct input_handle *handle, unsigned int type, unsigned int code, int value)
{
... ...
 wake_up_interruptible(&evdev->wait);   //有事件触发,便唤醒等待中断
}
其中evdev_event()是evdev.c(事件驱动) 的evdev_handler->.event成员,如下图所示:
当有事件发生了,比如对于按键驱动,当有按键按下时,就会进入.event函数中处理事件。
分析下,是谁调用evdev_event()这个.event事件驱动函数
应该就是之前分析的input_dev那层调用的
我们来看看内核 gpio_keys_isr()函数代码例子就知道了 (driver/input/keyboard/gpio_key.c)
static irqreturn_t gpio_keys_isr(int irq, void *dev_id)
{
 /*获取按键值,赋到state里*/
 ... ...

/*上报事件*/
input_event(input, type, button->code, !!state);
input_sync(input);                        //同步信号通知,表示事件发送完毕
}
显然就是通过input_event()来调用.event事件函数,我们来看看:
void input_event(struct input_dev *dev, unsigned int type, unsigned int code, int value)
{
struct input_handle *handle;
... ...

/* 通过input_dev ->h_list链表找到input_handle驱动处理结构体*/
list_for_each_entry(handle, &dev->h_list, d_node)
if (handle->open)  //如果input_handle之前open 过,那么这个就是我们的驱动处理结构体
    handle->handler->event(handle, type, code, value); //调用evdev_event()的.event事件函数

}
若之前驱动input_dev和处理input_handler已经通过input_handler 的.connect函数建立起了连接,那么就调用evdev_event()的.event事件函数,如下图所示:
3.总结
1.注册输入子系统,进入put_init():
1)创建主设备号为13的"input"字符设备
err = register_chrdev(INPUT_MAJOR, "input", &input_fops);
2.open打开驱动,进入input_open_file():
1)更新设备的file_oprations
file->f_op=fops_get(handler->fops);
2)执行file_oprations->open函数
err = new_fops->open(inode, file);
3.注册input_handler,进入input_register_handler():
1)添加到input_table[]处理数组中
input_table[handler->minor >> 5] = handler;
2)添加到input_handler_list链表中
list_add_tail(&handler->node, &input_handler_list);
3)判断input_dev的id,是否有支持这个驱动的设备
 list_for_each_entry(dev, &input_dev_list, node)   //遍历查找input_dev_list链表里所有input_dev

 input_attach_handler(dev, handler);             //判断两者id,若两者支持便进行连接。
4.注册input_dev,进入input_register_device():
1)放在input_dev_list链表中
list_add_tail(&dev->node, &input_dev_list);
2)判断input_handler的id,是否有支持这个设备的驱动
list_for_each_entry(handler, &input_handler_list, node)  //遍历查找input_handler_list链表里所有input_handler
input_attach_handler(dev, handler);                      //判断两者id,若两者支持便进行连接。
5.判断input_handler和input_dev的id,进入input_attach_handler():
1)匹配两者id,
input_match_device(handler->id_table, dev); //匹配input_handler和dev的id,不成功退出函数
2)匹配成功调用input_handler ->connect
handler->connect(handler, dev, id); //建立连接
6.建立input_handler和input_dev的连接,进入input_handler->connect():
1)创建全局结构体,通过input_handle结构体连接双方
evdev = kzalloc(sizeof(struct evdev), GFP_KERNEL);    //创建两者连接的input_handle全局结构体
list_add_tail(&handle->d_node, &handle->dev->h_list); //连接input_dev->h_list
list_add_tail(&handle->h_node, &handler->h_list);    // 连接input_handle->h_list
7.有事件发生时,比如按键中断,在中断函数中需要进入input_event()上报事件:
1)找到驱动处理结构体,然后执行input_handler->event()
list_for_each_entry(handle, &dev->h_list, d_node)     // 通过input_dev ->h_list链表找到input_handle驱动处理结构体
if (handle->open)  //如果input_handle之前open 过,那么这个就是我们的驱动处理结构体(有可能一个驱动设备在不同情况下有不同的驱动处理方式)
    handle->handler->event(handle, type, code, value); //调用evdev_event()的.event事件函数