ansible
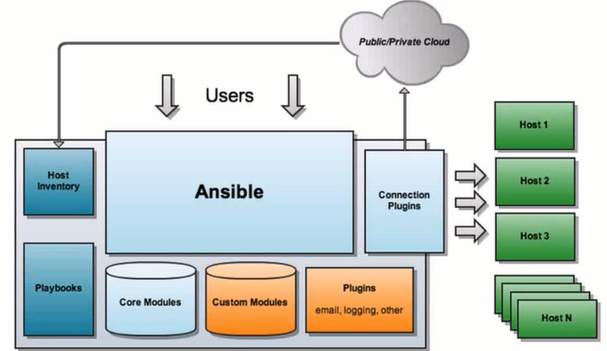
Ansible:Ansible的核心程序Host Lnventory:记录了每一个由Ansible管理的主机信息,信息包括ssh端口,root帐号密码,ip地址等等。可以通过file来加载,可以通过CMDB加载Playbooks:YAML格式文件,多个任务定义在一个文件中,使用时可以统一调用,“剧本”用来定义那些主机需要调用那些模块来完成的功能.Core Modules:Ansible执行任何管理任务都不是由Ansible自己完成,而是由核心模块完成;Ansible管理主机之前,先调用core Modules中的模块,然后指明管理Host Lnventory中的主机,就可以完成管理主机。Custom Modules:自定义模块,完成Ansible核心模块无法完成的功能,此模块支持任何语言编写。Connection Plugins:连接插件,Ansible和Host通信使用
ansible简介
ansible是新出现的自动化运维工具,基于Python开发,集合了众多运维工具(puppet、cfengine、chef、func、fabric)的优点,实现了批量系统配置、批量程序部署、批量运行命令等功能。
ansible是基于模块工作的,本身没有批量部署的能力。真正具有批量部署的是ansible所运行的模块,ansible只是提供一种框架。主要包括:(1)、连接插件connection plugins:负责和被监控端实现通信;(2)、host inventory:指定操作的主机,是一个配置文件里面定义监控的主机;(3)、各种模块核心模块、command模块、自定义模块;(4)、借助于插件完成记录日志邮件等功能;(5)、playbook:剧本执行多个任务时,非必需可以让节点一次性运行多个任务。--摘自360百科 简而言之ansible有如下的特点:(一)批量管理工具(二)模块(三)python(四)无终端,是基于ssh实现管理的(五)也支持主从模式(六)也支持playbook
ansible优点
- Stupied Simple ,上手简单,学习曲线平滑
- SSH by default ,安全,无需安装客户端
- 配置简单、功能强大、扩展性强
- 支持API及自定义模块,可通过Python轻松扩展
- 通过Playbooks来定制强大的配置、状态管理
- 提供一个功能强大、操作性强的Web管理界面和REST API接口——AWX平台
- 幂等性:一种操作重复多次结果相同
ansible安装
yum install epel-release
yum install ansible
查看ansible的版本信息
ansible --version
查看ansible配置文件
[root@ken ~]# rpm -qc ansible
/etc/ansible/ansible.cfg
/etc/ansible/hosts
ansible配置客户端
1、server: ssh-keygen
2、scp id_rsa.pub root@192.168.254.25:/root/.ssh/authorized_keys
或ssh-copy-id -i id_rsa.pub root@192.168.254.25   #该命令自动拷贝到/root/.ssh下,并改名为authorized_keys
使用如下脚本即可进行批量分发
#!/bin/bash
. /etc/init.d/functions
#date:2018.11.16
#desc:this script for ssh key
#下载expect
yum install expect -y &>/dev/null
if [ $? -eq 0 ];then
        echo -n "download expect"
        success
        echo ""
else
        echo -n "download expect"
        failure
        echo ""
        exit 8
fi
#删除保存的秘钥信息
if [ -f id_rsa -o -f id_rsa.pub -o known_hosts ];then
        rm -rf /root/.ssh/id*
        rm -rf /root/.ssh/known*
fi
#自动生成秘钥对
/usr/bin/expect<<eof
spawn ssh-keygen
expect {
"(/root/.ssh/id_rsa)" {send
;exp_continue}
"passphrase" {send
;exp_continue}
"again" {send
}
}
expect eof
exit
eof
#在各个节点分发秘钥
for i in  37 38 39
do
ken=10.220.5.1$i
/usr/bin/expect<<eof
spawn ssh-copy-id $ken
expect {
"yes/no" {send yes
;exp_continue}
"password" {send o
}
}
expect eof
exit
eof
done
Ansible使用的管理模式
- hoc行模式
- playbook模式
- roles模式
ansible常用命令
- ansible-doc -l #查看支持的模块
- ansible-doc -s MODEL_NAME #查看模块用法
- ansible命令应用基础
- ansible <host-pattern> [options]
-m model_name:要使用的模块
-a args:特有的参数
- ansible all -m ping #查看client端是否正常ping通
- ansible webserver -m setup #查看客户端信息
- ansible webserver -m copy -a 'src=/root/git_test/code.txt dest=/root/test' #copy文件到cient端
- ansible webserver -m user -a "name=test state=present" #创建test用户
- ansible webserver -m user -a "name=test state=absent" #删除test用户
- ansible webserver -m yum -a ‘name=epel-relese state=latest‘ #yum安装
- ansible webserver -m service -a ‘name=httpd state=stopped enabled=no‘ #停止httpd服务
- ansible webserver -m script -a ‘/tmp/test.sh‘ #运行脚本
- ansible webserver -m command -a 'date' #查看时间
-m:指定模块名称
-a:指定模块的具体参数
-s:以sudo的方式运行操作
-i:指定被管理节点的主机列表
-f:一批连接几个主机进行操作(默认是5个主机)
获取模块使用帮助
使用-s指定获取shell模块的使用帮助
[root@ken ~]# ansible-doc -s shell
- name: Execute commands in nodes.
  shell:
      chdir:                 # cd into this directory before running the command
      creates:               # a filename, when it already exists, this step will *not* be run.
      executable:            # change the shell used to execute the command. Should be an absolute path to the executable.
      free_form:             # (required) The shell module takes a free form command to run, as a string.  There's not an
                               actual option named "free form".  See the examples!
      removes:               # a filename, when it does not exist, this step will *not* be run.
      stdin:                 # Set the stdin of the command directly to the specified value.
      warn:                  # if command warnings are on in ansible.cfg, do not warn about this particular line if set to
                               no/false.
Ansible管理节点的三种方法
还记得刚才在hosts文件添加的三行内容吗?[ken]
10.220.5.138
10.220.5.139
(一)指定主机组名
通过如下的命令就可以获取到了整个主机组节点的信息[root@ken ~]# ansible ken -m command -a "hostname"
10.220.5.138 | SUCCESS | rc=0 >>
ken
10.220.5.139 | SUCCESS | rc=0 >>
ken
(二)指定一个特定IP
指定ip 10.220.5.138获取特定节点的信息[root@ken ~]# ansible 10.220.5.138 -m command -a "ip a"
10.220.5.138 | SUCCESS | rc=0 >>
1: lo: <LOOPBACK,UP,LOWER_UP> mtu 65536 qdisc noqueue state UNKNOWN group default qlen 1000
link/loopback 00:00:00:00:00:00 brd 00:00:00:00:00:00
inet 127.0.0.1/8 scope host lo
valid_lft forever preferred_lft forever
inet6 ::1/128 scope host
valid_lft forever preferred_lft forever
2: eth0: <BROADCAST,MULTICAST,UP,LOWER_UP> mtu 1500 qdisc pfifo_fast state UNKNOWN group default qlen 1000
link/ether 00:0c:29:a9:90:16 brd ff:ff:ff:ff:ff:ff
inet 10.220.5.138/24 brd 10.220.5.255 scope global noprefixroute eth0
valid_lft forever preferred_lft forever
inet6 fe80::20c:29ff:fea9:9016/64 scope link
valid_lft forever preferred_lft forever
(三)使用all
因为在配置文件里面我只定义了一个主机组,所以这里呈现的效果和使用ken是一样的,大家可以尝试定义多个主机组,再使用all.[root@ken ~]# ansible all -m command -a "ls /tmp"
10.220.5.138 | SUCCESS | rc=0 >>
ansible_TpWP26
hsperfdata_root
hsperfdata_zabbix
systemd-private-495d844cb6f24a5fa04192c973de9274-chronyd.service-SVap94
systemd-private-495d844cb6f24a5fa04192c973de9274-httpd.service-Grw0SF
systemd-private-79452c683402427e944cc4959183f774-httpd.service-DENLXJ
systemd-private-79452c683402427e944cc4959183f774-ntpd.service-cH4QGP
systemd-private-f0243ed42bf34679b61e0687522914f6-chronyd.service-DADZWt
systemd-private-f0243ed42bf34679b61e0687522914f6-httpd.service-lCPw92
vmware-root
10.220.5.139 | SUCCESS | rc=0 >>
ansible_bxGz8A
systemd-private-2e376cd91398450f85a81bc060207ef8-chronyd.service-TxdhUO
systemd-private-2e376cd91398450f85a81bc060207ef8-httpd.service-k8IZOZ
systemd-private-5c9f32d6cff64520b10075e086d943ab-chronyd.service-iAH3c0
systemd-private-5c9f32d6cff64520b10075e086d943ab-httpd.service-dsAqeg
systemd-private-65ded84926e64a90b0a201a805f752ca-chronyd.service-eSj3iR
systemd-private-6706ba5361284cd4a0c91f3c8b68c606-chronyd.service-sLgAei
systemd-private-6706ba5361284cd4a0c91f3c8b68c606-httpd.service-op5Yg7
vmware-root
yum_save_tx.2018-11-15.16-02.KHC9kd.yumtx