Flask
一:介绍
Flask是一个使用 Python 编写的轻量级 Web 应用框架。其 WSGI 工具箱采用 Werkzeug ,模板引擎则使用 Jinja2 。Flask使用 BSD 授权。
Flask也被称为 “microframework” ,因为它使用简单的核心,用 extension 增加其他功能。Flask没有默认使用的数据库、窗体验证工具。
Flask是一个基于Python开发并且依赖jinja2模板和Werkzeug WSGI服务的一个微型框架,对于Werkzeug本质是Socket服务端,其用于接收http请求并对请求进行预处理,然后触发Flask框架,开发人员基于Flask框架提供的功能对请求进行相应的处理,并返回给用户,如果要返回给用户复杂的内容时,需要借助jinja2模板来实现对模板的处理,即:将模板和数据进行渲染,将渲染后的字符串返回给用户浏览器。
“微”(micro) 并不表示你需要把整个 Web 应用塞进单个 Python 文件(虽然确实可以 ),也不意味着 Flask 在功能上有所欠缺。微框架中的“微”意味着 Flask 旨在保持核心简单而易于扩展。Flask 不会替你做出太多决策——比如使用何种数据库。而那些 Flask 所选择的——比如使用何种模板引擎——则很容易替换。除此之外的一切都由可由你掌握。如此,Flask 可以与您珠联璧合。
默认情况下,Flask 不包含数据库抽象层、表单验证,或是其它任何已有多种库可以胜任的功能。然而,Flask 支持用扩展来给应用添加这些功能,如同是 Flask 本身实现的一样。众多的扩展提供了数据库集成、表单验证、上传处理、各种各样的开放认证技术等功能。Flask 也许是“微小”的,但它已准备好在需求繁杂的生产环境中投入使用。
一句话概括: flask 是一个轻量级且含有丰富组件的框架, 优点: 短小精悍
虚拟环境(virtualenv):
一个项目django1.7 一个项目django2.0 用一个django是不可能同时装两个版本。
解决方法:
创建一个虚拟环境,来让我们实现两个版本的使用。
pip3 install virtualenv 安装环境
virtualenv env1 创建一个虚拟环境env1
cd env1
cd Scripts
(env1) E:flaskenv1Scripts>
(env1) E:flaskenv1Scripts>deactivate.bat 退出env1
Scripts/activete 进入
Scripts/deactivete 退出
二: 安装使用
pip3 install flask


 1 from werkzeug.wrappers import Request,Response
 2
 3 @Request.application
 4 def hello(request):
 5     return Response("Hello world")
 6
 7
 8 if __name__ == '__main__':
 9     from werkzeug.serving import run_simple
10     run_simple("localhost",4000,hello)
from flask import Flask

app = Flask(__name__)  #实例化

@app.route('/index')  #路由系统
def hello_world():      #视图函数
    return  'Hello world'


if __name__ == '__main__':
    app.run()      #启动
路由:
反向生成url: url_for endpoint
from flask import Flask,url_for

app=Flask(__name__)

@app.route("/index",methods=['GET','POST'],endpoint='aaa')
def index():
    v = url_for('aaa')
    print(v)
    return 'ok'

if __name__ == '__main__':
    app.run()
路由传参: /index/<int:nid>
from flask import Flask,url_for

app=Flask(__name__)

@app.route("/index/<int:nid>",methods=['GET','POST'],endpoint='aaa')
def index(nid):
    v = url_for('aaa',nid=666)
    print(v)
    print(nid)
    return 'ok'

if __name__ == '__main__':
    app.run()
默认值,当URL中无参数,函数需要参数时,使用defaults={'k':'v'}为函数提供参数.
对URL最后的 / 符号是否严格要求. strict_slashes=None,
from flask import Flask,url_for

app=Flask(__name__)

@app.route("/index/<int:nid>",methods=['GET','POST'],endpoint='aaa',defaults={'nid':777},strict_slashes=False)
def index(nid):
    # v = url_for('aaa',nid=666)
    # print(v)
    print(nid)
    return 'ok'

if __name__ == '__main__':
    app.run()
重定向:redirect_to='路径'
from flask import Flask,url_for,redirect

app=Flask(__name__)

@app.route('/new',redirect_to='/old')
def new():
    return 'new'

@app.route('/old')
def old():
    return 'old'


if __name__ == '__main__':
    app.run()
对于所有的域名都需要解析为ip地址,然而浏览器并回去哪找?它会先去本地找。
两种解决方法:
1.去租个域名 aaa.com
2. 去租个公网ip 97.25.22.11
域名解析:
aaa.com 97.25.22.11
把代码放到 97.25.22.11公网的ip服务器上去运行。
然后,再去访问aaa.com的时候,它会先找域名,把域名解析为ip,
接着在浏览器对ip发起请求,服务器就会接收到请求并响应。
本地测试:
自己的本地文件:
C:WindowsSystem32driversetchost里面。添加对应的信息。

from flask import Flask,url_for,redirect

app=Flask(__name__)
app.config['SERVER_NAME'] = 'aaa.com:5000' #这句要记得加上


#只有访问  admin.aaa.com:5000/index  才有效
@app.route('/index', subdomain="admin")
def admin_index():
    return "admin.aaa.com"

 @app.route('/index',subdomain="www")
 def admin_index():
      return "www.aaa.com"


if __name__ == '__main__':
    app.run()
扩展url,自定义URL匹配正则表达式。
from flask import Flask,url_for

app = Flask(__name__)

# 定义转换的类
from werkzeug.routing import BaseConverter
class RegexConverter(BaseConverter):
    """
    自定义URL匹配正则表达式
    """

    def __init__(self, map, regex):
        super(RegexConverter, self).__init__(map)
        self.regex = regex

    def to_python(self, value):
        """
        路由匹配时,匹配成功后传递给视图函数中参数的值
        :param value:
        :return:
        """
        return int(value)

    def to_url(self, value):
        """
        使用url_for反向生成URL时,传递的参数经过该方法处理,返回的值用于生成URL中的参数
        :param value:
        :return:
        """
        val = super(RegexConverter, self).to_url(value)
        return val

# 添加到converts中
app.url_map.converters['xxx'] = RegexConverter

# 进行使用
@app.route('/index/<xxx("d+"):nid>',endpoint='xx')
def index(nid):
    url_for('xx',nid=123)
    return "Index"

if __name__ == '__main__':
    app.run()
视图:
Django:
FBV: /index/ func 对应函数
CBV: /index/ IndexClass.as_view() 对应类
Flask也支持CBV:
from flask import Flask,url_for,views

app = Flask(__name__)

def auth(func):
    def inner(*args, **kwargs):
        result = func(*args, **kwargs)
        return result
    return inner

class IndexView(views.MethodView):
    # methods = ['POST']

    decorators = [auth,]   #装饰器

    def get(self):
        v = url_for('index')    #反向生成url
        print(v)
        return "GET"

    def post(self):
        return "GET"

app.add_url_rule('/index', view_func=IndexView.as_view(name='index'))

if __name__ == '__main__':
    app.run()
模板语言:
1.模板继承
#模板页面:layout.html
<!DOCTYPE html>
<html lang="en">
<head>
    <meta charset="UTF-8">
    <meta http-equiv="X-UA-Compatible" content="IE=edge">
    <meta name="viewport" content="width=device-width, initial-scale=1">
    <title>Title</title>
</head>
<body>
    <h1>模板</h1>
    {% block body %}

    {% endblock %}
</body>
</html>


继承的页面: index.html
{% extends "layout.html" %}

{% block body %}
    {{v1}}
    <ul>
        {% for item in v2%}
        <li>
        {{item}}
        </li>
        {% endfor %}
        {{v2.0}}
        {{v2.1}}
        {{v2.2}}
    </ul>

    <ul>
        {% for key,val in v3.items() %}
        <li>{{key}}:{{val}}</li>
        {% endfor%}

        {% for k in v3.items() %}
        <li>{{k.0,k.1}}</li>
        <li>{{k}}</li>
        {% endfor%}

        {% for k in v3 %}
        <li>{{k}}</li>
        {% endfor%}

        {% for k in v3.values() %}
        <li>{{k}}</li>
        {% endfor%}
    </ul>

    {{v3.name}}:{{v3.age}}
    {{v3.get('name')}}
    {{v3.get('age')}}
    {{v4}}
    {{v4|safe}}
    {{test(1,19)}}
    {{sb(50,50)}}
    {{50|db(100,100)}}

    {% macro xxxx(name, type='text', value='') %}
        <input type="{{ type }}" name="{{ name }}" value="{{ value }}">
        <input type="{{ type }}" name="{{ name }}" value="{{ value }}">
        <input type="{{ type }}" name="{{ name }}" value="{{ value }}">
        <input type="{{ type }}" name="{{ name }}" value="{{ value }}">
    {% endmacro %}

    {{ xxxx('n1') }}

{% endblock %}
2.模板语言.py
from flask import Flask,render_template,Markup

app = Flask(__name__)

def test(a1,a2):
    return a1+a2

@app.template_global()  #公共资源  前端的用法:  {{sb(100,100)}}
def sb(a1, a2):
    return a1 + a2 + 100


@app.template_filter()  #公共资源  前端的用法:  {{1|db(100,100)}}
def db(a1, a2, a3):
    return a1 + a2 + a3

@app.route('/index2')
def index():
    v1 = "字符串"
    v2 = [11,22,33]
    v3 = {'name':'zbk','age':18}
    v4 = Markup("<input type='text' / >")
    return render_template('index2.html',v1=v1,v2=v2,v3=v3,v4=v4,test=test)

if __name__ == '__main__':
    app.run()
前端:index2.html
{% extends "layout.html" %}

{% block body %}
    {{v1}}
    <ul>
        {% for item in v2%}
        <li>
        {{item}}
        </li>
        {% endfor %}
        {{v2.0}}
        {{v2.1}}
        {{v2.2}}
    </ul>

    <ul>
        {% for key,val in v3.items() %}
        <li>{{key}}:{{val}}</li>
        {% endfor%}

        {% for k in v3.items() %}
        <li>{{k.0,k.1}}</li>
        <li>{{k}}</li>
        {% endfor%}

        {% for k in v3 %}
        <li>{{k}}</li>
        {% endfor%}

        {% for k in v3.values() %}
        <li>{{k}}</li>
        {% endfor%}
    </ul>

    {{v3.name}}:{{v3.age}}
    {{v3.get('name')}}
    {{v3.get('age')}}
    {{v4}}
    {{v4|safe}}
    {{test(1,19)}}
    {{sb(50,50)}}
    {{50|db(100,100)}}


  # 宏
    {% macro xxxx(name, type='text', value='') %}
        <input type="{{ type }}" name="{{ name }}" value="{{ value }}">
        <input type="{{ type }}" name="{{ name }}" value="{{ value }}">
        <input type="{{ type }}" name="{{ name }}" value="{{ value }}">
        <input type="{{ type }}" name="{{ name }}" value="{{ value }}">
    {% endmacro %}

    {{ xxxx('n1') }}

{% endblock %}
Session:
from flask import Flask,session
from werkzeug.local import LocalProxy
app = Flask(__name__)
app.secret_key = 'asdadas'
app.config['SESSION_COOKIE_NAME'] = 'session_zbk'
"""
'SESSION_COOKIE_NAME':                  'session',
'SESSION_COOKIE_DOMAIN':                None,   支持的域名
'SESSION_COOKIE_PATH':                  None,
'SESSION_COOKIE_HTTPONLY':              True,
'SESSION_COOKIE_SECURE':                False,
'SESSION_REFRESH_EACH_REQUEST':         True,
'PERMANENT_SESSION_LIFETIME':           timedelta(days=31)  是否每次都更新
"""


@app.route('/index3')
def index():
    # print(type(session))
    # session本质上操作的是字典,假设session保存在数据库
    # session['xxx'] = 123
    # session['xx1'] = 123
    # session['xx2'] = 123
    # session['xx3'] = 123
    # del session['xx2']
    session['xx3'] = 123
    return 'xxx'
闪现flash:
它是基于session创建的,flash往里面放个值,只要取一下就没了,
说简单点:就是session取值的时候就不是读取了,而是POP了。
from flask import Flask,session,Session,flash,get_flashed_messages,redirect,render_template,request
app = Flask(__name__)
app.secret_key ='sdfsdfsdf'

@app.route('/users')
def users():
    # msg = request.args.get('msg','')
    # msg = session.get('msg')
    # if msg:
    #     del session['msg']

    v = get_flashed_messages()
    print(v)
    msg = ''
    return render_template('users.html',msg=msg)

@app.route('/useradd')
def user_add():
    # 在数据库中添加一条数据
    # 假设添加成功,在跳转到列表页面时,显示添加成功
    # return redirect('/users?msg=添加成功')
    # session['msg'] = '添加成功'

    flash('添加成功')
    return redirect('/users')


if __name__ == '__main__':
    app.run()
扩展:类似装饰器,中间件。
from flask import Flask,session,Session,flash,get_flashed_messages,redirect,render_template,request
app = Flask(__name__)
app.secret_key ='sdfsdfsdf'

@app.before_request
def process_request1():
    print('process_request1')

@app.after_request
def process_response1(response):
    print('process_response1')
    return response


@app.before_request
def process_request2():
    print('process_request2')

@app.after_request
def process_response2(response):
    print('process_response2')
    return response


@app.route('/index')
def index():
    print('index')
    return 'Index'

@app.route('/order')
def order():
    print('order')
    return 'order'

# @app.route('/test')
# def test():
#     print('test')
#     return 'test'

if __name__ == '__main__':
    app.run()
Flask : 文件配置
1.文件参考
2.app.py:
from flask import Flask,session,current_app

# 创建配置,  Config 从实例化的时候就开始有了。
app = Flask(__name__)

app.secret_key ='sdfsdfsdf'

# 方式一:缺点:都在一个文件下
# app.config['SESSION_COOKIE_NAME'] = 'session_zbk'  #
# 方式二:优点; 分离开,不在文件下
# app.config.from_pyfile('settings.py')
#settings下的.print(app.config['AAAA'])
# 方式三:优点:django也是这么做的。谁读取文件,可以隔离开。
# import os
# os.environ['FLAKS-SETTINGS'] = 'settings.py'
# app.config.from_envvar('FLAKS-SETTINGS')
# 方式四:常用 .如果是python2 是 string, import_string    如果是python3 是  encode.  推荐用第四种,优点:不需要导入。
# app.config.from_object('settings.DevConfig')


@app.route('/index',endpoint='xx')
def index():
    print(current_app.config) #current_app:不管views视图函数在哪,都可以找到。
    session['xx3'] = 123
    return "xxx"

if __name__ == '__main__':
    # app.__call__
    app.run()
3.settings.py:
class BaseConfig(object):
    AAAA=123

class TestConfig(BaseConfig):
    DB = '127.0.0.1'

class DevConfig(BaseConfig):
    DB = '192.168.1.1'

class ProConfig(BaseConfig):
    DB = '47.18.1.1'
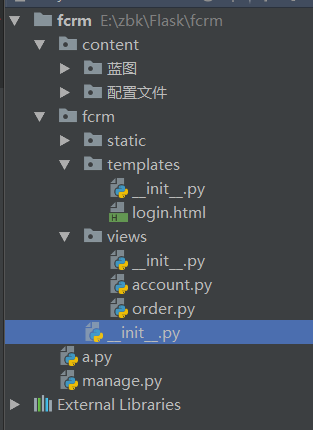
蓝图:
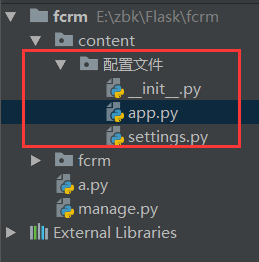
作用:原本是一个文件,但是业务代码太多,我们就需要分类了。不同的东西放在不同的文件。
在flask中,凡是多py文件需要拆分的,都应该用蓝图来做。把目录结构做一个调整。
action:
manage.py: 启动文件
import fcrm

if __name__ == '__main__':
    fcrm.app.run()
__init__.py : 内部关联条件
from flask import Flask
from .views import account
from .views import order
# __init__  表示:导入这个模块它就导入了,执行了

app = Flask(__name__)
print(app.root_path)
app.register_blueprint(account.account)
app.register_blueprint(order.order)
account.py: 账户相关
from flask import  Blueprint,render_template

account = Blueprint('pap_account',__name__)

@account.route('/login')
def login():
    return render_template('login.html')
order.py : 订单相关
from flask import  Blueprint

order = Blueprint('pap_order',__name__)

@order.route('/order')
def login():
    return 'Order'
小结: 通过蓝图,可以调整我们的目录结构,把不同的东西都拆分,放在另一个文件。
数据库连接池:
3个过程:
1.第一步,每次请求反复创建数据库连接。 缺点:连接数太多
解决方法: 把连接放到全局下。
from flask import Flask
from db import POOL
import pymysql
app = Flask(__name__)
app.secret_key ='sdfsdfsdf'
conn = pymysql.connect()   #放在全局下

@app.route('/index')
def index():
    # 第一步:缺点:每次请求反复创建数据库连接,连接数太多

     cursor = conn.cursor()
     cursor.execute('select * from tb where id > %s',[5,])
     result = cursor.fetchall()
     cursor.close()
     conn.close()
     print(result)


    return '执行成功'


if __name__ == '__main__':
    # app.__call__
    app.run()
2.第二步:如果是多线程的话,pymysql只知道同一时刻,只处理一个线程。因为,源代码有个 theadsafety = 1 缺点:不能支持并发
解决方法:加把锁,强制实现串行。 只有第一个线程执行完了,另一个线程才能进来。所以这样一来,也支持多线程。
from flask import Flask
from db import POOL
import pymysql
app = Flask(__name__)
app.secret_key ='sdfsdfsdf'


@app.route('/index')
def index():
    # 第一步:缺点:每次请求反复创建数据库连接,连接数太多
    # conn = pymysql.connect()
    # cursor = conn.cursor()
    # cursor.execute('select * from tb where id > %s',[5,])
    # result = cursor.fetchall()
    # cursor.close()
    # conn.close()
    # print(result)

    # 第二步:缺点,不能支持并发
     pymysql.threadsafety
     with LOCK:
         cursor = CONN.cursor()
         cursor.execute('select * from tb where id > %s', [5, ])
         result = cursor.fetchall()
         cursor.close()

         print(result)


    return '执行成功'


if __name__ == '__main__':
    # app.__call__
    app.run()
3.第三步: 支持多线程,但是,不能并发操作。 以上两部是两个极端,所以我们得折中一下。
python里面并没有解决方案,我们需要引入第三方模块。该模块为: pip3 install dbutils
from flask import Flask
from db import POOL
import pymysql
app = Flask(__name__)
app.secret_key ='sdfsdfsdf'


@app.route('/index')
def index():
    # 第一步:缺点:每次请求反复创建数据库连接,连接数太多
    # conn = pymysql.connect()
    # cursor = conn.cursor()
    # cursor.execute('select * from tb where id > %s',[5,])
    # result = cursor.fetchall()
    # cursor.close()
    # conn.close()
    # print(result)

    # 第二步:缺点,不能支持并发
    # pymysql.threadsafety
    # with LOCK:
    #     cursor = CONN.cursor()
    #     cursor.execute('select * from tb where id > %s', [5, ])
    #     result = cursor.fetchall()
    #     cursor.close()
    #
    #     print(result)

    # 第三步:基于DBUtils实现数据连接池
    #         - 为没个线程创建一个连接,该线程关闭时,不是真正关闭;本线程再次调用时,还是使用的最开始创建的连接。直到线程终止,数据库连接才关闭。
    #         - 创建一个连接池(10个连接),为所有线程提供连接,使用时来进行获取,使用完毕后,再次放回到连接池。
    #         PS:
    conn = POOL.connection()
    cursor = conn.cursor()
    cursor.execute('select * from tb1')
    result = cursor.fetchall()
    conn.close()


    return '执行成功'


if __name__ == '__main__':
    # app.__call__
    app.run()
dbutils有两种模式:
模式一:为每一个线程创建一个连接。如果一个线程反复去连接数据库的时候,始终用的是属于自己的那一个连接。 close并没有真的关闭,是一个伪关闭。线程终止了才会关闭。
"""
为每个线程创建一个连接,thread.local实现。


"""

from DBUtils.PersistentDB import PersistentDB
import pymysql

POOL = PersistentDB(
    creator=pymysql,  # 使用链接数据库的模块
    maxusage=None,  # 一个链接最多被重复使用的次数,None表示无限制
    setsession=[],  # 开始会话前执行的命令列表。如:["set datestyle to ...", "set time zone ..."]
    ping=0,
    # ping MySQL服务端,检查是否服务可用。# 如:0 = None = never, 1 = default = whenever it is requested, 2 = when a cursor is created, 4 = when a query is executed, 7 = always
    closeable=False,
    # 如果为False时, conn.close() 实际上被忽略,供下次使用,再线程关闭时,才会自动关闭链接。如果为True时, conn.close()则关闭链接,那么再次调用pool.connection时就会报错,因为已经真的关闭了连接(pool.steady_connection()可以获取一个新的链接)
    threadlocal=None,  # 本线程独享值得对象,用于保存链接对象,如果链接对象被重置
    host='127.0.0.1',
    port=3306,
    user='root',
    password='123',
    database='pooldb',
    charset='utf8'
)


def func():
    # conn = SteadyDBConnection()
    conn = POOL.connection()
    cursor = conn.cursor()
    cursor.execute('select * from tb1')
    result = cursor.fetchall()
    cursor.close()
    conn.close() # 不是真的关闭,而是假的关闭。 conn = pymysql.connect()   conn.close()

    conn = POOL.connection()
    cursor = conn.cursor()
    cursor.execute('select * from tb1')
    result = cursor.fetchall()
    cursor.close()
    conn.close()

import threading

for i in range(10):
    t = threading.Thread(target=func)
    t.start()
模式二:创建一个连接池,为所有线程提供连接,线程使用完毕,就把连接重新放回到连接池里。 连接池所有的连接都会被重复使用。theadsafety = 1
import time
import pymysql
import threading
from DBUtils.PooledDB import PooledDB, SharedDBConnection
POOL = PooledDB(
    creator=pymysql,  # 使用链接数据库的模块
    maxconnections=6,  # 连接池允许的最大连接数,0和None表示不限制连接数
    mincached=2,  # 初始化时,链接池中至少创建的空闲的链接,0表示不创建


    maxcached=5,  # 链接池中最多闲置的链接,0和None不限制
    maxshared=3,  # 链接池中最多共享的链接数量,0和None表示全部共享。PS: 无用,因为pymysql和MySQLdb等模块的 threadsafety都为1,所有值无论设置为多少,_maxcached永远为0,所以永远是所有链接都共享。
    blocking=True,  # 连接池中如果没有可用连接后,是否阻塞等待。True,等待;False,不等待然后报错
    maxusage=None,  # 一个链接最多被重复使用的次数,None表示无限制
    setsession=[],  # 开始会话前执行的命令列表。如:["set datestyle to ...", "set time zone ..."]
    ping=0,
    # ping MySQL服务端,检查是否服务可用。# 如:0 = None = never, 1 = default = whenever it is requested, 2 = when a cursor is created, 4 = when a query is executed, 7 = always
    host='127.0.0.1',
    port=3306,
    user='root',
    password='123',
    database='pooldb',
    charset='utf8'
)


def func():
    # 检测当前正在运行连接数的是否小于最大链接数,如果不小于则:等待或报raise TooManyConnections异常
    # 否则
    # 则优先去初始化时创建的链接中获取链接 SteadyDBConnection。
    # 然后将SteadyDBConnection对象封装到PooledDedicatedDBConnection中并返回。
    # 如果最开始创建的链接没有链接,则去创建一个SteadyDBConnection对象,再封装到PooledDedicatedDBConnection中并返回。
    # 一旦关闭链接后,连接就返回到连接池让后续线程继续使用。

    # PooledDedicatedDBConnection
    conn = POOL.connection()

    # print(th, '链接被拿走了', conn1._con)
    # print(th, '池子里目前有', pool._idle_cache, '
')

    cursor = conn.cursor()
    cursor.execute('select * from tb1')
    result = cursor.fetchall()
    conn.close()


    conn = POOL.connection()

    # print(th, '链接被拿走了', conn1._con)
    # print(th, '池子里目前有', pool._idle_cache, '
')

    cursor = conn.cursor()
    cursor.execute('select * from tb1')
    result = cursor.fetchall()
    conn.close()


func()
本地线程:
两个过程:
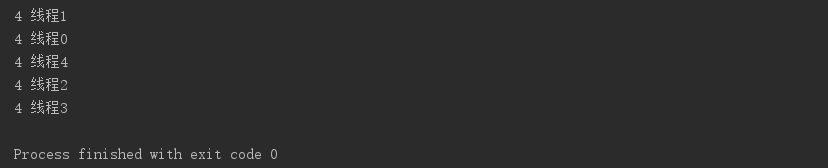
1.第一步:由于线程执行的速度快,途中sleep2秒,所有每个线程所打印的值都一样,前面打印的值都被最后一个的覆盖了。
import threading
import time
# 本地线程对象
# local_values = threading.local()

class Foo(object):
    def __init__(self):
        self.name= None
local_values = Foo()

def func(num):

    """
    # 第一个线程进来,本地线程对象会为他创建一个
    # 第二个线程进来,本地线程对象会为他创建一个
    {
        线程1的唯一标识:{name:1},
        线程2的唯一标识:{name:2},
    }
    :param num:
    :return:
    """
    local_values.name = num # 4
    # 线程停下来了
    time.sleep(2)
    # 第二个线程: local_values.name,去local_values中根据自己的唯一标识作为key,获取value中name对应的值
    print(local_values.name, threading.current_thread().name)


for i in range(5):
    th = threading.Thread(target=func, args=(i,), name='线程%s' % i)
    th.start()
打印如下;
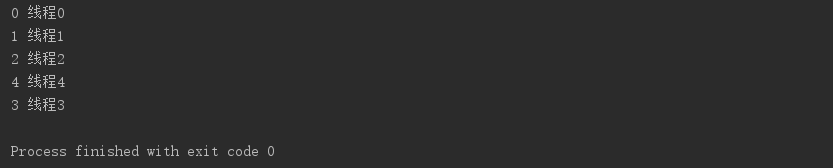
2.第二步: 本地线程能把我们做一个: 线程与线程之间的数据的隔离。
import threading
import time
# 本地线程对象
local_values = threading.local()

def func(num):

    """
    # 第一个线程进来,本地线程对象会为他创建一个
    # 第二个线程进来,本地线程对象会为他创建一个
    {
        线程1的唯一标识:{name:1},
        线程2的唯一标识:{name:2},
    }
    :param num:
    :return:
    """
    local_values.name = num # 4
    # 线程停下来了
    time.sleep(2)
    # 第二个线程: local_values.name,去local_values中根据自己的唯一标识作为key,获取value中name对应的值
    print(local_values.name, threading.current_thread().name)


for i in range(5):
    th = threading.Thread(target=func, args=(i,), name='线程%s' % i)
    th.start()
打印如下:
总结: 一下是实现了:即完成了并发,又防止无限制的连接
app.py:
from flask import Flask
from db import POOL    #导入
import pymysql
app = Flask(__name__)
app.secret_key ='sdfsdfsdf'


@app.route('/index')
def index():
    conn = POOL.connection()  #连接POOL ,即完成了并发,又防止无限制的连接

    cursor = conn.cursor()
    cursor.execute('select * from tb1')
    result = cursor.fetchall()
    conn.close()


    return '执行成功'


if __name__ == '__main__':
    # app.__call__
    app.run()
db.py:
import time
import pymysql
import threading
from DBUtils.PooledDB import PooledDB, SharedDBConnection
POOL = PooledDB(
    creator=pymysql,  # 使用链接数据库的模块
    maxconnections=6,  # 连接池允许的最大连接数,0和None表示不限制连接数
    mincached=2,  # 初始化时,链接池中至少创建的空闲的链接,0表示不创建
    maxcached=5,  # 链接池中最多闲置的链接,0和None不限制
    maxshared=3,  # 链接池中最多共享的链接数量,0和None表示全部共享。PS: 无用,因为pymysql和MySQLdb等模块的 threadsafety都为1,所有值无论设置为多少,_maxcached永远为0,所以永远是所有链接都共享。
    blocking=True,  # 连接池中如果没有可用连接后,是否阻塞等待。True,等待;False,不等待然后报错
    maxusage=None,  # 一个链接最多被重复使用的次数,None表示无限制
    setsession=[],  # 开始会话前执行的命令列表。如:["set datestyle to ...", "set time zone ..."]
    ping=0,
    # ping MySQL服务端,检查是否服务可用。# 如:0 = None = never, 1 = default = whenever it is requested, 2 = when a cursor is created, 4 = when a query is executed, 7 = always
    host='127.0.0.1',
    port=3306,
    user='root',
    password='123',
    database='pooldb',
    charset='utf8'
)
上下文处理:需要了解内部结构
本地线程:是flask里面自己创建的一个线程。它是怎么创建的?(本地线程只要用到可上下文处理的退一部分内容)
知识:
gevent 依赖于 greenlet 的协程。
from greenlet import getcurrent as get_ident
from _thread import get_ident # 获取线程的唯一标识 get_ident()
ident = self.__ident_func__() # 获取当前线程(协程)的唯一标识
storage[ident][name] = value # { 111:{'stack':[] },222:{'stack':[] } }
Local的功能跟本地线程类似: 如果有人创建一个对象,往这设置值,每个线程里都有一份。
但是,如果安装 greenlet ,那么它还是线程的唯一标识吗?它就不是线程的唯一标识了。而是 每一个协程的唯一标识了,
-------------from greenlet import getcurrent as get_ident -----=-----------------
如果装上它(greenlet),之前是一个线程创建一个连接,它是一个协程,微线程,它创建的更细了。
它就不是线程的唯一标识了。而是 每一个协程的唯一标识了。每一个线程里有多个协程。
LocalStack里面的push方法,就是往local里面添加stack.(为当前线程(协程)创建了一个stack和列表。)
    def push(self, obj):
        """Pushes a new item to the stack"""
        rv = getattr(self._local, 'stack', None)
        if rv is None:
            """
            self._local=
            {
               唯一标示: {'stack':[]}
            }
            """
            self._local.stack = rv = []
        rv.append(obj)
        return rv
    def pop(self):
        """Removes the topmost item from the stack, will return the
        old value or `None` if the stack was already empty.
        """
        # []
        stack = getattr(self._local, 'stack', None)     #getattr把stack拿回来了,是一个列表
        if stack is None:
            return None
        elif len(stack) == 1:
            #release_local(self._local)
            return stack[-1]    #把列表的一个值拿回来。如果有一个就拿最后一个,多个就pop出来。
        else:
            return stack.pop()
    @property
    def top(self):
        """The topmost item on the stack.  If the stack is empty,
        `None` is returned.
        """
        try:
            return self._local.stack[-1]    #只取一个,并没有删。
        except (AttributeError, IndexError):
            return None
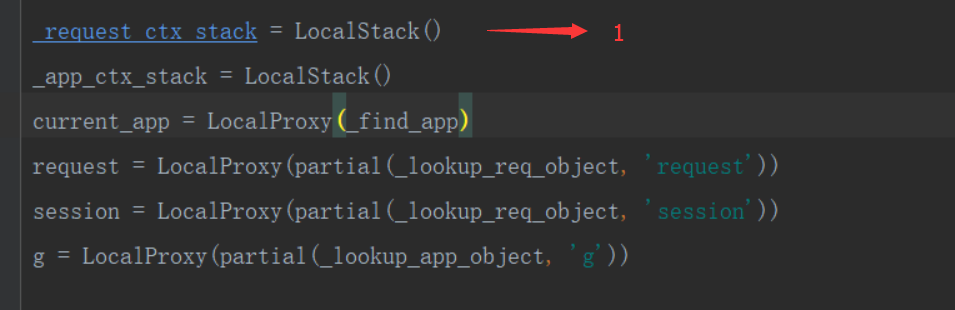
_request_ctx_stack = LocalStack() #实力化一个对象
小结:
class Local:这个类用来保存每一个线程或者协程的值。
class LocalStack: 去列表里面的取值。
当程序运行起来,就会在创建一个stack对象,localstack封装一个自己的local对象。local对象就相当于一个字典。
利用flask源码中的stack和local。
from functools import partial
from flask.globals import LocalStack, LocalProxy

_request_ctx_stack = LocalStack()


class RequestContext(object):    #请求相关
    def __init__(self, environ):
        self.request = environ


def _lookup_req_object(name):
    top = _request_ctx_stack.top
    if top is None:
        raise RuntimeError(_request_ctx_stack)
    return getattr(top, name)


# 实例化了LocalProxy对象,_lookup_req_object参数传递
session = LocalProxy(partial(_lookup_req_object, 'session'))


"""
local = {
    “标识”: {'stack': [RequestContext(),]}
}
"""
_request_ctx_stack.push(RequestContext('c1'))  # 当请求进来时,放入

print(session)  # 获取 RequestContext('c1'), top方法
print(session)  # 获取 RequestContext('c1'), top方法
_request_ctx_stack.pop()  # 请求结束pop
小结: flask里的request,session都是pop原理。相当于连接池。
补充 : 源代码。
ctrl+request

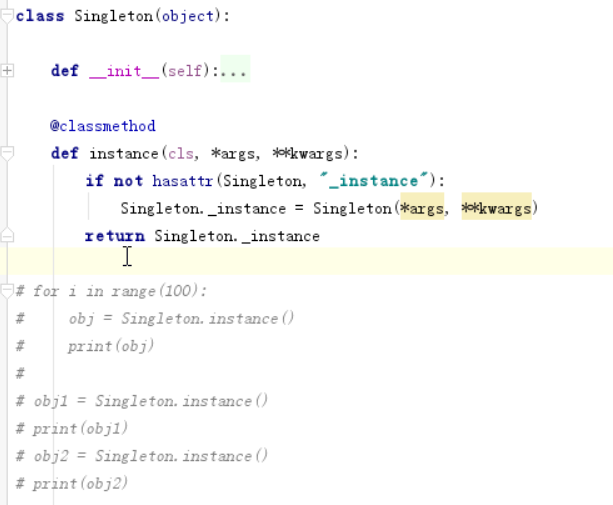
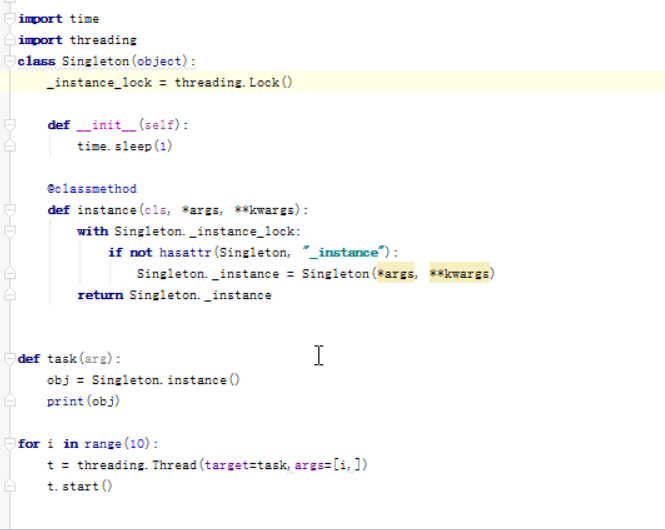
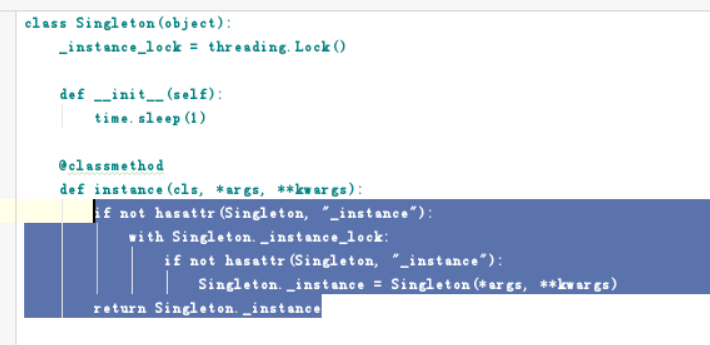
单例模式: