基本概念
本文使用squid代理服务
软件介绍:百度百科
作为应用层的代理服务软件,Squid主要提供缓存加速、应用层过滤控制的功能;
工作机制:缓存网页对象,减少重复请求(HTTP代理的缓存加速对象主要为文字、图像等静态Web元素);
代理类型:
- 传统代理:适用于Internet,需明确指定服务端;
- 透明代理:适用于共享上网网关,不需指定服务端;
使用代理的优点:
- 提高Web访问速度;
- 隐藏客户机的真实IP地址;
其他可以实现数据缓存的软件:
本文不过多介绍
编译安装Squid软件&&基本使用
软件软件下载地址:http://www.squid-cache.org/
1.编译安装软件
tar zxvf squid-3.4.6.tar.gz -C /usr/src/  //解包
cd /usr/src/squid-3.4.6/
./configure --prefix=/usr/local/squid --sysconfdir=/etc/ --enable-arp-acl --enable-linux-netfiulter --enable-linux-tproxy --enable-async-io=100 --enable-err-language="Simplify_Chinese" --enable-underscore --enable-poll --enable-gunregex    //配置,更多配置可以参考"./configure --help"
make && make install  //编译并安装


ln -s /usr/local/squid/sbin/* /usr/local/sbin/  #优化执行路径

useradd -M -s /sbin/nologin squid  #创建程序用户

chown -R squid:squid /usr/local/squid/var/  #更改指定目录额属主和属组
chmod -R 757 /usr/local/squid/var/  #修改指定目录的权限,以便写入日志
配置项说明:


--prefix=/usr/local/squid            //安装目录;
--sysconfdir=/etc/                 //单独将配置文件修改到其他目录下;
--enable-arp-acl                 //可以在规则中设置直接通过客户端MAC进行管理,防止客户端使用IP欺骗;
--enable-linux-netfiulter             //使用内核过滤;
--enable-linux-tproxy                 //支持透明模式;
--enable-async-io=100                 //异步I/O,提升存储性能,相当于--enable-pthreads  --enable-storeis=ufs,aufs  --with-pthreads  --with-aufs-thread=值;
--enable-err-language="Simplify_Chinese"     //错误信息的显示语言;
--enable-underscore                 //允许URL中有下划线;
--enable-poll                     //使用Poll()模式,提升性能;
--enable-gunregex                //使用GNU正则表达式;
配置文件内容:
位置::/etc/squid.conf(更详细的配置项请参考/etc/squid.conf.documented文件)
#
# Recommended minimum configuration:
#

# Example rule allowing access from your local networks.
# Adapt to list your (internal) IP networks from where browsing
# should be allowed
acl localnet src 10.0.0.0/8    # RFC1918 possible internal network
acl localnet src 172.16.0.0/12    # RFC1918 possible internal network
acl localnet src 192.168.0.0/16    # RFC1918 possible internal network
acl localnet src fc00::/7       # RFC 4193 local private network range
acl localnet src fe80::/10      # RFC 4291 link-local (directly plugged) machines

acl SSL_ports port 443
acl Safe_ports port 80        # http
acl Safe_ports port 21        # ftp
acl Safe_ports port 443        # https
acl Safe_ports port 70        # gopher
acl Safe_ports port 210        # wais
acl Safe_ports port 1025-65535    # unregistered ports
acl Safe_ports port 280        # http-mgmt
acl Safe_ports port 488        # gss-http
acl Safe_ports port 591        # filemaker
acl Safe_ports port 777        # multiling http
acl CONNECT method CONNECT

#
# Recommended minimum Access Permission configuration:
#
# Deny requests to certain unsafe ports
http_access deny !Safe_ports

# Deny CONNECT to other than secure SSL ports
http_access deny CONNECT !SSL_ports

# Only allow cachemgr access from localhost
http_access allow localhost manager
http_access deny manager

# We strongly recommend the following be uncommented to protect innocent
# web applications running on the proxy server who think the only
# one who can access services on "localhost" is a local user
#http_access deny to_localhost

#
# INSERT YOUR OWN RULE(S) HERE TO ALLOW ACCESS FROM YOUR CLIENTS
#

# Example rule allowing access from your local networks.
# Adapt localnet in the ACL section to list your (internal) IP networks
# from where browsing should be allowed
http_access allow localnet
http_access allow localhost

# And finally deny all other access to this proxy
http_access deny all

# Squid normally listens to port 3128
http_port 3128            //用来指定代理服务监听的地址和端口(默认端口为3128)

# Uncomment and adjust the following to add a disk cache directory.
#cache_dir ufs /usr/local/squid/var/cache/squid 100 16 256

# Leave coredumps in the first cache dir
coredump_dir /usr/local/squid/var/cache/squid

#
# Add any of your own refresh_pattern entries above these.
#
refresh_pattern ^ftp:        1440    20%    10080
refresh_pattern ^gopher:    1440    0%    1440
refresh_pattern -i (/cgi-bin/|?) 0    0%    0
refresh_pattern .        0    20%    4320
Squid运行控制:
squid -k parse //检查配置文件语法是否正确
squid //开启服务
squid -k kill //停止服务
squid -z //初始化缓存目录(清理缓存目录**服务停止的情况下)
更多的使用方法请参考:http://linux.51yip.com/search/squid
创建Squid服务脚本:
github address:https://github.com/spdir/ShellScripts/blob/master/squid.sh
#!/bin/bash
# chkconfig: 2345 90 25     #可以使用-,-的意思是所有运行级别
# config: /etc/squid.conf
# pidfile: /usr/local/squid/var/run/squid.pid
# Description: Squid - Internet Object Cache

PID="/usr/local/squid/var/run/squid.pid"   #程序运行才会有pid文件,反之则无
CONF="/etc/squid.conf"
CMD="/usr/local/squid/sbin/squid"

case "$1" in
    start)
        netstat -anpt | grep squid $> /dev/null
        if [ $? -eq 0 ]
            then
                echo "Squid is running"
            else
            $CMD
        fi
        ;;
    stop)
        $CMD -k kill $> /dev/null       #调用squid命令停止服务
        rm -rf $PID $> /dev/null        #删除pid文件
        ;;
    status)
        [ -f $PID ] &> /dev/null        #检测pid文件是否存在
        if [ $? -eq 0 ]                 #假如文件存在则0等于0,执行netstat命令展示端口
            then
                netstat  -aupt | grep squid
            else
                echo "Squid is not running"
        fi
        ;;
    restart)
        $0 stop $> /dev/null            #注意:$0 stop的意思是调用之前定义的stop
        echo "正在关闭Squid..."
        $0 start $> /dev/null
        echo "正在启动Squid..."
        ;;
    reload)
        $CMD -k reconfigure             #重新加载,但不中断服务,配置更改后,建议用这种方式加载
        ;;
    check)
        $CMD -k parse                   #检查配置文件语法是否错误
        ;;
    *)
        echo "用法:$0 {start | stop | restart | reload | check | status}"   # $0代表脚本名字/etc/squid.conf的用法
        ;;
esac
将这个文件放到/etc/init.d/目录下并命名为squid
chmod +x /etc/init.d/squid  //赋予执行权限
chkconfig --add squid  //添加到系统服务
chkconfig squid on
这样我们就可以通过squid脚本来启动、停止、重启、重载Squid服务了。
构建传统代理服务
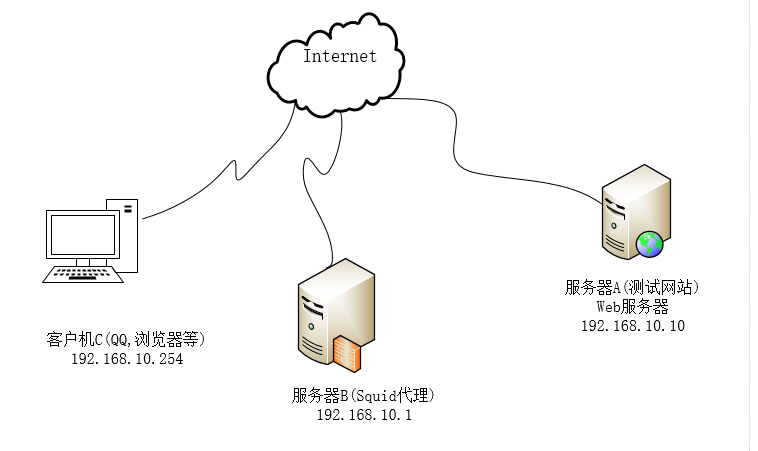
案例环境说明:
- 主机B提供Web代理服务
- 主机C通过代理访问主机A的网站
Squid服务器配置:
vim /etc/squid.conf     //修改配置文件

    省略......
    http_access allow all        //放在http_access deny all 之前
    http_port 3128
    reply_body_max_size 10 MB    //允许下载的最大文件大小(10MB)[可选]
    省略......
在防火墙中添加允许策略:(在实验环境中可以选择直接关闭防火墙)
iptables -I INPUT -p tcp --dport 3128 -j ACCEPT
service iptables save
 iptables:将防火墙规则保存到 /etc/sysconfig/iptables:     [确定]
重载Squid服务
service squid reload
客户机的代理配置
windows客户端:

linux客户端:
vim /etc/profile
http_proxy=http://192.168.10.1:3128 # 分别指定http、https、ftp协议使用的代理服务器地址

https_proxy=http://192.168.10.1:3128

ftp_proxy=http://192.168.10.1:3128

no_proxy=192.168.10. # 访问局域网地址(192.168.20.0/24网段)时不使用代理,可以用逗号分隔多个地址

export http_proxy https_proxy ftp_proxy no_proxy
source /etc/profile //立即生效
代理服务的验证方式:
在客户机192.168.10.254中通过浏览器访问目标网站 http://192.168.10.10/ 然后观察Squid代理服务器、Web服务器的访问日志,以验证代理服务是否发挥作用。
构建透明代理

案例环境说明:
- Linux网关提供透明代理服务
- 局域网通过代理访问Internet中的网站
配置Squid支持透明代理:
vim /etc/squid.conf    //修改squid配置文件
    省略......
    http_port 192.168.10.1:3128 tranparent    //只在其中一个IP地址上提供服务
    省略......
设置iptables的重定向策略
REDIRETC也是一种数据包控制类型,只能在nat表的PREROUTIN或OUTPUT链以及被调用的链中使用,通过"--to-prots 端口号"的形式来指定映射的目标端口。
iptables -t nat -I PREROUTING - eth1 -s 192.168.10.0/24 -p tcp --dport 80 -j REDIRECT --to-prots 3128            //http
iptables -t nat -I PREROUTING - eth1 -s 192.168.10.0/24 -p tcp --dport 443 -j REDIRECT --to-prots 3128            //https
service iptables save
  iptables:将防火墙规则保存到 /etc/sysconfig/iptables:     [确定]
3.验证透明代理的使用
为了验证透明代理的效果,如果手动指定的代理服务器设置应在客户机中将其去除。
linux客户机中的取出方式通过Unset命令清除http_proxy,https_proxy
unset http_proxy https_proxy
验证方式:(和传统的方式相同)
在客户机192.168.10.254中通过浏览器访问目标网站 http://192.168.10.10/ 然后观察Squid代理服务器、Web服务器的访问日志,以验证代理服务是否发挥作用。
未完待续......