Kindeditor富文本编辑器还算比较好上手的一款插件吧,下面记录一下我在学习和实践中遇到的那些坑。
编辑器初始化方法和参数网上一搜一大把,不想搜的点这里,文档上各个参数已经写得很清楚了,直接拿过来用就OK
开始说一些实际用到时的一些需求。
1、插入链接时增加链接标题的输入框
初始化的Kindeditor插入链接时是这样的
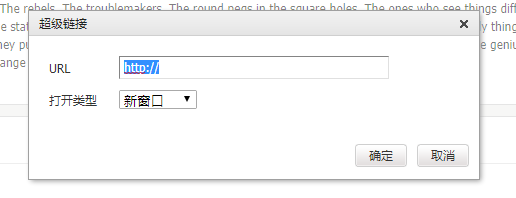
只能输入链接地址,不能输入链接文字,其实Kindeditor默认做法是,如果你在编辑其中没有选中内容,他就默认把链接地址设为链接文本,有选中的内容则自动提取选中内容为链接文本,其实这样做也是挺方便的,可是不是所有的用户都很聪明,根据产品经理的意思,为了获取更好的用户体验,必须要在弹出框中让用户自己填写链接文本,好吧,我改!
然后开始了各种摆渡,终于找到了一遍文章。具体操作方法如下:
修改方法如下:
第一步:修改lang/zh-cn.js,大约114行处增加
'link.linkTitle' : '链接标题',
第二步:修改plugins/link/link.js,增加红色处内容:
第1处:
html = '<div style="padding:20px;">' +
//title
 '<div class="ke-dialog-row">' +
'<label for="keTitle" style="60px;">' + lang.linkTitle + '</lable>' +
 '<input class="ke-input-text" type="text" id="keTitle" name="title" value="" style="260px;" /></div>' +
//url
 第2处:
yesBtn: {
            name: self.lang('yes'),
            click: function (e) {
                var title = K.trim(titleBox.val());
                var url = K.trim(urlBox.val());
                if (url == 'http://' || K.invalidUrl(url)) {
                    alert(self.lang('invalidUrl'));
                    urlBox[0].focus();
                    return;
                }
                self.exec('createlink', title, url, typeBox.val()).hideDialog().focus();
            }
        }
第3处:
div = dialog.div,
titleBox = K('input[name="title"]', div),
urlBox = K('input[name="url"]', div),
第4处:
if (a) {
                self.cmd.range.selectNode(a[0]);
                self.cmd.select();
                titleBox.val(a.attr('title'));
                urlBox.val(a.attr('data-ke-src'));
                typeBox.val(a.attr('target'));
}
第三步:修改kindeditor.js
第1处:
找到 createlink: function (title, url, type) { //其中title参数是另加的
第2处:
var html = '<a href="' + _escape(url) + '" data-ke-src="' + _escape(url) + '" title="' + _escape(title) + '"';
第3处:
if (range.collapsed) {
                html += '>' + _escape(title) + '</a>'; // 原先是_escape(url)
                return self.inserthtml(html);
}
第4处:
K('a[href="__kindeditor_temp_url__"]', doc).each(function () {
                K(this).attr('href', url).attr('data-ke-src', url).attr('title', title); //增加处
                if (type) {
                    K(this).attr('target', type);
                } else {
                    K(this).removeAttr('target');
                }
            });

到此完成
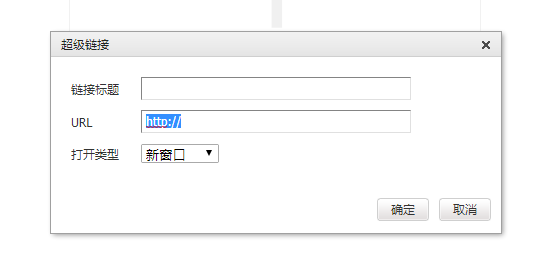
修改过后是这样的
ok,完美,到此修改完成,但是要注意的是如果你页面引用的是压缩后的js文件,那么你就必须重新压缩一下修改过的all.js替换一下就ok了。
2、设置宽度width好像不好使(反正我没弄出好的来)
一开始查文档,文档上写的很清楚
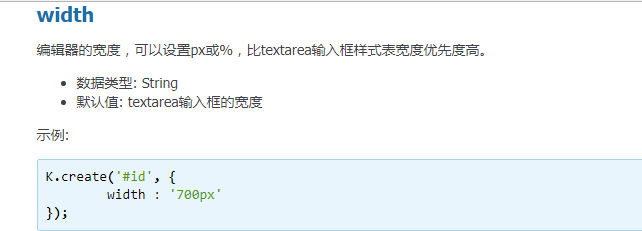
可是,我整半天都没整出来,然后又去翻看文档了,有重大发现
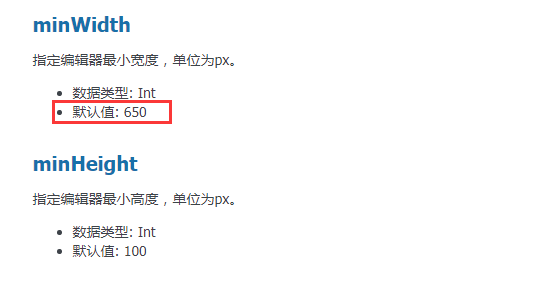
哈哈,自己都想打自己了,看来还是要好好看文档,这家伙藏太深一时没注意,修改了minWidth之后就ok了。
3、应产品经理要求,页面编辑器不要出现滚动条
想让编辑器横向不出现滚动条可以,so easy,文章中有参数可以设置
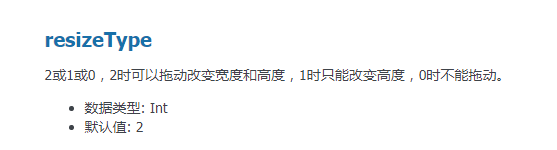
把resizeType:0或者1都可以实现,竖向滚动条这么弄,添加autoHeightMode这个参数,并设置为true就ok了。
4、限制编辑器内图片的显示大小
由于业务需要,用户上传的图片宽度可能会大过编辑器的宽度,可是想要图片在编辑器中显示的宽度不能超过编辑器的宽度,怎么整?再次研究文档发现cssData这个参数可以设置编辑器内文档页面的样式,哦哦,瞬间有想法了

那我只要只设置编辑器整个文档内图片的最大宽度就ok了
5、无法设置编辑器内默认提示文字
怎么办,怎么办,自己加吧。
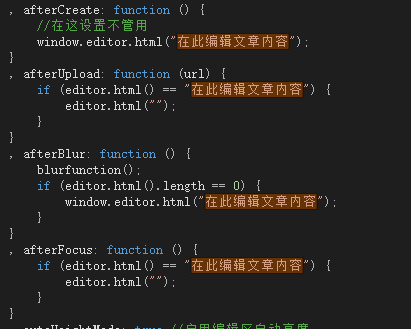
最先初始化时不能再afterCreate这个回调函数中设置,必须在 window.onload方法中设置,整理之后的完整代码如下:
  KindEditor.ready(function (K) {
            window.editor = K.create('#editor_id', {
                 '432px',
                minWidth: '100',
                minHeight: '200'
                , items: ['fontsize', 'forecolor', 'bold', 'italic', 'underline', 'image', 'link', 'unlink']
                , newlineTag: "br"//换行符
                , pasteType: 1//纯文本粘贴
                , resizeType: 0
                , fixToolBar: true
                , fillDescAfterUploadImage: false
                , uploadJson: "UserUploadImg.aspx?uploadimg=yes"
                , allowImageRemote: false
                , afterUpload: function (url) {
                    if (editor.html() == "在此编辑文章内容") {
                        editor.html("");
                    }
                }
                , afterBlur: function () {
                    blurfunction();
                    if (editor.html().length == 0) {
                        window.editor.html("在此编辑文章内容");
                    }
                }
                , afterFocus: function () {
                    if (editor.html() == "在此编辑文章内容") {
                        editor.html("");
                    }
                }
                , autoHeightMode: true //启用编辑区自动高度
                , cssData: "body img{ max-400px}"
            });
        });
        window.onload = function () {
          window.editor.html("在此编辑文章内容");
        }
6、编辑器获取焦点或者添加图片,粘贴时总是返回顶部
其实发生这个错误是应为 newlineTag: "br" 这个参数,不知道什么原因插件没有处理好,好吧自己改吧
 1  pos: function () {
 2             var self = this, node = self[0], x = 0, y = 0;
 3             if (node) {
 4                 if (node.getBoundingClientRect) {
 5                     var box = node.getBoundingClientRect(),
 6                         pos = _getScrollPos(self.doc);
 7                     x = box.left + pos.x;
 8                     //y = box.top + pos.y;
 9                     y = (parseInt(box.top) < 0 ? 0 : box.top) + pos.y;
10                 } else {
11                     while (node) {
12                         x += node.offsetLeft;
13                         y += node.offsetTop;
14                         node = node.offsetParent;
15                     }
16                 }
17             }
18             return { x: _round(x), y: _round(y) };
19         }
在all.js文件中找到并替换就ok了。