笔者通过查阅相关资料,了解了BeagleBoneBlack开发板的UART接口特性,掌握的UART接口的基本使用方法,最后通过一个C语言的例程实现串口的自发自收。有了这个串口开发板就可和其他设备进行串口通信了,比如可以将单片机通过串口挂在开发板上。
第一步:硬件连接
1、用miniUSB线将 电脑与开发板相连,BeagleBoneBlack启动之后,在浏览器里面输入192.168.7.2,打开网页之后就可以查看相关的串口信息。
注:
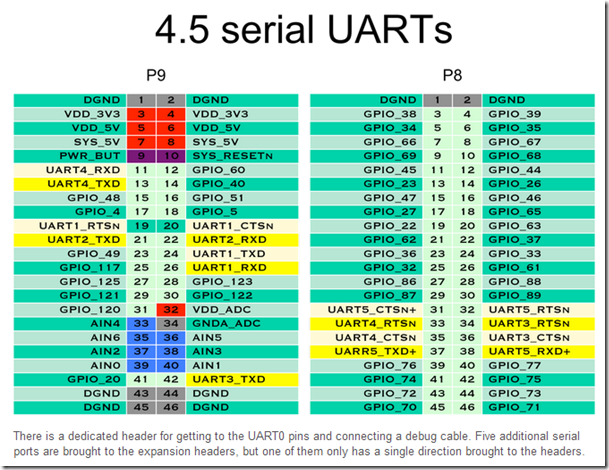
(1)BeagleBoneBlack开发板的P8,P9扩展接口上共引出了四个半的串口,其中UART1,UART2,UART4,UART5四个串口的发射和接收引脚全部引出,UART3只引出了发射引脚,所以共引出了四个串口;
(2)BeagleBoneBlack开发板的UART0引脚默认作为调试引脚使用,系统上电之后UART0作为默认的打印引脚使用;
(3)接下来的实验将会以UART4为例说明串口的使用。
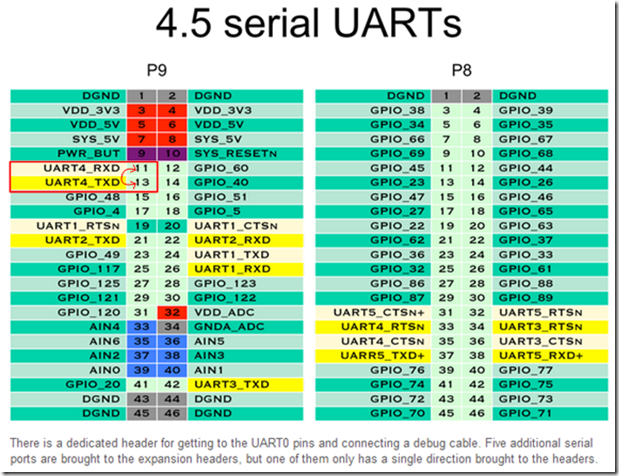
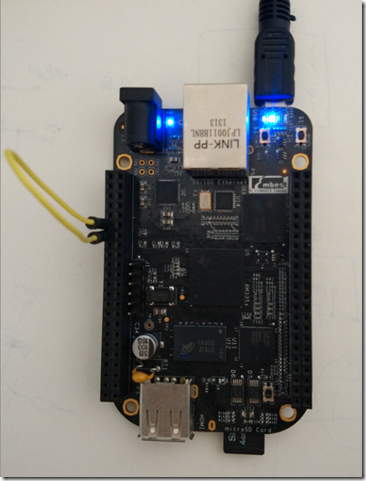
2、本实验的硬件连接如下图所示,将P9的11,13引脚直接连接,这样就可以实现自发自收。
3、实物图如下
第二步:手动打开串口
1、加载设备
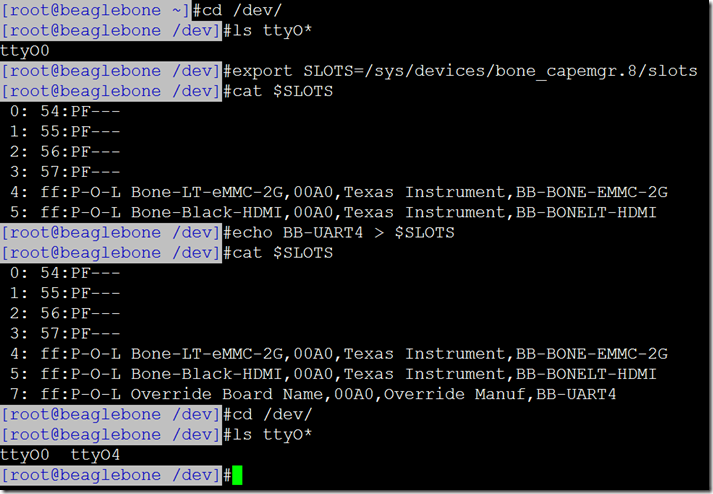
(1)添加环境变量:export SLOTS=/sys/devices/bone_capemgr.8/slots
注:
1)功能说明:设置或显示环境变量。
2)语法:export [-fnp][变量名称]=[变量设置值]
3)补充说明:在shell中执行程序时,shell会提供一组环境变量。 export可新增,修改或删除环境变量,供后续执行的程序使用。
4)作用范围:export的有效期仅限于于该此登陆操作。
5)参 数:
-f 代表[变量名称]中为函数名称。
-n 删除指定的变量。变量实际上并未删除,只是不会输出到后续指令的执行环境中。
-p 列出所有的shell赋予程序的环境变量。
6)一个变量创建时,它不会自动地为在它之后创建的shell进程所知。而命令export可以向后面的shell传递变量的值。当一个shell脚本调用并执行时,它不会自动得到原为脚本(调用者)里定义的变量的访问权,除非这些变量已经被显式地设置为可用。
7)export命令可以用于传递一个或多个变量的值到任何后继脚本
(2)查看环境变量:cat $SLOTS
(3)加载UART4:echo BB-UART4 > $SLOTS
(4)查看设备:ls ttyO*,ttyO4就是添加的UART4设备
注:
1)*:匹配符。ttyO*可以过滤出所有ttyO开头的文件
2、利用minicom打开串口
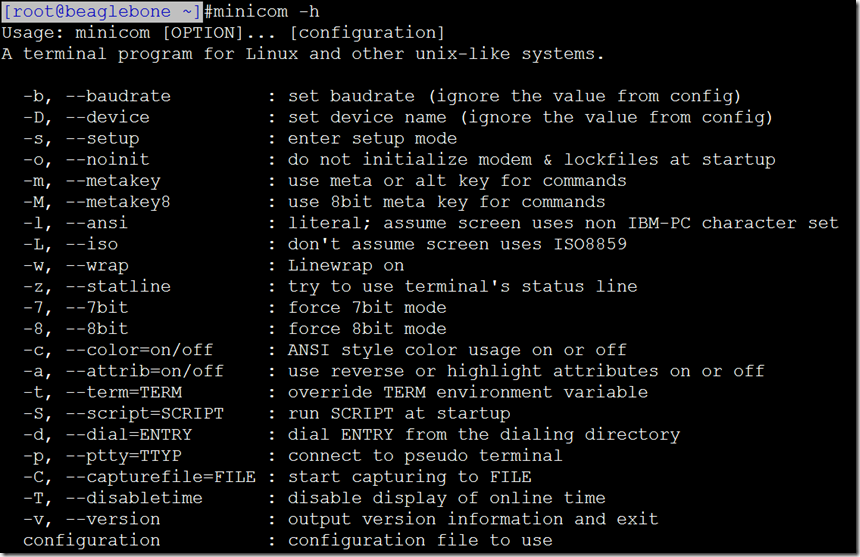
注:如果想知道minicom的参数配置和相关命令,可以输入minicom –h,如下图所示,
注:
(1) 由上图可知道,刚才打开的minicom时配置参数的意义;
(2)-b 9600 设置波特率
(3)-o 不初始化模块,且锁定启动状态
(4)-D /dev/ttyO4 设置驱动名称
3、回车之后就可以进入UART4了,这时候输入任何字符在终端上都会显示出来。
第三步:用C语言编程实现自发自收
1、代码如下
 1 #include<stdio.h>
 2 #include<fcntl.h>
 3 #include<unistd.h>
 4 #include<termios.h> // using the termios.h library
 5
 6 int main()
 7 {
 8      int file, count;
 9      if ((file = open("/dev/ttyO4", O_RDWR |  O_NOCTTY |  O_NDELAY))<0)
10      {
11          perror("UART: Failed to open the file.
");
12          return -1;
13      }
14      struct termios options; // the termios structure is vital
15      tcgetattr(file, &options); // sets the parameters associated with file
16           // Set up the communications options:
17           // 9600 baud, 8-bit, enable receiver, no modem control lines
18      options.c_cflag = B9600 | CS8 | CREAD | CLOCAL;
19      options.c_iflag = IGNPAR | ICRNL; // ignore partity errors, CR -> newline
20      tcflush(file, TCIFLUSH); // discard file information not transmitted
21      tcsetattr(file, TCSANOW, &options); // changes occur immmediately
22      unsigned char transmit[18] = "Hello BeagleBone!"; // the string to send
23
24      if ((count = write(file, &transmit,18))<0)
25      {  // send the string
26          perror("Failed to write to the output
");
27          return -1;
28      }
29
30      usleep(100000); // give the Arduino a chance to respond
31      unsigned char receive[100]; // declare a buffer for receiving data
32      if ((count = read(file, (void*)receive, 100))<0)
33      {  // receive the data
34          perror("Failed to read from the input
");
35          return -1;
36      }
37      if (count==0)
38          printf("There was no data available to read!
");
39      else
40      {
41          printf("The following was read in [%d]: %s
",count,receive);
42      }
43      close(file);
44      return 0;
45 }
2、实验现象
