原文链接:https://www.rabbitmq.com/tutorials/tutorial-two-java.html
Work Queues
(using the Java Client)
In the first tutorial we wrote programs to send and receive messages from a named queue.In this one we'll create a Work Queue that will be used to distribute time-consuming tasks among multiple workers.
在上一篇教程中,我们写的程序从一个指定的队列发送和接收消息。本篇,我们将创建一个用于多个角色之间分配耗时的任务,工作队列(Work Queue)。
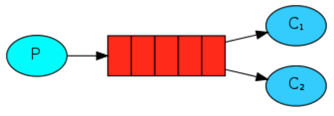
The main idea behind Work Queues(aka: Task Queues) is to avoid doing a resource-intensive task immediately and having to wait for it to complete. Instead we schedule the task to be done later. We encapsulate a task as a message and send it to a queue. A worker process running in the background will pop the tasks and eventually execute the job. When you run many workers the tasks will be shared between them.
工作队列(又名:任务队列)背后的主要思想是避免立即做一个资源密集型任务(一下子完成多个任务,即完成一个任务集),不必等待它完成。相反我们安排的每一个任务都将在稍后完成。一个在后台执行的worker进程将弹出任务,并最终执行任务。当你执行很多worker的任务时将在他们之间共享。
This concept is especially useful in web applications where it's impossible to handle a complex task during a short HTTP request window.
这一概念在web应用程序中是非常有用的,它不可能在很短的HTTP请求窗口处理一个复杂的任务。
Preparation
In the previous part of this tutorial we sent a message containing "Hello World!". Now we'll be sending strings that stand for complex tasks. We don't have a real-world task, like images to be resized or pdf files to be rendered, so let's fake it by just pretending we're busy - by using theThread.sleep() function. We'll take the number of dots in the string as its complexity; every dot will account for one second of "work". For example, a fake task described by Hello... will take three seconds.
在之前的教程中我们发送一个包含“Hello World!”的消息。现在我们将发送多个字符串来代表一个复杂的任务。我们没有一个现实的工作,比如图像的调整大小或者pdf文件的渲染,所以我们使当前线程睡眠(Thread.sleep())来假装我们很忙的样子。我们将把字符串中的点的数量作为它的复杂性,每一个点将占一秒钟的“工作”。比如说,一个假的任务是"Hello…"将需要三秒。
We will slightly modify the Send.java code from our previous example, to allow arbitrary messages to be sent from the command line. This program will schedule tasks to our work queue, so let's name it NewTask.java:
下面我们稍稍的修改一下之前例子中的Send.java的代码,允许任意的消息从命令行被发送出去。这个程序将为我们的任务安排工作队列,所以添加一个新类:NewTask.java:
String message = getMessage(argv);

channel.basicPublish("", "hello", null, message.getBytes());
System.out.println(" [x] Sent '" + message + "'");
Some help to get the message from the command line argument:
从命令行参数中获得一些帮助信息:
private static String getMessage(String[] strings){
    if (strings.length < 1)
        return "Hello World!";
    return joinStrings(strings, " ");
}

private static String joinStrings(String[] strings, String delimiter) {
    int length = strings.length;
    if (length == 0) return "";
    StringBuilder words = new StringBuilder(strings[0]);
    for (int i = 1; i < length; i++) {
        words.append(delimiter).append(strings[i]);
    }
    return words.toString();
}
Our old Recv.java program also requires some changes: it needs to fake a second of work for every dot in the message body.It will handle delivered messages and perform the task, so let's call it Worker.java:
我们之前的那个Recv.java程序也需要一些修改:它需要假装的在消息体中每执行一个'.'就休息一秒钟。它将处理传递的信息并执行任务,所以就叫它Worker.java程序吧:
final Consumer consumer = new DefaultConsumer(channel) {
  @Override
  public void handleDelivery(String consumerTag, Envelope envelope, AMQP.BasicProperties properties, byte[] body) throws IOException {
    String message = new String(body, "UTF-8");

    System.out.println(" [x] Received '" + message + "'");
    try {
      doWork(message);
    } finally {
      System.out.println(" [x] Done");
    }
  }
};
boolean autoAck = true; // acknowledgment is covered below
channel.basicConsume(TASK_QUEUE_NAME, autoAck, consumer);
Our fake task to simulate execution time:
我们用一个假任务来模拟一段时间的执行:
private static void doWork(String task) throws InterruptedException {
    for (char ch: task.toCharArray()) {
        if (ch == '.') Thread.sleep(1000);
    }
}
Compile them as in tutorial one (with the jar files in the working directory):
下面来编译它们(和在工作目录中的这个jar文件):
$ javac -cp rabbitmq-client.jar NewTask.java Worker.java