原文:http://www.cnblogs.com/clever101/archive/2009/12/14/1624204.html
本文转自博客园,此文作者依据codeproject英文版本翻译!
原文地址:http://www.codeproject.com/KB/cs/DotNetActiveX.aspx
原文作者:Daniel Yanovsky
翻译:朱金灿
本文介绍了怎样在C++工程集成C#窗口(Window Form)。
/360/360ie/360se6/User Data/temp/image020.jpg)
介绍
本文介绍如何在C++窗口中集成C#窗体(也被称为视窗窗体)。我们的C++窗口是使用纯粹的Win32 API函数创建的并不需要MFC。
背景
一般地,使用C#进行Windows编程比使用C++要容易得多,特别地当我们不能使用MFC库时。所以很多程序员喜欢使用C#环境建立他们的工程。但是有时候需要在C++环境下进行编程。例如:当你想在一个C++程序上开发一个附件软件时。我们解决这个问题的办法是为它开发一个插件,比如著名的Notepad++程序。Notepad++是使用C++语言编写的,具体是使用纯粹的Win32 API函数和STL以确保它具有较高的运行速度和更小的可执行文件。但是由此带来的弊端是设计和开发界面变得困难。所以,我们面对这个挑战决定使用C#创建我们的插件。我们怎样成功集成我们的.NET插件到使用纯粹的Win32 API函数创建的窗口?我希望这篇文章能帮你理解这一点。
我们为这篇文章准备了一个小示例。如果你希望见到我们为Notepad++编写的插件的全部源码,请访问我们的插件主页。
使用C#语言创建ActiveX控件
基础知识
这部分的解决方案是基于由Morgan Skinner发表的文章《以ActiveX控件的形式暴露Windows窗体控件》。尽管Skinner提供他的解决方案是由Visual Studio 8 Beta版本开发的,但他的例子在VS8的发行版运行得也很好(只是做了小小改动)。下面是我们对Skinner的解决方案所作的改动的一个列表:
1. 设置ClassInterface为ClassInterfaceType.None(这样我们暴露唯一指定的接口到COM)。更多的信息在下一章。
2. 工程应该被设置为visible to COM。具体是这样做的:在“Project Properties”菜单项上的“Application”选项卡上的Assembly Information对话框上的“Make assembly COM visible”被选中(具体如下图):

1. 你还应该注册工程为COM互操作(请注意在VS8.0的发行版,“Build”属性窗口和beta版本有着不同的设计)。当这个特性被选上,当工程成功编译之后Visual Studio将自动注册.NET ActiveX控件。(具体如下图)

4. 在Skinner的文章中,在ComUnregisterFunction()函数中有一个小错误。下面是正确的函数:

/// Unregister ActiveX DLL function
/// </summary>
/// <param name="i_Key"></param>
[ComUnregisterFunction()]
public static void UnregisterClass(string i_Key)
{
// strip off HKEY_CLASSES_ROOT from the passed key as I don't need it
StringBuilder sb = new StringBuilder(i_Key);
sb.Replace(@"HKEY_CLASSES_ROOT", "");
// open HKCRCLSID{guid} for write access
RegistryKey registerKey =
Registry.ClassesRoot.OpenSubKey(sb.ToString(), true);
// delete the 'Control' key,
// but don't throw an exception if it does not exist
registerKey.DeleteSubKey("Control", false);
// next open up InprocServer32
RegistryKey inprocServer32 =
registerKey.OpenSubKey("InprocServer32", true);
// and delete the CodeBase key, again not throwing if missing
inprocServer32.DeleteSubKey("CodeBase", false);
// finally close the main key
registerKey.Close();
}
为COM导出明确的方法
为了进行更为精确的设计,我们为COM导出指定的方法。每一个使用我们控件的外部程序都将仅仅访问它们必需的方法。
导出具体方法的最好方法是为包含所有相关方法创建一个接口。那么,具体的属性应该被添加到这个接口。Form类应该在这个接口实现。
/// COM Interface - enables to run c# code from c++
/// </summary>
[InterfaceType(ComInterfaceType.InterfaceIsDual)]
public interface ICSSExplorerInterface
{
void setButtonCaption(String strNewCaption);
void setAdapterDllPtr(IntPtr i_AdapterDllPtr);
}
使用微软消息体系
我们使用微软消息体系和VC工程的容器窗口和其他窗口进行通信。我们不处理任何事件,因为如果这样它将变得更为复杂并且对于我们的解决方案它不是必需的。
我们增加下面代码到我们的MyDotNetActiveX类去允许消息传输:
private static uint DOT_NET_BUTTON_PRESSED = 0x0400;
private void btnOK_Click(object sender, EventArgs e)
{
SendMessage(m_AdapterDllPtr.ToInt32(),
DOT_NET_BUTTON_PRESSED, IntPtr.Zero, IntPtr.Zero);
}
#region MAPPING_OF_USER32_DLL_SECTION
[DllImport("user32.dll", EntryPoint = "SendMessage")]
public static extern IntPtr SendMessage(
int hwnd, uint wMsg, IntPtr wParam, IntPtr lParam);
[DllImport("user32.dll", EntryPoint = "SendMessage")]
public static extern int SendMessage(
int hwnd, uint wMsg, int wParam, string lParam);
[DllImport("user32.dll", EntryPoint = "SendMessage")]
public static extern int SendMessage(
int hwnd, uint wMsg, int wParam, out int lParam);
[DllImport("user32.dll", EntryPoint = "SendMessage")]
public static extern int GetNbFiles(
int hwnd, uint wMsg, int wParam, int lParam);
[DllImport("user32.dll", EntryPoint = "SendMessage")]
public static extern int GetFileNames(
int hwnd, uint wMsg,
[MarshalAs(UnmanagedType.LPArray)]IntPtr[] wParam,
int lParam);
[DllImport("user32.dll", EntryPoint = "SendMessage")]
public static extern int SendMessage(
int hwnd, uint wMsg, int wParam, StringBuilder lParam);
#endregion
在初始化代码中,我们假设我们的容器窗口将传给它的窗口句柄(hwnd参数)来通讯。
编译工程
现在我们准备编译和测试这个控件。Visual Studio在成功编译之后将自动注册我们的ActiveX控件。你可以通过免费软件RegDllView查看注册信息。

在ActiveX控件测试容器中测试控件
在我们跳到这篇文章的下一步之前,在第三方程序中测试我们的控件是一段美好时光。我们使用ActiveX控件测试容器(tstcon32.exe)进行测试。这个程序在Visual Studio的安装目录下是可以找得到的。
1. 通过“Edit”菜单栏的“Insert New Control”菜单项插入控件

1. 现在选择“Control”菜单栏中的“Invoke Methods”菜单项。
2. 在Method Name combo-box控件选择setButtonCaption函数。
3. 在Parameter Value文本框中输入“Hello”并按下“Invoke”按钮
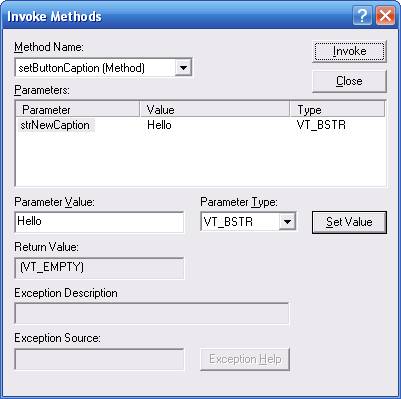
5. 下面是测试结果

添加 C# ActiveX 控件to C++ 窗口
使用ATL Control Containment
任何通过使用Active Template Library (ATL)都可以包含ActiveX控件。
在这部分指南里,我们将完成下面工作:
- 创建一个C++ Win32 Application 工程
- 插入 our ActiveX 控件到C++ 窗口
- 发送命令到 ActiveX控件
- 从我们的 ActiveX控件中接收消息
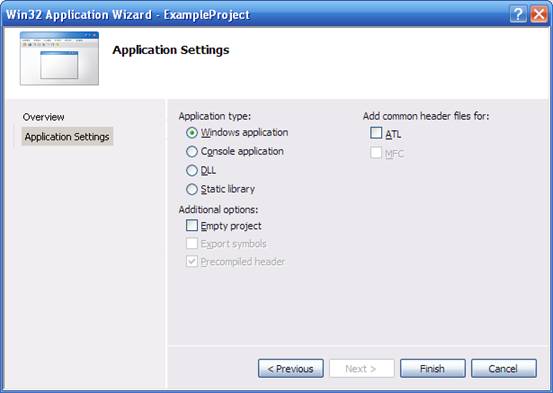
创建 C++ Win32 Application 工程
- 创建一个新的 Win32 工程并命名为“
CPP_Container:”:

2.采用默认设置并按下“OK”按钮:
插入 C# ActiveX 控件到C++ 窗口
- 添加下面代码到CPP_Container.cpp开头:
HWND _hAtl;
HWND _hSelf;
IUnknown* _pUnk;
DotNetActiveX::ICSSExplorerInterfacePtr _pDotNetCOMPtr;
HINSTANCE _hWebLib = ::LoadLibrary(TEXT("ATL.DLL"));
2.当Visual Studio编译完我们的C#工程,它创建了DotNetActiveX.tlb文件。这个文件包含了这个工程的所有方法和结构体。我们将通过下面命令导入这些数据:
#import "DotNetActiveX.tlb" named_guids raw_interfaces_only
3.添加下面函数到CPP_Container.cpp。这个函数插入ATL容器到窗口并加载我们的C# ActiveX控件:
{
//Initialize ATL control containment code.
BOOL (WINAPI *m_AtlAxWinInit)();
m_AtlAxWinInit = (BOOL (WINAPI *)(void))::GetProcAddress
(_hWebLib, "AtlAxWinInit");
m_AtlAxWinInit();
// Get the dimensions of the main window's client
// area, and enumerate the child windows. Pass the
// dimensions to the child windows during enumeration.
RECT rcClient;
GetClientRect(_hSelf, &rcClient);
_hAtl = ::CreateWindowEx(
WS_EX_CLIENTEDGE,
TEXT("AtlAxWin"),
strActiveXName,
WS_CHILD | WS_VISIBLE | /*WS_CLIPCHILDREN | */WS_EX_RTLREADING,
0, 0, rcClient.right, rcClient.bottom,
_hSelf,
NULL,
NULL,
NULL);
if (!_hAtl)
{
MessageBox( NULL, TEXT("Can not load AtlAxWin!"),
szTitle, MB_OK | MB_ICONSTOP);
throw int(106901);
}
HRESULT (WINAPI *m_AtlAxGetControl) (HWND h, IUnknown** pp);
m_AtlAxGetControl = (HRESULT (WINAPI *)
(HWND, IUnknown**))::GetProcAddress(_hWebLib, "AtlAxGetControl");
m_AtlAxGetControl(_hAtl, &_pUnk);
_pUnk->QueryInterface(__uuidof(DotNetActiveX::ICSSExplorerInterface),
(LPVOID *) &_pDotNetCOMPtr);
if (_pDotNetCOMPtr != NULL)
{
_pDotNetCOMPtr->setAdapterDllPtr((long) _hSelf);
}
else
{
// Get the dimensions of the main window's client
// area, and enumerate the child windows. Pass the
// dimensions to the child windows during enumeration.
RECT rcClient;
GetClientRect(_hSelf, &rcClient);
::DestroyWindow(_hAtl);
_hAtl = ::CreateWindowEx(
WS_EX_CLIENTEDGE,
TEXT("AtlAxWin"),
TEXT("MSHTML:""Please register ActiveX
control before using this plugin."""),
WS_CHILD | WS_VISIBLE | WS_CLIPCHILDREN |
WS_EX_RTLREADING,
0, 0, rcClient.right, rcClient.bottom,
_hSelf,
NULL,
NULL,
NULL);
}
}
4.为了更准确的开发,在WndProc函数中添加下面代码到WM_DESTORY消息处理块中(注:为了销毁C# ActiveX控件窗口和释放加载的内存)。
::DestroyWindow(_hAtl);
_pUnk->Release();
::FreeLibrary(_hWebLib);
5. 最后在_tWinMain函数调用loadActiveX函数。
发送命令到C# ActiveX控件
在插入TLB文件之后,我们在C#工程中导出的所有方法将会显示。现在我们简单地调用相关的方法:
_bstr_t bstrHelloWorld(strHelloWorld);
_pDotNetCOMPtr->setButtonCaption(bstrHelloWorld);
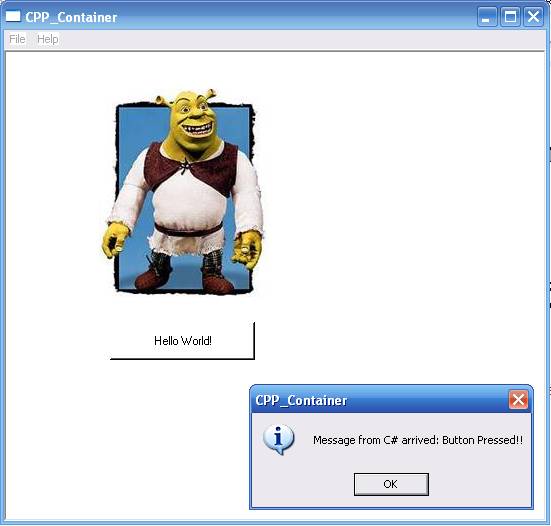
这将会把按钮的标题改为“Hello World!”。

从C# ActiveX控件接收消息
通过微软的消息体系从C#控件的消息能够到达C++窗口。通过调用loadActiveX函数我们已经将我们的窗口句柄发给C#控件。所以现在,我们仅仅需要在WndProc函数添加一些代码(注:消息处理代码)。WndProc函数是负责处理到达该窗口的每个消息。所以我们将在这个函数添加一个另外的case分支:
MessageBox(NULL, TEXT("Message from C# arrived: Button Pressed!!"),
szTitle, MB_OK | MB_ICONINFORMATION);
break;
现在,你可以按下在C# ActiveX控件的按钮并看到下面结果:

结论
我们希望这篇文章能够对那些在工程中混合使用C#和C++语言的开发者有所帮助。你可以查看我们开发的Notepad++插件:CSSExplorer plug-in for Notepad++。上面提到的所有想法在我们的插件都得到了实现。
参考文献
- C# Programming Guide - Example COM Class (C# Programming Guide)
- How to add ATL control containment support to any window in Visual C++
- Exposing Windows Forms Controls as ActiveX controls
历史
- 2009年10月10日: 初次提交
授权
这篇文章,包括所有相关源码和文件,遵循The Code Project Open License (CPOL)授权协议。
关于作者
Daniel Yanovsky :职业:软件开发工程师。国籍:以色列。