接着上一节
1.第一步:在pom文件中添加
 <!--   MyBatis  -->
        <dependency>
            <groupId>org.mybatis.spring.boot</groupId>
            <artifactId>mybatis-spring-boot-starter</artifactId>
            <version>1.3.1</version>
        </dependency>
        <dependency>
            <groupId>org.springframework.boot</groupId>
            <artifactId>spring-boot-starter</artifactId>
        </dependency>
        <dependency>
            <groupId>org.springframework.boot</groupId>
            <artifactId>spring-boot-devtools</artifactId>
            <optional>true</optional>
        </dependency>
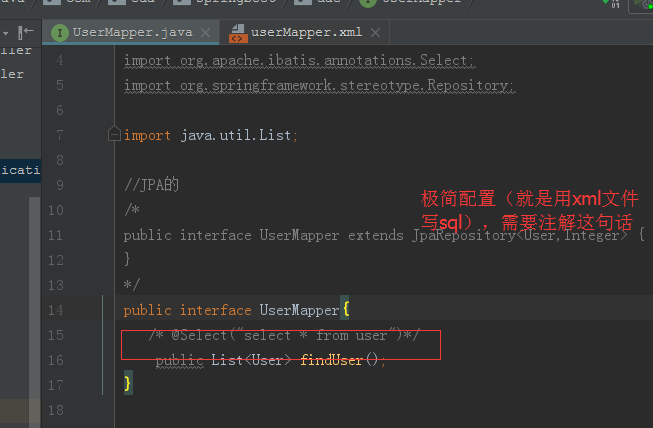
2.第二步:将userMapper类,改成下面这样
package com.oda.springboot.dao;

import com.oda.springboot.bean.User;
import org.apache.ibatis.annotations.Select;
import org.springframework.stereotype.Repository;

import java.util.List;

//JPA的
/*
public interface UserMapper extends JpaRepository<User,Integer> {
}
*/
public interface UserMapper{
   @Select("select * from user")
    public List<User> findUser();
}
3.第三步:将UserService类改成下面这样
package com.oda.springboot.service;

import com.oda.springboot.bean.User;
import com.oda.springboot.dao.UserMapper;
import org.springframework.beans.factory.annotation.Autowired;
import org.springframework.stereotype.Service;

import javax.annotation.Resource;
import java.util.List;

@Service
public class UserService {
    @Resource
    private UserMapper userMapper;

    //JPA的
    /*public List<User> users() {
        return userMapper.findAll();
    }*/

    public List<User> users(){
        return userMapper.findUser();
    }
}
4.第四步:将SpringbootApplication类改成下面这样
package com.oda.springboot;

import org.mybatis.spring.annotation.MapperScan;
import org.springframework.boot.SpringApplication;
import org.springframework.boot.autoconfigure.SpringBootApplication;
import org.springframework.boot.builder.SpringApplicationBuilder;

@SpringBootApplication
@MapperScan("com.oda.springboot.dao")
public class SpringbootApplication {
    protected SpringApplicationBuilder configure(SpringApplicationBuilder application) {
         return application.sources(SpringbootApplication.class);
    }
    public static void main(String[] args) {
        SpringApplication.run(SpringbootApplication.class, args);
    }
}
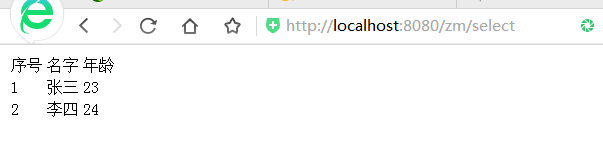
启动,访问http://localhost:8080/zm/users
极简配置(就是sql用xml文件写)
5.第五步:在resources包下新建mapper包,在其下新建userMapper.xml
<?xml version="1.0" encoding="UTF-8" ?>
        <!DOCTYPE mapper PUBLIC "-//ibatis.apache.org//DTD Mapper 3.0//EN" "http://mybatis.org/dtd/mybatis-3-mapper.dtd">
<mapper namespace="com.oda.springboot.dao.UserMapper">
    <select id="findUser" resultType="com.oda.springboot.bean.User">
        select *
        from user
    </select>
</mapper>
6.第六步:在application.yml中添加
mybatis:
  mapper-locations: classpath:mapper/*.xml
启动,访问http://localhost:8080/zm/users
