本节内容:
- 导入逆向工程
- 修改配置文件
- 生成逆向工程代码
- 测试逆向工程代码
在之前的例子中,我们得自己手写pojo和Mapper映射文件(Mapper接口和Mapper.xml文件),如果公司的表比较多,假如有200张表,这手写起来就很繁琐了。
使用官方网站的Mapper自动生成工具mybatis-generator-core-1.3.2来生成po类和Mapper映射文件。注意这些Mapper文件只针对单表操作,涉及多表的操作得自己手写。
一、导入逆向工程

导入IDEA后,项目如下所示:
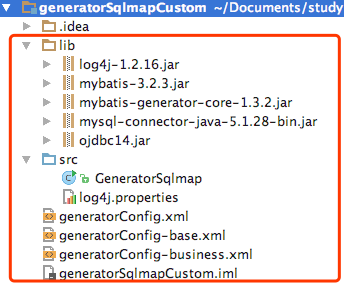
看上面的lib下的jar包,里面有连接mysql的驱动包,也有连接oracle的驱动包,我这里连接的是mysql数据库。
二、修改配置文件
generatorConfig-base.xml和generatorConfig-business.xml这两个配置文件没用,可以删除掉。修改generatorConfig.xml:
注意修改以下几点:
- 修改要生成的数据库表
- pojo文件所在包路径
- Mapper所在的包路径
<?xml version="1.0" encoding="UTF-8"?>
<!DOCTYPE generatorConfiguration
  PUBLIC "-//mybatis.org//DTD MyBatis Generator Configuration 1.0//EN"
  "http://mybatis.org/dtd/mybatis-generator-config_1_0.dtd">

<generatorConfiguration>
	<context id="testTables" targetRuntime="MyBatis3">
		<commentGenerator>
			<!-- 是否去除自动生成的注释(生成的注释是英文的) true:是 : false:否 -->
			<property name="suppressAllComments" value="true" />
		</commentGenerator>
		<!--数据库连接的信息:驱动类、连接地址、用户名、密码 -->
		<jdbcConnection driverClass="com.mysql.jdbc.Driver"
			connectionURL="jdbc:mysql://localhost:3306/mybatis" userId="root"
			password="123456">
		</jdbcConnection>
		<!--连接oracle数据库-->
		<!-- <jdbcConnection driverClass="oracle.jdbc.OracleDriver"
			connectionURL="jdbc:oracle:thin:@127.0.0.1:1521:yycg"
			userId="yycg"
			password="yycg">
		</jdbcConnection> -->

		<!-- 默认false,把JDBC DECIMAL 和 NUMERIC 类型解析为 Integer,为 true时把JDBC DECIMAL 和
			NUMERIC 类型解析为java.math.BigDecimal -->
		<javaTypeResolver>
			<property name="forceBigDecimals" value="false" />
		</javaTypeResolver>

		<!-- targetProject:生成PO类的位置
		    要注意targetProject,如果你是在Linux或者Mac上,路径应该是./src,如果是在windows上,路径应该是.src-->
		<javaModelGenerator targetPackage="com.wisedu.mybatis.model"
			targetProject="./src">
			<!-- enableSubPackages:是否让schema作为包的后缀 -->
			<property name="enableSubPackages" value="false" />
			<!-- 从数据库返回的值被清理前后的空格 -->
			<property name="trimStrings" value="true" />
		</javaModelGenerator>
        <!-- targetProject:mapper映射文件生成的位置 -->
		<sqlMapGenerator targetPackage="com.wisedu.mybatis.dao.automatic.mapper"
			targetProject="./src">
			<!-- enableSubPackages:是否让schema作为包的后缀 -->
			<property name="enableSubPackages" value="false" />
		</sqlMapGenerator>
		<!-- targetPackage:mapper接口生成的位置 -->
		<javaClientGenerator type="XMLMAPPER"
			targetPackage="com.wisedu.mybatis.dao.automatic.mapper"
			targetProject="./src">
			<!-- enableSubPackages:是否让schema作为包的后缀 -->
			<property name="enableSubPackages" value="false" />
		</javaClientGenerator>
		<!-- 指定数据库表 -->
		<table schema="" tableName="user">
            <!--生成的pojo类的属性名和表的列名一致,默认是遇到下划线变驼峰的。比如表中有一列叫user_id,那么默认生成的类属性名是userId-->
            <property name="useActualColumnNames" value="true"/>
        </table>
		<table schema="" tableName="orders">
            <property name="useActualColumnNames" value="true"/>
        </table>

		<!-- 有些表的字段需要指定java类型
		 <table schema="" tableName="">
			<columnOverride column="" javaType="" />
		</table> -->
	</context>
</generatorConfiguration>
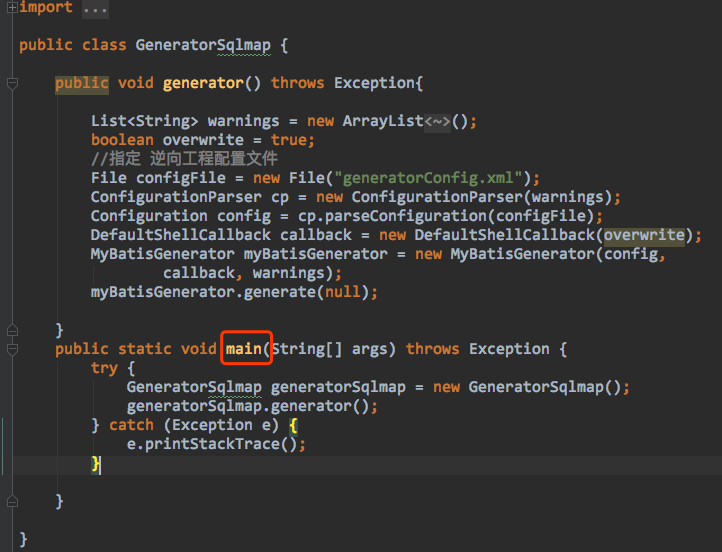
三、生成逆向工程代码
执行主程序 GeneratorSqlmap.java 的main方法:
查看控制台日志:
2017-12-28 17:55:14,738 [main] DEBUG [org.mybatis.generator.internal.db.DatabaseIntrospector] - Retrieving column information for table "user"
2017-12-28 17:55:14,772 [main] DEBUG [org.mybatis.generator.internal.db.DatabaseIntrospector] - Found column "id", data type 4, in table "mybatis..user"
2017-12-28 17:55:14,772 [main] DEBUG [org.mybatis.generator.internal.db.DatabaseIntrospector] - Found column "username", data type 12, in table "mybatis..user"
2017-12-28 17:55:14,773 [main] DEBUG [org.mybatis.generator.internal.db.DatabaseIntrospector] - Found column "birthday", data type 91, in table "mybatis..user"
2017-12-28 17:55:14,773 [main] DEBUG [org.mybatis.generator.internal.db.DatabaseIntrospector] - Found column "sex", data type 1, in table "mybatis..user"
2017-12-28 17:55:14,773 [main] DEBUG [org.mybatis.generator.internal.db.DatabaseIntrospector] - Found column "address", data type 12, in table "mybatis..user"
2017-12-28 17:55:14,783 [main] DEBUG [org.mybatis.generator.internal.db.DatabaseIntrospector] - Retrieving column information for table "orders"
2017-12-28 17:55:14,790 [main] DEBUG [org.mybatis.generator.internal.db.DatabaseIntrospector] - Found column "id", data type 4, in table "mybatis..orders"
2017-12-28 17:55:14,790 [main] DEBUG [org.mybatis.generator.internal.db.DatabaseIntrospector] - Found column "user_id", data type 4, in table "mybatis..orders"
2017-12-28 17:55:14,791 [main] DEBUG [org.mybatis.generator.internal.db.DatabaseIntrospector] - Found column "number", data type 12, in table "mybatis..orders"
2017-12-28 17:55:14,791 [main] DEBUG [org.mybatis.generator.internal.db.DatabaseIntrospector] - Found column "createtime", data type 93, in table "mybatis..orders"
2017-12-28 17:55:14,791 [main] DEBUG [org.mybatis.generator.internal.db.DatabaseIntrospector] - Found column "note", data type 12, in table "mybatis..orders"

Process finished with exit code 0
查看工程,就可以看见代码生成了。如果没生成,请刷新下项目。
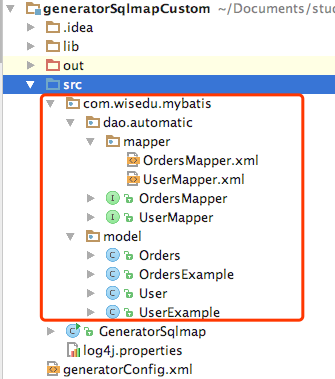
【说明】:
关于model中的 OrdersExample.java 和 UserExample.java 是专门的条件对象。下面的测试中会有使用。
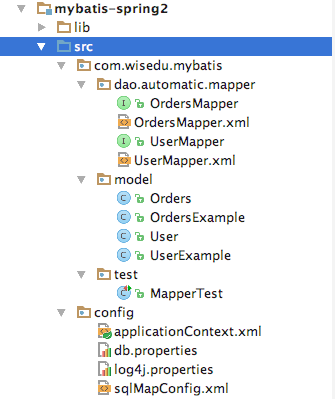
四、测试逆向工程代码
项目结构和前面博客中的一样,只是model、mapper都是上面逆向工程生成的代码。
applicationContext.xml内容如下:
<?xml version="1.0" encoding="UTF-8"?>
<beans xmlns="http://www.springframework.org/schema/beans"
       xmlns:context="http://www.springframework.org/schema/context" xmlns:p="http://www.springframework.org/schema/p"
       xmlns:aop="http://www.springframework.org/schema/aop" xmlns:tx="http://www.springframework.org/schema/tx"
       xmlns:xsi="http://www.w3.org/2001/XMLSchema-instance"
       xsi:schemaLocation="http://www.springframework.org/schema/beans http://www.springframework.org/schema/beans/spring-beans-4.0.xsd
	http://www.springframework.org/schema/context http://www.springframework.org/schema/context/spring-context-4.0.xsd
	http://www.springframework.org/schema/aop http://www.springframework.org/schema/aop/spring-aop-4.0.xsd http://www.springframework.org/schema/tx http://www.springframework.org/schema/tx/spring-tx-4.0.xsd
	http://www.springframework.org/schema/util http://www.springframework.org/schema/util/spring-util-4.0.xsd">

    <!-- 加载配置文件 -->
    <context:property-placeholder location="classpath:/config/db.properties" />

    <!-- 数据库连接池 -->
    <bean id="dataSource" class="org.apache.commons.dbcp.BasicDataSource"
          destroy-method="close">
        <property name="driverClassName" value="${jdbc.driver}" />
        <property name="url" value="${jdbc.url}" />
        <property name="username" value="${jdbc.username}" />
        <property name="password" value="${jdbc.password}" />
        <property name="maxActive" value="10" />
        <property name="maxIdle" value="5" />
    </bean>

    <!-- 配置Mybatis的工程 SqlSessionFactory -->
    <bean id="sqlSessionFactory" class="org.mybatis.spring.SqlSessionFactoryBean">
        <!-- 配置mybatis核心配置文件,原来核心配置文件中是有连接池的,现在交给Spring了 -->
        <property name="configLocation" value="classpath:/config/sqlMapConfig.xml" />
        <!-- 配置数据源 -->
        <property name="dataSource" ref="dataSource" />
    </bean>

    <!-- Mapper代理的方式开发方式二,扫描包方式配置代理(不注入工厂也可以,org.mybatis.spring.mapper.MapperScannerConfigurer会自己去Spring容器中去找) -->
    <bean class="org.mybatis.spring.mapper.MapperScannerConfigurer">
        <!-- 配置Mapper接口 -->
        <property name="basePackage" value="com.wisedu.mybatis.dao.automatic.mapper" />
    </bean>


</beans>
sqlMapConfig.xml内容如下:
<?xml version="1.0" encoding="UTF-8" ?>
<!DOCTYPE configuration
        PUBLIC "-//mybatis.org//DTD Config 3.0//EN"
        "http://mybatis.org/dtd/mybatis-3-config.dtd">
<configuration>
    <!-- 设置别名 -->
    <typeAliases>
        <!-- 2. 指定扫描包,会把包内所有的类都设置别名,别名的名称就是类名,大小写不敏感 -->
        <package name="com.wisedu.mybatis.model" />
    </typeAliases>

    <mappers>
        <package name="com.wisedu.mybatis.dao.automatic.mapper" />
    </mappers>

</configuration>
测试类MapperTest.java:
package com.wisedu.mybatis.test;

import com.wisedu.mybatis.dao.automatic.mapper.UserMapper;
import com.wisedu.mybatis.model.User;
import com.wisedu.mybatis.model.UserExample;
import org.junit.Before;
import org.junit.Test;
import org.springframework.context.ApplicationContext;
import org.springframework.context.support.ClassPathXmlApplicationContext;

import java.util.Date;
import java.util.List;

/**
 * Created by jkzhao on 12/28/17.
 */
public class MapperTest {
    private ApplicationContext context;

    @Before
    public void setUp() throws Exception {
        this.context = new ClassPathXmlApplicationContext("classpath:/config/applicationContext.xml");
    }

    @Test
    public void testQueryUser() {
        // 获取Mapper
        UserMapper userMapper = this.context.getBean(UserMapper.class);

        // 创建User对象扩展类,用户设置查询条件
        UserExample example1 = new UserExample();
        example1.createCriteria().andUsernameLike("%王%"); //example.createCriteria() 创建一个内部类对象

        // 查询数据
        List<User> list = userMapper.selectByExample(example1);
        System.out.println(list.size());

        UserExample example2 = new UserExample();
        example2.createCriteria().andUsernameLike("%张%").andSexEqualTo("1");
        int countByExample = userMapper.countByExample(example2);
        System.out.println(countByExample);

        //通过主键查询用户
        User user = userMapper.selectByPrimaryKey(1);
        System.out.println(user);

    }

    @Test
    public void testInsert() {
        // 获取Mapper
        UserMapper userMapper = this.context.getBean(UserMapper.class);

        User user = new User();
        user.setUsername("诸葛亮");
        user.setSex("1");
        user.setBirthday(new Date());
        user.setAddress("三国");

        userMapper.insert(user);
    }

}
【注意】:如果需要查看生成的sql语句,需要将log4j.properties放在src目录下。因为log4j.jar查找文件的时候是 先去代码根目录下去找log4j.properties,src运行后的发布目录就是代码根目录。可以直接修改log4j的源代码,或者修改web.xml中的配置:
<context-param>
    <param-name>log4jConfigLocation</param-name>
    <param-value>/WEB-INF/log4j.properties</param-value>
</context-param>
或者
  <context-param>
    <param-name>log4jConfigLocation</param-name>
    <param-value>WEB-INF/log4j.xml</param-value>
  </context-param>
【总结】:
- 逆向工程生成的代码只能做单表查询
- 不能在生成的代码上进行扩展,因为如果数据库变更,需要重新使用逆向工程生成代码,原来编写的代码就被覆盖了。
- 一张表会生成4个文件