本节内容:
- 监听器Listener
- 什么是监听器
- 监听器有哪些
- 监听三大域对象的创建与销毁的监听器
- 监听三大域对象的属性变化的监听器
- 与session中的绑定的对象相关的监听器(对象感知监听器)
- 邮箱服务器
- 示例:使用监听器完成定时生日祝福
一、监听器Listener
JavaEE包括13门规范 在课程中主要学习 servlet技术 和 jsp技术
其中 servlet规范包括三个技术点:servlet、listener和filter。
1. 什么是监听器
监听器就是监听某个对象的的状态变化的组件。
监听器的相关概念:
- 事件源:被监听的对象 --监听三个域对象 request、session和servletContext(除了不监听PageContent对象)
- 监听器:监听事件源对象。事件源对象的状态的变化都会触发监听器 --6+2=8个监听器
- 注册监听器:将监听器与事件源进行绑定。
- 响应行为:监听器监听到事件源的状态变化时 所涉及的功能代码 --程序员编写代码
2. 监听器有哪些
第一维度:按照被监听的对象划分。
ServletRequest域、HttpSession域和ServletContext域
第二维度:监听的内容分。
监听域对象的创建与销毁的、监听域对象的属性变化的
| 6个监听器 | ServletContext域 | HttpSession域 | ServletRequest域 |
| 域对象的创建与销毁 | ServletContextListener | HttpSessionListener | ServletRequestListener |
| 域对象属性的变化 | ServletContextAttributeListener | HttpSessionAttributeListener | ServletRequestAttributeListener |
3. 监听三大域对象的创建与销毁的监听器
(1)监听ServletContext域的创建与销毁的监听器ServletContextListener
1)ServletContext域的生命周期
何时创建:服务器启动创建
何时销毁:服务器关闭销毁
2)监听器的编写步骤(重点,各个监听器的编写步骤都一样)
- a.编写一个监听器类去实现监听器接口
- b.覆盖(实现)监听器的方法
- c.需要在web.xml中进行配置--注册
3)监听的方法

4)配置文件

5)ServletContextListener监听器的主要作用
- 初始化的工作:初始化对象、初始化数据 --加载数据库驱动,连接池的初始化
- 加载一些初始化的配置文件 --spring的配置文件
- 任务调度(定时器) --Timer/TimerTask
任务调度示例:
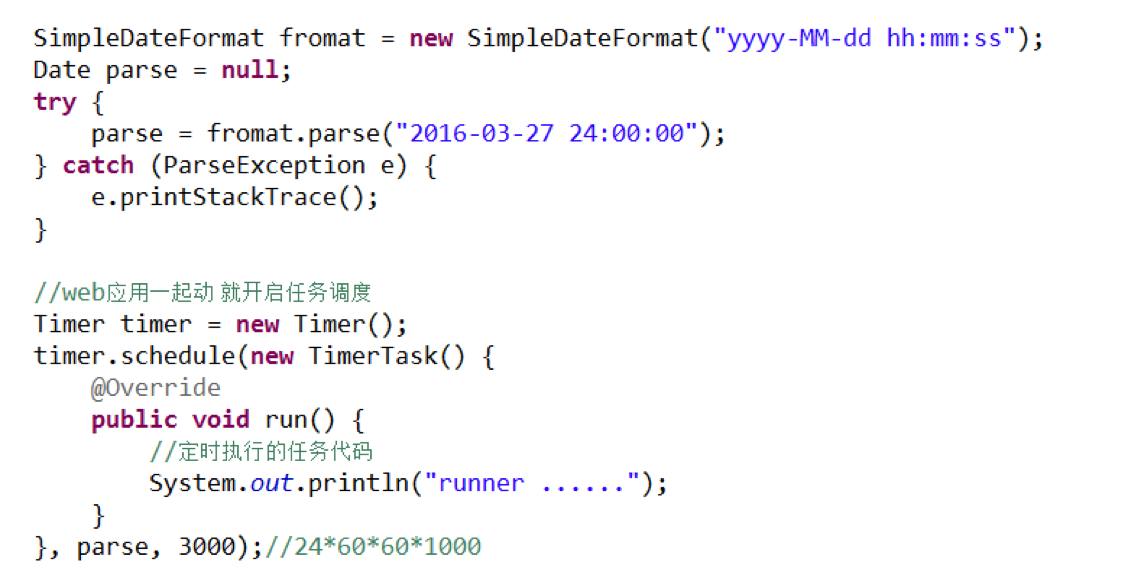
【示例】:


package com.itheima.create;

import java.text.ParseException;
import java.text.SimpleDateFormat;
import java.util.Date;
import java.util.Timer;
import java.util.TimerTask;

import javax.servlet.ServletContext;
import javax.servlet.ServletContextEvent;
import javax.servlet.ServletContextListener;

public class MyServletContextListener implements ServletContextListener{

    @Override
    //监听context域对象的创建
    public void contextInitialized(ServletContextEvent sce) {
        //就是被监听的对象 --ServletContext
        //ServletContext servletContext = sce.getServletContext();
        //getSource就是被监听的对象,是通用的方法。效果和上面的方法一样,获得的是object
        //ServletContext source = (ServletContext) sce.getSource();
        //System.out.println("context创建了....");

        //【示例1】:开启一个计息任务调度(模拟银行业务)
        /*Timer timer = new Timer(); //Java中的定时器
        //timer.scheduleAtFixedRate(task, firstTime, period); //task:任务  firstTime:第一次执行时间  period:间隔执行时间
        timer.scheduleAtFixedRate(new TimerTask() { //TimerTask是个接口,new一个接口,实现接口内的方法即可
            @Override
            public void run() {
                System.out.println("银行计息了.....");
            }
        } , new Date(), 5000); //new Date() 任务当前时间执行,马上就执行,5000是毫秒值,即5s
        */

        //【示例2】:修改成银行真实计息业务
        //1、起始时间: 定义成晚上12点(理论上应该是启动服务的那天晚上12点)
        //2、间隔时间:24小时
        SimpleDateFormat format = new SimpleDateFormat("yyyy-MM-dd hh:mm:ss");
        String currentTime = "2016-08-19 00:00:00";
        Date parse = null; //Date对象
        try {
            parse = format.parse(currentTime);
        } catch (ParseException e) {
            e.printStackTrace();
        }

        Timer timer = new Timer();
        timer.scheduleAtFixedRate(new TimerTask() {
            @Override
            public void run() {
                System.out.println("银行计息了.....");
            }
        } , parse, 24*60*60*1000);

    }

    //监听context域对象的销毁
    @Override
    public void contextDestroyed(ServletContextEvent sce) {
        System.out.println("context销毁了....");

    }

}
<?xml version="1.0" encoding="UTF-8"?>
<web-app xmlns:xsi="http://www.w3.org/2001/XMLSchema-instance" xmlns="http://java.sun.com/xml/ns/javaee" xsi:schemaLocation="http://java.sun.com/xml/ns/javaee http://java.sun.com/xml/ns/javaee/web-app_2_5.xsd" id="WebApp_ID" version="2.5">
  <display-name>WEB23</display-name>
  <!-- 注册监听器 -->
  <listener>
      <listener-class>com.itheima.create.MyServletContextListener</listener-class>
  </listener>
</web-app>
(2)监听Httpsession域的创建与销毁的监听器HttpSessionListener --用处不大
1) HttpSession对象的生命周期
何时创建:第一次调用request.getSession时创建
何时销毁:服务器关闭销毁、session过期、手动销毁
2)HttpSessionListener的方法

【示例】:
public class MyHttpSessionListener implements HttpSessionListener{

    @Override
    public void sessionCreated(HttpSessionEvent se) { //session对象创建的时候执行。比如我在WebContent下新建一个jsp文件。
                                                    //jsp文件的头,默认有个属性session=true,即在翻译jsp成Servlet的时候,默认会帮我们创建session对象
                                                    //所以我们直接访问jsp,会创建session对象。一创建session对象,就会执行该方法
        System.out.println("session创建"+se.getSession().getId());
    }

    @Override
    public void sessionDestroyed(HttpSessionEvent se) {
        System.out.println("session销毁");
    }

}
(3)监听ServletRequest域创建与销毁的监听器ServletRequestListener --基本没用
1) ServletRequest的生命周期
创建:每一次请求都会创建request
销毁:请求结束
2) ServletRequestListener的方法

4. 监听三大域对象的属性变化的监听器
(1)域对象的通用方法
setAttribute(name,value)
- 触发添加属性的监听器的方法
- 触发修改属性的监听器的方法
getAttribute(name) --不会对域对象有什么修改操作,所以不会触发监听器
removeAttribute(name)
- 触发删除属性的监听器的方法
(2)ServletContextAttributeListener监听器

【示例】:
public class MyServletContextAttributeListener implements ServletContextAttributeListener{

    @Override
    public void attributeAdded(ServletContextAttributeEvent scab) {
        //放到域中的属性
        System.out.println(scab.getName());//放到域中的name
        System.out.println(scab.getValue());//放到域中的value
    }

    @Override
    public void attributeRemoved(ServletContextAttributeEvent scab) {
        System.out.println(scab.getName());//删除的域中的name
        System.out.println(scab.getValue());//删除的域中的value
    }

    @Override
    public void attributeReplaced(ServletContextAttributeEvent scab) {
        System.out.println(scab.getName());//获得修改前的name
        System.out.println(scab.getValue());//获得修改前的value
    }

}
public class TestMyServletContextAttributeListener extends HttpServlet {

    protected void doGet(HttpServletRequest request, HttpServletResponse response)
            throws ServletException, IOException {

        ServletContext context = this.getServletContext();

        //向context域中存数据
        context.setAttribute("name", "tom");

        //改context数据
        context.setAttribute("name", "lucy");

        //删除context数据
        context.removeAttribute("name");
    }

    protected void doPost(HttpServletRequest request, HttpServletResponse response)
            throws ServletException, IOException {
        doGet(request, response);
    }
}
(3)HttpSessionAttributeListener监听器(使用方式同上)
(4)ServletRequestAriibuteListenr监听器(使用方式同上)
5. 与session中的绑定的对象相关的监听器(对象感知监听器:对象要被人绑了/放了,对象自己感知到了)
(1)即将要被绑定到session中的对象有几种状态
绑定状态:就是一个对象被放到session域中(比如有个user对象,被session绑定了)
解绑状态:就是这个对象从session域中移除了
钝化状态:是将session内存中的对象持久化(序列化)到磁盘
活化状态:就是将磁盘上的对象再次恢复到session内存中
绑定和解绑是一对,用的是一个监听器;钝化和活化是一对,用的是一个监听器。
面试题:当用户很多时,怎样对服务器进行优化?
答案不下二三十个。钝化和活化就是其中一种方式。当session很多时,可能很多用户并没有在操作,后面再有人访问时,服务器内存资源可能吃紧。可以把那些暂时不用的session存到磁盘上,保证为服务器腾出一定的空间,而且保证用户的session不丢。
(2)绑定与解绑的监听器HttpSessionBindingListener
注意:
- 这个监听不是注册给session的,而是注册给即将被session绑定的对象的。
- 这种感知监听器不需要在web.xml中配置。
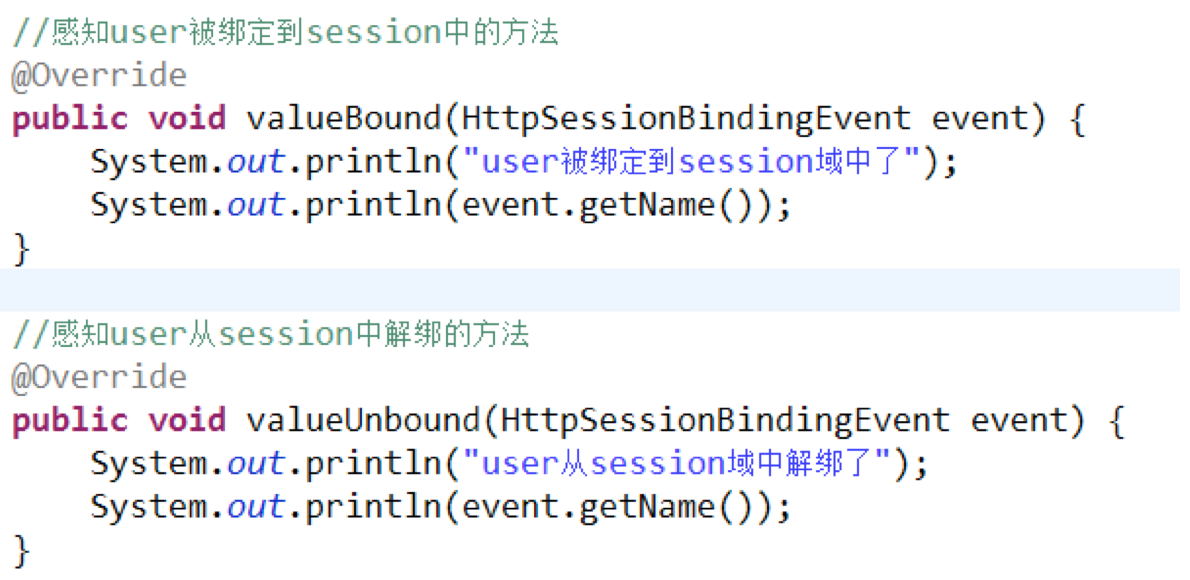
【示例】:
public class Person implements HttpSessionBindingListener{ //这种感知监听器不需要在web.xml中配置

    private String id;
    private String name;
    public String getId() {
        return id;
    }
    public void setId(String id) {
        this.id = id;
    }
    public String getName() {
        return name;
    }
    public void setName(String name) {
        this.name = name;
    }

    @Override
    //绑定的方法
    public void valueBound(HttpSessionBindingEvent event) {//将Person对象放在session当中就触发了这个方法
        System.out.println("person被绑定了");
    }
    @Override
    //解绑方法
    public void valueUnbound(HttpSessionBindingEvent event) {
        System.out.println("person被解绑了");
    }

}
public class TestPersonBindingServlet extends HttpServlet {

    protected void doGet(HttpServletRequest request, HttpServletResponse response)
            throws ServletException, IOException {

        HttpSession session = request.getSession();

        //将person对象绑到session中
        Person p = new Person();
        p.setId("100");
        p.setName("zhangsanfeng");

        session.setAttribute("person", p);

        //将person对象从session中解绑
        session.removeAttribute("person");
    }

    protected void doPost(HttpServletRequest request, HttpServletResponse response)
            throws ServletException, IOException {
        doGet(request, response);
    }
}
(3)钝化与活化的监听器HttpSessionActivationListener ——注意是存到session中的对象被钝化和活化
可以通过配置文件指定对象钝化时间 --对象多长时间不用被钝化。
在META-INF下创建一个context.xml来设置对象多长时间不用被钝化。
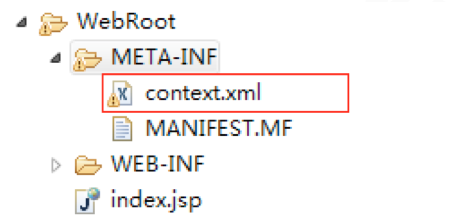
<Context>
 <!-- maxIdleSwap:session中的对象多长时间不使用就钝化,单位是分钟 -->
 <!-- directory:钝化后的对象的文件写到磁盘的哪个目录下。配置钝化的对象文件在 work/catalina/localhost/钝化文件 -->
 <Manager className="org.apache.catalina.session.PersistentManager" maxIdleSwap="1">
  <Store className="org.apache.catalina.session.FileStore" directory="itcast" />
 </Manager>
</Context>
上面的配置文件中,对象会被钝化到 $TOMCAT_NAME/work/Catalina/localhost/web应用名/itcast/ 目录下。
什么时候活化,再去访问时就活了。在下面的示例中,访问TestCustomerActiveServlet2.java就活化了。
【示例】:
public class Customer implements HttpSessionActivationListener,Serializable{ //必须实现Serializable接口,否则对象不能被写入磁盘。Serializable接口内部没有任何需要你实现的方法,它就是个标志

    private String id;
    private String name;

    public String getId() {
        return id;
    }
    public void setId(String id) {
        this.id = id;
    }
    public String getName() {
        return name;
    }
    public void setName(String name) {
        this.name = name;
    }


    @Override
    //钝化
    public void sessionWillPassivate(HttpSessionEvent se) {
        System.out.println("customer被钝化了");
    }
    @Override
    //活化
    public void sessionDidActivate(HttpSessionEvent se) {
        System.out.println("customer被活化了");
    }
}
public class TestCustomerActiveServlet extends HttpServlet {

    protected void doGet(HttpServletRequest request, HttpServletResponse response)
            throws ServletException, IOException {

        HttpSession session = request.getSession();

        //将customer放到session中
        Customer customer =new Customer();
        customer.setId("200");
        customer.setName("lucy");
        session.setAttribute("customer", customer);
        System.out.println("customer被放到session域中了");
    }

    protected void doPost(HttpServletRequest request, HttpServletResponse response)
            throws ServletException, IOException {
        doGet(request, response);
    }
}
public class TestCustomerActiveServlet2 extends HttpServlet {

    protected void doGet(HttpServletRequest request, HttpServletResponse response)
            throws ServletException, IOException {

        //从session域中获得customer
        HttpSession session = request.getSession();
        Customer customer = (Customer) session.getAttribute("customer");

        System.out.println(customer.getName());
    }

    protected void doPost(HttpServletRequest request, HttpServletResponse response)
            throws ServletException, IOException {
        doGet(request, response);
    }
}
二、邮箱服务器
1. 邮箱服务器的基本概念
邮件的客户端:可以只安装在电脑上的也可以是网页形式的。
邮件服务器:起到邮件的接受与推送的作用。
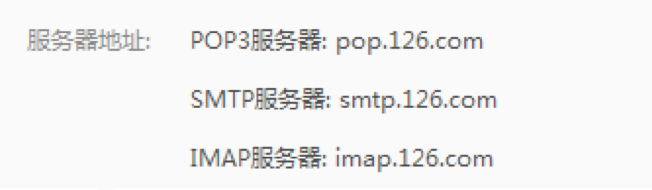
邮件发送的协议:协议:就是数据传输的约束。
- 接受邮件的协议:POP3 IMAP
- 发送邮件的协议:SMTP
2. 邮箱的发送过程
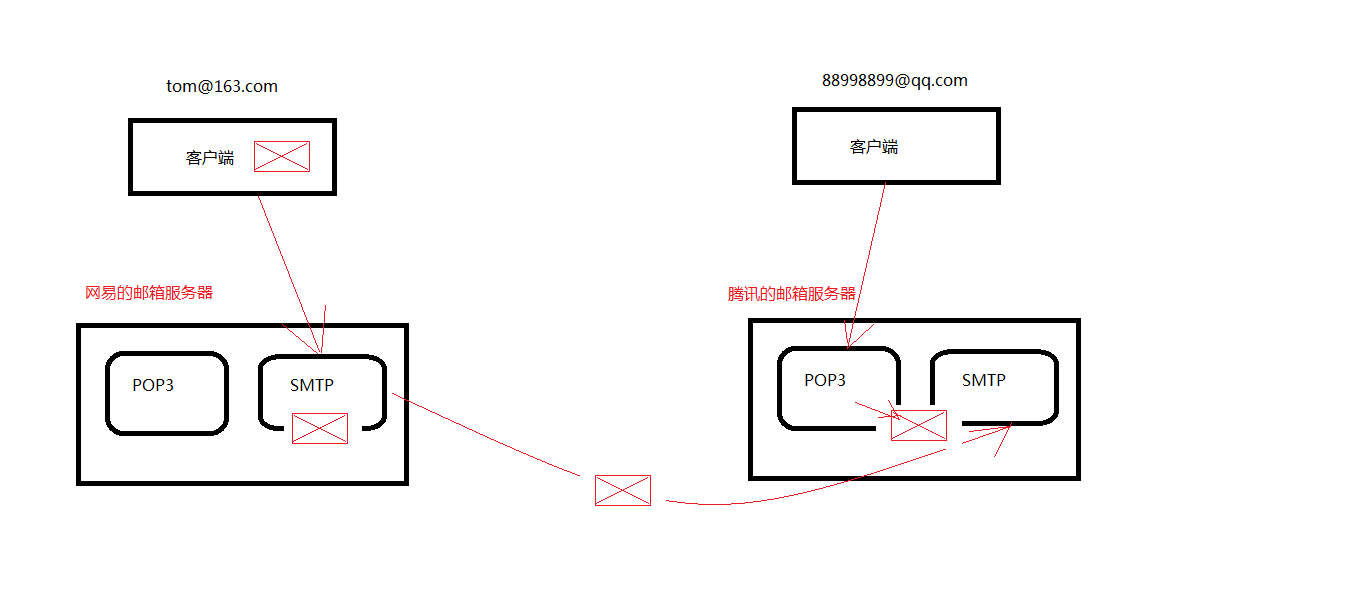
【注意】:SMTP只能找SMTP,不能找POP3,协议不一致,没办法交流。
3. 邮件发送代码
代码发邮件的应用场景:注册用户、找回密码、信用卡欠费账单。
JavaEE提供了一个额外的jar包:mail.jar。下面的发送邮件的代码拿过来用就行了,企业里面都是写好了。
public class MailUtils {

    //email:邮件发给谁  subject:主题  emailMsg:邮件的内容
    public static void sendMail(String email, String subject, String emailMsg)
            throws AddressException, MessagingException {

        // 1.创建一个程序与邮件服务器会话对象 Session
        Properties props = new Properties();
        props.setProperty("mail.transport.protocol", "SMTP");//发邮件的协议
        props.setProperty("mail.host", "localhost");//发送邮件的服务器地址,比如"smtp.126.com"
        props.setProperty("mail.smtp.auth", "true");// 指定验证为true,是否要验证

        // 创建验证器
        Authenticator auth = new Authenticator() {
            public PasswordAuthentication getPasswordAuthentication() {
                return new PasswordAuthentication("tom", "12345");//发邮件的账号的验证
            }
        };

        Session session = Session.getInstance(props, auth); //这个session和JaveEE中的session不一样,这是连接邮箱服务器成功的一个会话。这是mail包的session

        // 2.创建一个Message,它相当于是邮件内容
        Message message = new MimeMessage(session);

        message.setFrom(new InternetAddress("tom@itheima32.com")); // 设置发送者
        message.setRecipient(RecipientType.TO, new InternetAddress(email)); // 设置发送方式与接收者
        message.setSubject(subject);//邮件的主题
        message.setContent(emailMsg, "text/html;charset=utf-8");

        // 3.创建 Transport用于将邮件发送
        Transport.send(message);
    }
}
import javax.mail.MessagingException;
import javax.mail.internet.AddressException;

public class SendMailTest {

    public static void main(String[] args) throws AddressException, MessagingException {
        MailUtils.sendMail("lucy@itheima32.com", "测试邮件","这是一封测试邮件");

    }

}
三、示例:使用监听器完成定时生日祝福
public class BirthdayListener implements ServletContextListener{

    @Override
    public void contextInitialized(ServletContextEvent sce) {
        //当web应用启动,开启任务调动--功能: 在用户的生日当天发送邮件
        //开启一个定时器
        Timer timer = new Timer();
        timer.scheduleAtFixedRate(new TimerTask() {

            @Override
            public void run() {
                //为当前的生日的用户发邮件
                //1、获得今天过生日的人
                //获得今天的日期
                SimpleDateFormat format = new SimpleDateFormat("MM-dd");
                String currentDate = format.format(new Date());
                //根据当前时间从数据查询今天过生日的人
                QueryRunner runner = new QueryRunner(DataSourceUtils.getDataSource());
                String sql = "select * from customer where birthday like ?";
                List<Customer> customerList = null;
                try {
                    customerList = runner.query(sql, new BeanListHandler<Customer>(Customer.class) ,"%"+currentDate+"%");
                } catch (SQLException e) {
                    e.printStackTrace();
                } //08-18
                //2、发邮件
                if(customerList!=null&&customerList.size()>0){
                    for(Customer c : customerList){
                        String emailMsg = "亲爱的:"+c.getRealname()+",生日快乐!";
                        try {
                            MailUtils.sendMail(c.getEmail(), "生日祝福", emailMsg);
                            System.out.println(c.getRealname()+"邮件发送完毕");
                        } catch (MessagingException e) {
                            e.printStackTrace();
                        }
                    }
                }

            }
        }, new Date(), 1000*10);
        //实际开发中起始时间是一个固定的时间
        //实际开发中间隔时间是1天
    }

    @Override
    public void contextDestroyed(ServletContextEvent sce) {

    }

}
public class Customer {

    private int id;
    private String username;
    private String password;
    private String realname;
    private String birthday;
    private String email;
    public int getId() {
        return id;
    }
    public void setId(int id) {
        this.id = id;
    }
    public String getUsername() {
        return username;
    }
    public void setUsername(String username) {
        this.username = username;
    }
    public String getPassword() {
        return password;
    }
    public void setPassword(String password) {
        this.password = password;
    }
    public String getRealname() {
        return realname;
    }
    public void setRealname(String realname) {
        this.realname = realname;
    }
    public String getBirthday() {
        return birthday;
    }
    public void setBirthday(String birthday) {
        this.birthday = birthday;
    }
    public String getEmail() {
        return email;
    }
    public void setEmail(String email) {
        this.email = email;
    }

}
public class DataSourceUtils {

    private static DataSource dataSource = new ComboPooledDataSource();

    private static ThreadLocal<Connection> tl = new ThreadLocal<Connection>();

    // 直接可以获取一个连接池
    public static DataSource getDataSource() {
        return dataSource;
    }

    public static Connection getConnection() throws SQLException{
        return dataSource.getConnection();
    }

    // 获取连接对象
    public static Connection getCurrentConnection() throws SQLException {

        Connection con = tl.get();
        if (con == null) {
            con = dataSource.getConnection();
            tl.set(con);
        }
        return con;
    }

    // 开启事务
    public static void startTransaction() throws SQLException {
        Connection con = getCurrentConnection();
        if (con != null) {
            con.setAutoCommit(false);
        }
    }

    // 事务回滚
    public static void rollback() throws SQLException {
        Connection con = getCurrentConnection();
        if (con != null) {
            con.rollback();
        }
    }

    // 提交并且 关闭资源及从ThreadLocall中释放
    public static void commitAndRelease() throws SQLException {
        Connection con = getCurrentConnection();
        if (con != null) {
            con.commit(); // 事务提交
            con.close();// 关闭资源
            tl.remove();// 从线程绑定中移除
        }
    }

    // 关闭资源方法
    public static void closeConnection() throws SQLException {
        Connection con = getCurrentConnection();
        if (con != null) {
            con.close();
        }
    }

    public static void closeStatement(Statement st) throws SQLException {
        if (st != null) {
            st.close();
        }
    }

    public static void closeResultSet(ResultSet rs) throws SQLException {
        if (rs != null) {
            rs.close();
        }
    }

}
public class MailUtils {

    //email:邮件发给谁  subject:主题  emailMsg:邮件的内容
    public static void sendMail(String email, String subject, String emailMsg)
            throws AddressException, MessagingException {

        // 1.创建一个程序与邮件服务器会话对象 Session
        Properties props = new Properties();
        props.setProperty("mail.transport.protocol", "SMTP");//发邮件的协议
        props.setProperty("mail.host", "localhost");//发送邮件的服务器地址,比如"smtp.126.com"
        props.setProperty("mail.smtp.auth", "true");// 指定验证为true,是否要验证

        // 创建验证器
        Authenticator auth = new Authenticator() {
            public PasswordAuthentication getPasswordAuthentication() {
                return new PasswordAuthentication("tom", "12345");//发邮件的账号的验证
            }
        };

        Session session = Session.getInstance(props, auth); //这个session和JaveEE中的session不一样,这是连接邮箱服务器成功的一个会话。这是mail包的session

        // 2.创建一个Message,它相当于是邮件内容
        Message message = new MimeMessage(session);

        message.setFrom(new InternetAddress("tom@itheima32.com")); // 设置发送者
        message.setRecipient(RecipientType.TO, new InternetAddress(email)); // 设置发送方式与接收者
        message.setSubject(subject);//邮件的主题
        message.setContent(emailMsg, "text/html;charset=utf-8");

        // 3.创建 Transport用于将邮件发送
        Transport.send(message);
    }
}
<?xml version="1.0" encoding="UTF-8"?>
<c3p0-config>
    <default-config>
        <property name="user">root</property>
        <property name="password">123456</property>
        <property name="driverClass">com.mysql.jdbc.Driver</property>
        <property name="jdbcUrl">jdbc:mysql:///web23</property>
    </default-config>
</c3p0-config>