本节内容:
- Elasticsearch介绍
- Elasticsearch集群安装部署
- Elasticsearch优化
- 安装插件:中文分词器ik
一、Elasticsearch介绍
Elasticsearch是一个分布式搜索服务,提供Restful API,底层基于Lucene,采用多shard的方式保证数据安全,并且提供自动resharding的功能,加之github等大型的站点也采用 Elasticsearch作为其搜索服务。
二、Elasticsearch集群安装部署
1. 环境信息
| 主机名 | 操作系统版本 | IP地址 | 安装软件 |
| log1 | CentOS 7.0 | 114.55.29.86 | JDK1.7、elasticsearch-2.2.3 |
| log2 | CentOS 7.0 | 114.55.29.241 | JDK1.7、elasticsearch-2.2.3 |
| log3 | CentOS 7.0 | 114.55.253.15 | JDK1.7、elasticsearch-2.2.3 |
2. 安装JDK1.8
版本是Elasticsearch 2.2.3,官方建议jdk是1.8。3台机器都需要安装jdk1.8,添加新用户es。


[root@log1 local]# mkdir /usr/java
[root@log1 local]# tar zxf jdk-8u73-linux-x64.gz -C /usr/java/
3. 添加用户
Elasticsearch不能使用root用户去启动。
[root@log1 local]# groupadd -g 510 es
[root@log1 local]# useradd -g 510 -u 510 es
[root@log1 local]# echo "wisedu123" | passwd --stdin es &> /dev/null
用新创建的用户登录shell,配置PATH环境变量。
[es@log1 ~]$ vim ~/.bashrc
export JAVA_HOME=/usr/java/jdk1.8.0_73
export PATH=$JAVA_HOME/bin:$PATH
export CLASSPATH=.:$JAVA_HOME/lib/dt.jar:$JAVA_HOME/lib/tools.jar
[es@log1 ~]$ source ~/.bashrc
# mkdir /usr/local/elasticsearch
# chown -R es.es elasticsearch
4. 下载安装elasticsearch
es用户登录shell,下载安装elasticsearch。
[es@log1 ~]$ cd /usr/local/elasticsearch/
[es@log1 elasticsearch]$ wget https://download.elasticsearch.org/elasticsearch/release/org/elasticsearch/distribution/tar/elasticsearch/2.2.3/elasticsearch-2.2.3.tar.gz
[es@log1 elasticsearch]$ tar zxf elasticsearch-2.2.3.tar.gz
[es@log1 elasticsearch]$ mv elasticsearch-2.2.1/* ./
[es@log1 elasticsearch]$ rm -rf elasticsearch-2.2.1
[es@log1 elasticsearch]$ rm -f elasticsearch-2.2.1.tar.gz
5. 配置elasticsearch
(1)配置elasticsearch 堆内存,编辑bin/elasticsearch.in.sh
[es@log1 elasticsearch]$ vim bin/elasticsearch.in.sh
将参数:ES_MIN_MEM、ES_MAX_MEM设置为当前物理机内存的一半(注意单位,并保证两个值相等)

(2)配置Elasticsearch集群名称以及节点名称、是否为主节点、path data等信息
[es@log1 elasticsearch]$ vim config/elasticsearch.yml


(3)配置保护Elasticsearch使用的内存防止其被swapped
在memory section下,启用配置:bootstrap.mlockall: true

(4)配置network host

【注意】:另外,请在Network段在多加两个配置,内容如下:
network.bind_host: 114.55.29.86
# Set the address other nodes will use to communicate with this node. If not
# set, it is automatically derived. It must point to an actual IP address.
network.publish_host: 114.55.29.86

如果不加上如上的配置,程序在连接时会报错:
^A[2016-03-28 16:18:08.791] [ERROR] [godseye] [godseye] [RMI TCP Connection(2)-127.0.0.1] [com.wisedu.godseye.search.util.SearchUtil] [buildIndex:70] NoNodeAvailableException[None of the configured nodes are available: [{#transport#-1}{114.55.29.86}{114.55.29.86:9300}]]
(5)配置Elasticsearch的自动发现机制

另外两台也是做如上的安装配置。只不过在配置中需要修改下面几处。


三、Elasticsearch优化
1. 检验配置中的bootstrap.mlockall: true是否生效
启动Elasticsearch:
[es@log1 elasticsearch]$ bin/elasticsearch -d
在shell终端执行命令:
curl http://114.55.29.86:9200/_nodes/process?pretty
关注这个这个请求返回数据中的mlockall的值,如果为false,则说明锁定内存失败,这可能由于运行elasticsearch的用户不具备这样的权限。解决该问题的方法是: 在运行elasticsearch之前,以root身份执行:
ulimit -l unlimited
然后再次重启elasticsearch。并查看上面的请求中的mlockall的值是否为true。
【注意】:这时候需要在root执行ulimit -l unlimited的shell终端上su - es,然后重启elasticsearch。因为这是命令行设置的ulimit -l unlimited,只对当前会话生效。
[root@log1 ~]# ulimit -l unlimited
[root@log1 ~]# su - es
[es@log1 ~]$ ps -ef|grep elasticsearch
[es@log1 ~]$ kill -9 27189
[es@log1 ~]$ /usr/local/elasticsearch/bin/elasticsearch -d
[es@log1 ~]$ curl http://114.55.29.86:9200/_nodes/process?pretty

如果仍然是false,可能是下面的原因:
Another possible reason why mlockall can fail is that the temporary directory (usually /tmp) is mounted with the noexec option. This can be solved by specifying a new temp directory, by starting Elasticsearch with:
./bin/elasticsearch -Djna.tmpdir=/path/to/new/dir
要想永久修改锁定内存大小无限制,需修改/etc/security/limits.conf,添加下面的内容,改完不需要重启系统,但是需要重新打开一个shell建立会话。
es - memlock -1
其中,es代表运行elasticsearch的用户,-表示同时设置了soft和hard,memlock代表设置的是”锁定内存”这个类型,-1(unlimited或者infinity)代表没限制。
2. 配置操作系统文件描述符数
查看elasticsearch能打开的最大文件描述符个数:
curl http://114.55.29.86:9200/_nodes/stats/process?pretty
查看参数:max_file_descriptors。推荐设置到32K甚至64K。

或者输入下面的命令进行查看:
$ ulimit -a
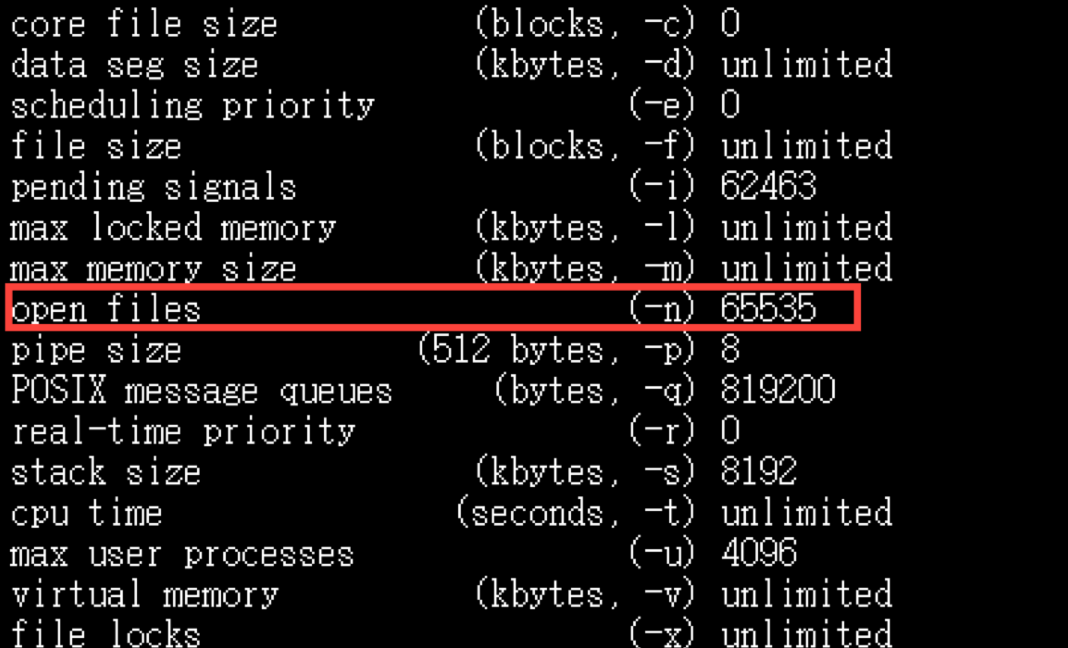
设置需要修改:
vim /etc/security/limits.conf
es               -       nofile          65535
3. 增大虚拟内存mmap count配置
备注:如果你以.deb或.rpm包安装,则默认不需要设置此项,因为已经被自动设置,查看方式为:
sysctl vm.max_map_count
如果是手动安装,以root身份执行如下命令:
sysctl vm.max_map_count=262144
并修改文件使设置永久生效:
[root@log1 ~]# vim /etc/sysctl.conf
添加一行:
vm.max_map_count = 262144
使生效:
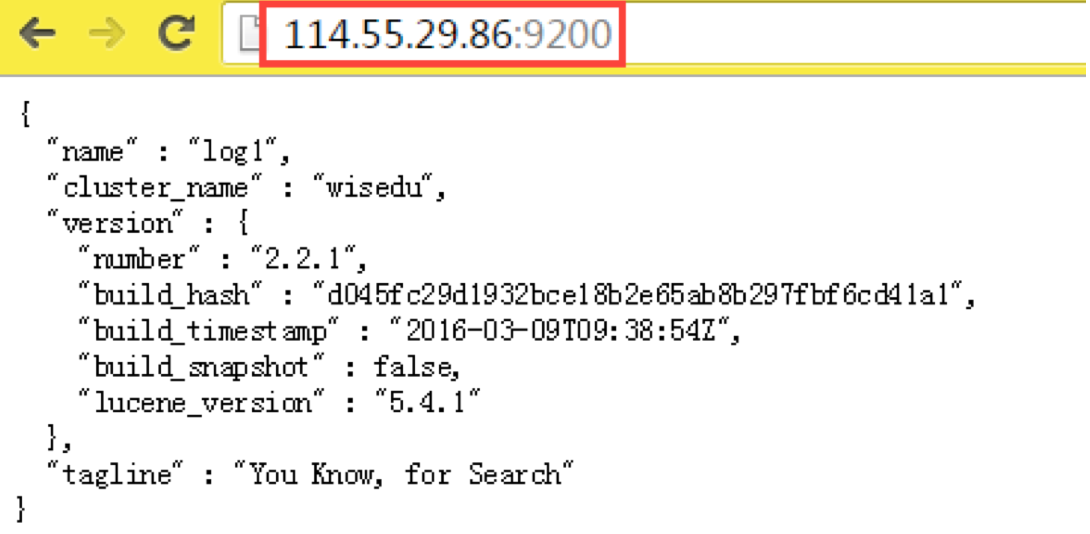
[root@log1 ~]# sysctl -p
改完后,重启elasticsearch。 在浏览器输入http://ip:9200/,查看页面信息,是否正常启动。
另外两台也需要做这些优化。
四、安装插件:中文分词器ik
elasticsearch-analysis-ik 是一款中文的分词插件,支持自定义词库。项目地址为:https://github.com/medcl/elasticsearch-analysis-ik
1. 安装Maven
由于该项目使用了Maven来管理,源代码放到github上。所以要先在服务器上面安装Maven,便可以直接在服务器上面生成项目jar包,部署起来更加方便了。
[root@log1 ~]# yum install -y maven
2. 安装ik
注意分词插件的版本,2.2.3对应的插件版本是1.9.3。

[es@log1 ~]$ git clone https://github.com/medcl/elasticsearch-analysis-ik.git
[es@log1 ~]$ cd elasticsearch-analysis-ik/
[es@log1 elasticsearch-analysis-ik]$ mvn package
3. 拷贝和解压
[es@log1 elasticsearch-analysis-ik]$ mkdir -p /usr/local/elasticsearch/plugins/ik
[es@log1 elasticsearch-analysis-ik]$ cp target/releases/elasticsearch-analysis-ik-1.9.3.zip /usr/local/elasticsearch/plugins/ik
[es@log1 ~]$ cd /usr/local/elasticsearch/plugins/ik/
[es@log1 ik]$ unzip -oq elasticsearch-analysis-ik-1.9.3.zip
4. 重启elasticsearch
直接重启就可以了,不需要在Elasticsearch中添加配置index.analysis.analyzer.ik.type : “ik” 。
[es@log1 ik]$ cd /usr/local/elasticsearch/bin/
[es@log1 bin]$ jps
20221 Jps
14910 Elasticsearch
[es@log1 bin]$ kill -9 14910
[es@log1 elasticsearch]$ bin/elasticsearch -d
另外两台也需要解压这个插件进去,重新启动。
5. 分词测试
(1)创建一个索引,名为index
[es@log1 elasticsearch]$ curl -XPUT http://114.55.29.86:9200/index
{"acknowledged":true}
(2)index some docs
命令行输入以下内容:
curl -XPOST http://114.55.29.86:9200/index/fulltext/1 -d'
{"content":"美国留给伊拉克的是个烂摊子吗"}
'

curl -XPOST http://114.55.29.86:9200/index/fulltext/2 -d'
{"content":"公安部:各地校车将享最高路权"}
'

curl -XPOST http:// 114.55.29.86:9200/index/fulltext/3 -d'
{"content":"中韩渔警冲突调查:韩警平均每天扣1艘中国渔船"}
'

curl -XPOST http:// 114.55.29.86:9200/index/fulltext/4 -d'
{"content":"中国驻洛杉矶领事馆遭亚裔男子枪击 嫌犯已自首"}
'
(3)测试
命令行输入:
curl -XPOST http://114.55.29.86:9200/index/fulltext/_search  -d'
{
        "query" : { "term" : { "content" : "中国" }},
        "highlight" : {
            "pre_tags" : ["<tag1>", "<tag2>"],
            "post_tags" : ["</tag1>", "</tag2>"],
            "fields" : {
                "content" : {}
            }
        }
}
'
结果:
{"took":74,"timed_out":false,"_shards":{"total":5,"successful":5,"failed":0},"hits":{"total":2,"max_score":1.5,"hits":[{"_index":"index","_type":"fulltext","_id":"4","_score":1.5,"_source":
{"content":"中国驻洛杉矶领事馆遭亚裔男子枪击 嫌犯已自首"}
,"highlight":{"content":["<tag1>中国</tag1>驻洛杉矶领事馆遭亚裔男子枪击 嫌犯已自首"]}},{"_index":"index","_type":"fulltext","_id":"3","_score":0.53699243,"_source":
{"content":"中韩渔警冲突调查:韩警平均每天扣1艘中国渔船"}
,"highlight":{"content":["中韩渔警冲突调查:韩警平均每天扣1艘<tag1>中国</tag1>渔船"]}}]}}
