前言:
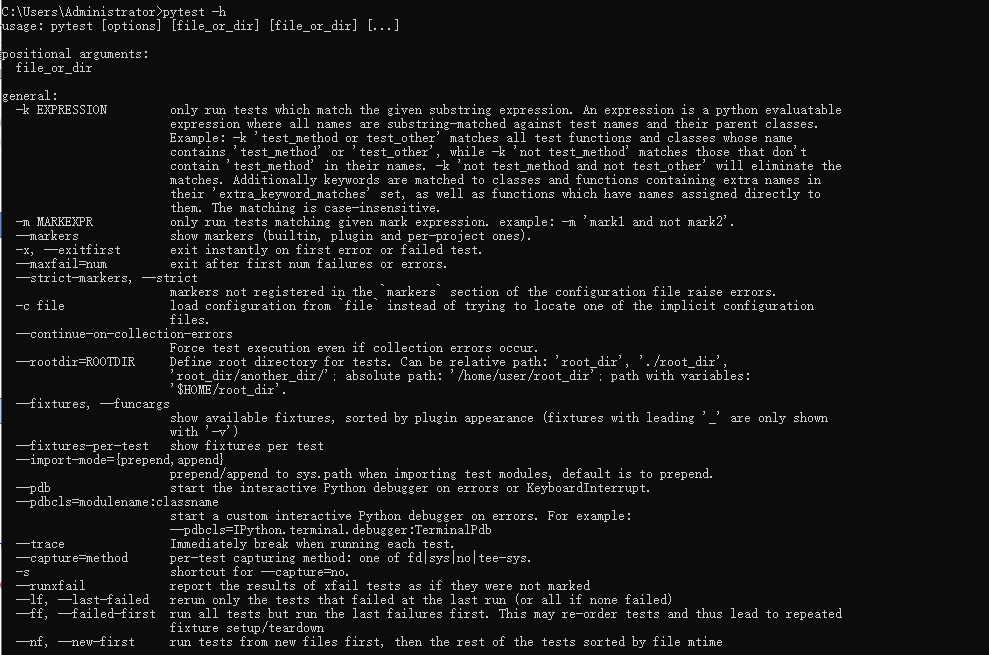
1.我们可以通过help帮助查看pytest如何使用
查看pytest命令行参数,可以用pytest -h或pytest --help查看
2. 用例设计原则
(1)文件名以test_*.py 文件和*_test.py
(2)以test_开头的函数
(3)以Test开头的类
(4)以test_开头的方法
(5)所有的包pakege必须有__init__.py文件
3.用例设计
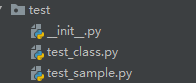
test_sample.py
def func(x):
    return x + 1

def test_answer():
    assert func(3) == 5
test_class.py
class TestClass:
    def test_one(self):
        x = "this"
        assert 'h' in x

    def test_two(self):
        x = "hello"
        assert hasattr(x,'check')

    def test_three(self):
        a = "hello"
        b = "hello world"
        assert a in b
一、执行方式
cmd执行pytest用例有三种方法,以下三种方法都可以,一般推荐第一个
1.pytest
2.py.test
3.python -m pytest
如果不带参数,在某个文件夹下执行时,它会查找该文件夹下所有的符合条件的用例(查看用例设计原则)
二、执行规则
1.执行某个目录下所有的用例
pytest 文件名/
2.执行某一个py文件下用例
pytest 脚本名称.py
3.-k 按关键字匹配
pytest -k "MyClass and not method"
4.按节点运行
运行.py 模块里面的某个函数
pytest test_mod.py::test_func
运行.py模块里面,测试类里面的某个方法
pytest test_mod.py::TestClass::test_method
5.标记表达式
pytest -m slow
将运行用@ pytest.mark.slow装饰器修饰的所有测试。
6.从包里面运行
pytest -pyargs pkg.testing
这将导入pkg.testing 并使用其文件系统位置来查询和运行测试。
7.pytest -x(遇到错误时停止测试)
pytest -x test_class.py
从运行结果可以看出,本来有3个用例,第二个用例失败后就没继续往下执行了
D:YOYO>pytest -x test_class.py
============================= test session starts =============================
platform win32 -- Python 3.6.0, pytest-3.6.3, py-1.5.4, pluggy-0.6.0
rootdir: D:YOYO, inifile:
collected 3 items

test_class.py .F

================================== FAILURES ===================================
_____________________________ TestClass.test_two ______________________________

self = <YOYO.test_class.TestClass object at 0x0000000003A29780>

    def test_two(self):
        x = "hello"
>       assert hasattr(x, 'check')
E       AssertionError: assert False
E        +  where False = hasattr('hello', 'check')

test_class.py:11: AssertionError
===================== 1 failed, 1 passed in 0.05 seconds ======================
8.pytest -maxfail=num(当用例错误个数达到指定数量时,停止测试)
pytest -maxfail=1
三、PyCharm配置pytest
 四、PyCharm运行三种方式
def hello():
    print("hello world !")

if __name__=="__main__":
    hello()
2.以unittest方式运行
当脚本命名为test_xx.py时,用到unittest框架,此时运行代码,PyCharm会自动识别到以unittest方式运行
3.pytest方式运行
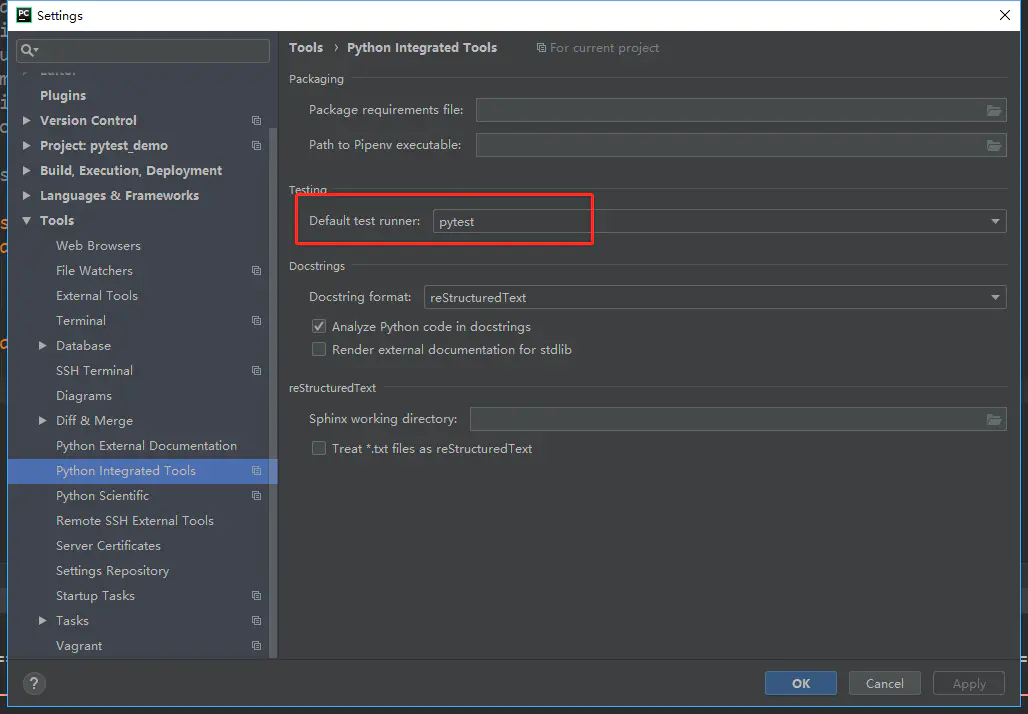
以pytest方式运行,需要改该工程设置默认的运行器:file->Setting->Tools->Python Integrated Tools->项目名称->Default test runner->选择pytest
ps:pytest是可以兼容unittest框架代码
四、实际应用
在PyCharm里面写pytest用例,先导入pytest
import pytest

class TestClass:
    def test_one(self):
        x = "this"
        assert 'h' in x

    def test_two(self):
        x = "hello"
        assert hasattr(x,'check')

    def test_three(self):
        a = "hello"
        b = "hello world"
        assert a in b

if __name__ == "__main__":
    pytest.main('[-q test_class.py')
运行结果:

五、PyCharm设置pytest
1.新建一个工程后,左上角file->Setting->Tools->Python Integrated Tools->项目名称->Default test runner->选择pytest
2.改完之后,再重新建个脚本(注意是先改项目运行方式,再写代码才能出来),接下来右键运行就能出来pytest运行了
3.pytest是可以兼容unittest脚本的,之前写的unittest用例也能用pytest框架去运行
参考链接:https://www.jianshu.com/p/8ac2c0f70583