1 分布式文件系统GlusterFS
GlusterFS适合存储大文件,小文件性能较差。生产上可以使用GlusterFS+Cinder为Openstack提供块存储,存储虚拟机镜像。
7.1 GlusterFS概述
GlusterFS是Scale-Out存储解决方案Gluster的核心,它是一个开源的分布式文件系统,具有强大的横向扩展能力,通过扩展能够支持数PB存储容量和处理数千客户端。GlusterFS借助TCP/IP或InfiniBand RDMA网络将物理分布的存储资源聚集在一起,使用单一全局命名空间来管理数据。GlusterFS基于可堆叠的用户空间设计,可为各种不同的数据负载提供优异的性能。
7.1.1 GlusterFS架构

7.1.2 GulsterFS特性
7.2 GlusterFS部署
7.2.1 环境说明
本文使用以下环境进行部署。
|
主机名 |
IP地址 |
角色 |
备注 |
|
linux-node1.unixhot.com |
192.168.56.11 |
Server、Client |
|
|
linux-node2.unixhot.com |
192.168.56.12 |
Server、Client |
7.2.2 GlusterFS安装
目前Gluster的最新版本为3.4.3版本,直接使用官方提供的repo进行安装。
[root@linux-node2 ~]# yum install centos-release-gluster
[root@linux-node2 ~]# yum install glusterfs-server
验证安装
[root@linux-node1 yum.repos.d]# glusterfs -V
glusterfs 3.4.3 built on Apr 3 2014 16:02:46
Repository revision: git://git.gluster.com/glusterfs.git
Copyright (c) 2006-2013 Red Hat, Inc. http://www.redhat.com/
启动Glusterd
[root@linux-node1 yum.repos.d]# /etc/init.d/glusterd start
请安装并启动linux-node2
7.3 Trusted Storage Pools创建
在开始创建ClusterFS卷之前,需要创建一个称之为Trusted Storage的池,是一个可信的网络存储服务器,可以理解为集群。为卷提供bricks。
gluster peer probe<主机名或者IP地址>,建议是IP地址,或者内网用DNS做主机名解析,或者在/etc/hosts做好绑定。
7.3.1 增加Server到Pool
添加成员服务器到Poll中:例
[root@linux-node1 ~]# gluster peer probe 192.168.1.12
peer probe: success
7.3.2 从Pool中删除Server
删除集群中的成员服务器:例
[root@linux-node1 ~]# gluster peer detach linux-node2.unixhot.com
peer detach: success
注意不要添加本地的服务器。
[root@linux-node1 ~]# gluster peer probe 10.6.16.1
peer probe: success: on localhost not needed
[root@linux-node1 ~]# gluster peer probe 10.6.16.2
peer probe: success
7.3.3 查看Pool状态
[root@linux-node1 ~]# gluster peer status
Number of Peers: 3
7.4 GlusterFS Volumes创建
GlusterFS的卷共有三种基本类型,可以组合共7种类型,其中Distributed、Replicated、Strped、为基本类型。Distributed Striped、Distributed Replicated、Distributed Striped Replicated、Striped Replicated。为组合类型。
本文为了测试7种卷类型,需要在各个服务器分别创建7个目录。
[root@linux-node1 ~]# mkdir /data && cd /data && mkdir type{1,2,3,4,5,6,7}/exp{1,2,3,4,5,6,7} –p
创建Volumes使用以下命令进行:
gluster volume create NEW-VOLNAME [stripe COUNT | replica COUNT]
[transport [tcp | rdma | tcp,rdma]] NEW-BRICK1 NEW-BRICK2 NEW-BRICK3...
7.4.1 创建分布式卷
分布式卷架构示意图:
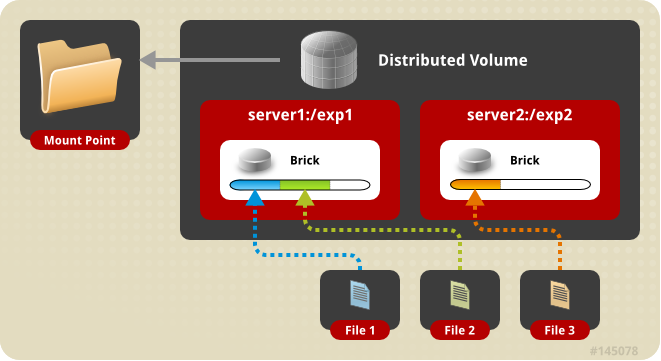
[root@linux-node1 data]# gluster volume create test1-volume 10.6.16.1:/data/type1/exp1 10.6.16.2:/data/type1/exp1 10.6.11.31:/data/type1/exp1 10.6.11.32:/data/type1/exp1 force
volume create: test1-volume: success: please start the volume to access data
[root@linux-node1 data]# gluster volume info test1-volume
Volume Name: test1-volume
Type: Distribute
Volume ID: 1ed9c3fe-3bc7-4525-b194-219a8e85f7fb
Status: Created
Number of Bricks: 4
Transport-type: tcp
Bricks:
Brick1: 10.6.16.1:/data/type1/exp1
Brick2: 10.6.16.2:/data/type1/exp1
Brick3: 10.6.11.31:/data/type1/exp1
Brick4: 10.6.11.32:/data/type1/exp1
7.4.2 创建复制卷
复制卷的架构示意图。
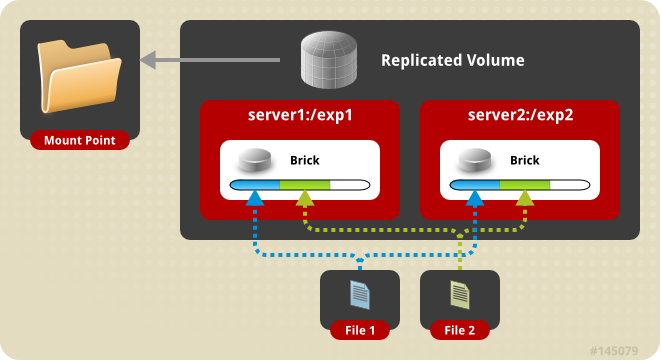
[root@linux-node1 data]# gluster volume create test2-volume replica 4 10.6.16.1:/data/type2/exp1 10.6.16.2:/data/type2/exp1 10.6.11.31:/data/type2/exp1 10.6.11.32:/data/type2/exp1 force
volume create: test2-volume: success: please start the volume to access data
[root@linux-node1 data]# gluster volume info test2-volume
Volume Name: test2-volume
Type: Replicate
Volume ID: 035b6768-2d07-4530-aa91-38571cacc90c
Status: Created
Number of Bricks: 1 x 4 = 4
Transport-type: tcp
Bricks:
Brick1: 10.6.16.1:/data/type2/exp1
Brick2: 10.6.16.2:/data/type2/exp1
Brick3: 10.6.11.31:/data/type2/exp1
Brick4: 10.6.11.32:/data/type2/exp1
7.4.3 创建条带卷
条带卷架构示意图:
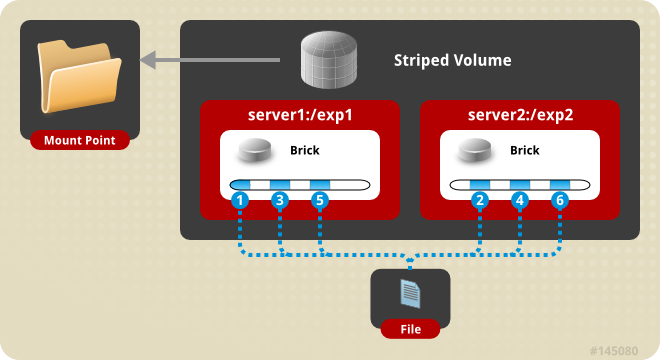
[root@linux-node1 ~]# gluster volume create test3-volume stripe 4 10.6.16.1:/data/type3/exp1 10.6.16.2:/data/type3/exp1 10.6.11.31:/data/type3/exp1 10.6.11.32:/data/type3/exp1 force
volume create: test3-volume: success: please start the volume to access data
[root@linux-node1 ~]# gluster volume info test3-volume
Volume Name: test3-volume
Type: Stripe
Volume ID: 6d754a08-c0e9-4fb8-bc8e-54c8f1f3cbe4
Status: Created
Number of Bricks: 1 x 4 = 4
Transport-type: tcp
Bricks:
Brick1: 10.6.16.1:/data/type3/exp1
Brick2: 10.6.16.2:/data/type3/exp1
Brick3: 10.6.11.31:/data/type3/exp1
Brick4: 10.6.11.32:/data/type3/exp1
7.4.4 创建分布式+条带卷
分布式条带卷架构示意图:
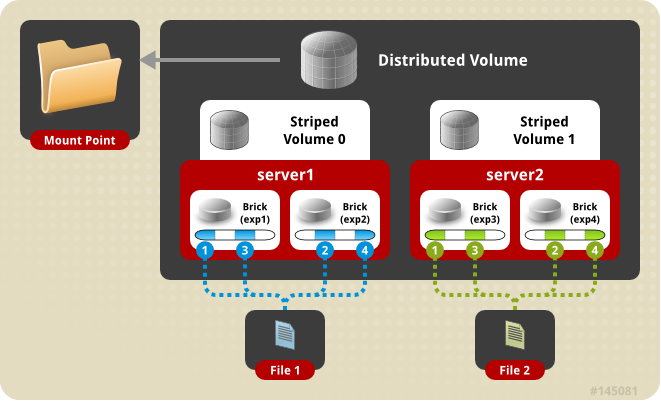
[root@linux-node1 ~]# gluster volume create test4-volume stripe 2 10.6.16.1:/data/type4/exp1 10.6.16.2:/data/type4/exp1 10.6.11.31:/data/type4/exp1 10.6.11.32:/data/type4/exp1 force
volume create: test4-volume: success: please start the volume to access data
[root@linux-node1 ~]# gluster volume info test4-volume
Volume Name: test4-volume
Type: Distributed-Stripe
Volume ID: 2b14574c-79c6-4329-91b9-8dc036969f2f
Status: Created
Number of Bricks: 2 x 2 = 4
Transport-type: tcp
Bricks:
Brick1: 10.6.16.1:/data/type4/exp1
Brick2: 10.6.16.2:/data/type4/exp1
Brick3: 10.6.11.31:/data/type4/exp1
Brick4: 10.6.11.32:/data/type4/exp1
7.4.5 创建分布式+复制卷
分布式复制卷架构示意图:

[root@linux-node1 ~]# gluster volume create test5-volume replica 2 10.6.16.1:/data/type5/exp1 10.6.16.2:/data/type5/exp1 10.6.11.31:/data/type5/exp1 10.6.11.32:/data/type5/exp1 force
volume create: test5-volume: success: please start the volume to access data
[root@linux-node1 ~]# gluster volume info test5-volume
Volume Name: test5-volume
Type: Distributed-Replicate
Volume ID: fc94f6f7-a3e4-471b-82b0-4e74d5a529b9
Status: Created
Number of Bricks: 2 x 2 = 4
Transport-type: tcp
Bricks:
Brick1: 10.6.16.1:/data/type5/exp1
Brick2: 10.6.16.2:/data/type5/exp1
Brick3: 10.6.11.31:/data/type5/exp1
Brick4: 10.6.11.32:/data/type5/exp1
7.4.6 创建分布式+条带+复制卷
[root@linux-node1 ~]# gluster volume create test6-volume stripe 2 replica 2 10.6.16.1:/data/type6/exp1 10.6.16.1:/data/type6/exp2 10.6.16.2:/data/type6/exp1 10.6.16.2:/data/type6/exp2 10.6.11.31:/data/type6/exp1 10.6.11.31:/data/type6/exp2 10.6.11.32:/data/type6/exp1 10.6.11.32:/data/type6/exp2 force
Multiple bricks of a replicate volume are present on the same server. This setup is not optimal.
Do you still want to continue creating the volume? (y/n) y
volume create: test6-volume: success: please start the volume to access data
[root@linux-node1 ~]# gluster volume info test6-volume
Volume Name: test6-volume
Type: Distributed-Striped-Replicate
Volume ID: e6d681e3-b006-41ce-a466-c4c16cf03cce
Status: Created
Number of Bricks: 2 x 2 x 2 = 8
Transport-type: tcp
Bricks:
Brick1: 10.6.16.1:/data/type6/exp1
Brick2: 10.6.16.1:/data/type6/exp2
Brick3: 10.6.16.2:/data/type6/exp1
Brick4: 10.6.16.2:/data/type6/exp2
Brick5: 10.6.11.31:/data/type6/exp1
Brick6: 10.6.11.31:/data/type6/exp2
Brick7: 10.6.11.32:/data/type6/exp1
Brick8: 10.6.11.32:/data/type6/exp2
7.4.7 创建条带+复制卷

[root@linux-node1 ~]# gluster volume create test7-volume stripe 2 replica 2 10.6.16.1:/data/type7/exp1 10.6.16.2:/data/type7/exp1 10.6.11.31:/data/type7/exp1 10.6.11.32:/data/type7/exp1 force
volume create: test7-volume: success: please start the volume to access data
[root@linux-node1 ~]# gluster volume info test7-volume
Volume Name: test7-volume
Type: Striped-Replicate
Volume ID: 3f007e9e-3c42-4dd3-935e-60da041659d1
Status: Created
Number of Bricks: 1 x 2 x 2 = 4
Transport-type: tcp
Bricks:
Brick1: 10.6.16.1:/data/type7/exp1
Brick2: 10.6.16.2:/data/type7/exp1
Brick3: 10.6.11.31:/data/type7/exp1
Brick4: 10.6.11.32:/data/type7/exp1
7.4.8 启动卷
在开始挂载使用卷之前,必需先启动卷。使用以下命令启动卷。
[root@linux-node3 yum.repos.d]# gluster volume start
Usage: volume start <VOLNAME> [force]
7.5 客户端挂载
GlusterFS支持三种客户端类型。Gluster Native Client、NFS和CIFS。官方推荐使用Native Client,可以使用GlusterFS的全部功能。
7.5.1 Gluster Native Client
Gluster Native Client是基于FUSE的,所以需要保证客户端安装了FUSE。这个是官方推荐的客户端,支持高并发和高效的写性能。
[root@linux-node4 ~]# yum -y install glusterfs-client
[root@linux-node4 ~]# mkdir /mnt/glusterfs
[root@linux-node4 ~]# mount.glusterfs 10.6.16.1:/test1-volume /mnt/glusterfs/
[root@linux-node4 ~]# mount
/dev/sda3 on / type ext4 (rw)
proc on /proc type proc (rw)
sysfs on /sys type sysfs (rw)
devpts on /dev/pts type devpts (rw,gid=5,mode=620)
tmpfs on /dev/shm type tmpfs (rw)
/dev/sda1 on /boot type ext4 (rw)
none on /proc/sys/fs/binfmt_misc type binfmt_misc (rw)
10.6.16.1:/test1-volume on /mnt/glusterfs type fuse.glusterfs (rw,default_permissions,allow_other,max_read=131072)
挂载参数
当使用mount –t glusterfs的使用,可以执行相关的参数如下:
backupvolfile-server=server-name
volfile-max-fetch-attempts=number of attempts
log-level=loglevel
log-file=logfile
transport=transport-type
direct-io-mode=[enable|disable]
For example:
# mount -t glusterfs -o backupvolfile-server=volfile_server2 --volfile-max-fetch-attempts=2 log-level=WARNING,log-file=/var/log/gluster.log server1:/test-volume /mnt/glusterfs
If backupvolfile-server option is added while mounting fuse client, when the first volfile server fails, then the server specified in backupvolfile-server option is used as volfile server to mount the client.
In --volfile-max-fetch-attempts=X option, specify the number of attempts to fetch volume files while mounting a volume. This option is useful when you mount a server with multiple IP addresses or when round-robin DNS is configured for the server-name..
7.5.2 NFS 挂载
NFS默认是使用的UDP进行通信,由于GlusterFS不支持UDP。所以需要设置为TCP的方式挂载。
mount -o mountproto=tcp -t nfs server1:/test-volume /mnt/glusterfs
7.5.3 CIFS挂载
7.5.4 测试各个卷类型
7.6 管理GlusterFS卷
7.6.1 停止卷
[root@linux-node1 ~]# gluster volume stop test1-volume
7.6.2 删除卷
[root@linux-node1 ~]# gluster volume delete test1-volume
7.6.3 扩展卷
GlusterFS支持在线进行卷的扩展。
[root@linux-node3 data]# gluster peer probe 10.6.11.21
peer probe: success
[root@linux-node3 data]# gluster volume add-brick test1-volume 10.6.11.21:/data/type1/exp1 force
volume add-brick: success
[root@linux-node3 data]# gluster volume info test1-volume
Volume Name: test1-volume
Type: Distribute
Volume ID: 1ed9c3fe-3bc7-4525-b194-219a8e85f7fb
Status: Stopped
Number of Bricks: 5
Transport-type: tcp
Bricks:
Brick1: 10.6.16.1:/data/type1/exp1
Brick2: 10.6.16.2:/data/type1/exp1
Brick3: 10.6.11.31:/data/type1/exp1
Brick4: 10.6.11.32:/data/type1/exp1
Brick5: 10.6.11.21:/data/type1/exp1
7.6.4 收缩卷
收缩卷和扩展卷相似据以Brick为单位。
[root@linux-node3 data]# gluster volume remove-brick test1-volume 10.6.11.21:/data/type1/exp1 start
volume remove-brick start: success
ID: 15764d05-5675-46b5-8467-b9eb12570e61
[root@linux-node3 data]# gluster volume remove-brick test1-volume 10.6.11.21:/data/type1/exp1 status
[root@linux-node3 data]# gluster volume remove-brick test1-volume 10.6.11.21:/data/type1/exp1 commit
Removing brick(s) can result in data loss. Do you want to Continue? (y/n) y
volume remove-brick commit: success
[root@linux-node3 data]# gluster volume info test1-volume
Volume Name: test1-volume
Type: Distribute
Volume ID: 1ed9c3fe-3bc7-4525-b194-219a8e85f7fb
Status: Started
Number of Bricks: 4
Transport-type: tcp
Bricks:
Brick1: 10.6.16.1:/data/type1/exp1
Brick2: 10.6.16.2:/data/type1/exp1
Brick3: 10.6.11.31:/data/type1/exp1
Brick4: 10.6.11.32:/data/type1/exp1
7.6.5 迁移卷
进行卷迁移前需要确保迁移目标已经加入集群。或者迁移的Brick目录存在。迁移卷可以执行暂停和中止的操作。
[root@linux-node3 data]# gluster volume replace-brick test1-volume 10.6.16.1:/data/type1/exp1 10.6.16.1:/data/type1/exp2 commit force
All replace-brick commands except commit force are deprecated. Do you want to continue? (y/n) y
暂停迁移
gluster volume replace-brick test1-volume 10.6.16.1:/data/type1/exp1 10.6.16.1:/data/type1/exp2 pause
中止迁移
gluster volume replace-brick test1-volume 10.6.16.1:/data/type1/exp1 10.6.16.1:/data/type1/exp2 abort
2.3.3.3替换Brick
# gluster volume replace-brick VOLNAME BRICKNEW-BRICK start/pause/abort/status/commit
#gluster volume replace-brick dht_vol server0:/mnt/sdb1 server0:/mnt/sdc1 start
//如上,执行replcace-brick卷替换启动命令,使用start启动命令后,开始将原始Brick的数据迁移到即将需要替换的Brick上。
#gluster volume replace-brick dht_vol server0:/mnt/sdb1 server0:/mnt/sdc1 status
//在数据迁移的过程中,可以查看替换任务是否完成。
#gluster volume replace-brick dht_vol server0:/mnt/sdb1 server0:/mnt/sdc1 abort
//在数据迁移的过程中,可以执行abort命令终止Brick替换。
#gluster volume replace-brick dht_vol server0:/mnt/sdb1 server0:/mnt/sdc1 commit
//在数据迁移结束之后,执行commit命令结束任务,则进行Brick替换。使用volume info命令可以查看到Brick已经被替换。
1.1.1 系统配额
开启/关闭系统配额
# gluster volume quota VOLNAME enable/disable
//在使用系统配额功能时,需要使用enable将其开启;disable为关闭配额功能命令。
设置(重置)目录配额
# gluster volume quota VOLNAME limit-usage /directory limit-value
#gluster volume quota dht_vol limit-usage /quota 10GB
//如上,设置dht_vol卷下的quota子目录的限额为10GB。
PS:这个目录是以系统挂载目录为根目录”/”,所以/quota即客户端挂载目录下的子目录quota
配额查看
# gluster volume quota VOLNAME list
# gluster volume quota VOLNAME list /directory name
//可以使用如上两个命令进行系统卷的配额查看,第一个命令查看目的卷的所有配额设置,第二个命令则是执行目录进行查看。
//可以显示配额大小及当前使用容量,若无使用容量(最小0KB)则说明设置的目录可能是错误的(不存在)。
地域复制(geo-replication)
# gluster volume geo-replication MASTER SLAVE start/status/stop
地域复制是系统提供的灾备功能,能够将系统的全部数据进行异步的增量备份到另外的磁盘中。
#gluster volume geo-replication dht_vol 192.168.2.104:/mnt/sdb1 start
//如上,开始执行将dht_vol卷的所有内容备份到2.104下的/mnt/sdb1中的task,需要注意的是,这个备份目标不能是系统中的Brick。
1.1.2 I/O信息查看
Profile Command 提供接口查看一个卷中的每一个brick的IO信息。
#gluster volume profile VOLNAME start
//启动profiling,之后则可以进行IO信息查看
#gluster volume profile VOLNAME info
//查看IO信息,可以查看到每一个Brick的IO信息
# gluster volume profile VOLNAME stop
//查看结束之后关闭profiling功能
1.1.3 Top监控
Top command 允许你查看bricks的性能例如:read, write, file open calls, file read calls, file write calls, directory open calls, and directory real calls
所有的查看都可以设置top数,默认100
# gluster volume top VOLNAME open [brick BRICK-NAME] [list-cnt cnt]
//查看打开的fd
#gluster volume top VOLNAME read [brick BRICK-NAME] [list-cnt cnt]
//查看调用次数最多的读调用
#gluster volume top VOLNAME write [brick BRICK-NAME] [list-cnt cnt]
//查看调用次数最多的写调用
# gluster volume top VOLNAME opendir [brick BRICK-NAME] [list-cnt cnt]
# gluster volume top VOLNAME readdir [brick BRICK-NAME] [list-cnt cnt]
//查看次数最多的目录调用
# gluster volume top VOLNAME read-perf [bs blk-size count count] [brick BRICK-NAME] [list-cnt cnt]
//查看每个Brick的读性能
# gluster volume top VOLNAME write-perf [bs blk-size count count] [brick BRICK-NAME] [list-cnt cnt]
//查看每个Brick的写性能