这部分的代码在https://github.com/zhaobao1830/koa2中demo文件夹中
Koa就是基于node自带的http模块,经过封装,监听端口,实现ctx(上下文)管理,中间件管理等
例子1、koa监听3000端口,在页面输出值
 1 const Koa = require('koa')
 2 const app = new Koa()
 3
 4 app.use((ctx,next) => {
 5   ctx.body = 'hello koa2'
 6 })
 7
 8 app.listen(3000, function () {
 9   console.log('启动3000端口')
10 })
ctx 是封装了request和response的上下文
next 的作用就是执行下一个中间件
APP 启动应用
例子2、http监听3000端口,页面返回值
1 const http = require('http')
2
3 const server = http.createServer((req,res) => {
4   res.writeHead('200')
5   res.end('hello node')
6 })
7 server.listen(3000, function () {
8   console.log('启动了3000端口')
9 })
例子3、使用http封装一个简单的web服务
 1 const http = require('http')
 2
 3 class application{
 4   constructor() {
 5     this.callback = () => {}
 6   }
 7
 8   use(callback) {
 9     this.callback = callback
10   }
11
12   listen(...args) {
13     const server = http.createServer((req,res) => {
14       this.callback(req, res)
15     })
16     server.listen(...args)
17   }
18 }
19
20 module.exports = application
 1 const Koa3 = require('./index3')
 2 const app = new Koa3()
 3
 4 app.use((req,res) => {
 5   res.writeHead(200)
 6   res.end('hello Koa3')
 7 })
 8
 9 app.listen(3003, function () {
10   console.log('启动3003端口')
11 })
例子4:
koa2中的ctx就是上下文,用来挂载request和response对象
js的get和set方法
 1 const yese = {
 2   _name: '夜色',
 3   get name() {
 4     return this._name
 5   },
 6   set name(val) {
 7     console.log('new name is' + val)
 8     this._name = val
 9   }
10 }
11
12 console.log(yese.name)
13 yese.name = '荷塘月色'
14 console.log(yese.name)
加入ctx上下文,封装了http里的request和response
index7.js
 1 const http = require('http')
 2
 3 //req是http模块里的
 4 let request = {
 5   get url () {
 6     return this.req.url
 7   }
 8 }
 9
10 let response = {
11   get body () {
12     return this._body
13   },
14   set body (val) {
15     this._body = val
16   }
17 }
18
19 // 把上面定义的request和response挂载到context对象中
20 let context = {
21    get url () {
22      return this.request.url
23    },
24    get body () {
25      return this.response.body
26    },
27   set body (val) {
28      this.response.body = val
29   }
30 }
31
32
33 class application{
34   constructor() {
35     // 把上面定义的context,request,response挂载到application中
36     this.context = context
37     this.request = request
38     this.response = response
39   }
40
41   use(callback) {
42     this.callback = callback
43   }
44   listen(...args) {
45     const server = http.createServer(async (req, res) => {
46       let ctx = this.createCtx(req,res)
47       await this.callback(ctx)
48       ctx.res.end(ctx.body)
49     })
50     server.listen(...args)
51   }
52   createCtx (req, res) {
53     let ctx = Object.create(this.context)
54     ctx.request = Object.create(this.request)
55     ctx.response = Object.create(this.response)
56     // 把http里的req赋值给ctx.request的req和ctx.req上
57     ctx.req = ctx.request.req = req
58     ctx.res = ctx.response.req = res
59     return ctx
60   }
61 }
62
63 module.exports = application
调用
 1 const Koa3 = require('./index7')
 2 const app = new Koa3()
 3
 4 app.use(async (ctx) => {
 5   ctx.body = 'hello Koa2 '+ ctx.url
 6 })
 7
 8 app.listen(3003, function () {
 9   console.log('启动3003端口')
10 })
例子5、(这个例子是同步的)compose中间件
 1 function add(x, y) {
 2   return x + y
 3 }
 4 function double(z) {
 5   return z*2
 6 }
 7
 8 const middlewares = [add, double]
 9 let len = middlewares.length
10 // 中间件
11 function compose(midds) {
12   console.log('midds:'+midds)
13    return (...args) => {
14     console.log(...args)
15      // 初始值
16      let res = midds[0](...args)
17      console.log(res)
18      for (let i = 1; i < len; i++) {
19        res = midds[i](res)
20      }
21      return res
22    }
23 }
24 const fn = compose(middlewares)
25 const res = fn(1,2)
26 console.log(res)
例子6、

自己实现的一个简单的compose代码
 1 async function fn1(next) {
 2   console.log('fn1')
 3   await next()
 4   console.log('end fn1')
 5 }
 6 async function fn2(next) {
 7   console.log('fn2')
 8   await delay()
 9   await next()
10   console.log('end fn2')
11 }
12 function fn3() {
13   console.log('fn3')
14 }
15
16 function delay() {
17   return new Promise((resolve, reject) => {
18     setTimeout(() => {
19       resolve()
20     }, 2000)
21   })
22 }
23
24 function compose (middlewares) {
25   return function () {
26     return dispatch(0)
27
28     function dispatch(i) {
29       let fn = middlewares[i]
30       if(!fn) {
31         return Promise.resolve()
32       }
33       // 这俩行是compose的核心代码
34       return Promise.resolve(fn(function next() {
35         return dispatch(i+1)
36       }))
37     }
38   }
39
40 }
41
42 const middlewares = [fn1, fn2, fn3]
43
44 const finalfn = compose(middlewares)
45 finalfn()
运行结果为:
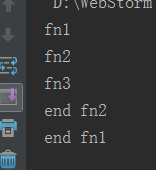
个人理解:核心就是先执行方法里的值,遇到了next(),就执行下一层的(koa2是一个类似洋葱圈的结构)
index11.js
 1 const http = require('http')
 2
 3 //req是http模块里的
 4 let request = {
 5   get url () {
 6     return this.req.url
 7   }
 8 }
 9
10 let response = {
11   get body () {
12     return this._body
13   },
14   set body (val) {
15     this._body = val
16   }
17 }
18
19 // 把上面定义的request和response挂载到context对象中
20 let context = {
21   get url () {
22     return this.request.url
23   },
24   get body () {
25     return this.response.body
26   },
27   set body (val) {
28     this.response.body = val
29   }
30 }
31
32
33 class application{
34   constructor() {
35     // 把上面定义的context,request,response挂载到application中
36     this.context = context
37     this.request = request
38     this.response = response
39     this.middlewares = []
40   }
41
42   use(callback) {
43     this.middlewares.push(callback)
44     // this.callback = callback
45   }
46   compose (middlewares) {
47     return function (context) {
48       return dispatch(0)
49
50         function dispatch(i) {
51           let fn = middlewares[i]
52           if(!fn) {
53             return Promise.resolve()
54           }
55           // 这俩行是compose的核心代码
56           return Promise.resolve(fn(context, function next() {
57             return dispatch(i+1)
58           }))
59         }
60     }
61   }
62   listen(...args) {
63     const server = http.createServer(async (req, res) => {
64       let ctx = this.createCtx(req,res)
65       const fn = this.compose(this.middlewares)
66       await fn(ctx)
67       ctx.res.end(ctx.body)
68     })
69     server.listen(...args)
70   }
71   createCtx (req, res) {
72     let ctx = Object.create(this.context)
73     ctx.request = Object.create(this.request)
74     ctx.response = Object.create(this.response)
75     // 把http里的req赋值给ctx.request的req和ctx.req上
76     ctx.req = ctx.request.req = req
77     ctx.res = ctx.response.req = res
78     return ctx
79   }
80 }
81
82 module.exports = application
 1 const Koa3 = require('./index11')
 2 const app = new Koa3()
 3
 4 function delay() {
 5   return new Promise((resolve, reject) => {
 6     setTimeout(() => {
 7       resolve()
 8     }, 2000)
 9   })
10 }
11
12 app.use(async (ctx, next) => {
13   ctx.body = '1'
14   await next()
15   ctx.body += '2'
16 })
17
18 app.use(async (ctx, next) => {
19   ctx.body += '3'
20   await delay()
21   await next()
22   ctx.body += '4'
23 })
24
25 app.use(async (ctx, next) => {
26   ctx.body += '5'
27 })
28
29 app.listen(3003, function () {
30   console.log('启动3003端口')
31 })
运行结果:
打开页面 2秒以后出现:13542 (async await要等异步的操作都执行完,才会输出结果)

Koa2的其他知识
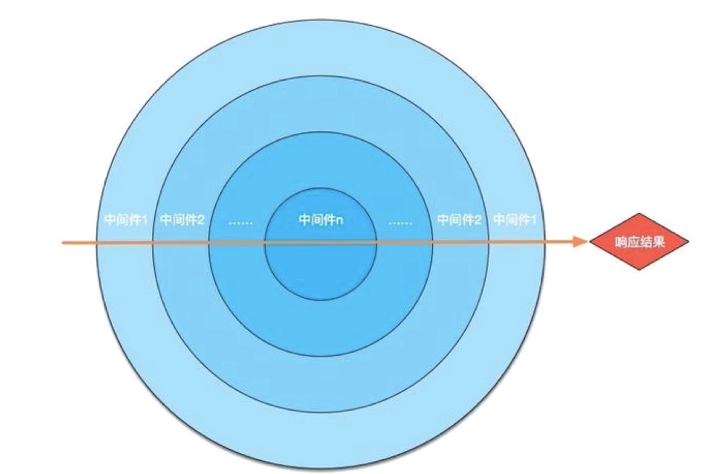
app.use()就算是一个中间件
中间件概念:一个http请求是:发起请求request,返回结果response,中间的部分就可以理解为中间件