项目中有些时候需要写服务,一般我们都是先创建控制台程序,测试,运行,成功之后再创建windows服务程序,这样好麻烦啊,有没有简单的控制台程序直接变成Widnows服务,经过查找,找到了Topshelf。Topshelf是一个托管使用.NET框架编写的服务的框架,简化了服务的创建,允许开发人员创建一个简单的控制台应用程序,可以使用Topshelf作为服务安装。
使用NSSM工具将exe封装为服务
根据下面的评论,增加了这一部分的内容,NSSM是一款比较好用的将exe封装为服务的工具
1.下载NSSM官网https://nssm.cc/,download
2. 解压
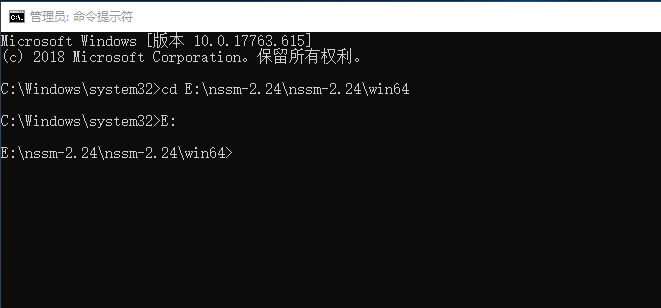
3. 在cmd中找到nssm.exe
例如:E:
ssm-2.24
ssm-2.24win64>
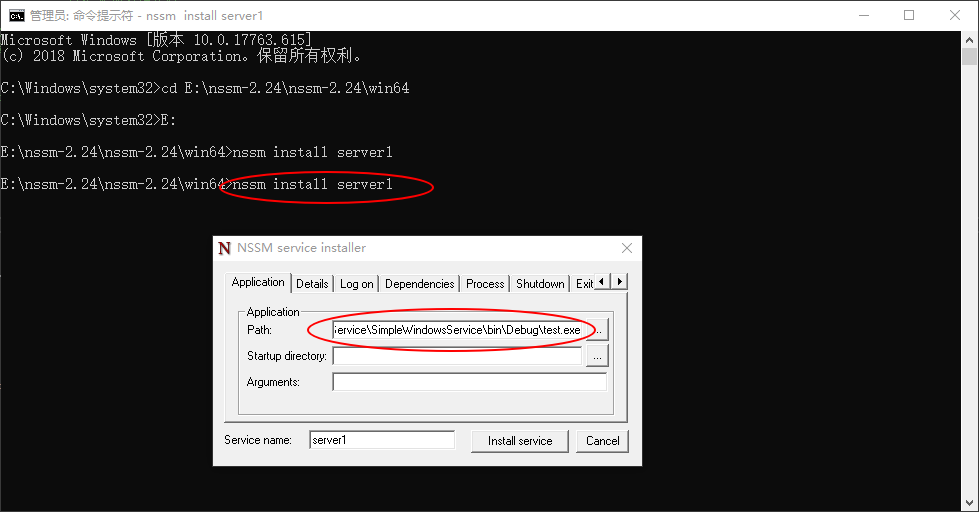
4. 安装服务
安装服务:nssm install <servicename>
写的控制台程序需要注意,不要一闪而过,也就是运行控制台程序的时候,控制台不会自己关闭,自己关闭意味着程序结束,服务启动之后也会结束,所以最后的 Console.ReadKey();还是需要的。
启动服务:nssm start <servicename>
停止服务:nssm stop <servicename>
重启服务: nssm restart <servicename>
服务删除:nssm remove <servicename>
这个工具的使用是根据下面的评论来的,比较好用,但是也有点小缺点,就是程序都需要写在main中,需要控制好运行的顺序,如果要服务开始的时候运行什么,中间运行什么,停止的时候运行什么,这个程序就没办法控制了,如果是一般的服务用工具就可以了,如果比较复杂,需要做流程控制,可以参考下面的程序。
NSSM .NET Core服务安装

Path:dotnet所在的目录,一般默认是在C:Program Filesdotnetdotnet.exe;
Startup directory:程序所在的目录,就是最后程序dll所在的目录;
Arguments:程序dll的名称,一般是项目名加上.dll;
Service name:在此写上服务的名称即可。
然后点击Install service按钮就完成了部署。
最后到Windows服务管理界面找到安装的服务名称,右键启动即可,或者直接运行nssm start 服务名称,也可以运行net start 服务名称。这样就可以非常简单的把.Net Core托管至Window服务中。方便管理、启动、停止等等。
Topshelf介绍
Topshelf是一个托管使用.NET框架编写的服务的框架。简化了服务的创建,允许开发人员创建一个简单的控制台应用程序,可以使用Topshelf作为服务安装。原因很简单:调试控制台应用程序比使用服务要容易得多。一旦应用程序经过测试并可以投入生产,Topshelf便可以轻松地将应用程序作为服务进行安装。这是一个开源的项目,项目地址,Nuget上可以搜到响应的库。
Topshelf使用
1.创建控制台程序
2.安装Topshelf,在Nuget上搜下
3.安装NLog、NLog.Config,目的是为了看日志,可以清楚的知道服务在运行,可以不要
NLog.Config简单配置
<?xml version="1.0" encoding="utf-8" ?>
<nlog xmlns="http://www.nlog-project.org/schemas/NLog.xsd"
      xmlns:xsi="http://www.w3.org/2001/XMLSchema-instance"
      xsi:schemaLocation="http://www.nlog-project.org/schemas/NLog.xsd NLog.xsd"
      autoReload="true"
      throwExceptions="false"
      internalLogLevel="Off" internalLogFile="c:	emp
log-internal.log">

  <!-- optional, add some variables
  https://github.com/nlog/NLog/wiki/Configuration-file#variables
  -->
  <variable name="myvar" value="myvalue"/>

  <!--
  See https://github.com/nlog/nlog/wiki/Configuration-file
  for information on customizing logging rules and outputs.
   -->
  <targets>

    <!--
    add your targets here
    See https://github.com/nlog/NLog/wiki/Targets for possible targets.
    See https://github.com/nlog/NLog/wiki/Layout-Renderers for the possible layout renderers.
    -->

    <!--
    Write events to a file with the date in the filename.
    -->
    <target xsi:type="File" name="f" fileName="${basedir}/logs/${shortdate}.log"
        layout="${longdate} ${uppercase:${level}} ${message}" />
  </targets>

  <rules>
    <!-- add your logging rules here -->

    <!--
    Write all events with minimal level of Debug (So Debug, Info, Warn, Error and Fatal, but not Trace)  to "f"
    -->
    <logger name="*" minlevel="Debug" writeTo="f" />
  </rules>
</nlog>
4.代码实现
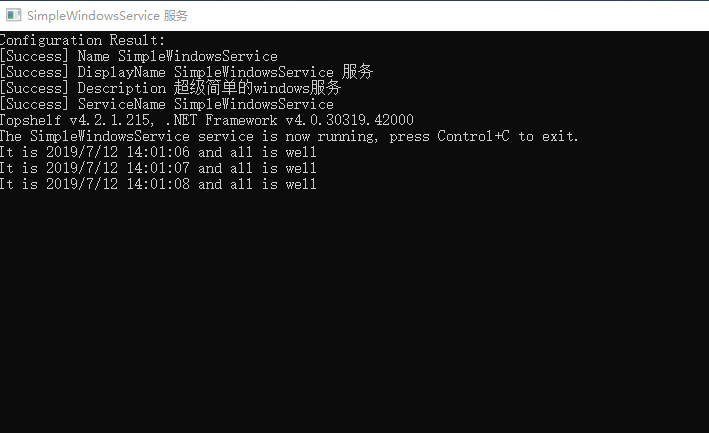
class Program
{
    private static readonly Logger logger = LogManager.GetLogger("Program");
    static void Main(string[] args)
    {
        logger.Info($"Main主程序{DateTime.Now}");
        var rc = HostFactory.Run(x =>                         //1.启动程序
        {
            logger.Info($"主程序{DateTime.Now}");
            x.Service<TownCrier>(s =>                         //2.设置服务类型
            {
                s.ConstructUsing(name => new TownCrier());    //3.创建服务实例
                s.WhenStarted(tc => tc.Start());              //4.启动程序
                s.WhenStopped(tc => tc.Stop());               //5.停止程序
            });
            x.RunAsLocalSystem();                             //6.本地系统运行

            x.SetDescription("超级简单的windows服务");         //7.windows服务的描述
            x.SetDisplayName("SimpleWindowsService 服务");                        //8.windows服务的显示名称
            x.SetServiceName("SimpleWindowsService");                        //9.windows服务的服务名称
        });

        var exitCode = (int)Convert.ChangeType(rc, rc.GetTypeCode());  //11.退出程序
        Environment.ExitCode = exitCode;

    }
}

public class TownCrier
{
    private static readonly Logger logger = LogManager.GetLogger("logTest");
    readonly Timer _timer; //System.Timers不要引用错误
    public TownCrier()
    {
        _timer = new Timer(1000) { AutoReset = true };
        _timer.Elapsed += (sender, eventArgs) =>
        {
            Console.WriteLine($"It is {DateTime.Now} and all is well");
            logger.Info($"It is {DateTime.Now} and all is well");
        };
    }
    public void Start() { _timer.Start(); }
    public void Stop() { _timer.Stop(); }
}
必须有启动方法(Start)和停止方法(Stop)
4. 运行控制台程序,也可以是调试,效果如下
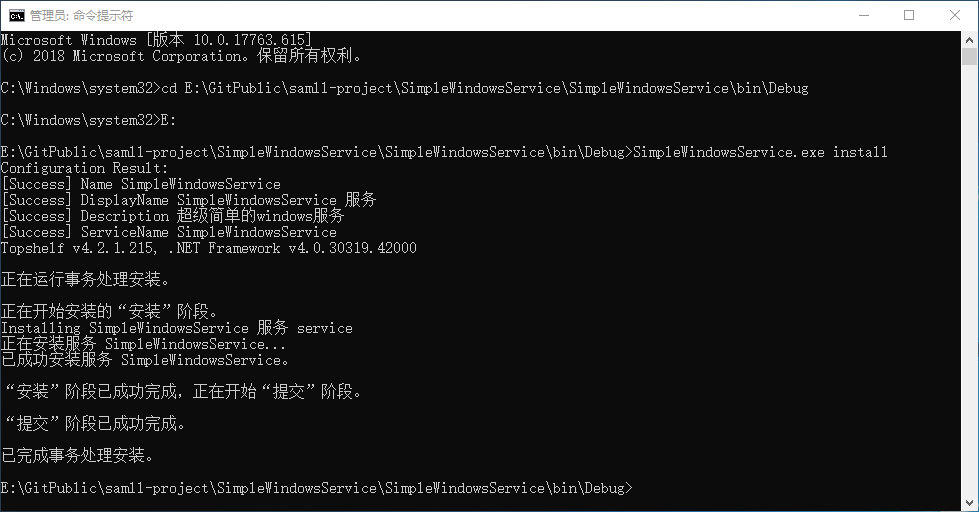
5. 程序调试运行成功,一切ok,现在可以安装服务了,以管理员身份运行cmd找到对应路径,开始安装
安装:SimpleWindowsService.exe install
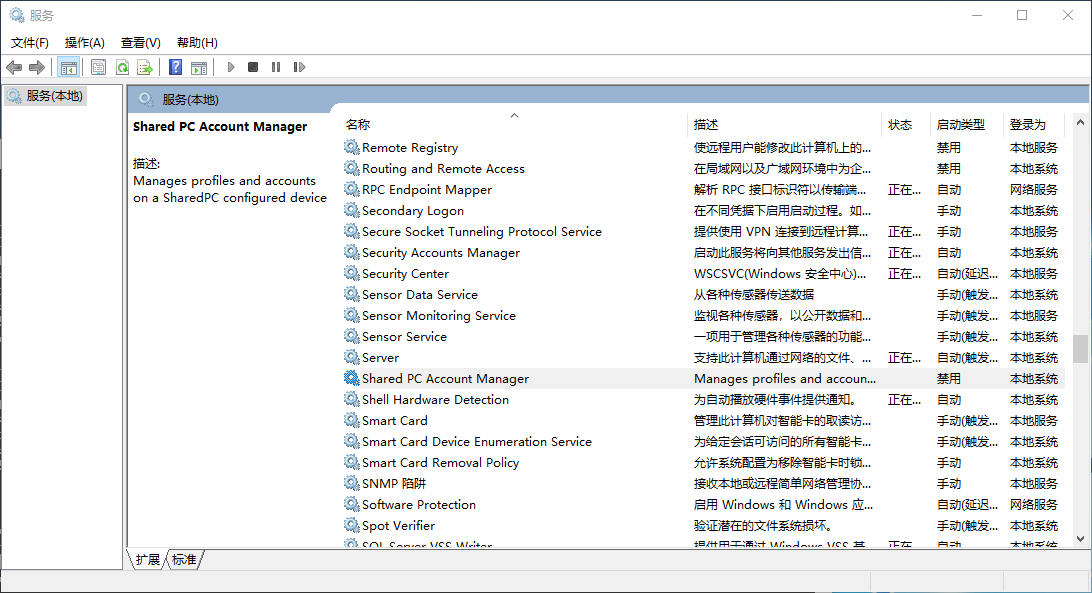
查看服务

启动:SimpleWindowsService.exe start


服务已经运行,查看运行情况,日志

卸载:SimpleWindowsService.exe uninstall
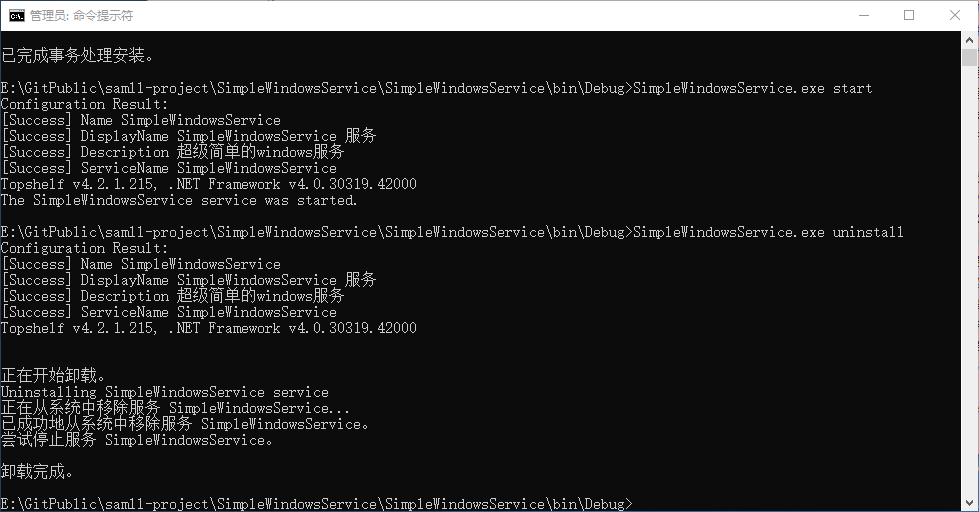
可以看到服务已经没有了
停止:SimpleWindowsService.exe stop
停止之后可以再次启动,这个功能不介绍了,卸载服务的时候会调用这个方法。
Topshelf的其他功能
安装动作之前:Topshelf允许指定在安装服务之前执行的操作。请注意,只有在安装服务时才会执行此操作。
HostFactory.New(x =>
{
    x.BeforeInstall(settings => { ... });
});
安装动作后:Topshelf允许指定在安装服务后执行的操作。请注意,只有在安装服务时才会执行此操作。
HostFactory.New(x =>
{
    x.AfterInstall(settings => { ... });
});
在卸载操作之前:Topshelf允许指定在卸载服务之前执行的操作。请注意,只有在卸载服务时才会执行此操作。
HostFactory.New(x =>
{
    x.BeforeUninstall(() => { ... });
});
卸载操作后:Topshelf允许指定在卸载服务后执行的操作。请注意,只有在卸载服务时才会执行此操作。
HostFactory.New(x =>
{
    x.AfterUninstall(() => { ... });
});
异常:为服务运行时抛出的异常提供回调。此回调不是处理程序,不会影响Topshelf已提供的默认异常处理。它旨在提供对触发外部操作,日志记录等的抛出异常的可见性。
HostFactory.New(x =>
{
    x.OnException(ex =>
    {
        // Do something with the exception
    });
});
其他的一些功能,如果需要可以查看英文官网文档
定时任务的服务
一般的服务都没有这么简单,一般都需要定时任务,这里的定时任务服务用到了FluentScheduler,FluentScheduler定时器介绍 ,这篇文章对FluentScheduler定时器进行了详细的介绍,这里不再介绍,只展示使用。
/// <summary>
/// 用MySchedule的任务定时功能
/// </summary>
public class MyJob {
    private static readonly Logger logger = LogManager.GetLogger("MyJob");
    public MyJob() { }
    public void Start()
    {
        logger.Info($"MySchedule启动 {DateTime.Now}");
        JobManager.Initialize(new MySchedule());
    }
    public void Stop()
    {
        logger.Info($"MySchedule停止 {DateTime.Now}");
        JobManager.Stop();
    }
}

/// <summary>
/// 定时器
/// </summary>
public class MySchedule : Registry
{
    private static readonly Logger logger = LogManager.GetLogger("MySchedule");
    public MySchedule()
    {
        SetNewsSchedule();
    }

    /// <summary>
    /// 设置任务
    /// </summary>
    private void SetNewsSchedule()
    {
        //获取链接发送邮件
        Schedule(() =>
        {
            logger.Info($"MySchedule运行 {DateTime.Now}");
        }
        ).ToRunNow().AndEvery(1000).Milliseconds();
    }
}
控制台程序调用
class Program
{
    private static readonly Logger logger = LogManager.GetLogger("Program");
    static void Main(string[] args)
    {
        logger.Info($"Main主程序{DateTime.Now}");
        var rc = HostFactory.Run(x =>                         //1.启动程序
        {
            logger.Info($"主程序{DateTime.Now}");
            x.Service<MyJob>(s =>                         //2.设置服务类型
            {
                s.ConstructUsing(name => new MyJob());    //3.创建服务实例
                s.WhenStarted(tc => tc.Start());              //4.启动程序
                s.WhenStopped(tc => tc.Stop());               //5.停止程序
            });
            x.RunAsLocalSystem();                             //6.本地系统运行

            x.SetDescription("超级简单的windows服务");         //7.windows服务的描述
            x.SetDisplayName("SimpleWindowsService 服务");                        //8.windows服务的显示名称
            x.SetServiceName("SimpleWindowsService");                        //9.windows服务的服务名称
        });
        var exitCode = (int)Convert.ChangeType(rc, rc.GetTypeCode());  //11.退出程序
        Environment.ExitCode = exitCode;

    }
}
服务安装两步走,管理员cmd,SimpleWindowsService.exe install, SimpleWindowsService.exe start
总结
1. 写控制台程序
2.管理员cmd,SimpleWindowsService.exe install
3.启动服务SimpleWindowsService.exe start
4.卸载服务SimpleWindowsService.exe uninstall