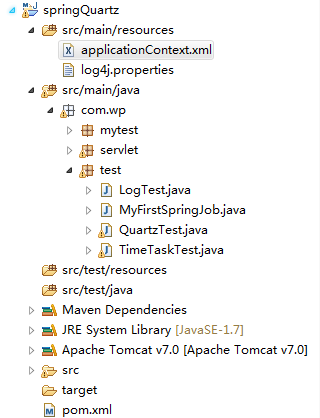
在企业应用中,我们经常会遇到定时任务(或任务调度)的需求,比如排班提醒、每天凌晨进行数据库维护等。一般的项目都会借助spring集成定时任务,进行任务功能开发。下面介绍一下定时任务的分类,并进行相关举例说明,大概知道定时任务是怎么来的就行,之后spring集成定时任务用的比较多。
分类
从实现的技术上来分类,目前主要有三种技术
- Java自带的java.util.Timer类,这个类允许你调度一个java.util.TimerTask任务。一般用的较少;
- 使用Quartz,这是一个功能比较强大的的调度器,可以让你的程序在指定时间执行,也可以按照某一个频度执行,配置起来稍显复杂;
- Spring3.0以后自带的task,可以将它看成一个轻量级的Quartz,而且使用起来比Quartz简单许多。
从任务调度的触发时机来分,这里主要是针对作业使用的触发器,主要有以下两种
- 每隔指定时间则触发一次,在Quartz中对应的触发器为:org.springframework.scheduling.quartz.SimpleTriggerBean;
- 每到指定时间则触发一次,在Quartz中对应的调度器为:org.springframework.scheduling.quartz.CronTriggerBean。
举例说明
Java自带
package com.wp.test;
import java.util.Calendar;
import java.util.Date;
import java.util.Timer;
import java.util.TimerTask;
public class TimeTaskTest {
    static int count = 0;
    public static void showTimer() {
        TimerTask task = new TimerTask() {
            @Override
            public void run() {
                ++count;
                System.out.println("时间=" + new Date() + " 执行了" + count + "次"); // 1次
            }
        };
        //设置执行时间
        Calendar calendar = Calendar.getInstance();
        int year = calendar.get(Calendar.YEAR);
        int month = calendar.get(Calendar.MONTH);
        int day = calendar.get(Calendar.DAY_OF_MONTH);//每天
        //定制每天的10:48:40执行,
        calendar.set(year, month, day, 10, 48, 40);
        Date date = calendar.getTime();
        Timer timer = new Timer();
        System.out.println(new Date());
        System.out.println(date);
        int period = 2 * 1000;
        //每天的date时刻执行task,每隔2秒重复执行
        //timer.schedule(task, date, period);
        //每天的date时刻执行task, 仅执行一次
        timer.schedule(task, date);
    }
    public static void main(String args[]){
        showTimer();
    }
}
Spring-Task
Spring3.0以后自主开发的定时任务工具,spring task,可以将它比作一个轻量级的Quartz,而且使用起来很简单,除spring相关的包外不需要额外的包,而且支持注解和配置文件两种方式,下面将分别介绍这两种方式。
配置文件方式
第一步:Java代码(控制台是通过log4j的方式打印的,日志相关的总结也会作一个小的总结)
package com.wp.test;
import java.text.DateFormat;
import java.util.Date;
import org.apache.log4j.Logger;
import org.springframework.stereotype.Component;
@Component("myFirstSpringJob")
public class MyFirstSpringJob {
    private Logger logger = Logger.getLogger(MyFirstSpringJob.class);
    public void run(){
        String time = DateFormat.getDateTimeInstance().format(new Date());
        logger.info("定时器触发打印"+time);
    }
}
第二步:在spring配置文件中添加task相关配置
<?xml version="1.0" encoding="UTF-8"?>
<beans xmlns="http://www.springframework.org/schema/beans"
    xmlns:context="http://www.springframework.org/schema/context"
    xmlns:xsi="http://www.w3.org/2001/XMLSchema-instance"
    xmlns:task="http://www.springframework.org/schema/task"
    xsi:schemaLocation="
             http://www.springframework.org/schema/beans
             http://www.springframework.org/schema/beans/spring-beans-3.0.xsd
            http://www.springframework.org/schema/context
            http://www.springframework.org/schema/context/spring-context-3.0.xsd
            http://www.springframework.org/schema/task
            http://www.springframework.org/schema/task/spring-task-3.0.xsd">
    <context:component-scan base-package="com.wp" />  <!-- 自动扫描所有注解该路径 -->
    <task:scheduled-tasks>
        <task:scheduled ref="myFirstSpringJob" method="run" cron="0/3 * *  * * ? "/><!-- 每3秒执行一次 -->
    </task:scheduled-tasks>
</beans>
使用注解形式
第一步:Java代码
package com.wp.test;
import java.text.DateFormat;
import java.util.Date;
import org.apache.log4j.Logger;
import org.springframework.scheduling.annotation.Scheduled;
import org.springframework.stereotype.Component;
@Component
public class MyFirstSpringJob {
    private Logger logger = Logger.getLogger(MyFirstSpringJob.class);
    @Scheduled(cron="0/1 * *  * * ? ")
    public void run(){
        String time = DateFormat.getDateTimeInstance().format(new Date());
        logger.info("定时器触发打印"+time);
    }
}
第二步:在spring配置文件中添加task相关配置
<?xml version="1.0" encoding="UTF-8"?>
<beans xmlns="http://www.springframework.org/schema/beans"
    xmlns:context="http://www.springframework.org/schema/context"
    xmlns:xsi="http://www.w3.org/2001/XMLSchema-instance"
    xmlns:task="http://www.springframework.org/schema/task"
    xsi:schemaLocation="
             http://www.springframework.org/schema/beans
             http://www.springframework.org/schema/beans/spring-beans-3.0.xsd
            http://www.springframework.org/schema/context
            http://www.springframework.org/schema/context/spring-context-3.0.xsd
            http://www.springframework.org/schema/task
            http://www.springframework.org/schema/task/spring-task-3.0.xsd">
    <context:component-scan base-package="com.wp" />  <!-- 自动扫描所有注解该路径 -->
    <task:annotation-driven/>
</beans>
Spring Quartz
Quartz是企业应用用的最多的定时任务技术(别的博客看的,哈哈),主要有三个核心概念:调度器、任务和触发器。三者关系简单来说就是,调度器负责调度各个任务,到了某个时刻或者过了一定时间,触发器触动了,相关任务便启动执行。
相应的类和接口描述:
1 JobDetail,描述任务的相关情况,可以指定执行对象和执行方法;
2 Trigger,描述出发Job执行的时间触发规则。有SimpleTrigger和CronTrigger两个子类代表两种方式,前者是每个一段时间执行一次的方式,后者是到某个具体时间执行的方式;要注册JobDetail,说明触发器触发的任务是哪个;
3 Scheduler,代表一个Quartz的独立运行容器,要注册Trigge,说明让调度器知道有哪些触发器和任务,然后会启动定时任务,根据规则执行相关任务。
具体实现(Maven项目,博客中有创建Maven项目的随笔)

第一步:添加jar包依赖

<project xmlns="http://maven.apache.org/POM/4.0.0" xmlns:xsi="http://www.w3.org/2001/XMLSchema-instance"
    xsi:schemaLocation="http://maven.apache.org/POM/4.0.0 http://maven.apache.org/maven-v4_0_0.xsd">
    <modelVersion>4.0.0</modelVersion>
    <groupId>com.wp.test</groupId>
    <artifactId>springQuartz</artifactId>
    <packaging>war</packaging>
    <version>0.0.1-SNAPSHOT</version>
    <name>springQuartz Maven Webapp</name>
    <url>http://maven.apache.org</url>
    <dependencies>
        <dependency>
            <groupId>junit</groupId>
            <artifactId>junit</artifactId>
            <version>3.8.1</version>
            <scope>test</scope>
        </dependency>
        <dependency>
            <groupId>org.springframework</groupId>
            <artifactId>spring-context</artifactId>
            <version>3.2.14.RELEASE</version>
        </dependency>
        <dependency>
            <groupId>log4j</groupId>
            <artifactId>log4j</artifactId>
            <version>1.2.17</version>
        </dependency>

        <dependency>
            <groupId>org.springframework.webflow</groupId>
            <artifactId>spring-webflow</artifactId>
            <version>2.3.4.RELEASE</version>
        </dependency>

        <dependency>
            <groupId>ch.qos.logback</groupId>
            <artifactId>logback-classic</artifactId>
            <version>1.1.0</version>
        </dependency>
        <dependency>
            <groupId>org.quartz-scheduler</groupId>
            <artifactId>quartz</artifactId>
            <version>1.8.4</version>
        </dependency>
        <!-- https://mvnrepository.com/artifact/org.springframework/spring-support -->
        <dependency>
            <groupId>org.springframework</groupId>
            <artifactId>spring-support</artifactId>
            <version>2.0.6</version>
        </dependency>
        <dependency>
            <groupId>org.springframework</groupId>
            <artifactId>spring-tx</artifactId>
            <version>3.2.5.RELEASE_BUNDLE</version>
        </dependency>
    </dependencies>
    <build>
        <finalName>springQuartz</finalName>
    </build>
</project>
第二步:Java代码
package com.wp.test;
import java.util.Date;
import org.apache.log4j.Logger;
import org.springframework.stereotype.Component;
@Component("quartzTest")
public class QuartzTest {
    private Logger logger = Logger.getLogger(QuartzTest.class);
    //到了某个时刻就会被调用
    public void autoRun(){
        logger.info("It's time to run :" + new Date());
    }
}
第三步:在spring配置文件中配置
a SimpleTrigger方式
<?xml version="1.0" encoding="UTF-8"?>
<beans xmlns="http://www.springframework.org/schema/beans"
    xmlns:context="http://www.springframework.org/schema/context"
    xmlns:xsi="http://www.w3.org/2001/XMLSchema-instance"
    xsi:schemaLocation="
             http://www.springframework.org/schema/beans
             http://www.springframework.org/schema/beans/spring-beans-3.0.xsd
            http://www.springframework.org/schema/context
            http://www.springframework.org/schema/context/spring-context-3.0.xsd">

    <context:component-scan base-package="com.wp" />  <!-- 自动扫描所有注解该路径 -->

    <bean id="quartzTestJob"
        class="org.springframework.scheduling.quartz.MethodInvokingJobDetailFactoryBean">
        <property name="targetObject" ref="quartzTest"></property>
        <property name="targetMethod" value="autoRun"></property>
        <!-- 参数all为true时, 所有执行该服务的线程(该线程数即服务入口组件的线程数)都被启动 -->
        <!-- 参数all为false时,只有一个线程被启动 -->
        <property name="concurrent" value="false"></property>
    </bean>
<!--增加调度触发器—>
    <bean id="quartzTestTrigger" class="org.springframework.scheduling.quartz.SimpleTriggerBean">
        <property name="jobDetail" ref="quartzTestJob" />
        <!-- 2秒后运行 -->
        <property name="startDelay" value="2000" />
        <!-- 每隔1秒重复 -->
        <property name="repeatInterval" value="1000" />
    </bean>
    <!-- 设置调度 -->
    <bean name="quartzScheduler"
        class="org.springframework.scheduling.quartz.SchedulerFactoryBean">
        <property name="triggers">
            <list>
                <ref local="quartzTestTrigger" />
            </list>
        </property>
    </bean>
</beans>
b CronTrigger方式
<?xml version="1.0" encoding="UTF-8"?>
<beans xmlns="http://www.springframework.org/schema/beans"
    xmlns:context="http://www.springframework.org/schema/context"
    xmlns:xsi="http://www.w3.org/2001/XMLSchema-instance"
    xsi:schemaLocation="
             http://www.springframework.org/schema/beans
             http://www.springframework.org/schema/beans/spring-beans-3.0.xsd
            http://www.springframework.org/schema/context
            http://www.springframework.org/schema/context/spring-context-3.0.xsd">

    <context:component-scan base-package="com.wp" />  <!-- 自动扫描所有注解该路径 -->
    <bean id="quartzTestJob"
        class="org.springframework.scheduling.quartz.MethodInvokingJobDetailFactoryBean">
        <property name="targetObject" ref="quartzTest"></property>
        <property name="targetMethod" value="autoRun"></property>
        <property name="concurrent" value="false"></property>
    </bean>

    <bean id="quartzTestTrigger" class="org.springframework.scheduling.quartz.CronTriggerBean">
        <property name="jobDetail" ref="quartzTestJob" />
        <!-- 每天十点 -->
        <property name="cronExpression" value="50 05 17 * * ?"></property>
    </bean>

    <bean name="quartzScheduler"
        class="org.springframework.scheduling.quartz.SchedulerFactoryBean">
        <property name="triggers">
            <list>
                <ref local="quartzTestTrigger" />
            </list>
        </property>
        <property name="taskExecutor" ref="executor"></property>
    </bean>
    <!-- 线程执行器配置,用于任务注册 -->
    <bean id="executor"
        class="org.springframework.scheduling.concurrent.ThreadPoolTaskExecutor">
        <property name="corePoolSize" value="10" />
        <property name="maxPoolSize" value="100" />
        <property name="queueCapacity" value="500" />
    </bean>
</beans>
cron表达式
用的时候百度吧,然后把用到的作好记录,方便下次使用。
0 0 1/3 * * ?:从第0个时间点执行一次,然后推迟三个时间点执行。
0 0 */3 * * ?:当前时间点,如果能被3整除则执行一次。
设计:部署当天执行一次,然后每隔3天执行一次 0 0 23 x/3 * ? 那么需要动态获取当前时间

http://mp.weixin.qq.com/s/dxuPJz0iCjAstOwgU1BkaA
