AOP (Aspect Oriented Programming)
1.1、什么是AOP
AOP意为面向切面编程,通过预编译方式和运行期动态代理实现程序功能的统一维护的一种技术。
AOP是0OP的延续,是软件开发中的一个热点,也是Spring框架中的一一个重要内容,是函数式编程的一种衍生范型。
利用AOP可以对业务逻辑的各个部分进行隔离,从而使得业务逻辑各部分之间的耦合度降低,提高程序的可重用性,同时提高了开发的效率。
1.2AOP术语
1、Aspect:切面,表示增强的功能,就是一堆代码,完成某个一个功能。非业务功能
常见的切面功能有日志,事务, 统计信息, 参数检查, 权限验证。
2、JoinPoint:连接点,连接业务方法和切面的位置。就某类中 的业务方法
3、Pointcut :切入点,指多个连接点方法的集合。多个方法
4、目标对象:给哪个类的方法增加功能,这个类就是目标对象
5、Advice:通知,通知表示切面功能执行的时间。
1.3、AOP在Spring中的作用
提供声明式事务;允许用户自定义切面
- 横切关注点:跨越应用程序多个模块的方法或功能。即是,与我们业务逻辑无关的,但是我们需要关注的部分,就是横切关注点。如日志,安全,缓存,事务等等
- 切面(ASPECT) :横切关注点被模块化的特殊对象。即,它是一个类。
- 通知(Advice) :切面必须要完成的工作。即,它是类中的一个方法。
- 目标(Target) :被通知对象。
- 代理(Proxy) :向目标对象应用通知之后创建的对象。
- 切入点(PointCut) :切面通知执行的"地点”的定义。
- 连接点(JointPoint) :与切入点匹配的执行点。

AspectJ框架:
地址:http://www.eclipse.org/aspectj/
. aspectJ:一个开源的专门做aop的框架。spring框架中集成了aspectj框架, 邇过spring就能使用aspectj的功能。
aspectJ框架实现aop有两种方式:
- 1.使用xm1的配置文件:配置全 局事务
- 2.使用注解,我们在项目中要做aop功能,一般 都使用注解,aspectj有5个 注解。
2、实现AOP的第一种方式(使用Spring的API接口):
【maven导入AOP依赖包】
    <!--springAOP的包-->
        <dependency>
            <groupId>org.aspectj</groupId>
            <artifactId>aspectjweaver</artifactId>
            <version>1.9.4</version>
        </dependency>
【xml配置文件中导入aop的约束】
<?xml version="1.0" encoding="UTF-8"?>
<beans xmlns="http://www.springframework.org/schema/beans"
       xmlns:xsi="http://www.w3.org/2001/XMLSchema-instance"
       xmlns:context="http://www.springframework.org/schema/context"
       xmlns:aop="http://www.springframework.org/schema/aop"

       xsi:schemaLocation="http://www.springframework.org/schema/beans
        https://www.springframework.org/schema/beans/spring-beans.xsd
        http://www.springframework.org/schema/context
        https://www.springframework.org/schema/context/spring-context.xsd

        http://www.springframework.org/schema/aop
        https://www.springframework.org/schema/aop/spring-aop.xsd

">
1、service业务层
public interface UserService {
    void add();
    void delete();
    void update();
    void select();
}
2、业务层的实现类
public class UserServiceImpl implements UserService {

    public void add() {
        System.out.println("添加用户的方法~");
    }

    public void delete() {
        System.out.println("删除用户的方法~");
    }

    public void update() {
        System.out.println("修改用户的方法~");
    }

    public void select() {
        System.out.println("查询用户的方法~");
    }
}
3、日志类,在方法前后切入
import org.springframework.aop.MethodBeforeAdvice;
import java.lang.reflect.Method;

// 日志增强类,方法前的通知
public class Log implements MethodBeforeAdvice {
    /**
     * @param method 要执行的目标对象的方法
     * @param args   参数
     * @param target 目标对象
     */
    public void before(Method method, Object[] args, Object target) throws Throwable {
        System.out.println("执行了" + target.getClass().getName() + "对象的" + method.getName() + "方法");
    }
}
package com.zhixi.Log;

import org.springframework.aop.AfterAdvice;
import org.springframework.aop.AfterReturningAdvice;
import java.lang.reflect.Method;
// 日志增强类,方法执行后,返回值
public class AfterLog implements AfterReturningAdvice {

    /**
     * ,如果有的话*被调用方法的@param方法* @param将方法的参数args * @param以方法调用的目标为目标也许
     *
     * @param returnValue 方法返回的值
     * @param method      要执行的目标的方法
     * @param args        参数
     * @param target      目标对象
     */
    public void afterReturning(Object returnValue, Method method, Object[] args, Object target) throws Throwable {
        System.out.println("执行" + method.getName() + "返回" + returnValue);
    }
}
4、配置文件
<?xml version="1.0" encoding="UTF-8"?>
<beans xmlns="http://www.springframework.org/schema/beans"
       xmlns:xsi="http://www.w3.org/2001/XMLSchema-instance"
       xmlns:context="http://www.springframework.org/schema/context"
       xmlns:aop="http://www.springframework.org/schema/aop"

       xsi:schemaLocation="http://www.springframework.org/schema/beans
        https://www.springframework.org/schema/beans/spring-beans.xsd
        http://www.springframework.org/schema/context
        https://www.springframework.org/schema/context/spring-context.xsd

        http://www.springframework.org/schema/aop
        https://www.springframework.org/schema/aop/spring-aop.xsd

">
    <bean id="userServiceImpl" class="com.zhixi.service.UserServiceImpl"/>
    <bean id="log" class="com.zhixi.Log.Log"/>
    <bean id="afterLog" class="com.zhixi.Log.AfterLog"/>

    <!--配置aop:先导入aop的约束-->
    <aop:config>
        <!--pointcut:切入点,expression表达式:()-->
        <aop:pointcut id="pointcut" expression="execution(* com.zhixi.service.UserServiceImpl.*(..))"/>

        <!--执行环绕增加-->
        <aop:advisor advice-ref="log" pointcut-ref="pointcut"></aop:advisor>
        <aop:advisor advice-ref="afterLog" pointcut-ref="pointcut"></aop:advisor>
    </aop:config>
</beans>
5、测试类以及结果:
import com.zhixi.service.UserService;
import org.springframework.context.ApplicationContext;
import org.springframework.context.support.ClassPathXmlApplicationContext;

public class MyTest {
    public static void main(String[] args) {
        ApplicationContext context = new ClassPathXmlApplicationContext("applicationContext.xml");
        // 动态代理代理的是接口
        UserService userServiceImpl = (UserService) context.getBean("userServiceImpl");
        userServiceImpl.add();
    }
}
执行了com.zhixi.service.UserServiceImpl对象的add方法
添加用户的方法~
执行add返回null
3、实现AOP的第二种方式(使用自定义类):
1、创建切面类
public class DiyPoint {
    public void before() {
        System.out.println("diy开始");
    }

    public void after() {
        System.out.println("diy结束");
    }
}
2、xml
    <bean id="userServiceImpl" class="com.zhixi.service.UserServiceImpl"/>

    <!--实现AOP的方式二:自定义类-->
    <bean id="diy" class="com.zhixi.diy.DiyPoint"></bean>
    <aop:config>
        <!--自定义切面-->
        <aop:aspect ref="diy">
            <!--切入点-->
            <aop:pointcut id="point" expression="execution(* com.zhixi.service.*.*(..))"/>
            <!--在切入点之前执行自定义类的哪个方法-->
            <aop:before method="before" pointcut-ref="point"></aop:before>
            <aop:after method="after" pointcut-ref="point"></aop:after>
        </aop:aspect>
    </aop:config>
3、测试
测试类不变:
diy开始
删除用户的方法~
diy结束
==================================================================================================================================
4、实现AOP的第三种方式(使用注解,掌握):
需求:在service业务方法执行前输出系统当前时间!使用AOP注解进行完成!
1、service业务接口
1 package com.zhixi.services;
2
3 /**
4  * @author zhangzhixi
5  */
6 public interface UserService {
7     void doSome();
8 }
2、业务接口的实现类
1 // 表示注册这个bean
2 @Component
3 public class UserServiceImpl implements UserService {
4
5     public void doSome() {
6         System.out.println("doSome方法执行~");
7     }
8 }
3、切面类【执行的额外需求添加的方法】
1 @Component
2 @Aspect
3 public class MyAspect {
4     @Before("execution(* com.zhixi.services.*.*(..))")
5     public void showTime(JoinPoint jp) {
6         System.out.println("系统当前的时间是:" + new Date());
7     }
8 }
4、xml配置文件
 1 <?xml version="1.0" encoding="UTF-8"?>
 2 <beans xmlns="http://www.springframework.org/schema/beans"
 3        xmlns:xsi="http://www.w3.org/2001/XMLSchema-instance"
 4        xmlns:aop="http://www.springframework.org/schema/aop"
 5        xmlns:context="http://www.springframework.org/schema/context"
 6        xsi:schemaLocation="http://www.springframework.org/schema/beans
 7         http://www.springframework.org/schema/beans/spring-beans.xsd
 8         http://www.springframework.org/schema/aop
 9         https://www.springframework.org/schema/aop/spring-aop.xsd
10         http://www.springframework.org/schema/context
11         https://www.springframework.org/schema/context/spring-context.xsd">
12
13     <!--AOP的自动代理-->
14     <aop:aspectj-autoproxy/>
15     <!--扫描包,说明在这个包下的注解会被识别-->
16     <context:component-scan base-package="com.zhixi"></context:component-scan>
17     <!--注解的支持-->
18     <context:annotation-config></context:annotation-config>
19 </beans>
5、测试类跟测试结果
1     @Test
2     public void test1(){
3         ApplicationContext context = new ClassPathXmlApplicationContext("applicationContext.xml");
4         UserService userService = context.getBean("userServiceImpl", UserService.class);
5         userService.doSome();
6     }
系统当前的时间是:Fri Jan 08 13:10:49 CST 2021
doSome方法执行~
JoinPoint(连接点):
JoinPoint:业务方法,要加入切面功能的业务方法
作用是:可以在通知方法中获取方法执行时的信息,例如方法名称 ,方法的实参。
如果你的切面功能中需要用到方法的信息,就加入JoinPoint.
这NoinPoint参数的值是由框架赋予,必须是第一个位置的参数
切面方法:
@Before("execution(* com.zhixi.services.*.*(..))")
    public void showTime(JoinPoint jp) {

        System.out.println("方法的签名:"+jp.getSignature());
        System.out.println("方法名:"+jp.getSignature().getName());

        // 获取方法的实参列表
        Object[] args = jp.getArgs();
        for (Object arg : args) {
            System.out.println(arg);
        }

        System.out.println("系统当前的时间是:" + new Date());
    }
输出结果:
方法的签名:void com.zhixi.services.UserService.doSome()
方法名:doSome
系统当前的时间是:Fri Jan 08 13:21:05 CST 2021
doSome方法执行~
------------------------------------------------------------------------------------------------------------------------------------------------------------------------
@AfterReturning【后置通知-掌握】:
表示在程序执行后生效,并携带方法的返回值
需求:
在执行添加学生操作后,在控制台打印出用户的信息,使用AOP实现
Student:
@Component
@Data
@NoArgsConstructor
@AllArgsConstructor
public class Student {
    private String name;
    private int age;
}
1、service接口中定义添加学生的方法
public interface UserService {
    void doSome();

    // 添加学生的方法
    Student addStudent(Student student);
}
2、接口实现类实现这个方法
// 表示注册这个bean
@Component
public class UserServiceImpl implements UserService {

    public void doSome() {
        System.out.println("doSome方法执行~");
    }

    public Student addStudent(Student student) {
        return student;
    }
}
3、切面类中定义需求中需要打印的信息
    @AfterReturning(value = "execution(* com.zhixi.services.*.addStudent(..))",returning = "res")
    // res表示是执行方法的返回值结果,这里res表示的是添加的学生对象
    public void userNotice(Object res){
        System.out.println("添加用户成功!");
        System.out.println(res.toString());
    }
4、测试类以及结果
    @Test
    public void test2(){
        ApplicationContext context = new ClassPathXmlApplicationContext("applicationContext.xml");
        UserService userService = context.getBean("userServiceImpl", UserService.class);
        userService.addStudent(new Student("张三",23));
    }
添加用户成功!
Student(name=张三, age=23)
在不修改源代码的方式,添加的所需要的增加的业务,这就是面向切面编程!
@Around(环绕通知-掌握):
环绕通知:经常做事务,在目标方法之前开启事务,执行目标方法,在目标方法之后提文事务
环绕通知方法的定义格式
1. public
2.必须有一个返回值,推荐使用object
3.方法名称自定义
4.方法有参数,固定的参数ProceedingJoinPoint
特点:
1.它是功能最强的通知
2.在目标方法的前和后都能增强功能。
3.控制目标方法是否被调用执行
4.修改原来的目标方法的执行结果。影响最后的 调用结果
环绕通知,
等同于idk动态代理的,InvocationHandler接口
参数:ProceedingJoinPoint,可以把它当做JoinPoint使用,因为它继承了JoinPoint
作用:执行目标方法的返回值:就是目标方法的执行结果,可以被修改。
案例就使用上个@AfterReturning的例子,修改切面类中的方法即可:
    @Around("execution(* *..addStudent(..))")
    public Object myAround(ProceedingJoinPoint pjp) throws Throwable {
        // 实现环绕增加
        Object res = null;
        System.out.println("环绕通知,在目标方法执行前打印系统时间:" + new Date());

        // 相当于执行service接口中的方法
        res = pjp.proceed();
        System.out.println(res.toString());

        System.out.println("事务结束");
        return res;
    }
结果:
环绕通知,在目标方法执行前打印系统时间:Fri Jan 08 15:12:33 CST 2021
Student(name=张三, age=23)
事务结束
END-动力节点王鹤老师讲解AOP
- @Aspect:表示这个类是一个切面类
- @Before:前置通知注解
@Before-前置通知:
方法的定义要求:
1.公共方法public
     *    2.方法没有返回值
     *    3.方法名称自定义
     *    4.方法可以有参数,也可以没有参数。
     *      如果有参数,参数不是自定义的,有几个参数类型可以使用。
业务需求:在业务方法执行前添加输出时间
1.定义业务方法:
package com.zhixi.test01;

/**
 * @author zhangzhixi
 * @date 2021/3/18 11:35
 */
public interface SomeService {
    /**
     * 业务方法
     *
     * @param name 姓名
     * @param age 年龄
     */
    void doSome(String name, Integer age);
}
2.定义业务方法的实现类:
package com.zhixi.test01;

/**
 * @author zhangzhixi
 * @date 2021/3/18 11:36
 */
public class SomeServiceImpl implements SomeService {
    @Override
    public void doSome(String name, Integer age) {
        System.out.println("==============doSome方法执行===========");
    }
}
3.在切面类中添加切面方法,实现需求:
package com.zhixi.test01;

/**
 * @author zhangzhixi
 * @date 2021/3/18 11:39
 */

import org.aspectj.lang.annotation.Aspect;
import org.aspectj.lang.annotation.Before;

import java.util.Date;

@Aspect
public class MyAspect {
    /**
     * 定义方法,方法是实现切面功能的。
     * 方法的定义要求:
     *    1.公共方法public
     *    2.方法没有返回值
     *    3.方法名称自定义
     *    4.方法可以有参数,也可以没有参数。
     *       如果有参数,参数不是自定义的,有几个参数类型可以使用。
     */

    /**
     * @Before:前置通知 属性:value,是切入 点表达式,表示切面的功能执行的位置。
     * 位置:在方法的上面
     * 特点;
     * 1.在目标方法之前先执行的
     * 2.不会改变目标方法的执行结果
     * 3.不会影响目标方法的执行。
     */
    @Before(value = "execution(* com.zhixi.test01.SomeServiceImpl.doSome(..))")
    public void myBefore() {
        // 你切面要执行的功能代码
        System.out.println("前置通知,在业务方法执行前输出执行时间:" + new Date());
    }
}
4、application.xml配置
<!--定义目标对象-->
<bean id="someService" class="com.zhixi.test01.SomeServiceImpl"/>

<!--定义切面类-->
<bean id="myAspect" class="com.zhixi.test01.MyAspect"/>

<!--AOP的自动代理生成器-->
<aop:aspectj-autoproxy/>
5、测试
/**
 * @author zhangzhixi
 * @date 2021/3/18 12:31
 */
public class MyTest {
    @Test
    public void test1(){
        // 读取配置
        ApplicationContext context = new ClassPathXmlApplicationContext("application.xml");
        // 从容器中获取目标对象
         SomeService proxy = (SomeService) context.getBean("someService");
         // 执行业务方法
         proxy.doSome("张三", 23);
    }
}

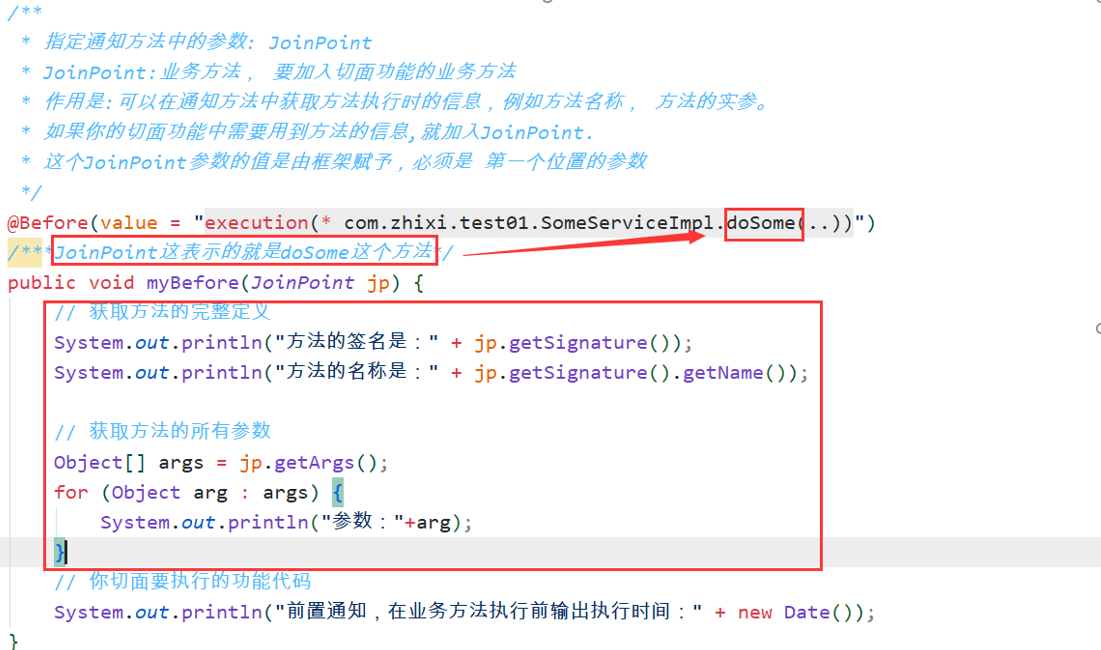
JoinPoint参数:连接点
指定通知方法中的参数: JoinPoint
JoinPoint:业务方法, 要加入切面功能的业务方法
作用是:可以在通知方法中获取方法执行时的信息,例如方法名称, 方法的实参。
如果你的切面功能中需要用到方法的信息,就加入JoinPoint.
这个JoinPoint参数的值是由框架赋予,必须是 第一个位置的参数

@AfterReturning后置通知
方法的定义要求:
1.公共方法public
2.方法没有返回值
3.方法名称自定义
4.方法是有参数的,推荐是Object,参数名自定义
需求:在方法执行后增加一个事务提交的功能
1、 在接口中添加doOther方法
String doOther(String name,Integer age);
2、 实现接口
@Override
 public String doOther(String name, Integer age) {
     System.out.println("==============doOther方法执行===========");
     // 需求在方法执行后增加一个事务的功能
     return "zhangzhixi";
 }
3、 添加后置通知方法
/**
  * 定义方法,方法是实现切面功能的。
  * 方法的定义要求:
  *    1.公共方法public
  *    2.方法没有返回值
  *    3.方法名称自定义
  *    4.方法是有参数的,推荐是Object,参数名自定义
  */
 /**
  * @AfterReturning :后置通知
  * 属性:
  * 1.value 切入点表达式
  * 2.returning 自定义变量,表示目标方法的返回值
  * 自定义的变量名和通知方法的形参名一致
  * 位置:在定义的方法上面
  */
 @AfterReturning(value = "execution(* com.zhixi.test02.SomeServiceImpl.doOther(..))", returning = "arg")
 public void myAfter(Object arg) {
     // object arg:是目标方法执行后的返回值, 根据返回值做你的切面的功能处理
     System.out.println("后置通知:在目标方法的执行后执行的,返回值是:" + arg);
 }
4、测试
// 读取配置
 ApplicationContext context = new ClassPathXmlApplicationContext("application.xml");
 // 从容器中获取目标对象
 SomeService proxy = (SomeService) context.getBean("someService");
 // 执行业务方法
 proxy.doOther("zx", 23);

@Around环绕通知
ProceedingJoinPoint继承了JoinPoint,可以使用JoinPoint中的方法!
* 环绕通知方法的定义格式:
*  1.public

 * 2.必须有一个返回值,推荐使用object

 * 3.方法名称自定义

 * 4.方法有参数,固定的参数ProceedingJoinPoint
环绕通知的特点:
 * 1.它是功能最强的通知
 * 2.在目标方法的前和后都能增强功能。
 * 3.控制目标方法是否被调用执行
 * 4.修改原来的目标方法的执行结果。 影响最后的调用结果
 * 环绕通知,等同于idk动态代理的, InvocationHandler接口
 * 参数:
 *      ProceedingJoinPoint就等同于Method
 * 作用:执行目标方法
 * 返回值:就是目标方法的执行结果,可以被修改。
环绕通知通常做事务:在业务方法前开启事务,在业务方法执行后提交事务!
1、定义业务方法接口

2、实现业务方法

3、添加环绕通知
/**
  * 环绕通知方法的定义格式
  * 1.public
  * 2.必须有一个返回值,推荐使用object
  * 3.方法名称自定义
  * 4.方法有参数,固定的参数ProceedingJoinPoint
  */
 /**
  * 特点:
  * 1.它是功能最强的通知
  * 2.在目标方法的前和后都能增强功能。
  * 3.控制目标方法是否被调用执行
  * 4.修改原来的目标方法的执行结果。 影响最后的调用结果
  * 环绕通知,等同于idk动态代理的, InvocationHandler接口
  * 参数:
  * ProceedingJoinPoint就等同于Method
  * 作用:执行目标方法
  * 返回值:就是目标方法的执行结果,可以被修改。
  */
 @Around(value = "execution(* com.zhixi.test03.SomeServiceImpl.doFirst(..))")
 public Object myAround(ProceedingJoinPoint pjp) throws Throwable {
     // 业务方法的返回值
     Object proceed = null;
     System.out.println("环绕通知,在目标方法执行前打印系统时间:" + new Date());
     // 进行判断业务方法是否执行
     if (pjp != null && "张三".equals(pjp.getArgs()[0])) {
         // 执行业务方法,相当于jdk动态代理中的:method.invoke,在这个例子中执行的是doFirst方法
         proceed = pjp.proceed();
     }
     // 修改值
     if (pjp != null) {
         proceed = "修改值成功";
     }
     System.out.println("环绕通知,在目标方法执行结束执行事务");
     return proceed;
 }
4、测试


@Pointcut 定义和管理切入点
先看个例子,如果我们想管理我们相同的切入点表达式,应该怎么操作呢?
1、业务接口
/**
 * @author zhangzhixi
 * @date 2021/3/18 11:35
 */
public interface SomeService {
    /**
     * 业务方法
     */
    void doSome();
}
2、业务接口的实现
/**
 * @author zhangzhixi
 * @date 2021/3/18 11:36
 */
public class SomeServiceImpl implements SomeService {

    @Override
    public void doSome() {
        System.out.println("业务方法执行!");
    }
}
3、切面类
@Aspect
public class MyAspect {

    @Before(value = "execution(* com.zhixi.test04.SomeServiceImpl.doSome(..))")
    public void myBefore(){
        System.out.println("前置通知:在目标方法执行前执行~");
    }

    @After(value = "execution(* com.zhixi.test04.SomeServiceImpl.doSome(..))")
    public void  myAfter(){
        System.out.println("最终通知:在目标方法执行后执行~");
    }
}
4、测试类
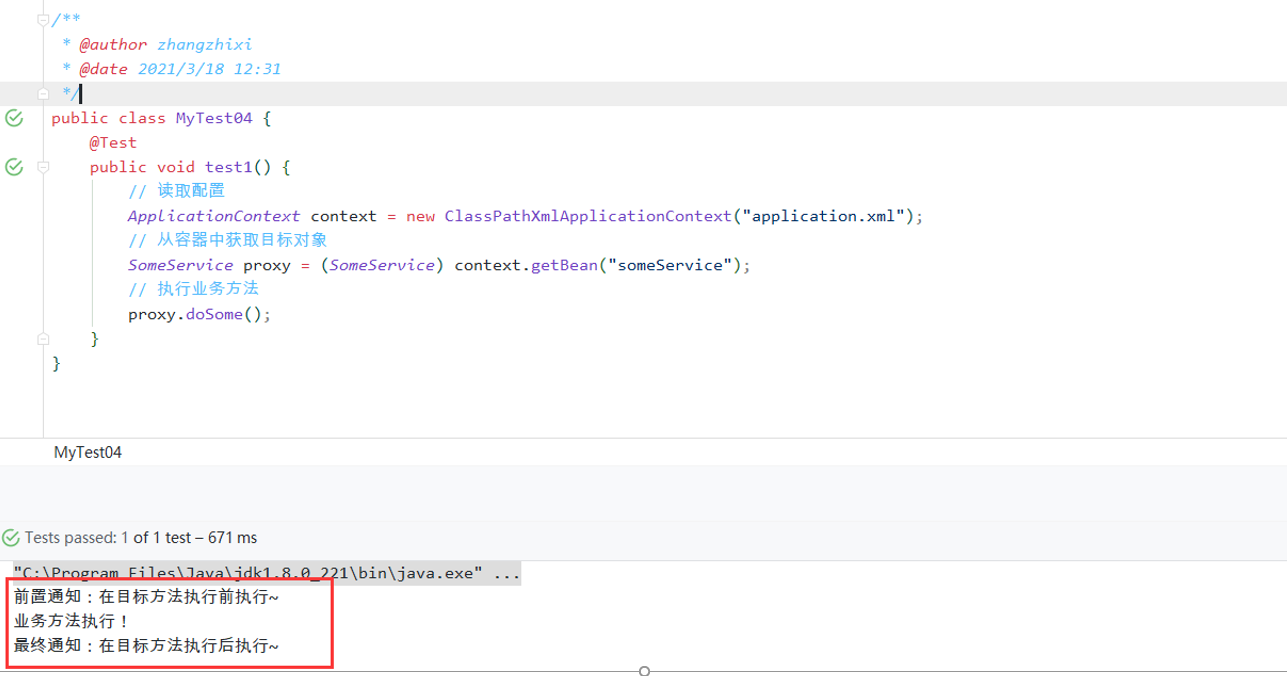
可以看到我们在切面类中的前置跟最终通知方法的切入点表达式是一样的,是不是可以将他俩合并一下?这就需要用到我们的Pointcut注解了、
@Aspect
public class MyAspect {

    @Before(value = "myPoint()")
    public void myBefore() {
        System.out.println("前置通知:在目标方法执行前执行~");
    }

    @After(value = "myPoint()")
    public void myAfter() {
        System.out.println("最终通知:在目标方法执行后执行~");
    }

    /**
     * @Pointcut :定义和管理切入点
     * 属性:value切入点表达式
     * 位置:在自定义的方法上面
     * 特点:
     * 当使用@Pointcut定义在一个方法的上面,此时这 个方法的名称就是切入点表达式的别名。
     * 其它的通知中, value属性就可以使用这个方法名称,代替切入点表达式了
     */
    @Pointcut(value = "execution(* com.zhixi.test04.SomeServiceImpl.doSome(..))")
    public void myPoint() {
        // 无需代码
    }
}
测试结果:

spring中的cglib动态代理
结论:目标类没有接口,使用cglib动态代理,spring 框架会自动应用cglib
按照上个例子的测试,来查看使用的动态代理方式:

再来测试一下:将我们例子的接口给去掉,看下测试会输出什么?
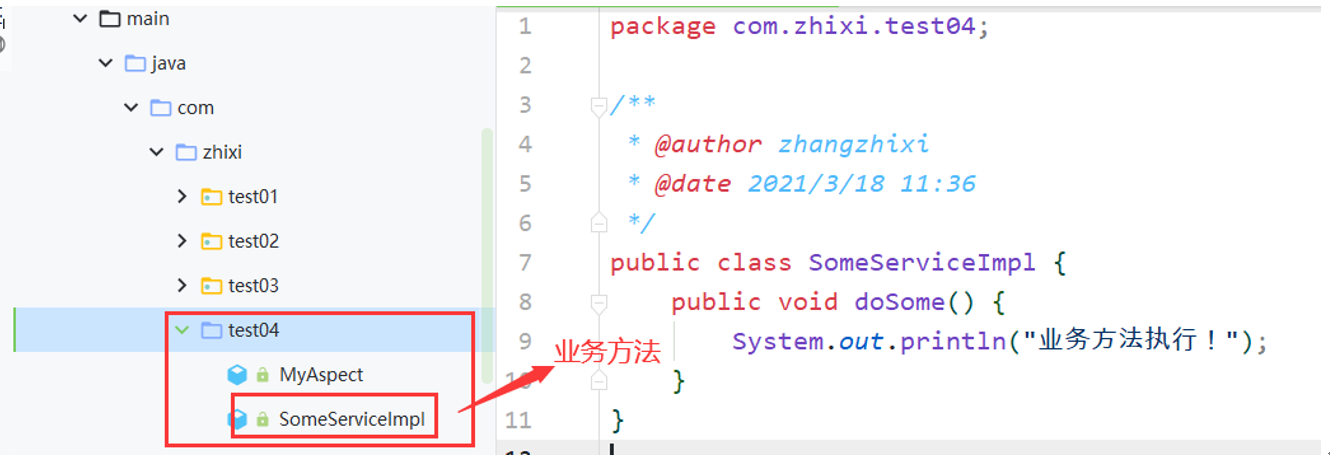
测试:
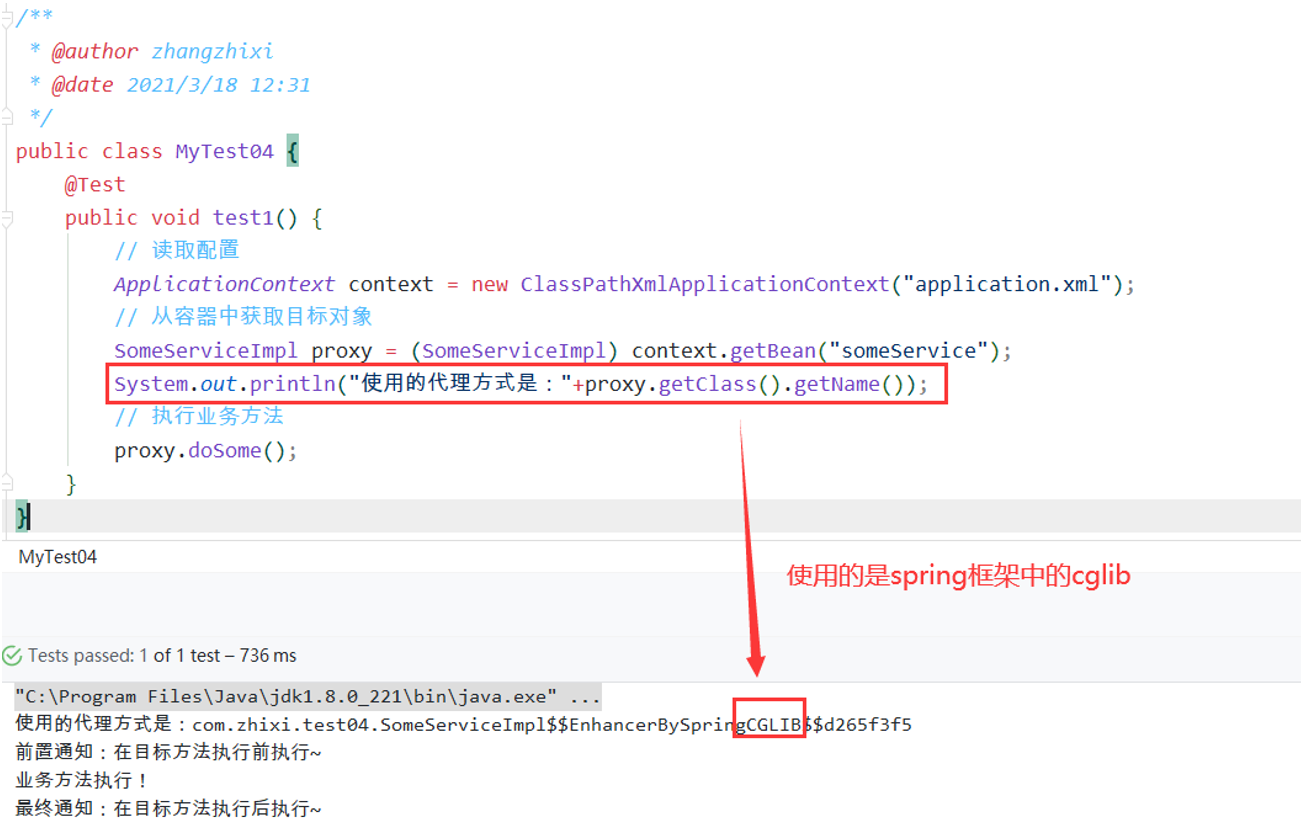
如果目标类有接口,但是我们还想用cglib动态代理的话就需要在xml中加:
<!--AOP的自动代理生成器-->
<aop:aspectj-autoproxy proxy-target-class="true"/>
Spring集成mybatis
依赖:
创建maven项目导入依赖以及解决maven的静态资资源导出问题:

 1     <dependencies>
 2         <dependency>
 3             <groupId>junit</groupId>
 4             <artifactId>junit</artifactId>
 5             <version>4.11</version>
 6             <scope>test</scope>
 7         </dependency>
 8         <!--mysql-jdbc依赖-->
 9         <dependency>
10             <groupId>mysql</groupId>
11             <artifactId>mysql-connector-java</artifactId>
12             <version>5.1.48</version>
13         </dependency>
14         <!--mybatis依赖-->
15         <dependency>
16             <groupId>org.mybatis</groupId>
17             <artifactId>mybatis</artifactId>
18             <version>3.4.6</version>
19         </dependency>
20         <!--spring依赖-->
21         <dependency>
22             <groupId>org.springframework</groupId>
23             <artifactId>spring-webmvc</artifactId>
24             <version>5.2.12.RELEASE</version>
25         </dependency>
26         <!--springAOP的包-->
27         <dependency>
28             <groupId>org.aspectj</groupId>
29             <artifactId>aspectjweaver</artifactId>
30             <version>1.9.4</version>
31         </dependency>
32         <!--ssm整合jdbc依赖-->
33         <dependency>
34             <groupId>org.springframework</groupId>
35             <artifactId>spring-jdbc</artifactId>
36             <version>5.2.12.RELEASE</version>
37         </dependency>
38         <!--mybatis整合依赖-->
39         <dependency>
40             <groupId>org.mybatis</groupId>
41             <artifactId>mybatis-spring</artifactId>
42             <version>2.0.5</version>
43         </dependency>
44         <!--druid数据库连接池-->
45         <dependency>
46             <groupId>com.alibaba</groupId>
47             <artifactId>druid</artifactId>
48             <version>1.1.9</version>
49         </dependency>
50     </dependencies>
51
52     <build>
53         <!--静态资源导出问题-->
54         <resources>
55             <resource>
56                 <directory>src/main/java</directory><!--所在的目录-->
57                 <includes><!--包括目录下的.properties,.xml 文件都会扫描到-->
58                     <include>**/*.properties</include>
59                     <include>**/*.xml</include>
60                 </includes>
61                 <filtering>false</filtering>
62             </resource>
63         </resources>
64         <plugins>
65             <plugin>
66                 <artifactId>maven-compiler-plugin</artifactId>
67                 <version>3.1</version>
68                 <configuration>
69                     <source>1.8</source>
70                     <target>1.8</target>
71                 </configuration>
72             </plugin>
73         </plugins>
74     </build>
创建实体类以及业务跟业务接口查询方法
pojo实体类:com.zhixi.pojo.Student
 1 /**
 2  * @author zhangzhixi
 3  * @date 2021/3/19 16:28
 4  */
 5 @Data
 6 @NoArgsConstructor
 7 @AllArgsConstructor
 8 @Alias(value = "student")
 9 public class Student {
10     private Integer id;
11     private String name;
12     private String email;
13     private Integer age;
14 }
业务接口:com.zhixi.dao.StudnetDao
package com.zhixi.dao;

import com.zhixi.pojo.Student;

import java.util.List;

/**
 * @author zhangzhixi
 * @date 2021/3/19 16:30
 */
public interface StudentDao {

    /**
     * 添加用户
     *
     * @param student
     * @return
     */
    int insertStudent(Student student);


    /**
     * 查询全部用户
     * @return
     */
    List<Student> queryAllStudent();
}
业务接口对应的映射文件:resources/mapper/StudentDao
 1 <?xml version="1.0" encoding="UTF-8" ?>
 2 <!DOCTYPE mapper
 3         PUBLIC "-//mybatis.org//DTD Mapper 3.0//EN"
 4         "http://mybatis.org/dtd/mybatis-3-mapper.dtd">
 5 <mapper namespace="com.zhixi.dao.StudentDao">
 6     <insert id="insertStudent" parameterType="student">
 7         insert into springdb.student (id, name, email, age)
 8         values (#{id}, #{name}, #{email}, #{age});
 9     </insert>
10
11     <select id="queryAllStudent" resultType="student">
12         select *
13         from springdb.student;
14     </select>
15 </mapper>
mybatis配置:resources/mybatis.xml
<?xml version="1.0" encoding="UTF-8" ?>
<!DOCTYPE configuration
        PUBLIC "-//mybatis.org//DTD Config 3.0//EN"
        "http://mybatis.org/dtd/mybatis-3-config.dtd">

<configuration>

    <!--日志-->
    <settings>
        <setting name="logImpl" value="STDOUT_LOGGING"/>
    </settings>
    <!--设置实体类别名-->
    <typeAliases>
        <package name="com.zhixi.pojo"/>
    </typeAliases>
</configuration>
创建service层:
service层接口:com.zhixi.service.StudentService
package com.zhixi.service;

import com.zhixi.pojo.Student;

import java.util.List;

/**
 * @author zhangzhixi
 * @date 2021/3/19 17:01
 */
public interface StudentService {

    /**
     * 添加用户
     *
     * @param student
     * @return
     */
    int insertStudent(Student student);


    /**
     * 查询全部用户
     * @return
     */
    List<Student> queryAllStudent();
}
service层接口的实现类(执行CRUD):
package com.zhixi.service;

import com.zhixi.dao.UserMapper;
import com.zhixi.pojo.Student;
import org.mybatis.spring.SqlSessionTemplate;

import java.util.List;

/**
 * @author zhangzhixi
 * @date 2021/3/19 20:35
 */
public class UserServiceImpl implements UserService {
    // 在原来我们所有的操作都是SQLSession来,现在使用SQLSessionTemplate
    private SqlSessionTemplate sqlSession;

    public void setSqlSession(SqlSessionTemplate sqlSession) {
        this.sqlSession = sqlSession;
    }

    @Override
    public int insertStudent(Student student) {
        UserMapper mapper = sqlSession.getMapper(UserMapper.class);
        return mapper.insertStudent(student);
    }

    @Override
    public List<Student> queryStudent() {
        UserMapper mapper = sqlSession.getMapper(UserMapper.class);
        return mapper.queryStudent();
    }
}
spring配置
Druid数据库连接池
<!--配置数据源--> <bean id="dataSource" class="com.alibaba.druid.pool.DruidDataSource" init-method="init" destroy-method="close"> <property name="url" value="jdbc:mysql://localhost:3306/springdb?useSSL=true&useUnicode=true&characterEncoding=UTF-8&serverTimezone=UTC"/> <property name="username" value="root"/> <property name="password" value="zhixi158"/> </bean>
sqlSessionFactory的创建
<!--sqlSessionFactory的创建-->
<bean id="sqlSessionFactory" class="org.mybatis.spring.SqlSessionFactoryBean">
    <property name="dataSource" ref="dataSource"/>
    <!--绑定mybatis的设置,说明和spring连通了-->
    <property name="configLocation" value="mybatis-config.xml"/>
    <!--mapper映射器-->
    <property name="mapperLocations" value="mapper/*.xml"/>
</bean>
SqlSessionTemplate的创建:
<!--SqlSessionTemplate:就是我们在测试类使用的SQLSession对象-->
<bean id="sqlSession" class="org.mybatis.spring.SqlSessionTemplate">
    <!--因为在SqlSessionTemplate中没有set方法,所以只能通过构造器注入-->
    <constructor-arg index="0" ref="sqlSessionFactory"/>
</bean>
注册bean
<!--xml文件中对应的创建UserMapperImpl 这个bean -->
<bean id="userMapper" class="com.zhixi.service.UserServiceImpl">
    <property name="sqlSession" ref="sqlSession"/>
</bean>
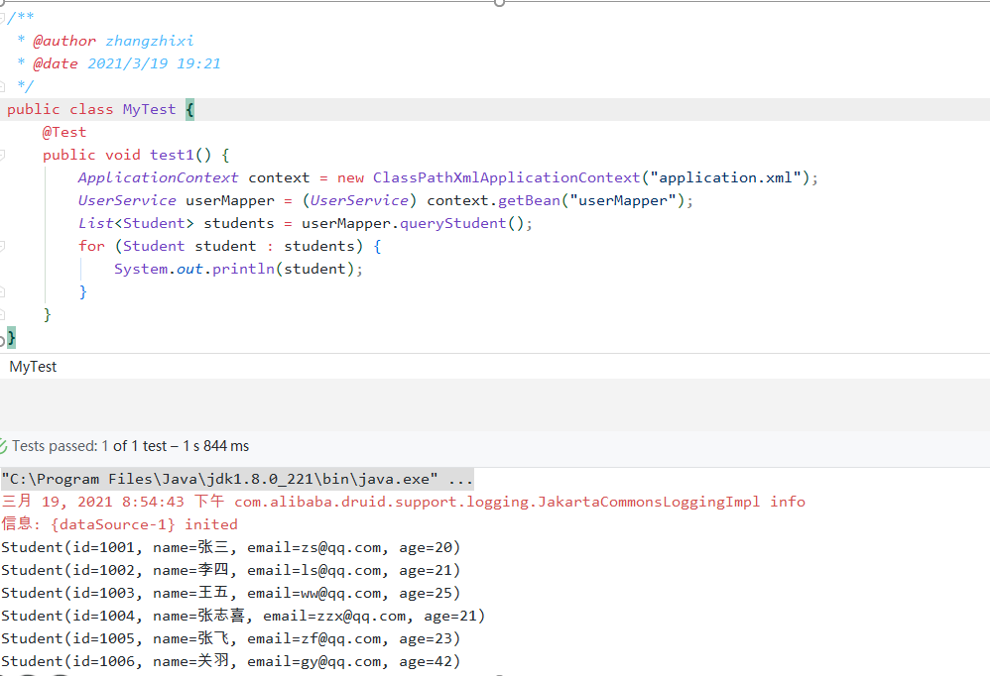
测试:
