//************************ iOS10 适配 **************************//
//************************ 11/02/2016 **************************//
添加下 iOS10 的适配 主要代码,其他参照官方文档
注意 AppDelegate中import <UserNotifications/UserNotifications.h>:
#ifdef NSFoundationVersionNumber_iOS_9_x_Max
#import <UserNotifications/UserNotifications.h>
#endif
// 极光配置
- (void)configJPush:(NSDictionary *)launchOptions {

    if ([[UIDevice currentDevice].systemVersion floatValue] >= 10.0) {
#ifdef NSFoundationVersionNumber_iOS_9_x_Max
        JPUSHRegisterEntity * entity = [[JPUSHRegisterEntity alloc] init];
        entity.types = UNAuthorizationOptionAlert|UNAuthorizationOptionBadge|UNAuthorizationOptionSound;
        [JPUSHService registerForRemoteNotificationConfig:entity delegate:self];
#endif
    }
    else if ([[UIDevice currentDevice].systemVersion floatValue] >= 8.0) {

            //可以添加自定义categories
            [JPUSHService registerForRemoteNotificationTypes:
                                                             (UIUserNotificationTypeBadge |
                                                              UIUserNotificationTypeSound |
                                                              UIUserNotificationTypeAlert)
                                                  categories:nil];
        }
        else {
            //categories 必须为nil
            [JPUSHService registerForRemoteNotificationTypes:(UIRemoteNotificationTypeBadge |
                                                              UIRemoteNotificationTypeSound |
                                                              UIRemoteNotificationTypeAlert)
                                                  categories:nil];
        }
    //Required
    // 如需继续使用pushConfig.plist文件声明appKey等配置内容,请依旧使用[JPUSHService setupWithOption:launchOptions]方式初始化。
    [JPUSHService setupWithOption:launchOptions appKey:JPUSH_APPKEY
                          channel:JPUSH_CHANNEL
                 apsForProduction:JPUSH_ISPRODUCTION
            advertisingIdentifier:nil];

    //2.1.9版本新增获取registration id block接口。
    [JPUSHService registrationIDCompletionHandler:^(int resCode, NSString *registrationID) {
        if(resCode == 0){
            NSLog(@"registrationID获取成功:%@",registrationID);

        }
        else{
            NSLog(@"registrationID获取失败,code:%d",resCode);
        }
    }];
}
//************************ iOS10 适配 end ****************************************//
极光推送
1.首先当然是账号的申请
2.之后 环境配置:
这里放链接: 极光官方文档讲的很清晰,给赞(文档可以操作到开启remote notifications处,之后再参考iOS SDK 集成指南集成JPush SDK)。
PS:提一句,遇到问题还是查看官方文档最有效。
3.集成JPush:仍是参照文档
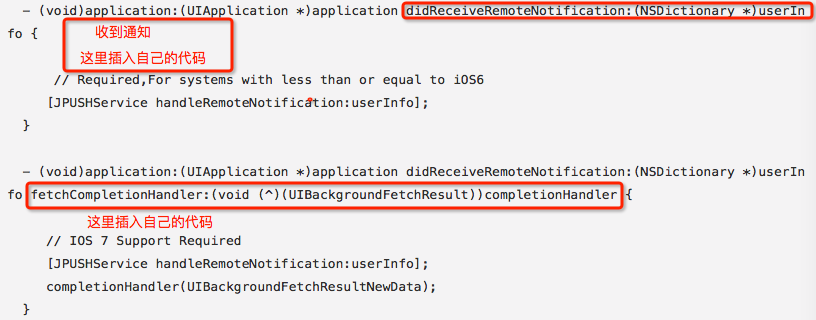
集成之后,在下图两个方法中,进行收到通知的操作(这里按照自己项目的需求来了)
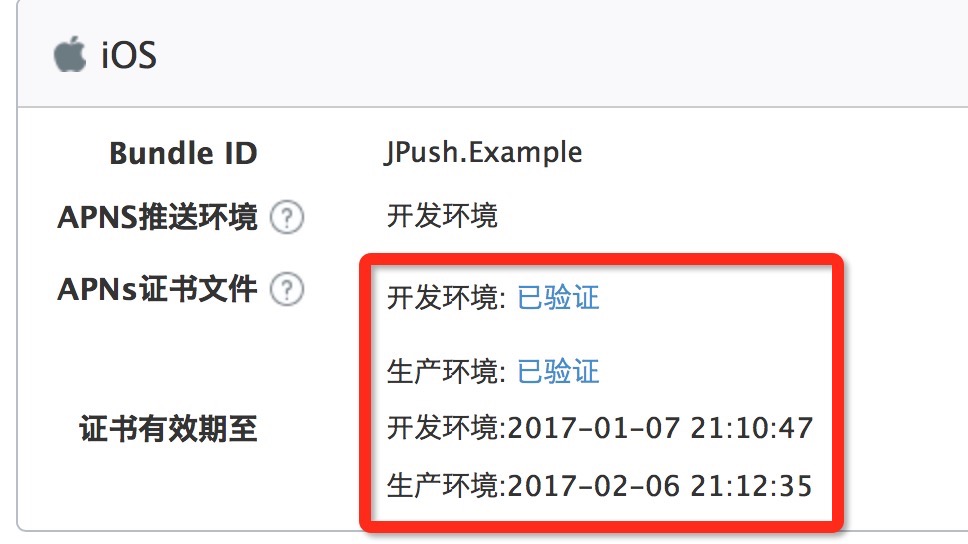
4.到这里算是OK,注意下图代码中 isProduction,是否是生产环境,如果是开发环境则设为NO,生产环境要设为YES。

友情提醒:仔细阅读官方文档哦。
注意:分享转载请注明原博链接,多谢。