因业务需求,要在 vue2.0 的项目里使用富文本编辑器,经过调研多个编辑器,CKEditor5 支持 vue,遂采用。因 CKEditor5 文档比较少,此处记录下引用和一些基本用法。
CKEditor5官网
https://ckeditor.com/docs/ckeditor5/latest/builds/guides/overview.html
CKEditor5 引入
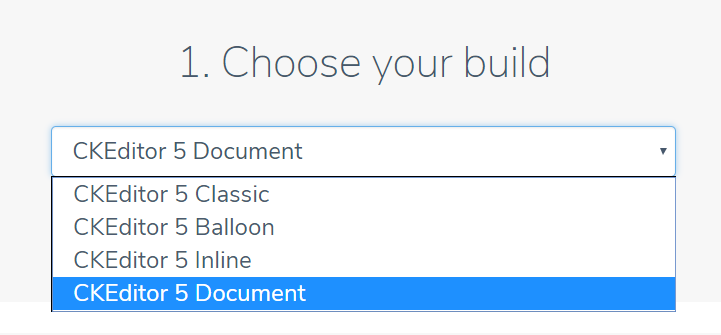
有四种编辑器可供下载,根据自己的需求选择,因为开发需求需要颜色笔,所以采用 Document editor。
如果之前有用 Classic 版本的,在下载 Document 版本时需要 uninstall Classic,额,好像是句废话,但是我用的时候 uninstall Classic好多次才卸载掉。
1. 根据官网提示,采用 npm 引入CKEditor5,地址:https://ckeditor.com/ckeditor-5/download/。根据提示 copy 命令执行:
npm install --save @ckeditor/ckeditor5-build-decoupled-document
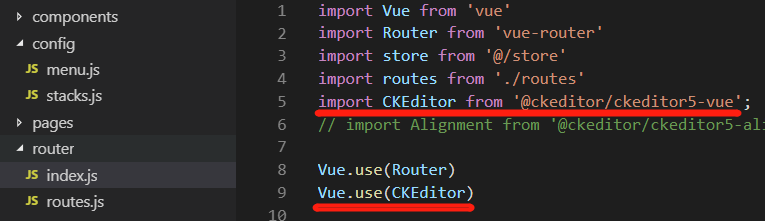
2. router/index.js 引入 CKEditor
3. 在使用的页面引入,需要中文的可引入 zh-cn.js 文件
import DecoupledEditor from '@ckeditor/ckeditor5-build-decoupled-document'
import '@ckeditor/ckeditor5-build-decoupled-document/build/translations/zh-cn.js'
4. html 页面写入 <ckedtior> 标签
<ckeditor id="editor" :editor="editor" @ready="onReady" v-model="content" :config="editorConfig"></ckeditor>
说明:
v-model = "content" 获取编辑器里输入的内容;
:config = "editorCnfig" 需要配置的项;
@ready = "onReady" 编辑器初始化
5. js 部分
import DecoupledEditor from '@ckeditor/ckeditor5-build-decoupled-document'
import '@ckeditor/ckeditor5-build-decoupled-document/build/translations/zh-cn.js'

DecoupledEditor
  .create(document.querySelector('#editor'), {
  }).then(editor => {
    // 打印所有的配置项
    // console.log('》》》》', Array.from( editor.ui.componentFactory.names() ) );
  }).catch(error => {
    console.error(error)
  })


export default {
  data: () => ({
    editor: DecoupledEditor,
    editorConfig: {
      toolbar: ['heading', 'fontSize', 'highlight', 'highlight:yellowMarker', 'highlight:greenMarker', 'highlight:pinkMarker', 'highlight:blueMarker', 'fontFamily', 'alignment', 'imageUpload', 'bold', 'italic', 'underline', 'imageStyle:full', 'imageStyle:alignLeft', 'imageStyle:alignRight', 'link', 'undo', 'redo'],
      fontSize: {
        options: [8, 9, 10, 11, 12, 'default', 14, 16, 18, 20, 22, 24, 26, 28, 36, 44, 48, 72],
      },
     }
    },
    ckfinder: {
      uploadUrl: `${store.getters.currentStack.baseURL}/ckeditor/upload`,
    }
  })
}
说明:
1. DecoupledEditor.create(document.querySelector('#editor'), {})此处代码可省略,除非你想打印出所有的配置项。
2. toolbar 配置工具栏
3. fontSize 字体 default 默认字体
4. highlight :配置字体颜色和高亮。详细的写法可参考:https://ckeditor.com/docs/ckeditor5/latest/features/highlight.html
   (默认只有三四种颜色,谷歌搜“CKEditor5 highlight” ,第一条出来了,CKEditor 中文的文档很少,不要抗拒英文文档,逃离舒适区,也对自己说哈哈)
自定义图片上传插件问题
方法一:
文中标红的地方,是配置图片上传,只需要填写上传图片的后台接口,注意,后台返回的字段必须包括 uploaded 上传的字节数 和 url 两个字段,不然一直会 alert 提示框报错。
方法二:
有些极端情况,上传图片的接口任何人都能访问到,如果被盗用恶意上传大量图片,服务器的存储空间和流量就会被挤爆,所以这个接口需要 token/cookie 校验限制下。那么问题来了,如果需要传递 token 值,该怎么传?这就需要自定义图片上传插件。推荐文章:https://www.jianshu.com/p/47e25447b771 里面有介绍如何自定义上传图片插件,但是有些部分讲的不是特别清楚,当时也是看的云里雾里。下面记录下如何解决这个问题。
1、按照官网自定义上传图片插件的文档,有两篇文章可参考:
https://ckeditor.com/docs/ckeditor5/latest/framework/guides/deep-dive/upload-adapter.html
https://stackoverflow.com/questions/52873321/add-custom-headers-to-upload-image
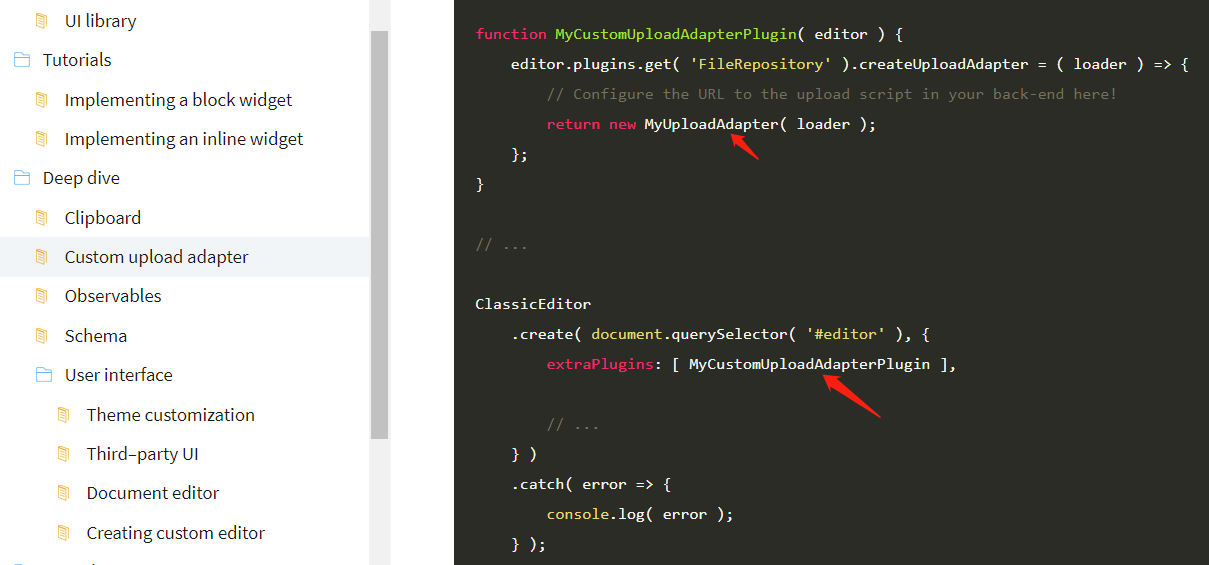
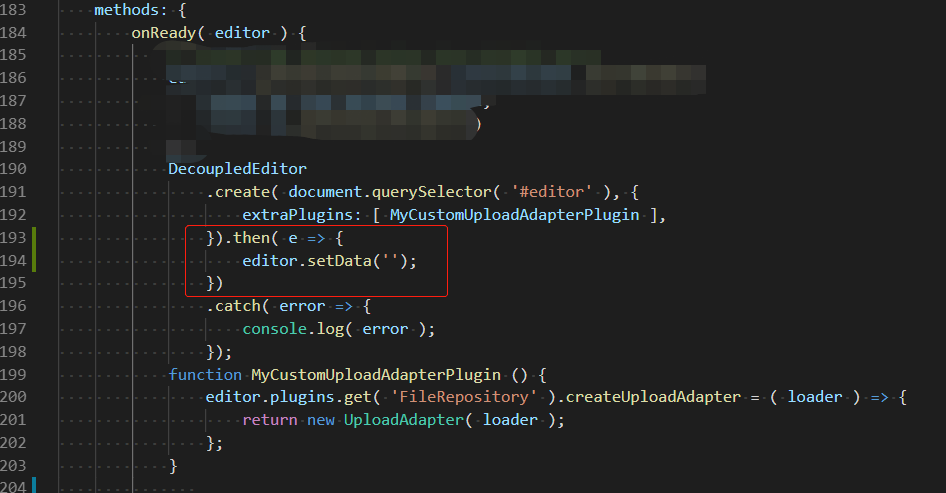
按照文档,需要在 ClassicEditor.cteate() ,定义插件 MyCustomUploadAdapterPlugin ,在MyCustomUploadAdapterPlugin 插件里创建类 MyUploadAdapter,MyUploadAdapter 放在 <script> 标签下面,写法如下:(注意!onReady 里的这种写法是错的,正确的写法是把绿色部分去掉,下面会讲导致的 bug 及正确写法)
<ckeditor id="editor" :editor="editor" v-model="content" @ready="onReady" :config="editorConfig"></ckeditor>
data: () => ({
  editor: DecoupledEditor
})
methods: {
        onReady( editor ) {
            DecoupledEditor
                .create( document.querySelector( '#editor' ), {
                    extraPlugins: [ MyCustomUploadAdapterPlugin ],
                } )
                .catch( error => {
                    console.log( error );
                });
            function MyCustomUploadAdapterPlugin () {
                editor.plugins.get( 'FileRepository' ).createUploadAdapter = ( loader ) => {
                    return new MyUploadAdapter( loader );
                };
            }
        }
}
<script>
class MyUploadAdapter {
  constructor( loader ) {
    // Save Loader instance to update upload progress.
    this.loader = loader;
  }

  async upload() {
    const data = new FormData();
    data.append('typeOption', 'upload_image');
    data.append('upload', await this.loader.file);

    return new Promise((resolve, reject) => {
      axios({
        url: `api/xxxx/ckeditor/upload`,
        method: 'post',
        data,
        headers: {
          'Authorization': 'Bearer tokenxxxxxxxxxxxxxxxxxxx'  // 此处为你定义的token 值(Bearer token 接口认证方式)
        },
        withCredentials: true // true 为不允许带 token, false 为允许,可能会遇到跨域报错:Error: Network Error 弹窗提示(感谢@ big_yellow 指正)
      }).then(res => {
        var resData = res.data;
        resData.default = resData.url;
        resolve(resData);
      }).catch(error => {
        reject(error)
      });
    });
  }
}
</script>
我查到的文档里是没有上段代码两处标红的地方 async await (ES6 用法),导致 console.log 错误,同事误打误撞加上 async await ,没有报错,具体原因还不太清楚,可能是 DOM 还未加载出来导致的,欢迎大家指正。
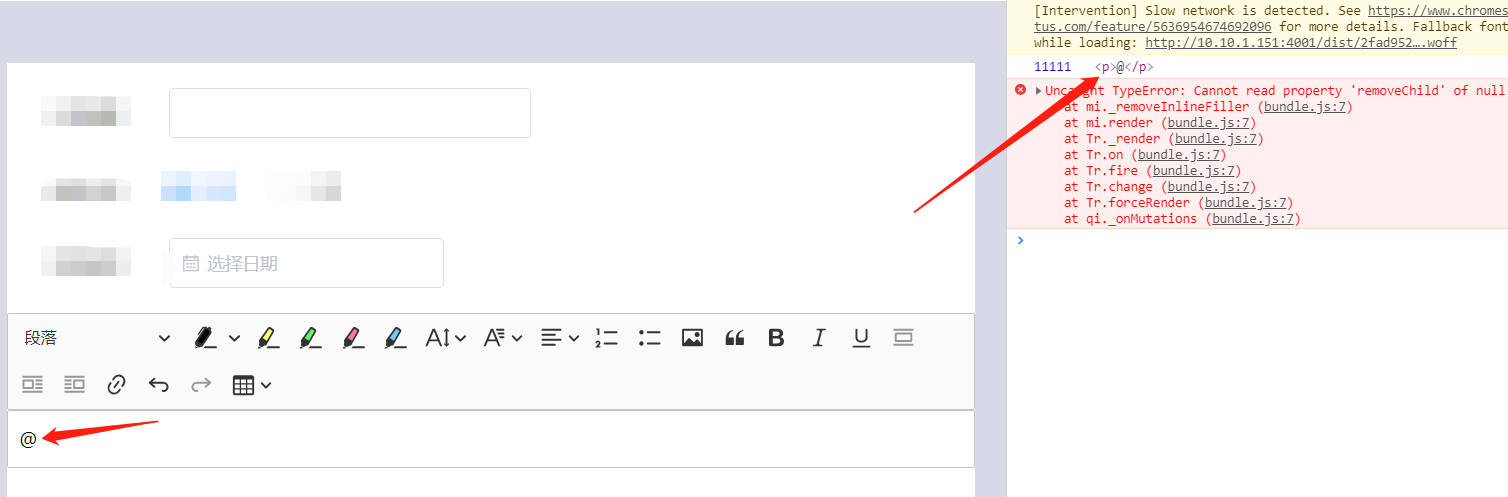
写到这里,页面可以正常加载,并可传递 token 值使用图片上传功能,但是,编辑器默认内容会显示 @ 符号,
console.log(11111, document.getElementById('editor').childNodes[0]) 打印出这个值为:<br data-cke-filler>,或下图 <p>@</p>,
尝试使用清除 DOM 把 “@” 删除,但是编辑器试图删除不存在的 DOM 节点时崩溃,导致页面卡死。
解决方法如下:运用 editor.setData() 设置编辑器初始值。
现在说下正确的自定义图片上传插件在 @onReady 里写法:
onReady( editor ) {
    // 自定义上传图片插件
    editor.plugins.get( 'FileRepository' ).createUploadAdapter = ( loader ) => {
         return new MyUploadAdapter( loader );
     };
 }
解释:@onReady 的作用跟 DecoupledEditor.create( document.querySelector( '#editor' ), {}) 作用一样,导致报错。
设置字体样式:
有的用户浏览器不支持的字体样式,需要下载字体包,并在 css 里设置 @font-face
@font-face {
    font-family: 'KaiTi';
    src: url('../fonts/KaiTi.ttf');
    font-family: 'SimHei';
    src: url('../fonts/SimHei.ttf');
    font-family: 'SimSun';
    src: url('../fonts/SimSun.ttf');
    font-weight: normal;
    font-style: normal;
}
    data: () => ({
        title: '',
        type: 'news',
        content: '',
        publish_at: '',
        editor: DecoupledEditor,
        editorConfig: {
            language: 'zh-cn',
            toolbar: ['heading', 'fontSize', 'fontFamily', 'redo', 'insertTable'],
            fontSize: {
                options: [ 12, 'default', 14, 16, 18, 20, 22, 24, 26, 28, 36, 44, 48, 72],
            },
            fontFamily: {
                options: [
                    '宋体',
                    '黑体',
                    '楷体',
                    '微软雅黑',
                ]
            },
    })