一、概述
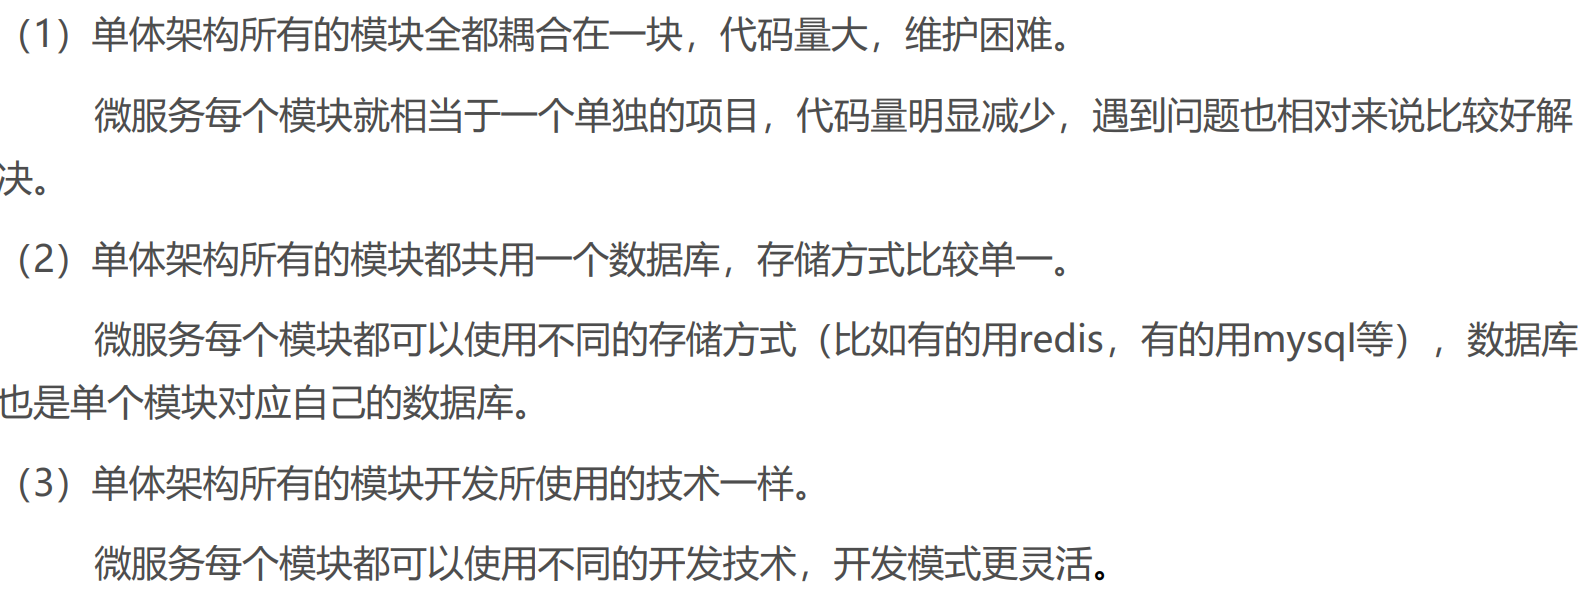
1.微服务与单体架构区别
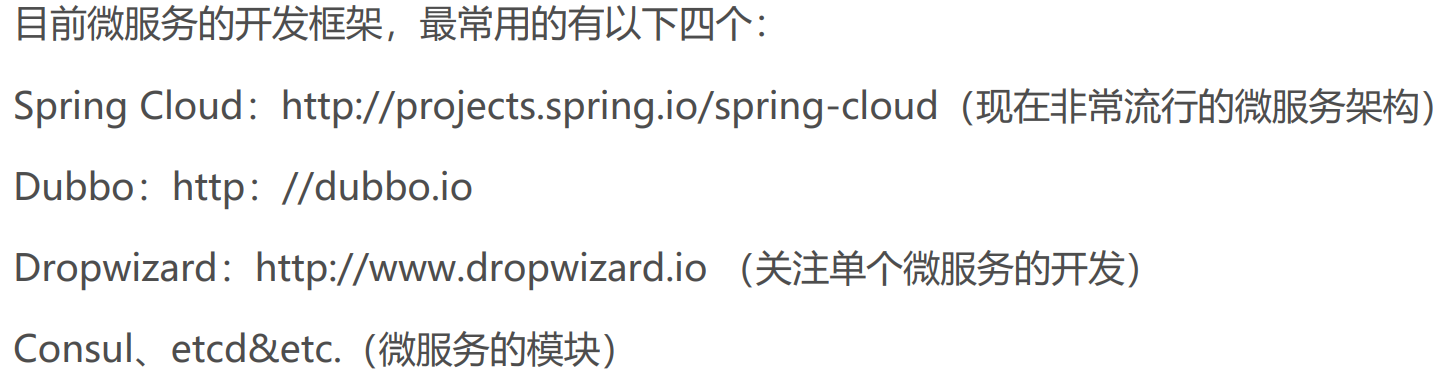
2. 什么是Spring Cloud
Spring Cloud是一系列框架的集合。它利用Spring Boot的开发便利性简化了分布式系统基础设施的开发,如服务发现、服务注册、配置中心、消息总线、负载均衡、 熔断器、数据监控等,都可以用Spring Boot的开发风格做到一键启动和部署。Spring并没有重复制造轮子,它只是将目前各家公司开发的比较成熟、经得起实际考验的服务框架组合起来,通过SpringBoot风格进行再封装屏蔽掉了复杂的配置和实现原理,最终给开发者留出了一套简单易懂、易部署和易维护的分布式系统开发工具包
3.Spring Cloud和Spring Boot是什么关系
- Spring Boot 是 Spring 的一套快速配置脚手架,可以基于Spring Boot 快速开发单个微服务,Spring Cloud是一个基于Spring Boot实现的开发工具;
- Spring Boot专注于快速、方便集成的单个微服务个体,Spring Cloud关注全局的服务治理框架;
- Spring Boot使用了默认大于配置的理念,很多集成方案已经帮你选择好了,能不配置就不配置,Spring Cloud很大的一部分是基于Spring Boot来实现,必须基于Spring Boot开发。
- 可以单独使用Spring Boot开发项目,但是Spring Cloud离不开 Spring Boot。
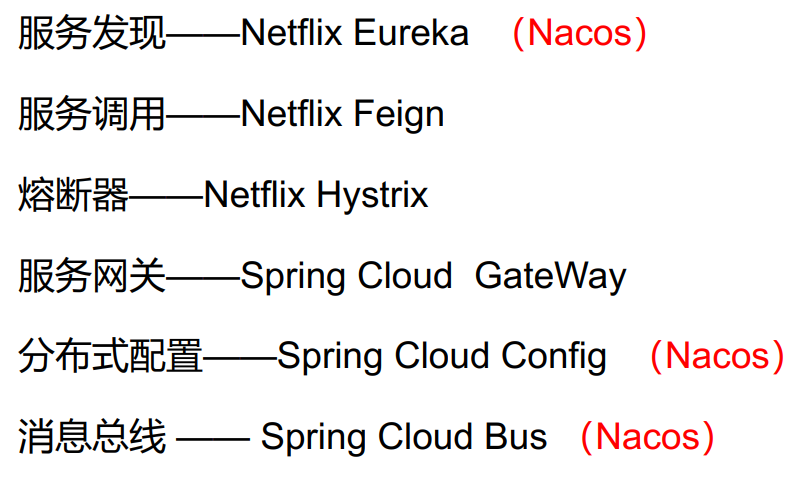
4.Spring Cloud相关基础服务组件
二、Nacos
1.概述
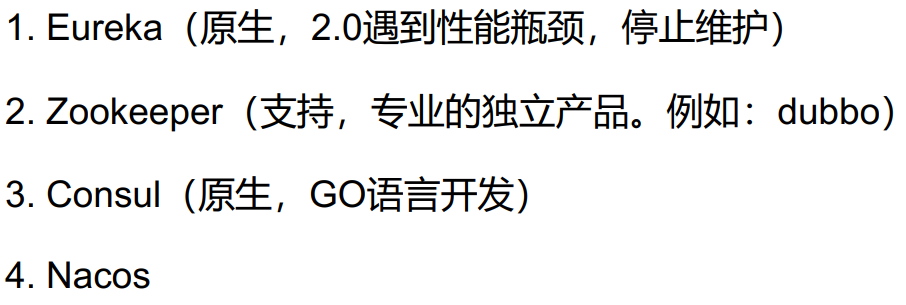
1.常见的注册中心
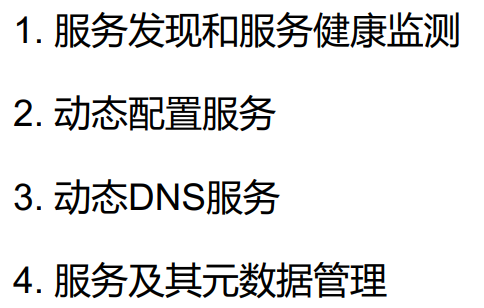
2.Nacos主要提供以下四大功能
3. 结构

2. 安装与配置
1.下载 nacos
下载地址:https://github.com/alibaba/nacos/releases
2.启动nacos服务
- - Linux/Unix/Mac
- 启动命令(standalone代表着单机模式运行,非集群模式)
- 启动命令:sh startup.sh -m standalone
- - Windows
- 启动命令:cmd startup.cmd 或者双击startup.cmd运行文件。
- 访问:http://localhost:8848/nacos
- 用户名密码:nacos/nacos
3.步骤
1. 引入依赖
 1         <dependency>
 2             <groupId>org.springframework.cloud</groupId>
 3             <artifactId>spring-cloud-starter-netflix-ribbon</artifactId>
 4         </dependency>
 5         <!-- hystrix熔断器依赖,主要是用 @HystrixCommand -->
 6         <dependency>
 7             <groupId>org.springframework.cloud</groupId>
 8             <artifactId>spring-cloud-starter-netflix-hystrix</artifactId>
 9         </dependency>
10         <!--服务注册-->
11         <dependency>
12             <groupId>org.springframework.cloud</groupId>
13             <artifactId>spring-cloud-starter-alibaba-nacos-discovery</artifactId>
14          </dependency>
15         <!--服务调用-->
16         <dependency>
17             <groupId>org.springframework.cloud</groupId>
18             <artifactId>spring-cloud-starter-openfeign</artifactId>
19         </dependency>
2. 添加配置信息
1 # application.properties
2 # nacos服务地址
3 spring.cloud.nacos.discovery.server-addr=127.0.0.1:8848
3. 添加Nacos客户端注解
1 @EnableDiscoveryClient
4. 在服务端的启动类添加注解
1 @EnableFeignClients
5. 在服务端创建包和接口 (客户端)
创建client包
- @FeignClient注解用于指定从哪个服务中调用功能 ,名称与被调用的服务名保持一致。
- @DeleteMapping注解用于对被调用的微服务进行地址映射。
- @PathVariable注解一定要指定参数名称,否则出错
- @Component注解防止,在其他位置注入CodClient时idea报错
1 @FeignClient("service-vod")
2 @Component
3 public interface VodClient {
4     @DeleteMapping(value = "/eduvod/vod/video/{videoId}") // 该处写全路径名
5     public R removeVideo(@PathVariable("videoId") String videoId); //该处一点要加别名"videoId"
6 }
6. 调用微服务
1 @Autowire
2 private VodClient vodClient;
三、Hystrix基本概念
1. Spring Cloud调用接口过程
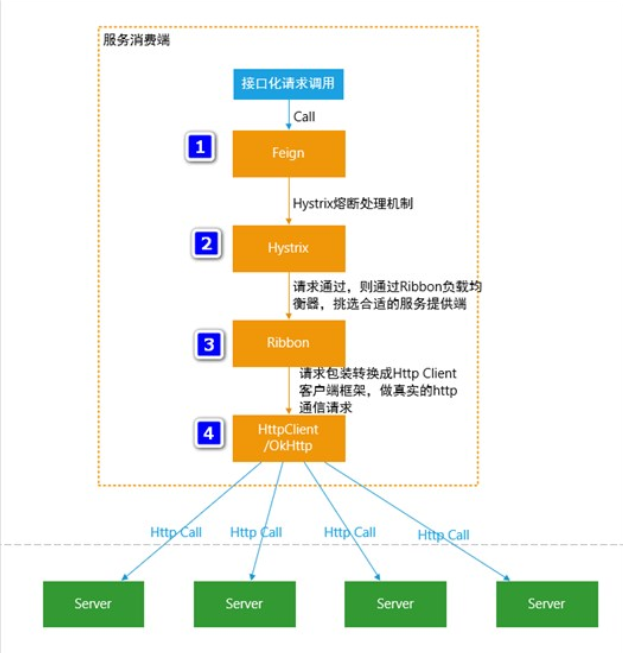
- (1)接口化请求调用当调用被@FeignClient注解修饰的接口时,在框架内部,将请求转换成Feign的请求实例feign.Request,交由Feign框架处理。
- (2)Feign :转化请求Feign是一个http请求调用的轻量级框架,可以以Java接口注解的方式调用Http请求,封装了Http调用流程。
- (3)Hystrix:熔断处理机制 Feign的调用关系,会被Hystrix代理拦截,对每一个Feign调用请求,Hystrix都会将其包装成HystrixCommand,参与Hystrix的流控和熔断规则。如果请求判断需要熔断,则Hystrix直接熔断,抛出异常或者使用FallbackFactory返回熔断Fallback结果;如果通过,则将调用请求传递给Ribbon组件。
- (4)Ribbon:服务地址选择 当请求传递到Ribbon之后,Ribbon会根据自身维护的服务列表,根据服务的服务质量,如平均响应时间,Load等,结合特定的规则,从列表中挑选合适的服务实例,选择好机器之后,然后将机器实例的信息请求传递给Http Client客户端,HttpClient客户端来执行真正的Http接口调用;
- (5)HttpClient :Http客户端,真正执行Http调用根据上层Ribbon传递过来的请求,已经指定了服务地址,则HttpClient开始执行真正的Http请求
2. 步骤
1.导入依赖
2.在配置文件中添加hystrix配置
1 #开启熔断机制
2 feign.hystrix.enabled=true
3 # 设置hystrix超时时间,默认1000ms
4 hystrix.command.default.execution.isolation.thread.timeoutInMilliseconds=6000
3.创建熔断器的实现类 (即实现VodClient)
注意:开启熔断器后必要要有实现类
 1 @Component
 2 public class VodFileDegradeFeignClient implements VodClient {
 3     @Override
 4      public R removeVideo(String videoId) {
 5         return R.error().message("time out");
 6     }
 7     @Override
 8     public R removeVideoList(List videoIdList) {
 9         return R.error().message("time out");
10     }
11 }
4.修改VodClient接口的注解
1 @FeignClient(name = "service-vod", fallback = VodFileDegradeFeignClient.class)
2 @Component
3 public interface VodClient {
4     @DeleteMapping(value = "/eduvod/vod/{videoId}")
5     public R removeVideo(@PathVariable("videoId") String videoId);
6
7     @DeleteMapping(value = "/eduvod/vod/delete-batch")
8     public R removeVideoList(@RequestParam("videoIdList") List videoIdList);
9 }
四、网关
1. 问题
- (1)客户端会多次请求不同的微服务,增加了客户端的复杂性。
- (2)存在跨域请求,在一定场景下处理相对复杂。
- (3)认证复杂,每个服务都需要独立认证。
- (4)难以重构,随着项目的迭代,可能需要重新划分微服务。例如,可能将多个服务合并成一个或者将一个服务拆分成多个。如果客户端直接与微服务通信,那么重构将会很难实施。
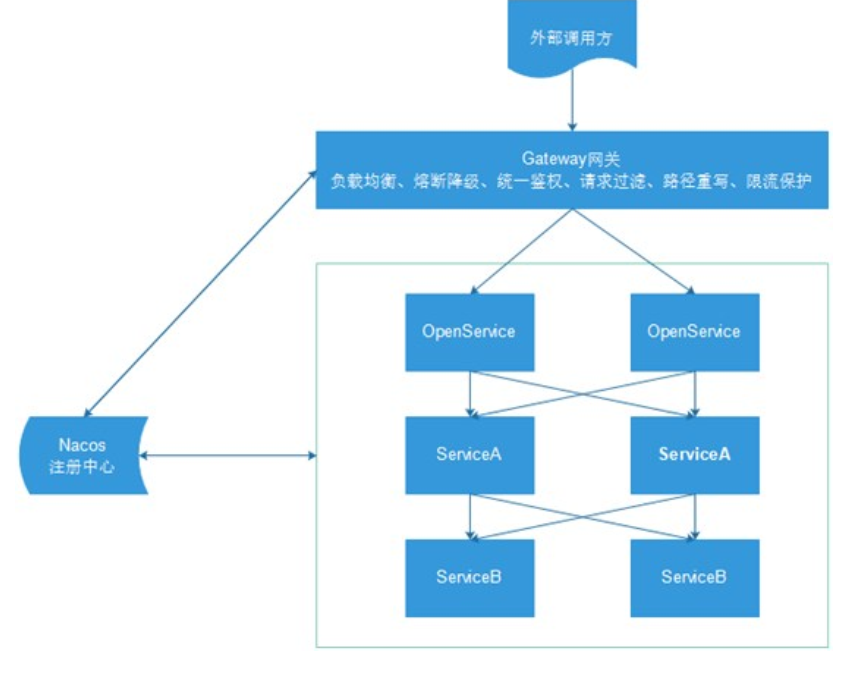
- (5)某些微服务可能使用了防火墙 / 浏览器不友好的协议,直接访问会有一定的困难。以上这些问题可以借助 API 网关解决。API 网关是介于客户端和服务器端之间的中间层,所有的外部请求都会先经过 API 网关这一层。也就是说,API 的实现方面更多的考虑业务逻辑,而安全、性能、监控可以交由 API 网关来做,这样既提高业务灵活性又不缺安全性
2. 网关作用
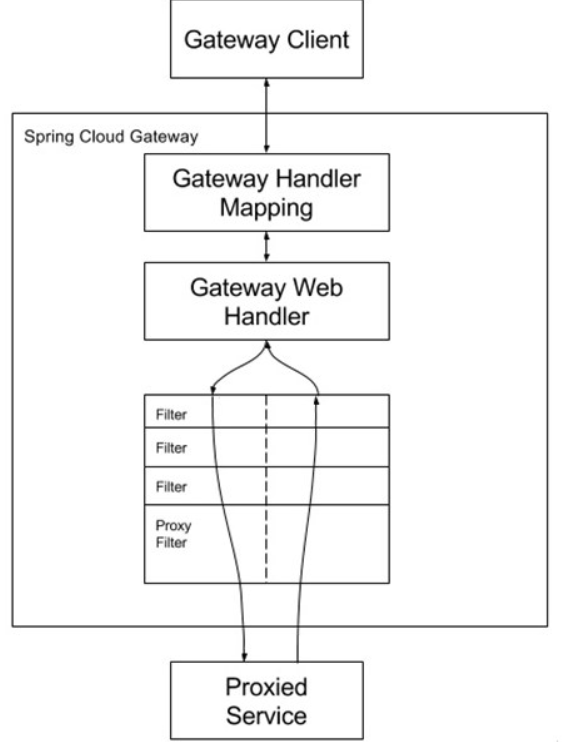
(1)路由。路由是网关最基础的部分,路由信息有一个ID、一个目的URL、一组断言和一组Filter组成。如果断言路由为真,则说明请求的URL和配置匹配
(2)断言。Java8中的断言函数。Spring Cloud Gateway中的断言函数输入类型是Spring5.0框架中的ServerWebExchange。Spring Cloud Gateway中的断言函数允许开发者去定义匹配来自于httprequest中的任何信息,比如请求头和参数等。
(3)过滤器。一个标准的Spring webFilter。Spring cloud gateway中的filter分为两种类型的Filter,分别是Gateway Filter和Global Filter。过滤器Filter将会对请求和响应进行修改处理
3. 步骤
1.导入依赖
 1     <dependencies>
 2         <dependency>
 3             <groupId>com.atguigu</groupId>
 4             <artifactId>common-util</artifactId>
 5             <version>0.0.1-SNAPSHOT</version>
 6         </dependency>
 7         <dependency>
 8             <groupId>org.springframework.cloud</groupId>
 9             <artifactId>spring-cloud-starter-alibaba-nacos-discovery</artifactId>
10         </dependency>
11         <dependency>
12             <groupId>org.springframework.cloud</groupId>
13             <artifactId>spring-cloud-starter-gateway</artifactId>
14         </dependency>
15         <!--gson-->
16         <dependency>
17             <groupId>com.google.code.gson</groupId>
18             <artifactId>gson</artifactId>
19         </dependency>
20         <!--服务调用-->
21         <dependency>
22             <groupId>org.springframework.cloud</groupId>
23             <artifactId>spring-cloud-starter-openfeign</artifactId>
24         </dependency>
25     </dependencies>
2. 配置文件


 1 # 服务端口
 2 server.port=9001
 3 # 服务名
 4 spring.application.name=gateway
 5 # nacos服务地址
 6 spring.cloud.nacos.discovery.server-addr=127.0.0.1:8848
 7 #使用服务发现路由
 8 spring.cloud.gateway.discovery.locator.enabled=true
 9 #服务路由名小写
10 #spring.cloud.gateway.discovery.locator.lower-case-service-id=true
11 #设置路由id
12 spring.cloud.gateway.routes[0].id=service-acl
13 #设置路由的uri
14 spring.cloud.gateway.routes[0].uri=lb://service-acl
15 #设置路由断言,代理servicerId为auth-service的/auth/路径
16 spring.cloud.gateway.routes[0].predicates= Path=/*/acl/**
17 #配置service-edu服务
18 spring.cloud.gateway.routes[1].id=service-edu
19 spring.cloud.gateway.routes[1].uri=lb://service-edu
20 spring.cloud.gateway.routes[1].predicates= Path=/eduservice/**
21 #配置service-ucenter服务
22 spring.cloud.gateway.routes[2].id=service-ucenter
23 spring.cloud.gateway.routes[2].uri=lb://service-ucenter
24 spring.cloud.gateway.routes[2].predicates= Path=/ucenterservice/**
25 #配置service-ucenter服务
26 spring.cloud.gateway.routes[3].id=service-cms
27 spring.cloud.gateway.routes[3].uri=lb://service-cms
28 spring.cloud.gateway.routes[3].predicates= Path=/cmsservice/**
29 spring.cloud.gateway.routes[4].id=service-msm
30 spring.cloud.gateway.routes[4].uri=lb://service-msm
31 spring.cloud.gateway.routes[4].predicates= Path=/edumsm/**
32 spring.cloud.gateway.routes[5].id=service-order
33 spring.cloud.gateway.routes[5].uri=lb://service-order
34 spring.cloud.gateway.routes[5].predicates= Path=/orderservice/**
35 spring.cloud.gateway.routes[6].id=service-order
36 spring.cloud.gateway.routes[6].uri=lb://service-order
37 spring.cloud.gateway.routes[6].predicates= Path=/orderservice/**
38 spring.cloud.gateway.routes[7].id=service-oss
39 spring.cloud.gateway.routes[7].uri=lb://service-oss
40 spring.cloud.gateway.routes[7].predicates= Path=/eduoss/**
41 spring.cloud.gateway.routes[8].id=service-statistic
42 spring.cloud.gateway.routes[8].uri=lb://service-statistic
43 spring.cloud.gateway.routes[8].predicates= Path=/staservice/**
44 spring.cloud.gateway.routes[9].id=service-vod
45 spring.cloud.gateway.routes[9].uri=lb://service-vod
46 spring.cloud.gateway.routes[9].predicates= Path=/eduvod/**
47 spring.cloud.gateway.routes[10].id=service-edu
48 spring.cloud.gateway.routes[10].uri=lb://service-edu
49 spring.cloud.gateway.routes[10].predicates= Path=/eduuser/**
3. 配置

 1 import org.springframework.context.annotation.Bean;
 2 import org.springframework.context.annotation.Configuration;
 3 import org.springframework.web.cors.CorsConfiguration;
 4 import org.springframework.web.cors.reactive.CorsWebFilter;
 5 import org.springframework.web.cors.reactive.UrlBasedCorsConfigurationSource;
 6 import org.springframework.web.util.pattern.PathPatternParser;
 7
 8
 9 @Configuration
10 public class CorsConfig {
11     @Bean
12     public CorsWebFilter corsFilter() {
13         CorsConfiguration config = new CorsConfiguration();
14         config.addAllowedMethod("*");
15         config.addAllowedOrigin("*");
16         config.addAllowedHeader("*");
17
18         UrlBasedCorsConfigurationSource source = new UrlBasedCorsConfigurationSource(new PathPatternParser());
19         source.registerCorsConfiguration("/**", config);
20
21         return new CorsWebFilter(source);
22     }
23 }
 1 import com.google.gson.JsonObject;
 2 import org.springframework.cloud.gateway.filter.GatewayFilterChain;
 3 import org.springframework.cloud.gateway.filter.GlobalFilter;
 4 import org.springframework.core.Ordered;
 5 import org.springframework.core.io.buffer.DataBuffer;
 6 import org.springframework.http.server.reactive.ServerHttpRequest;
 7 import org.springframework.http.server.reactive.ServerHttpResponse;
 8 import org.springframework.stereotype.Component;
 9 import org.springframework.util.AntPathMatcher;
10 import org.springframework.web.server.ServerWebExchange;
11 import reactor.core.publisher.Mono;
12
13 import java.nio.charset.StandardCharsets;
14 import java.util.List;
15
16 /**
17  * <p>
18  * 全局Filter,统一处理会员登录与外部不允许访问的服务
19  * </p>
20  *
21  */
22 @Component
23 public class AuthGlobalFilter implements GlobalFilter, Ordered {
24
25     private AntPathMatcher antPathMatcher = new AntPathMatcher();
26
27     @Override
28     public Mono<Void> filter(ServerWebExchange exchange, GatewayFilterChain chain) {
29         ServerHttpRequest request = exchange.getRequest();
30         String path = request.getURI().getPath();
31         //谷粒学院api接口,校验用户必须登录
32         if(antPathMatcher.match("/api/**/auth/**", path)) {
33             List<String> tokenList = request.getHeaders().get("token");
34             if(null == tokenList) {
35                 ServerHttpResponse response = exchange.getResponse();
36                 return out(response);
37             } else {
38 //                Boolean isCheck = JwtUtils.checkToken(tokenList.get(0));
39 //                if(!isCheck) {
40                     ServerHttpResponse response = exchange.getResponse();
41                     return out(response);
42 //                }
43             }
44         }
45         //内部服务接口,不允许外部访问
46         if(antPathMatcher.match("/**/inner/**", path)) {
47             ServerHttpResponse response = exchange.getResponse();
48             return out(response);
49         }
50         return chain.filter(exchange);
51     }
52
53     @Override
54     public int getOrder() {
55         return 0;
56     }
57
58     private Mono<Void> out(ServerHttpResponse response) {
59         JsonObject message = new JsonObject();
60         message.addProperty("success", false);
61         message.addProperty("code", 28004);
62         message.addProperty("data", "鉴权失败");
63         byte[] bits = message.toString().getBytes(StandardCharsets.UTF_8);
64         DataBuffer buffer = response.bufferFactory().wrap(bits);
65         //response.setStatusCode(HttpStatus.UNAUTHORIZED);
66         //指定编码,否则在浏览器中会中文乱码
67         response.getHeaders().add("Content-Type", "application/json;charset=UTF-8");
68         return response.writeWith(Mono.just(buffer));
69     }
70 }
 1 import org.springframework.beans.factory.ObjectProvider;
 2 import org.springframework.boot.autoconfigure.web.ResourceProperties;
 3 import org.springframework.boot.autoconfigure.web.ServerProperties;
 4 import org.springframework.boot.context.properties.EnableConfigurationProperties;
 5 import org.springframework.boot.web.reactive.error.ErrorAttributes;
 6 import org.springframework.boot.web.reactive.error.ErrorWebExceptionHandler;
 7 import org.springframework.context.ApplicationContext;
 8 import org.springframework.context.annotation.Bean;
 9 import org.springframework.context.annotation.Configuration;
10 import org.springframework.core.Ordered;
11 import org.springframework.core.annotation.Order;
12 import org.springframework.http.codec.ServerCodecConfigurer;
13 import org.springframework.web.reactive.result.view.ViewResolver;
14
15 import java.util.Collections;
16 import java.util.List;
17
18 /**
19  * 覆盖默认的异常处理
20  *
21  *
22  */
23 @Configuration
24 @EnableConfigurationProperties({ServerProperties.class, ResourceProperties.class})
25 public class ErrorHandlerConfig {
26
27     private final ServerProperties serverProperties;
28
29     private final ApplicationContext applicationContext;
30
31     private final ResourceProperties resourceProperties;
32
33     private final List<ViewResolver> viewResolvers;
34
35     private final ServerCodecConfigurer serverCodecConfigurer;
36
37     public ErrorHandlerConfig(ServerProperties serverProperties,
38                                      ResourceProperties resourceProperties,
39                                      ObjectProvider<List<ViewResolver>> viewResolversProvider,
40                                         ServerCodecConfigurer serverCodecConfigurer,
41                                      ApplicationContext applicationContext) {
42         this.serverProperties = serverProperties;
43         this.applicationContext = applicationContext;
44         this.resourceProperties = resourceProperties;
45         this.viewResolvers = viewResolversProvider.getIfAvailable(Collections::emptyList);
46         this.serverCodecConfigurer = serverCodecConfigurer;
47     }
48
49     @Bean
50     @Order(Ordered.HIGHEST_PRECEDENCE)
51     public ErrorWebExceptionHandler errorWebExceptionHandler(ErrorAttributes errorAttributes) {
52         JsonExceptionHandler exceptionHandler = new JsonExceptionHandler(
53                 errorAttributes,
54                 this.resourceProperties,
55                 this.serverProperties.getError(),
56                 this.applicationContext);
57         exceptionHandler.setViewResolvers(this.viewResolvers);
58         exceptionHandler.setMessageWriters(this.serverCodecConfigurer.getWriters());
59         exceptionHandler.setMessageReaders(this.serverCodecConfigurer.getReaders());
60         return exceptionHandler;
61     }
62 }
 1 import org.springframework.boot.autoconfigure.web.ErrorProperties;
 2 import org.springframework.boot.autoconfigure.web.ResourceProperties;
 3 import org.springframework.boot.autoconfigure.web.reactive.error.DefaultErrorWebExceptionHandler;
 4 import org.springframework.boot.web.reactive.error.ErrorAttributes;
 5 import org.springframework.context.ApplicationContext;
 6 import org.springframework.http.HttpStatus;
 7 import org.springframework.web.reactive.function.server.*;
 8
 9 import java.util.HashMap;
10 import java.util.Map;
11
12 /**
13  * 自定义异常处理
14  *
15  * <p>异常时用JSON代替HTML异常信息<p>
16  *
17  *
18  */
19 public class JsonExceptionHandler extends DefaultErrorWebExceptionHandler {
20
21     public JsonExceptionHandler(ErrorAttributes errorAttributes, ResourceProperties resourceProperties,
22                                 ErrorProperties errorProperties, ApplicationContext applicationContext) {
23         super(errorAttributes, resourceProperties, errorProperties, applicationContext);
24     }
25
26     /**
27      * 获取异常属性
28      */
29     @Override
30     protected Map<String, Object> getErrorAttributes(ServerRequest request, boolean includeStackTrace) {
31         Map<String, Object> map = new HashMap<>();
32         map.put("success", false);
33         map.put("code", 20005);
34         map.put("message", "网关失败");
35         map.put("data", null);
36         return map;
37     }
38
39     /**
40      * 指定响应处理方法为JSON处理的方法
41      * @param errorAttributes
42      */
43     @Override
44     protected RouterFunction<ServerResponse> getRoutingFunction(ErrorAttributes errorAttributes) {
45         return RouterFunctions.route(RequestPredicates.all(), this::renderErrorResponse);
46     }
47
48     /**
49      * 根据code获取对应的HttpStatus
50      * @param errorAttributes
51      */
52     @Override
53     protected int getHttpStatus(Map<String, Object> errorAttributes) {
54         return 200;
55     }
56 }
 1 import org.springframework.boot.SpringApplication;
 2 import org.springframework.boot.autoconfigure.SpringBootApplication;
 3 import org.springframework.context.annotation.ComponentScan;
 4
 5
 6 @SpringBootApplication
 7 @ComponentScan("com.atguigu")
 8 public class GatewayApplication {
 9     public static void main(String[] args) {
10         SpringApplication.run(GatewayApplication.class,args);
11     }
12 }
五、配置中心 nacos
应用场景:
在系统开发过程中,开发者通常会将一些需要变更的参数、变量等从代码中分离出来独立管理,以独立的配置文件的形式存在。目的是让静态的系统工件或者交付物(如 WAR,JAR 包等)更好地和实际的物理运行环境进行适配。配置管理一般包含在系统部署的过程中,由系统管理员或者运维人员完成。配置变更是调整系统运行时的行为的有效手段。
如果微服务架构中没有使用统一配置中心时,所存在的问题:
- - 配置文件分散在各个项目里,不方便维护
- - 配置内容安全与权限
- - 更新配置后,项目需要重启
- nacos配置中心:系统配置的集中管理(编辑、存储、分发)、动态更新不重启、回滚配置(变更管理、历史版本管理、变更审计)等所有与配置相关的活动。
1. 读取Nacos配置中心的配置文件
1.导入依赖
1 <dependency>
2   <groupId>org.springframework.cloud</groupId>
3   <artifactId>spring-cloud-starter-alibaba-nacos-config</artifactId>
4 </dependency>
2.创建bootstrap.properties配置文件
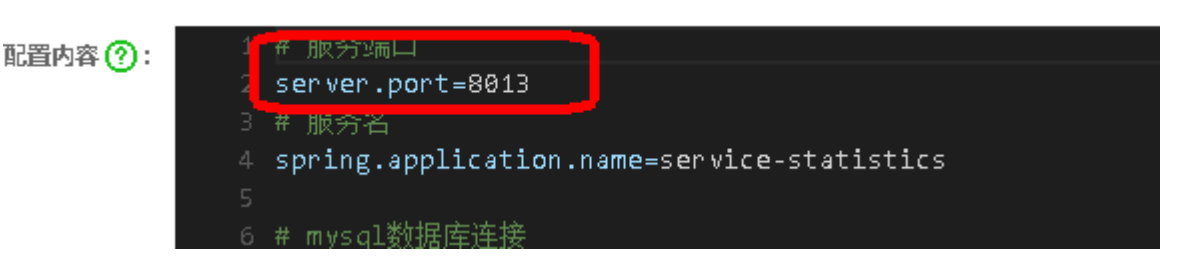
#配置中心地址
spring.cloud.nacos.config.server-addr=127.0.0.1:8848
#spring.profiles.active=dev
# 该配置影响统一配置中心中的dataId
spring.application.name=service-statistics
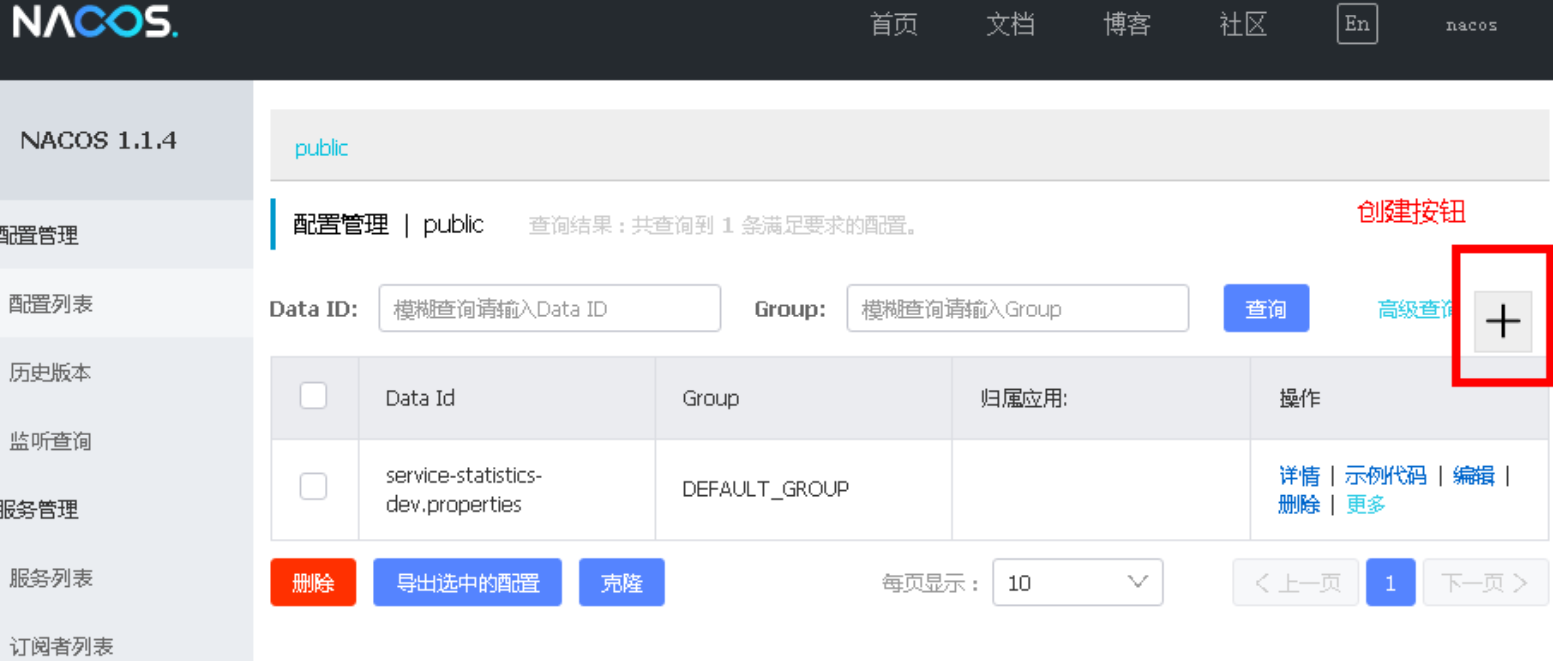
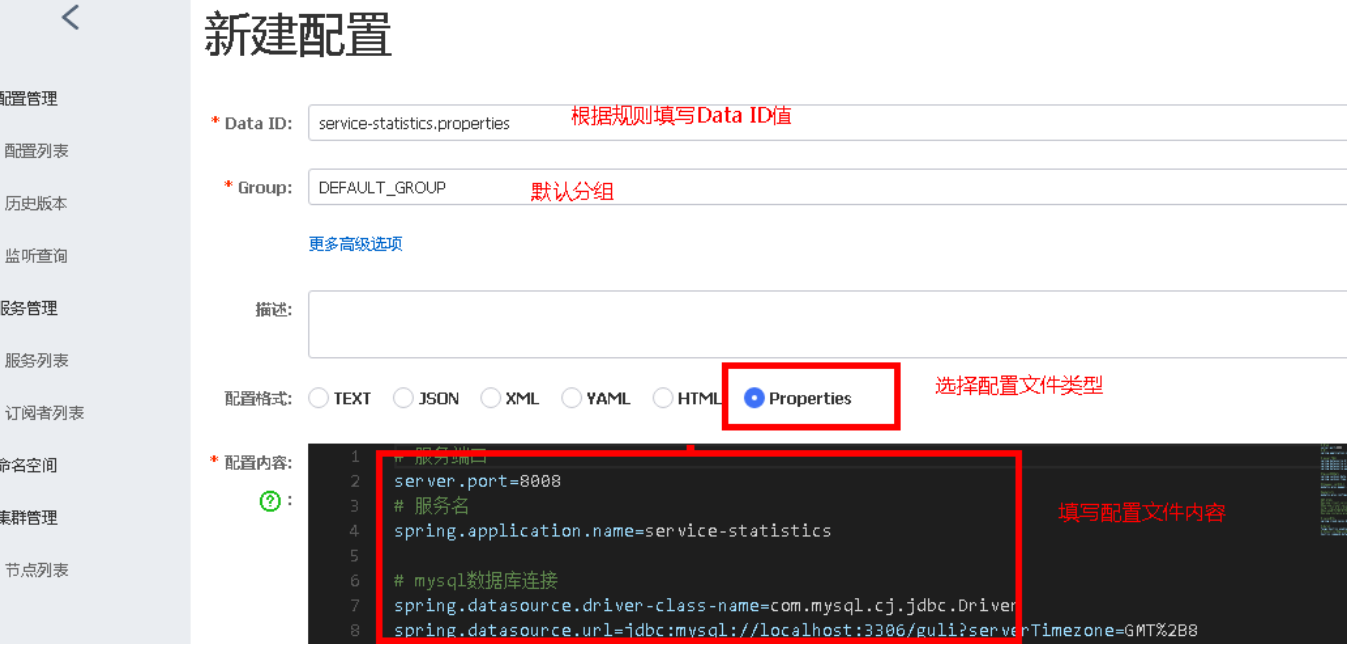
a)Data ID 的完整规则格式如下${prefix}-${spring.profile.active}.${file-extension}
- - prefix 默认为所属工程配置spring.application.name 的值(即:nacos-provider),也可以通过配置项 spring.cloud.nacos.config.prefix来配置。
- - spring.profiles.active=dev 即为当前环境对应的 profile。 注意:当spring.profiles.active 为空时,对应的连接符 - 也将不存在,dataId 的拼接格式变成${prefix}.${file-extension}
- - file-exetension 为配置内容的数据格式,可以通过配置项spring.cloud.nacos.config.file-extension 来配置。目前只支持 properties 和 yaml 类型。
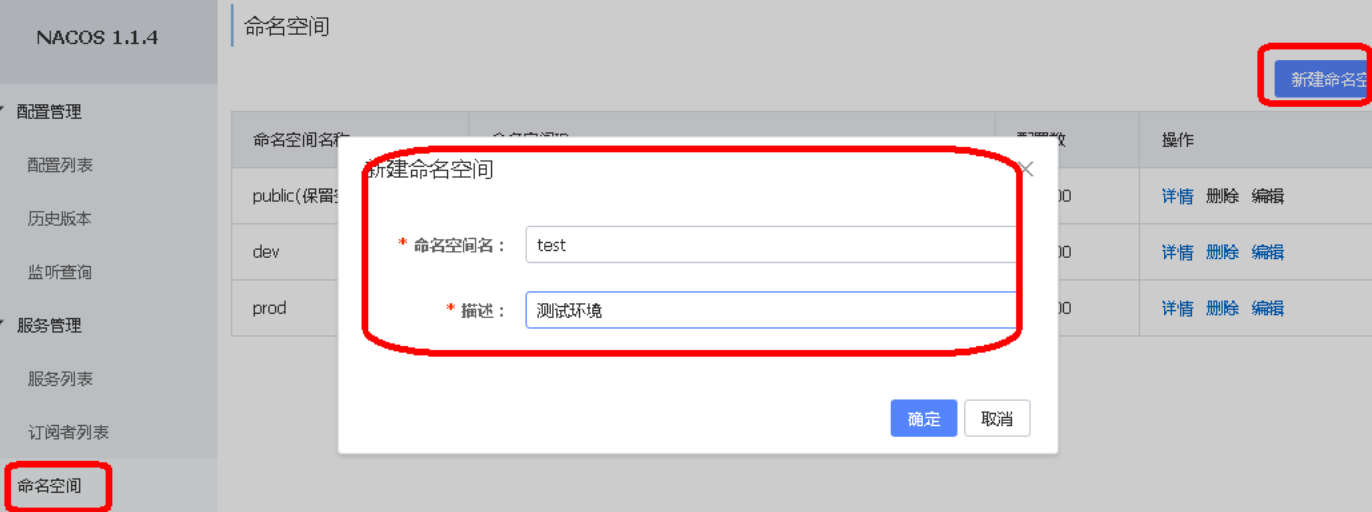
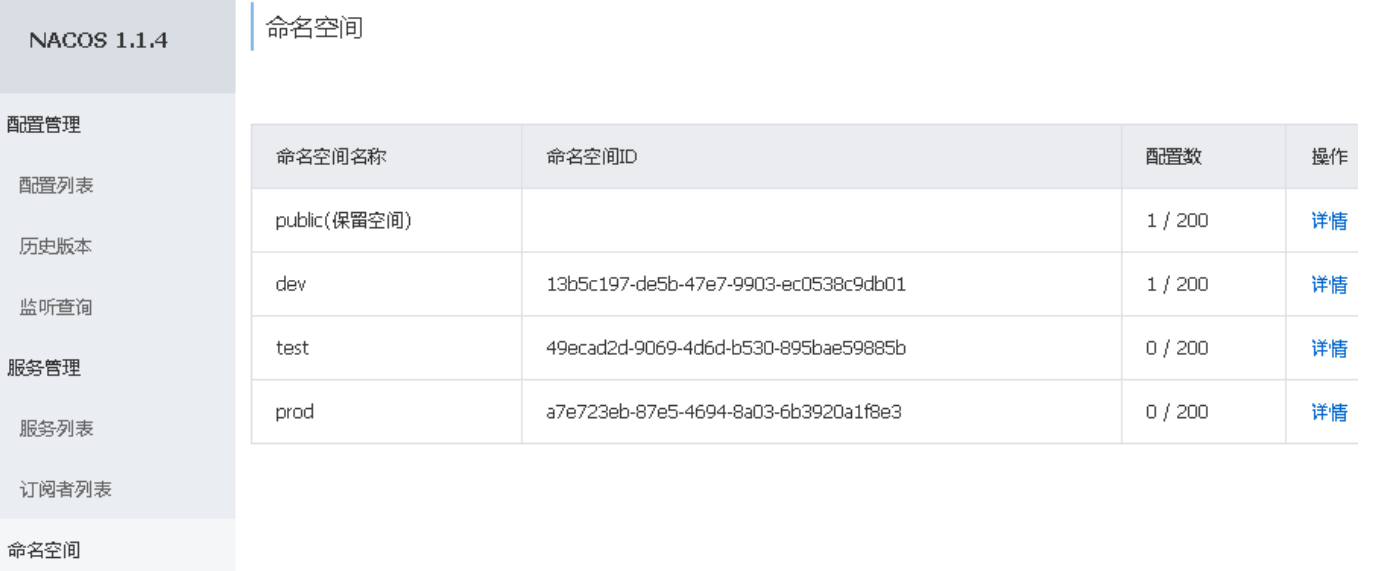
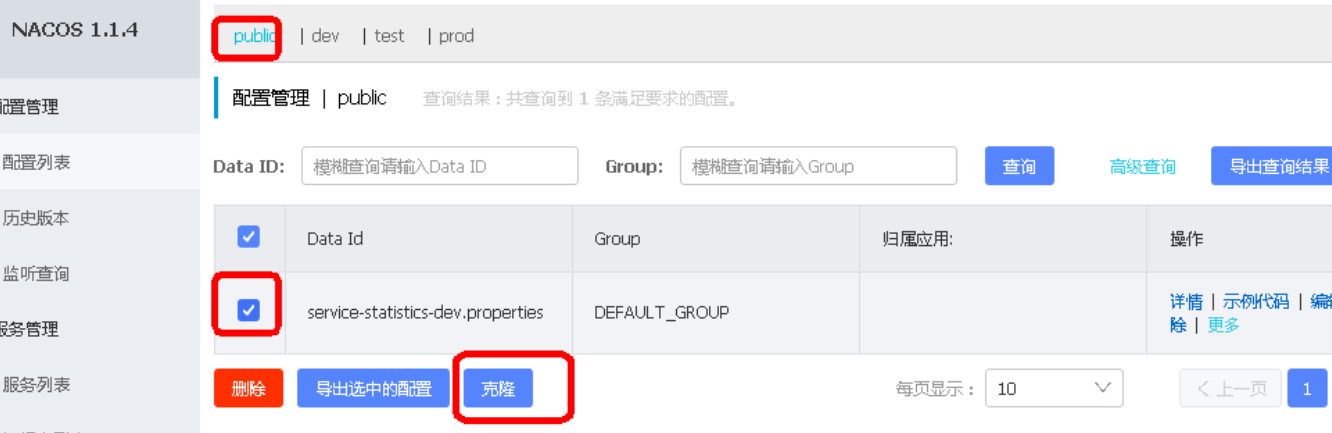
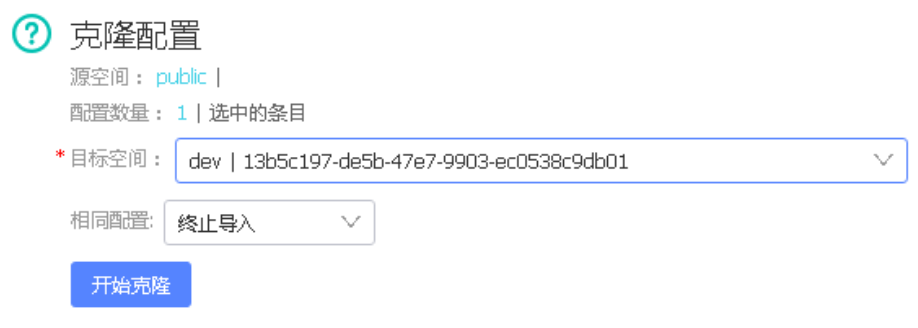
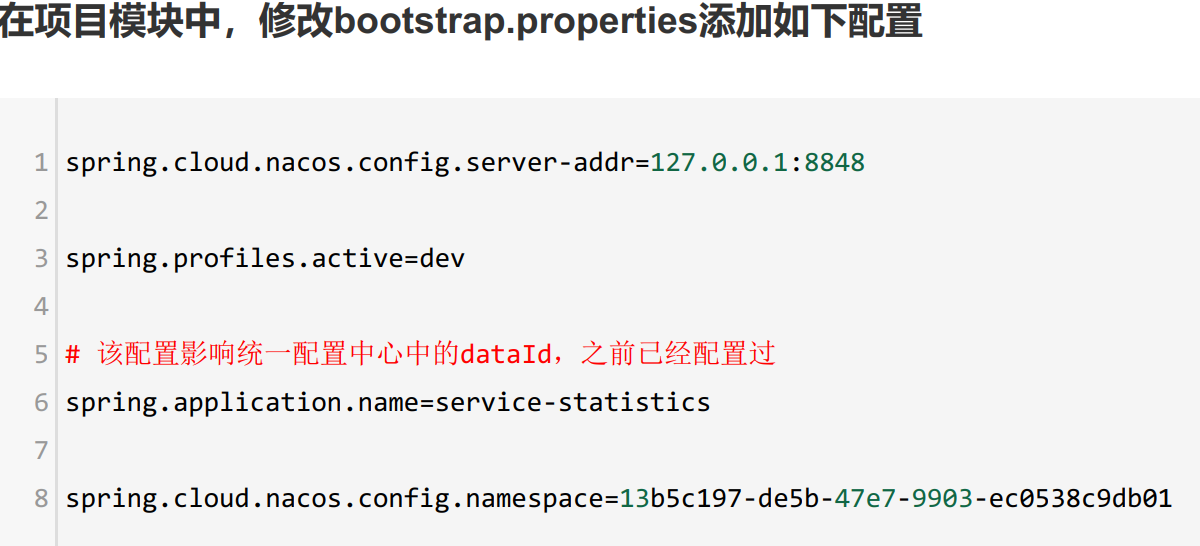
2.名称空间切换环境
在实际开发中,通常有多套不同的环境(默认只有public),那么这个时候可以根据指定的环境来创建不同的 namespce,例如,开发、测试和生产三个不同的环境,那么使用一套 nacos 集群可以分别建以下三个不同的 namespace。以此来实现多环境的隔离
3.多配置文件加载
在一些情况下需要加载多个配置文件。假如现在dev名称空间下有三个配置文件:service-statistics.properties、redis.properties、jdbc.properties

