logging日志模块
logging跟日志有关!
需求:但凡写项目都要记录日志,是为了防止程序崩溃意外终止掉了将报错的信息提前记下来,以后根据这些提示信息去定位错误。还有程序运行当中的一些用户的转账、交易信息记录下来。
怎么用日志功能?
# 导入logging模块
import logging
一、日志的五个级别:遵循自下而上进行匹配debug-->info-->warning-->error-->critical
调试信息:调试过程中一些打印信息,看到这些调试信息就知道程序运行到哪一步,出了哪些结果。
logging.debug('调试信息')
正常信息:程序正常运行中的一些信息。
logging.info('正常信息')
警告信息:
logging.warning('警告信息')
报错信息:
logging.error('错误信息')
严重错误信息:
logging.critical('严重错误信息')
二、默认级别是warning,往屏幕打印。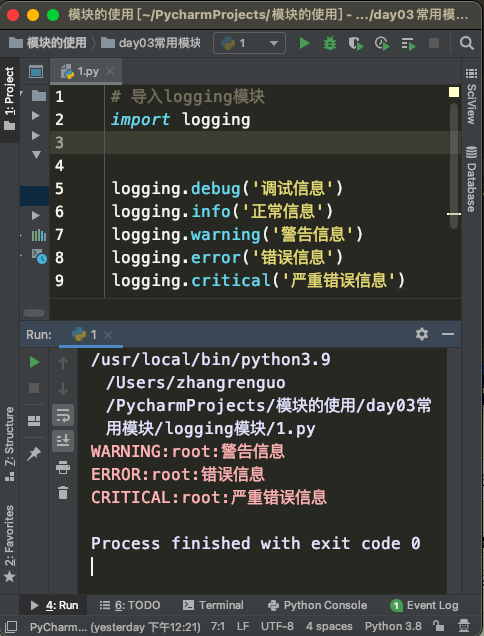
日志的格式
(日志级别)(日志分割格式,默认是:)(日志名默认是root)(日志分割格式)(日志信息)
WARNING:root:警告信息
ERROR:root:错误信息
CRITICAL:root:严重错误信息
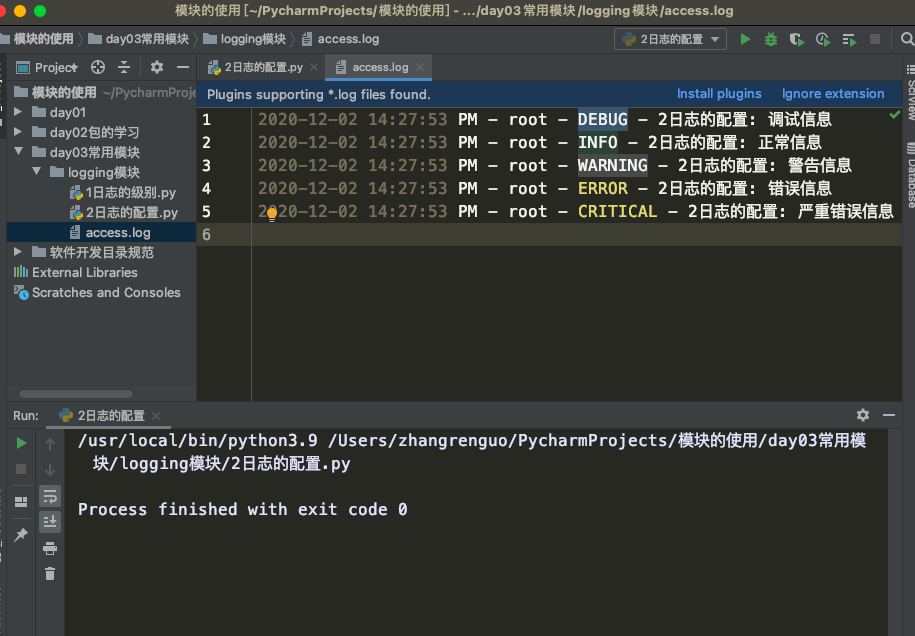
三、为logging模块指定全局配置,针对所有logger有效,控制打印到文件中
import logging

# 进行基本的日志配置
logging.basicConfig(
#     指定文件名(日志路径)
    filename='access.log',
#     指定日志格式asctime对应时间格式, - 对应分隔符,name对应日志名,levelname对应日志级别,module对应模块名,message对应日志具体信息。
    format='%(asctime)s - %(name)s - %(levelname)s - %(module)s: %(message)s',
#     定制时间格式取代%(asctime)s
    datefmt='%Y-%m-%d %H:%M:%S %p',
#     指定日志级别
    level=10
)

# 这些设置的意思是:level=10意味着所有日志全部放行,以format指定的指定方式每一条日志都是这种形式,放行的都存在filename指定的文件里面存以追加的模式。

logging.debug('调试信息')
logging.info('正常信息')
logging.warning('警告信息')
logging.error('错误信息')
logging.critical('严重错误信息')
四、logging模块的Formatter,Handler,Logger,Filter对象
1、logger:负责产生日志信息。
可以得到不同的logger,造日志以后通过logger.来产生日志信息。
2、formatter:控制日志输出格式。
3、filter:负责筛选日志
4、handler:负责日志输出的目标,目标可以是文件或者终端。
import logging
# 造logger对象
logger1 = logging.getLogger('交易日志')
logger2 = logging.getLogger('用户相关')
#造日志信息
logger1.info('用户a转账给用户b200万')
# 控制日志输出格式
formatter1 = logging.Formatter(
    #指定日志格式
    fmt='%(asctime)s : %(levelname)s : %(message)s',
    #指定时间格式 %H:%M:%S 时分秒可以用%X表示      %p 上下午
    datefmt='%Y-%m-%d %X'
)
formatter2 = logging.Formatter(
    #指定日志格式
    fmt='%(asctime)s : %(name)s : %(levelname)s : %(message)s',
    #指定时间格式 %H:%M:%S 时分秒可以用%X表示      %p 上下午
    datefmt='%Y-%m-%d %X'
)
#控制日志往文件输
h1 = logging.FileHandler(filename='access1.log',encoding='utf-8')
h2 = logging.FileHandler(filename='access2.log',encoding='utf-8')
# 控制日志在屏幕打印
sh = logging.StreamHandler()
让logger1产生日志目的是为了往不同地方输出h1(access1.log),h2(access2.log),sh(屏幕)。logger产生的日志能够拷贝多份给handler,handler接收后往不同地方打印。
# 绑定logger对象与handler对象
logger1.addHandler(h1)
logger1.addHandler(h2)
logger1.addHandler(sh)
handlerf负责往不同的目标打印,打印的时候遵照某种格式。进行绑定。
# 绑定handler对象和formatter对象
h1.setFormatter(formatter1)
h2.setFormatter(formatter1)
sh.setFormatter(formatter2)
# 设置日志级别可以在两个关卡进行设置,logger与handler。
logger1.setLevel(30)
h1.setLevel(10)
h2.setLevel(10)
sh.setLevel(10)


import logging
# 造logger对象
logger1 = logging.getLogger('交易日志')
logger2 = logging.getLogger('用户相关')
#造日志信息
# logger1.info('用户a转账给用户b200万')
# 控制日志输出格式
formatter1 = logging.Formatter(
    #指定日志格式
    fmt='%(asctime)s : %(levelname)s : %(message)s',
    #指定时间格式 %H:%M:%S 时分秒可以用%X表示      %p 上下午
    datefmt='%Y-%m-%d %X'
)
formatter2 = logging.Formatter(
    #指定日志格式
    fmt='%(asctime)s - %(name)s - %(levelname)s - %(message)s',
    #指定时间格式 %H:%M:%S 时分秒可以用%X表示      %p 上下午
    datefmt='%Y-%m-%d %X'
)
#控制日志往文件输
h1 = logging.FileHandler(filename='access1.log',encoding='utf-8')
h2 = logging.FileHandler(filename='access2.log',encoding='utf-8')
# 控制日志在屏幕打印
sh = logging.StreamHandler()

# 绑定logger对象与handler对象
logger1.addHandler(h1)
logger1.addHandler(h2)
logger1.addHandler(sh)

# 绑定handler对象和formatter对象
h1.setFormatter(formatter1)
h2.setFormatter(formatter1)
sh.setFormatter(formatter2)

# 设置日志级别可以在两个关卡进行设置,logger与handler。
# logger1.setLevel(30)
logger1.setLevel(10)
h1.setLevel(10)
h2.setLevel(10)
sh.setLevel(10)


#造日志信息
logger1.info('用户a转账给用户b200万')
以后怎么用?写到一个字典里。
"""
logging配置
"""

import os
import logging.config
# 1、定义三种日志输出格式,日志中可能用到的格式化串如下
standard_format = '%(asctime)s - %(filename)s : %(lineno)d - %(levelname)s - %(message)s'

simple_format = '%(levelname)s - %(asctime)s - %(filename)s:%(lineno)d - %(message)s'

test_format = '[%(asctime)s] %(message)s'
# 2、log文件的目录
logfile_dir = os.path.dirname(os.path.abspath(__file__))
logfile_name = 'access3.log'


# 如果不存在定义的日志目录就创建一个
if not os.path.isdir(logfile_dir):
    os.mkdir(logfile_dir)

# log文件的全路径
logfile_path = os.path.join(logfile_dir,logfile_name)

# 3、日志配置字典
LOGGING_DIC = {
    'version': 1,
    'disable_existing_loggers': False,
    'formatters': {
        'standard': {
            'format': standard_format
        },
        'simple': {
            'format': simple_format
        },
    },
    'filters': {},
    'handlers': {
        #打印到终端的日志
        'console': {
            'level': 'DEBUG',
            'class': 'logging.StreamHandler',  # 打印到屏幕
            'formatter': 'simple'
        },
        #打印到文件的日志,收集info及以上的日志
        'default': {
            'level': 10,
            # 'class': 'logging.handlers.RotatingFileHandler',  # 保存到文件,日志轮转
            'class': 'logging.FileHandler',  # 保存到文件,日志轮转
            'formatter': 'standard',
            'filename': 'access3.log',  # 日志文件
            'encoding': 'utf-8',  # 日志文件的编码,再也不用担心中文log乱码了
        },
    },
    'loggers': {
        #logging.getLogger(__name__)拿到的logger配置
        'logger1': {
            'handlers': ['default', 'console'],  # 这里把上面定义的两个handler都加上,即log数据既写入文件又打印到屏幕
            'level': 'DEBUG', # loggers(第一层日志级别关限制)--->handlers(第二层日志级别关卡限制)
            'propagate': False,  # 默认为True,向上(更高level的logger)传递,通常设置为False即可,否则会一份日志向上层层传递
        },
    },
}
import settings

# !!!强调!!!
# 1、logging是一个包,需要使用其下的config、getLogger,可以如下导入
# from logging import config
# from logging import getLogger

# 2、也可以使用如下导入
import logging.config # 这样连同logging.getLogger都一起导入了,然后使用前缀logging.config.

# 3、logging模块从字典加载配置
logging.config.dictConfig(settings.LOGGING_DIC)

# 4、输出日志
# logger1=logging.getLogger('用户交易')
logger1=logging.getLogger('logger1')
logger1.info('用户a转账给用户b200万')

author:zrg
json与pickle序列化与反序列化模块
一、什么是序列化/反序列化?
序列化就是将内存中的数据结构转换成一种中间格式存储到硬盘或者基于网络传输。
反序列化就是将硬盘中或者网络中传来的一种数据格式转换成内存中的数据结构。
二、为什么要有?
1、可以保存某一时间点程序中所有的数据(运行状态)。
2、数据的跨平台交互。
三、怎么用?
json
具有跨平台性。
只能对应python部分的数据类型。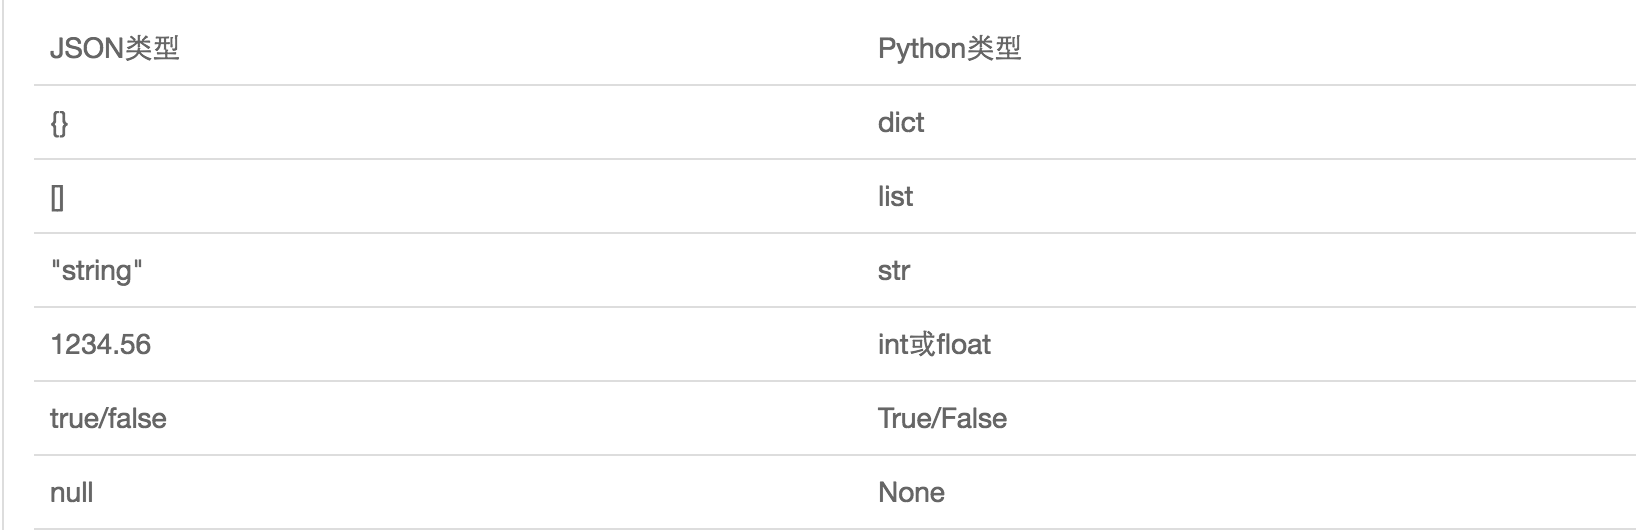
pickle
只能被python识别。
不能跨平台。
json的序列化:
# 导入json模块
import json

dic = {'name':'zrg','age':26,'sex':'male','addr':'suzhou','job':'python'}
# 序列化:内存中数据类型------序列化----->中间格式json
json_str = json.dumps(dic)
print(json_str,type(json_str))
# {"name": "zrg", "age": 26, "sex": "male", "addr": "suzhou", "job": "python"} <class 'str'>
json格式不能识别单引号全都是双引号。
with open(r'db1.json','wt',encoding='utf-8')as f:
    json.dump(dic,f)
json的反序列化:
import json

with open(r'db.json','rt',encoding='utf-8')as f:
    json_str = f.read()
# 反序列化:中间格式json---反序列化--->内存中的数据类型
dic = json.loads(json_str)
print(dic,type(dic))
# {'name': 'zrg', 'age': 26, 'sex': 'male', 'addr': 'suzhou', 'job': 'python'} <class 'dict'>
with open(r'db.json','rt',encoding='utf-8')as f:
    dic = json.load(f)
pickle的序列化:
import pickle

dic = {'name':'zrg','age':26,'sex':'male','addr':'suzhou','job':'python'}
# 1、把内存数据序列化
pic = pickle.dumps(dic)
# print(pic,type(pic))
# b'x80x04x95Fx00x00x00x00x00x00x00}x94(x8cx04namex94x8cx03zrgx94x8cx03agex94Kx1ax8cx03sexx94x8cx04malex94x8cx04addrx94x8cx06suzhoux94x8cx03jobx94x8cx06pythonx94u.' <class 'bytes'>

# 2、写入文件
with open(r'db.pic','wb')as f:
    f.write(pic)
with open(r'db.pic','wb')as f:
    pickle.dump(dic,f)
第一个放序列化的东西,第二个放文件对象。
pickle的反序列化:
# 导入pickle模块
import pickle


with open(r'db.pic','r')as f:
    pic = f.read()
# 反序列化:中间格式json---反序列化--->内存中的数据类型
dic = pickle.loads(pic)
print(dic,type(dic))
# with open(r'db.pic','rb')as f:
#     dic = pickle.load(f)
time时间模块
一、时间分三种形式
1、时间戳:通常来说,时间戳表示的是从1970年1月1日00:00:00开始按秒计算的偏移量。我们运行“type(time.time())”,返回的是float类型。
import time

# time.time()
print(time.time())
# 1606987827.917328
一般用来统计时间。
import time

start = time.time()
time.sleep(3)
stop = time.time()
print(stop-start)
# 3.0047099590301514
2、格式化的字符串形式
# 二、格式化的字符串
# time.strftime('%Y-%m-%d %X')
print(time.strftime('%Y-%m-%d %X'))
3、时间对象
# 三、时间对象
# time.localtime()
t = time.localtime()
print(t)
# time.struct_time(tm_year=2020, tm_mon=12, tm_mday=3, tm_hour=17, tm_min=37, tm_sec=8, tm_wday=3, tm_yday=338, tm_isdst=0)
t2 = time.gmtime()
print(t2)
# time.struct_time(tm_year=2020, tm_mon=12, tm_mday=3, tm_hour=9, tm_min=39, tm_sec=14, tm_wday=3, tm_yday=338, tm_isdst=0)
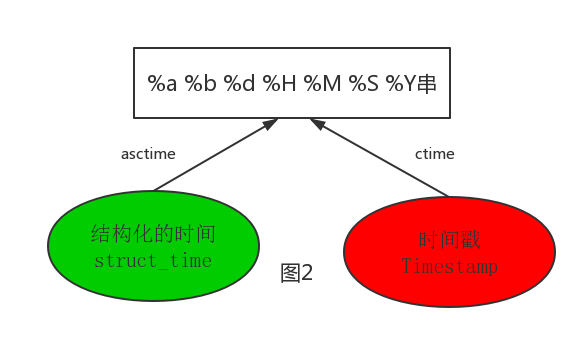
其中计算机认识的时间只能是'时间戳'格式,而程序员可处理的或者说人类能看懂的时间有: '格式化的时间字符串','结构化的时间' ,于是有了下图的转换关系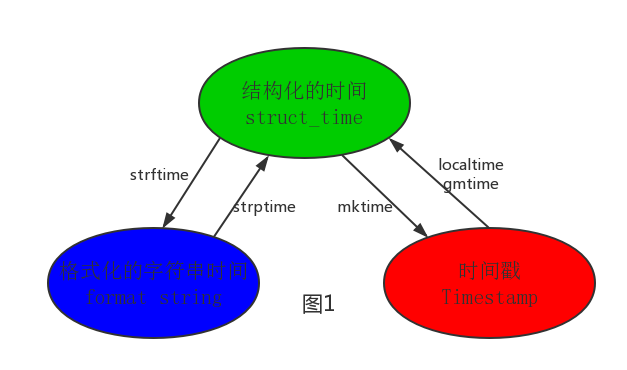
#--------------------------按图1转换时间
# localtime([secs])
# 将一个时间戳转换为当前时区的struct_time。secs参数未提供,则以当前时间为准。
time.localtime()
time.localtime(1473525444.037215)

# gmtime([secs]) 和localtime()方法类似,gmtime()方法是将一个时间戳转换为UTC时区(0时区)的struct_time。

# mktime(t) : 将一个struct_time转化为时间戳。
print(time.mktime(time.localtime()))#1473525749.0


# strftime(format[, t]) : 把一个代表时间的元组或者struct_time(如由time.localtime()和
# time.gmtime()返回)转化为格式化的时间字符串。如果t未指定,将传入time.localtime()。如果元组中任何一个
# 元素越界,ValueError的错误将会被抛出。
print(time.strftime("%Y-%m-%d %X", time.localtime()))#2016-09-11 00:49:56

# time.strptime(string[, format])
# 把一个格式化时间字符串转化为struct_time。实际上它和strftime()是逆操作。
print(time.strptime('2011-05-05 16:37:06', '%Y-%m-%d %X'))
#time.struct_time(tm_year=2011, tm_mon=5, tm_mday=5, tm_hour=16, tm_min=37, tm_sec=6,
#  tm_wday=3, tm_yday=125, tm_isdst=-1)
#在这个函数中,format默认为:"%a %b %d %H:%M:%S %Y"。
Linux系统时间格式
print(time.asctime())
print(time.ctime())
# Thu Dec  3 17:50:46 2020
# Thu Dec  3 17:50:46 2020
#--------------------------按图2转换时间
# asctime([t]) : 把一个表示时间的元组或者struct_time表示为这种形式:'Sun Jun 20 23:21:05 1993'。
# 如果没有参数,将会将time.localtime()作为参数传入。
print(time.asctime())#Sun Sep 11 00:43:43 2016

# ctime([secs]) : 把一个时间戳(按秒计算的浮点数)转化为time.asctime()的形式。如果参数未给或者为
# None的时候,将会默认time.time()为参数。它的作用相当于time.asctime(time.localtime(secs))。
print(time.ctime())  # Sun Sep 11 00:46:38 2016
print(time.ctime(time.time()))  # Sun Sep 11 00:46:38 2016
datetime时间模块
针对time模块:
1、获取格式化字符串形式的时间麻烦
2、时间戳与格式化时间之间的转换麻烦
3、获取之前或者未来的事件麻烦
import datetime

# 获取当前时间
print(datetime.datetime.now())
# 2020-12-03 17:59:17.911877

# 直接把时间戳转换成时间
print(datetime.datetime.fromtimestamp(2132445))
# 1970-01-26 00:20:45

# 获取3天后时间
datetime.datetime.now() + datetime.timedelta(days=3)
# 获取3天前时间
datetime.datetime.now() + datetime.timedelta(days=-3)
可以替换年月任何时间的某一部分。
c_time = datetime.datetime.now()
c_time.replace(year=2020)
random 随机模块
闭区间取不到,开区间取的到。
random() (0,1)只取0与1之间的小数
randint(1,3) [1,3]
randrang(1,3) [1,3) 顾头不顾尾
choice([1,'zeg',[3,4]]) 多选一,从多个里面选出一个。
sample([[1,'zeg',[3,4]],2) 任选2个
uniform(1,3) (1,3)取1-3之间的小数
import random

print(random.random())
# 0.387634318787233
print(random.randint(1,3))
# 3  2  1  都有可能
print(random.randrange(1,5))
# 3
print(random.choice([1,'zeg',[3,4]]))
# [3, 4]
print(random.sample([1,'zeg',[3,4]],2))
# ['zeg', 1]
print(random.uniform(1,3))
# 1.3256070924204961
打乱顺序:shuffle()
list = ['a','b','c','d','e']
random.shuffle(list)
print(list)
# ['b', 'c', 'e', 'a', 'd']
生成随机验证码:
import random
def make_code(n):
    res=''
    for i in range(n):
        s1=chr(random.randint(65,90))  #根据随机的数字用chr转成ascii码表里面的字母
        s2=str(random.randint(0,9))    #取出随机的数字,但是因为要累加所以转成字符串
        res+=random.choice([s1,s2])
    return res

print(make_code(5))
os模块
os模块是与操作系统交互的一个接口。
os.getcwd() 获取当前的目录
print(os.getcwd())
# /Users/zhangrenguo/PycharmProjects/模块的使用/day03常用模块/os模块
os.chair() 可以切换目录,写绝对路径
os.chdir(r'/Users/zhangrenguo/PycharmProjects/模块的使用/day02包的学习')
print(os.listdir('.'))
# ['run.py', '包1']
os.curdir() 返回当前目录
os.pardir()
os.makedirs() 递归的生成目录
os.mkdir()
os.rmdir()
os.removedirs()
os.stat
os.sep 看路径分隔符
os.linesep 看行分割符
os.pathsep 看环境变量分割符
os.name 当前操作系统名字
os.system() 执行系统命令。
os.environ 获取环境变量(程序所有的组件都能访问到的变量这叫环境变量)。
os.path.abspath()
os.path.spilt() 将目录与文件名切成两部分
os.path.dirname() 取当前路径的文件夹
os.path.basename() 取文件名
os.path.exists() 路径是否存在
os.path.isabs() 是否是绝对路径(windows前面跟着盘符,linux/开头)
os.path.isfile() 是否是一个存在的文件
os.path.isdir() 是否是一个存在的目录
os.path.join() 拼接路径,从左往右开始找开头
os.path.getatime()
os.path.getmtime()
os.path.getsize(path) 获取path的大小。
在Linux和Mac平台上,该函数会原样返回path,在windows平台上会将路径中所有字符转换为小写,并将所有斜杠转换为饭斜杠。
>>> os.path.normcase('c:/windows\system32\')
'c:windowssystem32'


规范化路径,如..和/
>>> os.path.normpath('c://windows\System32\../Temp/')
'c:windowsTemp'

>>> a='/Users/jieli/test1/\a1/\\aa.py/../..'
>>> print(os.path.normpath(a))
/Users/jieli/test1
获取项目根目录的方法:
# 获取项目根目录方法一:
BASE_DIR = os.path.dirname(os.path.dirname(os.path.abspath(__file__)))
# print(BASE_DIR)
# /Users/zhangrenguo/PycharmProjects/模块的使用/day03常用模块


# 获取项目根目录方法二:
res = os.path.join(
    os.path.abspath(__file__),
    '..',
    '..'
)
# print(res)
# /Users/zhangrenguo/PycharmProjects/模块的使用/day03常用模块/os模块/os模块学习讲解.py/../..
print(os.path.normpath(res))
# /Users/zhangrenguo/PycharmProjects/模块的使用/day03常用模块
re正则模块
一、什么是正则?
用一系列有特殊含义的字符来组成规则,该规则用来描述具有某一特征的字符串,正则就是用来去一个大的字符串中匹配出符合规则的子字符串。
二、为什么要用正则?
1、用户注册
2、爬虫程序
三、怎么用正则?
1、re模块的特殊字符
w 匹配字母数字下划线
W 匹配非字母数字下划线
import re
# w  匹配字母数字下划线
print(re.findall('w','hello 123_*/-=+'))
# ['h', 'e', 'l', 'l', 'o', '1', '2', '3', '_']
# W   匹配费字母数字下划线
print(re.findall('W','hello 123_*/-=+'))
# [' ', '*', '/', '-', '=', '+']
s 匹配任意空白字符(制表符 ,换行符,空格)( f)
S 匹配任意非空字符
# s 匹配任意空白字符
# print(re.findall('s','hel
lo 1	23_ */-=+'))
# ['
', ' ', '	', ' ']
# S 匹配任意非空字符
print(re.findall('S','hel
lo 1	23_ */-=+'))
# ['h', 'e', 'l', 'l', 'o', '1', '2', '3', '_', '*', '/', '-', '=', '+']
d 匹配任意数字,等价于[0,9]
D 匹配任意非数字
# s 匹配任意数字
# print(re.findall('d','hel
lo 1	23_ */-=+'))
# ['1', '2', '3']
# D 匹配任意非数字
print(re.findall('D','hel
lo 1	23_ */-=+'))
# ['h', 'e', 'l', '
', 'l', 'o', ' ', '	', '_', ' ', '*', '/', '-', '=', '+']
匹配换行符
#
 匹配一个换行符
print(re.findall('
','hel
lo 1	23_ */-=+'))
# ['
']
匹配制表符
# 	 匹配制表符
print(re.findall('	','hel
lo 1	23_ *	/-=+'))
# ['	', '	']
^ 匹配字符串的开头,意思是以什么开头。
print(re.findall('zrg','hello,zrg 18
 married=-	 yj+zrg'))
# ['zrg', 'zrg']
# ^
print(re.findall('^zrg','zrg hello,zrg 18
 married=-	 yj+zrg'))
# ['zrg']
# ^
print(re.findall('^zrg','hello,zrg 18
 married=-	 yj+zrg'))
# []
$ 匹配字符串的末尾,意思结尾开始倒着匹配。
#$匹配字符串的末尾,意思结尾开始倒着匹配。
print(re.findall('zrg$','hello,zrg 18
 married=-	 yj+zrg'))
2、重复匹配
. 匹配换行符以外的任意一个字符。
import re
# .匹配任意一个字符
print(re.findall('a.c','aac abc alc aaaaac a*c a+c aczrgabacd asd   asfaf
d'))
#['aac', 'abc', 'alc', 'aac', 'a*c', 'a+c']
findall(第一个参数是正则表达式,第二个参数是要被匹配的字符串,第三个参数就是用来写一些附加的配置标志)
[]:匹配一个字符,该字符属于括号内指定的字符。
注意:[]内的尖括号不是以什么开头的意思了,是取反的意思!
# print(re.findall('a[a-z]c','aac abc alc aaaaac a*c a+c aczrgabacd asd   asfaf
d = alc a2c'))
#['aac', 'abc', 'alc', 'aac', 'alc']
# print(re.findall('a[A-Z]c','aac abc alc aAc aBc aaaaac a*c a+c aczrgabacd asd   asfaf
d = alc a2c'))
# ['aAc', 'aBc']
# print(re.findall('a[-+*/]c','aac abc alc aAc aBc aaaaac a*c a+c aczrgabacd asd a-c  asfaf
d = alc a2c'))
# ['a*c', 'a+c', 'a-c']
# print(re.findall('a[a-z][a-z]c','aac abc alc aAc aBc aaaaac a*c a+c aczrgabacd asd a-c  asfaf
d = alc a2c'))
# ['aaac', 'abac']
除了小写字母以外的全都行。
print(re.findall('a[^a-z]c','aac abc alc aAc aBc aaaaac a*c a+c aczrgabacd asd a-c  asfaf
d = alc a2c'))
# ['aAc', 'aBc', 'a*c', 'a+c', 'a-c', 'a2c']
*,不能单独使用必须与其它字符连用,代表*左侧的字符出现0次或无穷次。
# print(re.findall('ab*','a ab abbb abbbb albbbb a-123'))
#['a', 'ab', 'abbb', 'abbbb', 'a', 'a']
?,不能单独使用必须与其它字符连用,代表?左侧的字符出现0次或1次。
# print(re.findall('ab?','a ab abbb abbbb albbbb a-123'))
#['a', 'ab', 'ab', 'ab', 'a', 'a']
+,不能单独使用必须与其它字符连用,代表+左侧的字符出现1次或无穷次。
# print(re.findall('ab+','a ab abbb abbbb albbbb a-123'))
#['ab', 'abbb', 'abbbb']
{n,m},不能单独使用必须与其它字符连用,花括号内值代表几次到几次。
print(re.findall('ab{1,3}','a ab abbb abbbb albbbb a-123'))
# ['ab', 'abbb', 'abbb']
结合使用:
.*,贪婪匹配,代表匹配所有。
print(re.findall('a.*c','alc aAc aBc  aczrgabacdasda-c  asfaf
d = alca2c'))
# ['alc aAc aBc  aczrgabacdasda-c', 'alca2c']
.*?,非贪婪匹配(爬虫经常用到)
print(re.findall('a.*?c','alc aAc aBc  aczrgabacdasda-c  asfaf
d = alca2c'))
# ['alc', 'aAc', 'aBc', 'ac', 'abac', 'asda-c', 'alc', 'a2c']
(),分组,括号内?:代表取整体不只是取括号内的。
# print(re.findall('job=".*?"','name="zrg" age="18" job="python"'))
# ['job="python"']
print(re.findall('(age)=".*?"','name="zrg" age="18" job="python"'))
# ['age']
print(re.findall('age="(.*?)"','name="zrg" age="18" job="python"'))
# ['18']
匹配就是在找规律,找到规律然后用正则表达式把规律翻译出来。
|,或,匹配成功一个就可以。
print(re.findall('a|b','ab12a1234a435basdsfg'))
# ['a', 'b', 'a', 'a', 'b', 'a']
print(re.findall('companies|company','Too many companies have gone bankrupt, and the next is my company'))
# ['companies', 'company']
print(re.findall('compan(?:ies|y)','Too many companies have gone bankrupt, and the next is my company'))
# ['companies', 'company']
只匹配ac
zrg