最近在做3GPP的编解码,发现有两个第三方库比较好用。一个是ASN1C(c语言编译环境),一个是python第三方库asn1tools。这里介绍下asn1tools的使用方法:
1 第一步:生成asn文件
将需要编码的数据结构保存在asn后缀名的文件中
3GPP中的结构如下:
-- ASN1START
BCCH-BCH-Message-NB ::= SEQUENCE {
message BCCH-BCH-MessageType-NB
}
BCCH-BCH-MessageType-NB::= MasterInformationBlock-NB
-- ASN1STOP
对应的.asn文件的基本结构如下:也就是讲ASN1START和ASN1STOP中的数据提取出来。然后上asn自己的头信息
EUTRA-RRC-Definitions DEFINITIONS AUTOMATIC TAGS ::=
BEGIN
BCCH-BCH-Message ::= SEQUENCE {
message BCCH-BCH-MessageType
}
END
在3GPP中有大量的类似结构,如果一个个手动的拷贝,太耗费时间了。因此用下面的代码将3GPP中的数据结构自动提取出来保存在asn文件中。代码如下:
#include <iostream>
#include <fstream>
#include <string>
#include <vector>
using namespace std;
int main()
{
std::string output_file;
std::string input_file = "D:/code_block_prj/gen_asn/protol.txt";
std::cout<<input_file.c_str()<<std::endl;
int pos = input_file.find('.');
if (pos == std::string::npos )
{
output_file = input_file + ".asn";
}
else
{
output_file = input_file.substr(0,pos) + ".asn";
}
std::fstream input;
input.open(input_file.c_str(), std::fstream::in );
if ( input.fail() == true)
{
std::cout<<"Please check input file is correct !"<<std::endl;
return 1;
}
std::fstream output;
output.open(output_file.c_str(), std::fstream::out );
if ( output.fail() == true)
{
std::cout<<"The output file can not be created here !"<<std::endl;
return 1;
}
std::string input_line;
std::vector<std::string > vec_asn;
std::vector<std::string >::iterator itr;
const unsigned long cul_asn_idle = 0x0;
const unsigned long cul_asn_start = 0x1;
unsigned long asn_state = cul_asn_idle;
while ( std::getline(input, input_line) )
{
if ( cul_asn_idle == asn_state )
{
if ( input_line.find("-- ASN1START") != std::string::npos )
{
asn_state |= cul_asn_start;
}
continue;
}
if ( 0 != (cul_asn_start & asn_state) )
{
if ( input_line.find("-- ASN1STOP") != std::string::npos )
{
asn_state = cul_asn_idle;
}
else
{
vec_asn.push_back(input_line);
}
}
}
for ( itr = vec_asn.begin(); itr != vec_asn.end(); ++itr )
{
output<<*itr<<std::endl;
}
input.close();
output.close();
return 0;
}
2:打开36331的word文档并另存为txt文件
3:运行上面的程序,其中input_file就是保存txt文件的位置,需要自己设置。运行完后会在本地文件夹下面生成一个asn文件
第二步:利用asn1tools进行编解码:
一:首先pip3 install asn1tools进行模块安装
二:在3GPP中有大量的数据结构,例如sequence, bit string, octer string, bool, sequence of等等,这些结构体在python对应的结构体如下表。
|
ASN.1 type |
Python type |
Example |
||
|
BOOLEAN |
bool |
True 'ackNackSRS-SimultaneousTransmission': True |
||
|
INTEGER |
int |
87 'p0-NominalPUCCH': -127, |
||
|
REAL |
float |
33.12 |
||
|
NULL |
– |
None |
||
|
BIT STRING |
tuple(bytes, int) |
(b'x50', 4) 元组第一个参数为值,第二个参数为bit长度 示例: ac-BarringForSpecialAC BIT STRING (SIZE(5)) 'ac-BarringForSpecialAC': (b'xf0', 5) |
||
|
OCTET STRING |
bytes |
b'x44x1exff' hnb-Name OCTET STRING (SIZE(1..48)) 'hnb-Name': b'4' |
||
|
OBJECT IDENTIFIER |
str |
'1.33.2' |
||
|
ENUMERATED |
str |
'one' ac-BarringTime ENUMERATED {s4, s8, s16, s32, s64, s128, s256, s512}, 代码: 'ac-BarringTime': 's128', |
||
|
SEQUENCE |
dict |
{'a': 52, 'b': 1} |
||
|
SEQUENCE OF |
list |
[1, 3]采用list列表的方法[] 示例一: InterFreqCarrierFreqList ::= SEQUENCE (SIZE (1..maxFreq)) OF InterFreqCarrierFreqInfo
|
||
|
SET |
dict |
{'foo': 'bar'} |
||
|
SET OF |
list |
[3, 0, 7] |
||
|
CHOICE |
tuple |
('a', 5) |
||
|
UTF8String |
str |
'hello' |
||
|
NumericString |
str |
'234359' |
||
|
PrintableString |
str |
'goo' |
||
|
IA5String |
str |
'name' |
||
|
VisibleString |
str |
'gle' |
||
|
GeneralString |
str |
'abc' |
||
|
BMPString |
str |
'ko' |
||
|
GraphicString |
str |
'a b' |
||
|
TeletexString |
str |
'ßø' |
||
|
UniversalString |
str |
'åäö' |
||
|
UTCTime |
datetime.datetime |
datetime(2018, 6, 11) |
||
|
GeneralizedTime |
datetime.datetime |
datetime(2018, 1, 31) |
||
|
ObjectDescriptor |
– |
– |
三:对结构进行赋值。以BCCH-DL-SCH-Message-NB结构为例,首先需要根据BCCH-DL-SCH-Message-NB的结构用python的结构体进行赋值。如下所示。具体的赋值方法参考上面的表格。
BCCH_DL_SCH_Message_NB={
'message':(
'c1',(
'systemInformationBlockType1-r13',{
'hyperSFN-MSB-r13':(b'x07',8),
'cellAccessRelatedInfo-r13':{
'plmn-IdentityList-r13':[
{'plmn-Identity-r13':{'mcc':[0,0,1],'mnc':[0,1]},
'cellReservedForOperatorUse-r13':'notReserved',
'attachWithoutPDN-Connectivity-r13':'true'}],
'trackingAreaCode-r13':(b'x00x01',16),
'cellIdentity-r13':(b'x00x01x10x10',28),
'cellBarred-r13':'notBarred',
'intraFreqReselection-r13':'notAllowed',
},
'cellSelectionInfo-r13':{
'q-RxLevMin-r13':-53,
'q-QualMin-r13':-20
},
'freqBandIndicator-r13':8,
'schedulingInfoList-r13':[{'si-Periodicity-r13':'rf64','si-RepetitionPattern-r13':'every8thRF','sib-MappingInfo-r13':[],'si-TB-r13':'b552'}],
'si-WindowLength-r13':'ms160'
}
)
)
}
四:进行编码。在encode函数中第一个参数就是asn文件中的结构体名称。第二个参数就是上面赋值的字典结构。最终得到16进制的码流
def asn1tools__3GPP():
foo = asn1tools.compile_files('protol.asn', 'uper')
encoded = foo.encode('BCCH-DL-SCH-Message-NB',BCCH_DL_SCH_Message_NB)
print(encoded.hex())
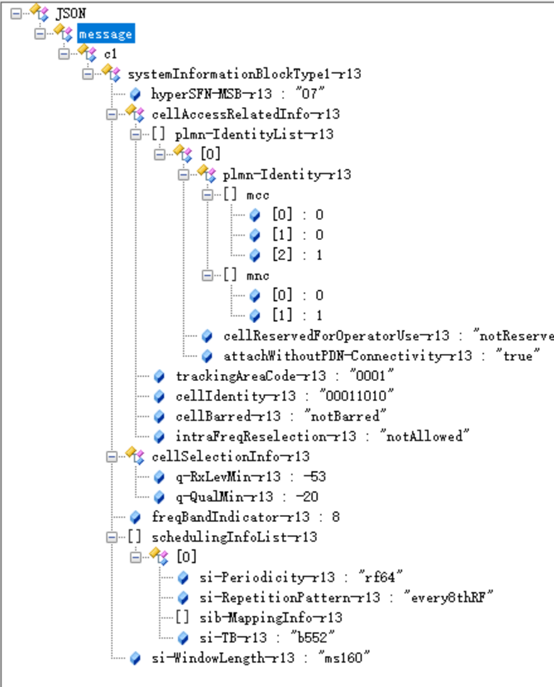
五:数据可视化:16进制的码流对于观测不方便。因此将前面编码得到的16进制码流再进行解码并保存在json文件中,然后通过jsonViewer工具进行查看。代码如下
class MyEncoder(json.JSONEncoder):
def default(self, obj):
if isinstance(obj, bytes):
return str(obj, encoding='utf-8');
return json.JSONEncoder.default(self, obj)
def asn1tools__3GPP():
foo = asn1tools.compile_files('protol.asn', 'uper')
encoded = foo.encode('BCCH-DL-SCH-Message-NB',BCCH_DL_SCH_Message_NB)
print(encoded.hex())
decoded=foo.decode('BCCH-DL-SCH-Message-NB',encoded)
value=json.dumps(decoded,indent=1,cls=MyEncoder,ensure_ascii=False)
print(decoded,value)
f=open('BCCH.json','wb')
f.write(value.encode("utf-8"))
f.close()
在jsonViewer中打开json文件,可以更直观的观测结构
但是这样会有一个问题,在编译BIT STRING或者OCTER STRING的时候,编译完后的数据无法写入json文件。原因在于json文件是utf-8的编码格式。某些字节utf-8无法识别,例如0x80这样的数据。如果将trackingAreaCode-r13改成如下的值,那么在写入json文件的时候就会提示utf-8 can’t decode �x80的错误
'trackingAreaCode-r13':(b'x80x01',16),
那么代码修改如下。用uper和jer两种编码方式编译asn文件。然后将UPER解码得到的数据用jer的方法进行编码。然后再写入json文件。
def asn1tools__3GPP():
foo = asn1tools.compile_files('protol.asn', 'uper')
foo_jer=asn1tools.compile_files('protol.asn', 'jer')
encoded = foo.encode('BCCH-DL-SCH-Message-NB',BCCH_DL_SCH_Message_NB)
print(encoded.hex())
decoded=foo.decode('BCCH-DL-SCH-Message-NB',encoded)
value_jer = foo_jer.encode('BCCH-DL-SCH-Message-NB', decoded)
with open('BCCH.json','wb') as f:
f.write(value_jer)
这样做的原理是UPER是将数据以字节的形式编码,而jer是以字符串的形式编码。因此写入json文件没有任何问题。得到的结构数据如下。
