1.项目创建
1.1新建一个空的asp.net core程序
1.2 添加Nuget程序包 IdentityServer4
1.3 添加配置文件
新建一个静态类 Config
 1  public static class Config
 2     {
 3         /// <summary>
 4         /// 受保护的API范围
 5         /// </summary>
 6         public static IEnumerable<ApiScope> ApiScopes => new[]
 7         {
 8              new ApiScope()
 9              {
10                Name="sample_api",
11                DisplayName="Sample Api"
12              },
13         };
14         /// <summary>
15         /// 客户端集合
16         /// </summary>
17         public static IEnumerable<Client> Clients => new[]
18         {
19              new Client
20              {
21                 //客户端唯一标识
22                 ClientId="sample_client",
23                 //客户端密钥
24                 ClientSecrets={new Secret("sample_client_secret".Sha256())},
25                 //授权类型  客户端凭据
26                 AllowedGrantTypes=GrantTypes.ClientCredentials,
27                 //允许访问哪些API范围
28                 AllowedScopes={"sample_api"}
29              }
30         };
31     }
1.4 在Start Up中注册Identity Server4【在内存中配置】
        public void ConfigureServices(IServiceCollection services)
        {
            //创建构建器
            var builder = services.AddIdentityServer();
            //生成开发者 签名密钥
            builder.AddDeveloperSigningCredential();
            //在内存中配置 客户端以及API范围
            builder.AddInMemoryApiScopes(Config.ApiScopes).AddInMemoryClients(Config.Clients);
        }
1.5 添加中间件
 public void Configure(IApplicationBuilder app, IWebHostEnvironment env)
        {
            if (env.IsDevelopment())
            {
                app.UseDeveloperExceptionPage();
            }

            app.UseIdentityServer();
        }
2.启动项目
启动项目会在项目目录中生成一个签名密钥文件后缀名(.jwt)
2.1测试
将项目启动 使用postman访问
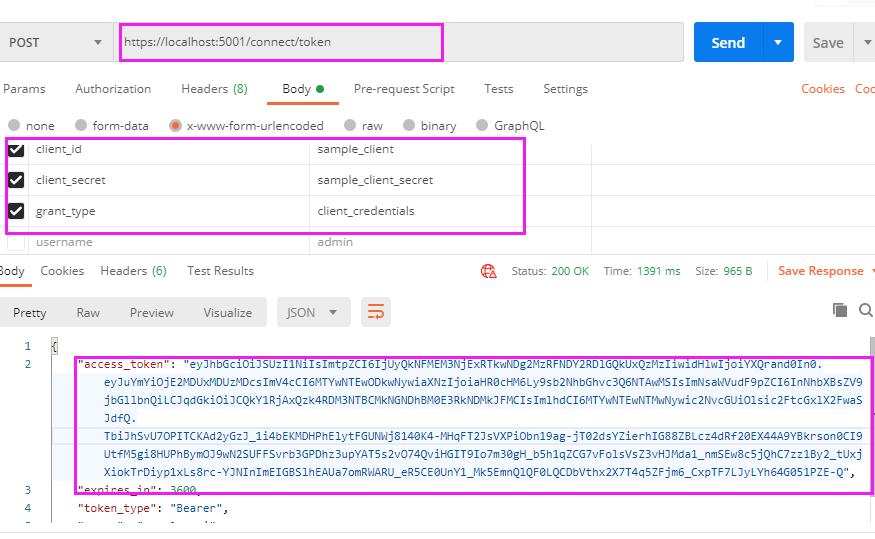
将密钥以及客户端ID等信息传过去 可以得到一个token
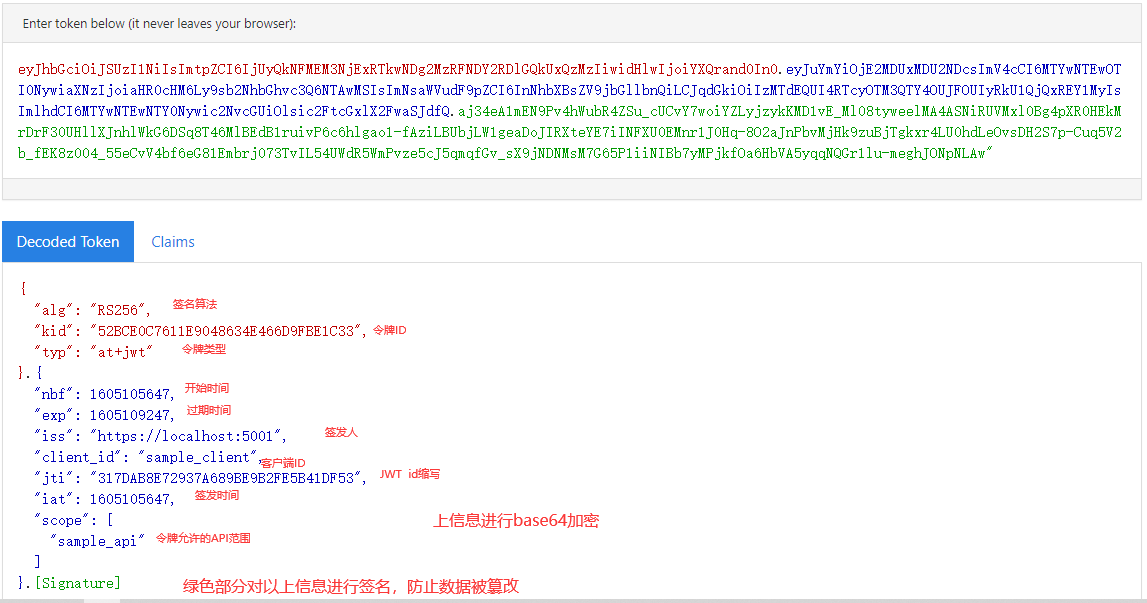
可以在官网上对这个token进行解析[jwt.io][jwt.ms]