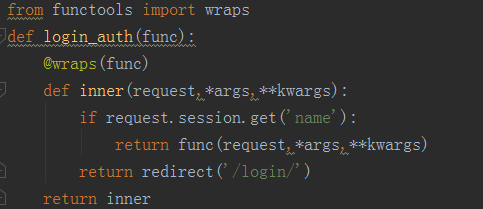
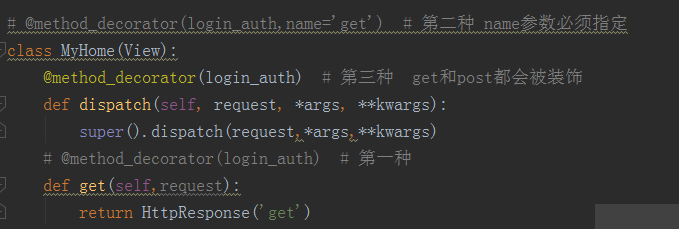
CBV加装饰器校验session
CSRF跨站请求
CSRF Token相关装饰器在CBV只能加到dispatch方法上,或者加在视图类上然后name参数指定为dispatch方法。
csrf_protect,为当前函数强制设置防跨站请求伪造功能,即便settings中没有设置全局中间件。
csrf_exempt,取消当前函数防跨站请求伪造功能,即便settings中设置了全局中间件。
导入相关模块:
from django.utils.decorators import method_decorator #CBV加装饰器需要导入的模块
from django.views.decorators.csrf import csrf_exempt,csrf_protect
csrf_protect 跟正常的CBV装饰器一样      三种
csrf_exempt  只能有下面两种方式
        @method_decorator(csrf_exempt,name='dispatch')  # 第一种
        class Index3(View):
            # @method_decorator(csrf_exempt)   # 第二种
            def dispatch(self, request, *args, **kwargs):
                super().dispatch(request,*args,**kwargs)
        其实都是给dispatch加
AUTH认证模块
Django内置了强大的用户认证系统--auth,它默认使用 auth_user 表来存储用户数据。
常用方法
from django.contrib import auth
authenticate()
提供了用户认证功能,即验证用户名以及密码是否正确,一般需要username 、password两个关键字参数。
如果认证成功(用户名和密码正确有效),便会返回一个 User 对象。(类似于models的筛选对象)

authenticate()会在该 User 对象上设置一个属性(is_authenticated())来标识后端已经认证了该用户,且该信息在后续的登录过程中是需要的
login(HttpRequest, user)
该函数接受一个HttpRequest对象,以及一个经过认证的User对象。
该函数实现一个用户登录的功能。它本质上会在后端为该用户生成相关session数据

is_authenticated()
用来判断当前请求是否通过了认证。

login_requierd()
auth 给我们提供的一个装饰器工具,用来快捷的给某个视图添加登录校验。
用法:
from django.contrib.auth.decorators import login_required
@login_required
def my_view(request):
  ...
若用户没有登录,则会跳转到django默认的 登录URL '/accounts/login/ ' 并传递当前访问url的绝对路径 (登陆成功后,会重定向到该路径)。
如果需要自定义登录的URL,则需要在settings.py文件中通过LOGIN_URL进行修改。
示例:
LOGIN_URL = '/login/' # 这里配置成你项目登录页面的路由
create_user()
用法:
from django.contrib.auth.models import User
User.objects.create(username=username,password=password)       # 用create创建的话auth_user表中password字段的值为明文,不推荐
User.objects.create_user(username=username,password=password)  # 创建普通用户
User.objects.create_superuser(username=username,password=password,email='123@163.com')  # 创建超级用户要加上email
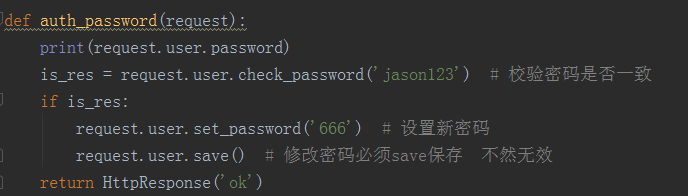
check_password(password)
auth 提供的一个检查密码是否正确的方法,需要提供当前请求用户的密码。
密码正确返回True,否则返回False。
set_password(password)
auth 提供的一个修改密码的方法,接收 要设置的新密码 作为参数。
注意:设置完一定要调用用户对象的save方法!!!
扩展默认的auth_user表
法一(了解):
models.py文件中:
from django.contrib.auth.models import User,AbstractUser
class Userinfo(models.Model):
phone = models.CharField(max_length=32)
avatar = models.CharField(max_length=32)
ab = models.OneToOneField(to=User)
法二:
from django.contrib.auth.models import AbstractUser
class Userinfo(AbstractUser):
phone = models.CharField(max_length=32)
avatar = models.CharField(max_length=32)
按法二的方式扩展了内置的auth_user表之后,一定要在settings.py中告诉Django,我现在使用我新定义的UserInfo表来做用户认证
AUTH_USER_MODEL = "app名.UserInfo"