环境介绍:本文中服务端客户端使用的都是ssm框架,配置文件分为spring_servlet.xml,spring_service.xml,mybatis.xml
在spring里面使用rmi完成远程调用步骤分以下几步:
一、在服务端
1.编写服务端接口
 1 package com.dzf.service;
 2
 3 import java.util.List;
 4
 5 import com.dzf.entity.Author;
 6
 7 public interface RmiServerService {
 8     public List<Author> getAuthorByName(String name);
 9
10     public Integer insertAuthor(Author author);
11 }
2.编写具体的实现类
 1 package com.dzf.service;
 2
 3 import java.util.List;
 4 import org.springframework.beans.factory.annotation.Autowired;
 5 import org.springframework.stereotype.Service;
 6 import org.springframework.transaction.annotation.Transactional;
 7 import com.dzf.dao.AuthorDao;
 8 import com.dzf.entity.Author;
 9 //@Service   //这里面不需要自动注入,需要手写bean
10 public class RmiServerServiceImpl implements RmiServerService {
11
12     @Autowired
13     private AuthorDao authorDao;
14
15     @Override
16     public List<Author> getAuthorByName(String name) {
17         // TODO Auto-generated method stub
18         if(name==null && "".equals(name)){
19             return null;
20         }
21         return authorDao.getAuthorByName(name);
22     }
23
24     @Transactional
25     @Override
26     public Integer insertAuthor(Author author) {
27         // TODO Auto-generated method stub
28         if(author == null){
29             return null;
30         }
31         authorDao.insert(author);
32         return author.getId(); //返回的插入这条数据的主键值
33     }
34
35 }
3.在spring-service.xml中添加服务端的配置
1 <bean name = "rmiServerService" class="com.dzf.service.RmiServerServiceImpl"></bean>
2     <bean name="rmiTest" class="org.springframework.remoting.rmi.RmiServiceExporter">
3        <property name="service" ref="rmiServerService" />
4        <property name="serviceName" value="rmiServerService" />
5        <!--这个地方必须写接口的位置全限定名  -->
6        <property name="serviceInterface" value="com.dzf.service.RmiServerService"/>
7        <!-- 这个端口不能和项目的端口一样,是个独立的端口 -->
8        <property name="registryPort" value="8083" />
9 </bean>
我这里把dao层的写法也贴出来,仅供查考
package com.dzf.dao;

import java.util.List;

import org.apache.ibatis.annotations.Insert;
import org.apache.ibatis.annotations.Options;
import org.apache.ibatis.annotations.Select;
import org.springframework.stereotype.Repository;

import com.dzf.entity.Author;

@Repository
public interface AuthorDao {

    @Select("select * from author t where t.id = #{id}")
    public Author getAuthorById(Integer Id);

    @Select("select * from author t where t.name like concat('%',#{name},'%')")
    public List<Author> getAuthorByName(String name);

    @Insert("insert into author(name,age,tel) values (#{name},#{age},#{tel})")
    @Options(useGeneratedKeys=true,keyProperty="id")
    public Integer insert(Author author);
}
二、客户端(调用端的配置)
1.编写一个和服务端一模一样的接口
 1 package com.dzf.service;
 2
 3 import java.util.List;
 4
 5 import com.dzf.entity.Author;
 6
 7 public interface RmiServerService {
 8     public List<Author> getAuthorByName(String name);
 9
10     public Integer insertAuthor(Author author);
11 }
2.编写配置文件
1 <!-- Spring Rmi 客户端配置 -->
2     <bean id="rmiServerService" class="org.springframework.remoting.rmi.RmiProxyFactoryBean">
3        <property name="serviceUrl" value="rmi://127.0.0.1:8083/rmiServerService"/>
4         <property name="serviceInterface" value="com.dzf.rmi.service.RmiServerService"/>
5         <property name="lookupStubOnStartup" value="false"/>
6         <property name="refreshStubOnConnectFailure" value="true"></property>
7     </bean>
3.编写controller层的代码
 1 package com.dzf.rmi.controller;
 2
 3 import java.util.List;
 4
 5 import org.springframework.beans.factory.annotation.Autowired;
 6 import org.springframework.stereotype.Controller;
 7 import org.springframework.web.bind.annotation.RequestMapping;
 8 import org.springframework.web.bind.annotation.ResponseBody;
 9
10 import com.dzf.entity.Author;
11 import com.dzf.rmi.service.RmiServerService;
12
13 @Controller
14 @RequestMapping("/rmi")
15 public class RmiServlet {
16
17     @Autowired
18     private RmiServerService rmiServerService; //这个起的名字要和配置文件里面的一样
19
20     @RequestMapping("/getAuthorByName")
21     @ResponseBody
22     public List<Author> getAuthorByName(){
23         String name  = "a";
24         return rmiServerService.getAuthorByName(name);
25     }
26
27
28     @RequestMapping("/insert")
29     @ResponseBody
30     public Integer insert(){
31         Author author = new Author();
32         author.setName("丁");
33         author.setAge(23);
34         author.setTel("13033563156");
35         return  rmiServerService.insertAuthor(author);
36     }
37
38 }
4.使用接口工具调用
1.
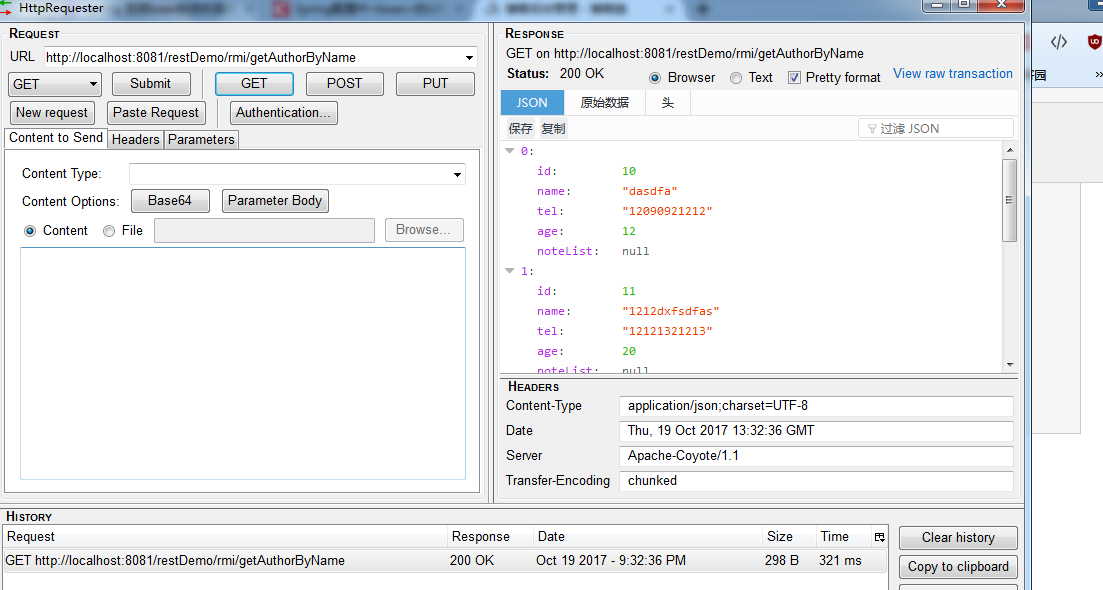
2.

到此可以看到,调用完全没有问题!
总结下:
核心
1.服务端通过org.springframework.remoting.rmi.RmiServiceExporter这个类暴露服务接口
2.服务端和客户端定义同样的接口
3.调用端通过org.springframework.remoting.rmi.RmiProxyFactoryBean调用服务端的暴露的接口
注意:实体类需要实现序列化接口!