1.掌握spring的属性注入的方法:
1.1构造方法注入普通值---------<constructor-arg>标签的使用
首先新建一个类


package spring.day1.demo3;

public class car {

    private String name;
    private double price;

    public car(String name, Double price) {
        this.name = name;
        this.price = price;
    }

    @Override
    public String toString() {
        return "car [name=" + name + ", price=" + price + "]";
    }

}
在编写applicationContext2.xml
<?xml version="1.0" encoding="UTF-8"?>
<!-- =======================引入spring的关于bean的约束 ========================= -->
<beans xmlns="http://www.springframework.org/schema/beans"
    xmlns:p="http://www.springframework.org/schema/p"
    xmlns:xsi="http://www.w3.org/2001/XMLSchema-instance"
    xsi:schemaLocation="
        http://www.springframework.org/schema/beans
        http://www.springframework.org/schema/beans/spring-beans.xsd">

    <!-- ================spring属性注入=============================== -->
    <!-- 构造方法注入 -->
    <bean id="car" class="spring.day1.demo3.car">
        <constructor-arg name="name" value="宝马"></constructor-arg>
        <constructor-arg name="price" value="500000"></constructor-arg>
    </bean>

</beans>
在编写测试类SpringDemo3
package spring.day1.demo3;

import org.junit.Test;
import org.springframework.context.ApplicationContext;
import org.springframework.context.support.ClassPathXmlApplicationContext;

public class springDemo3 {

    @Test
    public void demo1() {
        ApplicationContext applicationContext = new ClassPathXmlApplicationContext("applicationContext2.xml");
        car bean = (car) applicationContext.getBean("car");
        System.out.println(bean);
    }
}
运行结果如下

1.2set方法注入普通值和对象属性(ref的使用)------<property>标签的使用
新建一个类car2
package spring.day1.demo3;

public class car2 {

    private String name;
    private double price;

    public void setName(String name) {
        this.name = name;
    }
    public void setPrice(double price) {
        this.price = price;
    }
    @Override
    public String toString() {
        return "car2 [name=" + name + ", price=" + price + "]";
    }

}
新建一个Employee类
package spring.day1.demo3;

public class employee {
    private String name;
    private car2 car;

    public void setName(String name) {
        this.name = name;
    }

    public void setCar(car2 car) {
        this.car = car;
    }

    @Override
    public String toString() {
        return "Employee [name=" + name + ", car=" + car + "]";
    }
}
在applicationContext2.xml中加入以下
<!-- set方法对car2注入普通值 -->
    <bean id="car2" class="spring.day1.demo3.car2">
        <property name="name" value="奔驰"></property>
        <property name="price" value="600000"></property>
    </bean>

    <!-- set方法注入对象 -->
    <bean id="employee" class="spring.day1.demo3.employee">
        <property name="name" value="张三"></property>
        <property name="car" ref="car2"></property>
    </bean>
在测试类SpringDemo3加入以下
@Test
    public void demo2() {
        ApplicationContext applicationContext = new ClassPathXmlApplicationContext("applicationContext2.xml");
        employee bean = (employee) applicationContext.getBean("employee");
        System.out.println(bean);
    }
运行截图如下

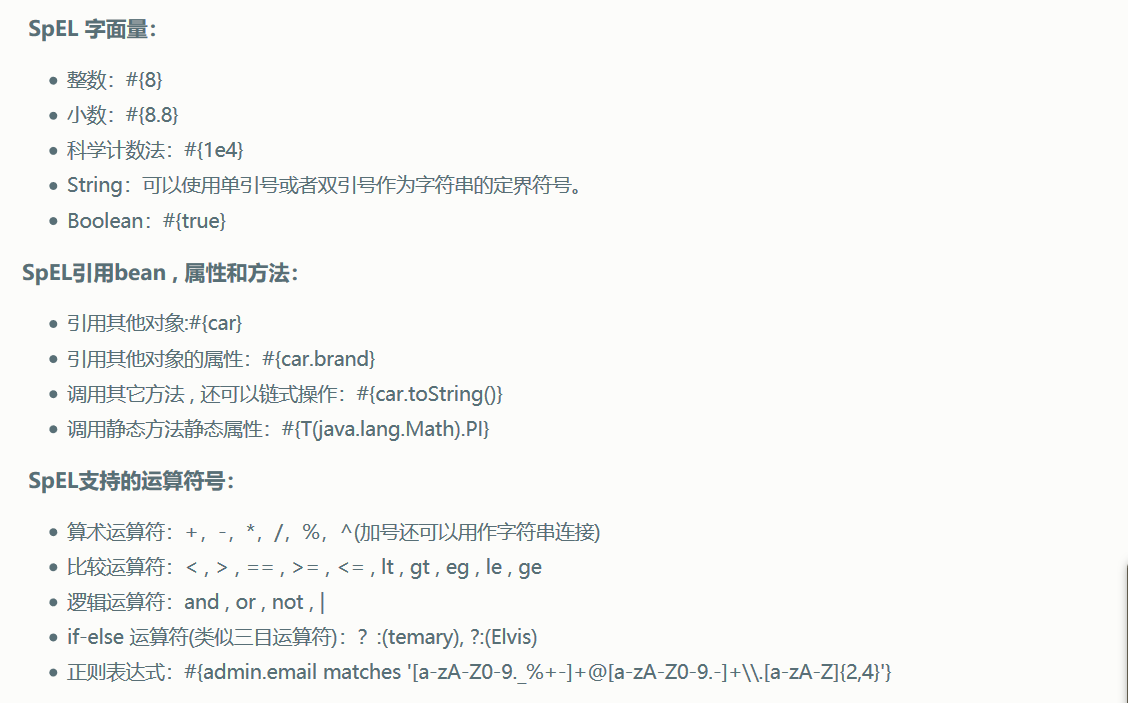
1.3SPEL方式注入普通值和对象值(Spring3.0以后)
SpEL:Spring Expression Language,Spring的表达式语言。
语法格式:#{SPEL}
新建一个类carInfo
package spring.day1.demo3;

public class carInfo {
    private String name;
    private double price;

    public String getName() {
        return "小三轮儿";
    }

    public double getPrice() {
        return Math.random()*1000;
    }

}
修改applicationContext2.xml为如下
<?xml version="1.0" encoding="UTF-8"?>
<!-- =======================引入spring的关于bean的约束 ========================= -->
<beans xmlns="http://www.springframework.org/schema/beans"
    xmlns:p="http://www.springframework.org/schema/p"
    xmlns:xsi="http://www.w3.org/2001/XMLSchema-instance"
    xsi:schemaLocation="
        http://www.springframework.org/schema/beans
        http://www.springframework.org/schema/beans/spring-beans.xsd">

    <!-- ================spring属性注入=============================== -->
    <!-- 构造方法注入 -->
    <bean id="car" class="spring.day1.demo3.car">
        <constructor-arg name="name" value="宝马"></constructor-arg>
        <constructor-arg name="price" value="500000"></constructor-arg>
    </bean>

    <!-- set方法对car2注入普通值 -->
    <!-- <bean id="car2" class="spring.day1.demo3.car2">
        <property name="name" value="奔驰"></property>
        <property name="price" value="600000"></property>
    </bean> -->

    <!-- set方法注入对象 -->
    <!-- <bean id="employee" class="spring.day1.demo3.employee">
        <property name="name" value="张三"></property>
        <property name="car" ref="car2"></property>
    </bean> -->

    <!-- SPEL方式 -->
    <bean id="carInfo" class="spring.day1.demo3.carInfo"></bean>

    <bean id="car2" class="spring.day1.demo3.car2">
        <property name="name" value="#{carInfo.name}"></property>
        <property name="price" value="#{carInfo.getPrice()}"></property>
    </bean>

</beans>
在测试类SpringDemo3加入以下
@Test
    public void demo3() {
        ApplicationContext applicationContext = new ClassPathXmlApplicationContext("applicationContext2.xml");
        car2 bean = (car2) applicationContext.getBean("car2");
        System.out.println(bean);
    }
运行截图如下

1.4P名称空间方式注入普通值和对象(Spring2.5以后)了解

2.集合属性注入(了解)
1.新建CollectionBean类
2.在applicationContext2.xml中加入如下代码
3.新建测试类测试
<!-- =======================spring集合属性的注入============================ -->
    <bean id="collectionBean" class="zcc.spring.demo5.CollectionBean">
        <!-- 数组类型 -->
        <property name="arrs">
            <list>
                <value>张三</value>
                <value>李四</value>
                <value>王麻子</value>
            </list>
        </property>
        <!-- List集合类型 -->
        <property name="list">
            <list>
                <value>一号</value>
                <value>二号</value>
                <value>三号</value>
            </list>
        </property>
        <!-- Set集合类型 -->
        <property name="set">
            <set>
                <value>a</value>
                <value>b</value>
                <value>c</value>
            </set>
        </property>
        <!-- Map集合类型 -->
        <property name="map">
            <map>
                <entry key="数字" value="1"></entry>
                <entry key="性别" value="男"></entry>
            </map>
        </property>
    </bean>
package zcc.spring.demo5;

import java.util.Arrays;
import java.util.List;
import java.util.Map;
import java.util.Set;

/*
 * 集合属性的注入
 */
public class CollectionBean {
    private String []arrs;
    private List<String> list;
    private Set<String> set;
    private Map<String,String> map;
    public void setArrs(String[] arrs) {
        this.arrs = arrs;
    }
    public void setList(List<String> list) {
        this.list = list;
    }
    public void setSet(Set<String> set) {
        this.set = set;
    }
    public void setMap(Map<String, String> map) {
        this.map = map;
    }
    @Override
    public String toString() {
        return "CollectionBean [arrs=" + Arrays.toString(arrs) + ", list=" + list + ", set=" + set + ", map=" + map
                + "]";
    }

}
package zcc.spring.demo5;

import org.junit.Test;
import org.springframework.context.ApplicationContext;
import org.springframework.context.support.ClassPathXmlApplicationContext;

/*
 * 集合类型的属性注入
 */
public class SpringDemo5 {

    @Test
    public void demo1() {
        //创建spring的工厂来实例化xml中所有的bean对象
        ApplicationContext applicationContext = new ClassPathXmlApplicationContext("applicationContext.xml");
        CollectionBean bean = (CollectionBean) applicationContext.getBean("collectionBean");
        System.out.println(bean);
    }

}
