一般的软件项目,在开发、测试及生产等环境下配置文件中参数是不同的。传统的做法是在项目部署的时候,手动修改或者替换这个配置文件。这样太麻烦了,我们可以用Maven的profile来解决这个问题。只要在打包时加个参数就可以实现想打那个环境的配置文件就打包那个环境的配置文件,提高了效率。
下面介绍下具体的做法
一、多环境配置文件的放置
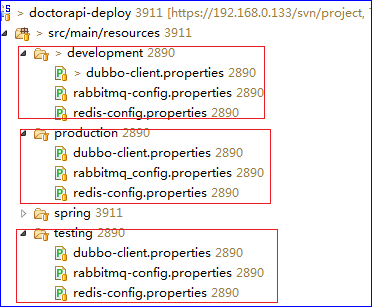
将不同环境下的配置文件按照文件夹来划分,但需要保证配置文件的文件名在不同环境下必须一致
- development:开发环境
- testing:测试环境
- production:生产环境
配置文件分文件夹后的效果如下图
二、pom文件的配置
(1)配置profile
在pom文件中配置不同的profile。profile里面id标签为这个profile的名字,properties标签的内容为这个profile里面的参数。
我们配置profile的参数为: profiles.active=对应环境文件夹名字
这样在打包资源文件时,通过激活不同的profile来拿取profiles.active的值所对应的文件夹进行打包。
代码如下:
	<profiles>
		<profile>
			<!-- 开发环境 -->
			<id>development</id>
			<properties>
				<profiles.active>development</profiles.active>
			</properties>
			<activation>
				<activeByDefault>true</activeByDefault>
			</activation>
		</profile>
		<profile>
			<!-- 测试环境 -->
			<id>testing</id>
			<properties>
				<profiles.active>testing</profiles.active>
			</properties>
		</profile>
		<profile>
			<!-- 生产环境 -->
			<id>production</id>
			<properties>
				<profiles.active>production</profiles.active>
			</properties>
		</profile>
    </profiles>
x
1
<profiles>2
<profile>3
<!-- 开发环境 -->4
<id>development</id>5
<properties>6
<profiles.active>development</profiles.active>7
</properties>8
<activation>9
<activeByDefault>true</activeByDefault>10
</activation>11
</profile>12
<profile>13
<!-- 测试环境 -->14
<id>testing</id>15
<properties>16
<profiles.active>testing</profiles.active>17
</properties>18
</profile>19
<profile>20
<!-- 生产环境 -->21
<id>production</id>22
<properties>23
<profiles.active>production</profiles.active>24
</properties>25
</profile>26
</profiles> 通过<activeByDefault>true</activeByDefault>设置默认激活的profile
(2)配置maven资源文件打包规则
打包资源文件时,需要通过profile里面的profiles.active的值来切换不同环境的资源文件。具体的配置见下面代码
		<resources>
			<resource>
				<directory>src/main/resources</directory>
				<!-- 这个filter必须要设为true, 把所有文件都过滤掉,然后下面再手动include,一个一个文件夹自己添加 -->
				<filtering>true</filtering>
				<includes>
					<include>spring/*</include>
				</includes>
			</resource>
			<resource>
				<!-- 这里会直接把${profiles.active}对应文件夹下的内容打包到classpath下 -->
				<directory>src/main/resources/${profiles.active}</directory>
			</resource>
		</resources>
14
1
<resources>2
<resource>3
<directory>src/main/resources</directory>4
<!-- 这个filter必须要设为true, 把所有文件都过滤掉,然后下面再手动include,一个一个文件夹自己添加 -->5
<filtering>true</filtering>6
<includes>7
<include>spring/*</include>8
</includes>9
</resource>10
<resource>11
<!-- 这里会直接把${profiles.active}对应文件夹下的内容打包到classpath下 -->12
<directory>src/main/resources/${profiles.active}</directory>13
</resource>14
</resources> 关于maven的resource可以参考这篇文章:https://blog.csdn.net/feicongcong/article/details/78833618
特别关注下<includes>和<directory>的作用
这里由于用了<directory>src/main/resources/${profiles.active}</directory>,它是把${profiles.active}对应文件夹下的内容打包到classpath下面了,所以读取${profile.active}文件夹下的propertis文件的路径为 classpath:xxx.properties
三、如何在Spring配置文件中读取这些不同环境下的propertis文件
其实在上面已经说了,按照我这个配置来读取的话,这些propertis文件都在classpath下面。参考代码如下
	 <bean id="propertyConfig"
          class="org.springframework.beans.factory.config.PropertyPlaceholderConfigurer">
        <property name="locations">
            <list>
		 		<value>classpath:redis-config.properties</value>
		 		<value>classpath:dubbo-client.properties</value>
		 		<value>classpath:rabbitmq-config.properties</value>
		 	</list>
        </property>
    </bean>
1
<bean id="propertyConfig" 2
class="org.springframework.beans.factory.config.PropertyPlaceholderConfigurer"> 3
<property name="locations"> 4
<list>5
<value>classpath:redis-config.properties</value>6
<value>classpath:dubbo-client.properties</value>7
<value>classpath:rabbitmq-config.properties</value>8
</list> 9
</property> 10
</bean>四、如何打包
mvn package –P 这里填你的profile的id值
特别注意:P是大写的