本文,试图中一个干净的ubuntu14.04机器上安装caffe的cpu版本。
http://blog.csdn.net/sinat_35188997/article/details/73530434
http://caffe.berkeleyvision.org/installation.html
http://blog.csdn.net/zly_kemgine/article/details/78749764
首先卸载掉一些包:
卸载所有cuda有关的包:
apt-get remove --purge cuda-*
卸载掉所有nvidia有关的包:
apt-get remove --purge nvidia-*
卸载掉所有cudnn包:
apt-get remove --purge libcudnn*
卸载掉所有caffe包:
apt-get remove --purge caffe-*
卸载掉conda:
直接删除conda安装目录,然后在环境变量配置文件中删除旧路径即可http://blog.csdn.net/qq_22474567/article/details/54984257
然后使用dpkg -l|grep 或 dpkg -S 软件名 或 find 查看是否卸载干净
因为我是用的是什么都没有的干净的ubuntu系统,所以免去上面的步骤。
然后安装conda:
上官网下载.sh文件,运行,运行过程中配置一下安装目录,确认一下是否要加入环境变量即可,安装完成后重启terminal即可使用
对于caffe的依赖包有哪些,请参考Prerequisites:http://caffe.berkeleyvision.org/installation.html
然后安装openblas:
源码:https://github.com/xianyi/OpenBLAS
安装教程:http://www.tuicool.com/articles/vimi6v
下载openblas源码,解压,进入目录,
make
make完成后,根据输出中的提示,修改Makefile.rule文件中的prefix字段,设置安装目录,然后执行,
make install
(或者也可以直接执行 make PREFIX=安装路径 install 命令)
然后安装protobuf:
注意,caffe暂不支持protobuf3,我们一般选择安装protobuf 2.5.0
源码:https://github.com/google/protobuf
安装教程:http://blog.csdn.net/10km/article/details/53023527
http://blog.csdn.net/nyist327/article/details/49908891
http://blog.csdn.net/missdaddio/article/details/67631777
官方教程上说,直接
$ ./configure --prefix=安装路径
$ make -j16
$make check -j16
$ make install
但是,解压后发现没有configure文件,上网搜索后发现,需要先运行autogen.sh生成configure文件
运行autogen.sh,发现程序试图从一个被墙的网站上下载gtest-1.5.0.tar.bz2,因为机器不能翻墙,所以无法下载。
查看autogen.sh的代码,发现下面这段代码:
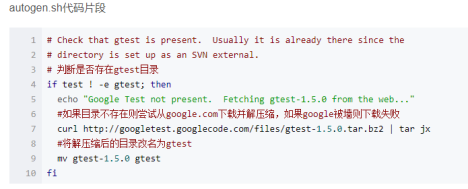
于是手动下载googletest-release-1.5.0.zip,解压缩后,改名为gtest放在protobuf-2.5.0目录下
再次运行autogen.sh,再次出错
/autogen.sh: 40: autoreconf: not found
搜了一下,发现是因为缺包
解决办法: sudo apt-get install autoconf automake libtool
再次运行autogen.sh,成功生成configure,然后
$ ./configure --prefix=安装路径
$ make -j16
$make check -j16
$ make install
最后运行protoc命令,查看是否安装成功
然后,安装到anaconda中
export PATH=/HOME_ANACONDA_PATH/bin:PATH
#cd ./python
#python setup.py build
#python setup.py test
#python setup.py install
正确安装如图:

然后安装boost:
源码:http://www.boost.org/users/history/version_1_66_0.html(这里注意,不要用github上下载的zip,github上下载下来的zip不全,会报can't cd into ...错误)
教程:
./bootstrap.sh --prefix=/usr --with-python=/opt/anaconda2/bin/ --with-python-root=/opt/anaconda2/

./b2
./b2 install
然后安装glog
源码:https://github.com/google/glog/tree/v0.3.3
教程:
tar zxvf glog-0.3.3.tar.gz
cd glog-0.3.3
./configure ¨C-prefix=/usr
make && make install
然后安装gflags
源码:https://github.com/gflags/gflags
教程:
要先安装cmake:apt-get update & apt-get install cmake
cd gflags-master
mkdir build
cd build
export CXXFLAGS="-fPIC"
cmake -D CMAKE_INSTALL_PREFIX=/usr .. (这里注意最后的两个点,别漏了)
make VERBOSE=1
make
make install
然后安装hdf5
源码:https://support.hdfgroup.org/HDF5/release/obtainsrc518.html
教程:
tar -zxvf hdf5-1.8.3.tar.gz
$ ./configure --prefix=/usr
make
make check # run test suite.
make install
make check-install # verify installation.
然后安装snappy
源码:http://google.github.io/snappy/
教程:https://github.com/google/snappy/blob/master/README.md
cd google-snappy-4f7bd2d
mkdir build
cd build
(export CXXFLAGS='-fPIC')——这句后来被证明应该加上,以便在编译时产生share文件夹
cmake -D CMAKE_INSTALL_PREFIX=/usr ..
make
make install
然后安装opencv(这里注意一下,尽量编译安装opencv3。我尝试过直接用conda install opencv而不使用编译安装,结果在安装caffe时存在一些问题)
源码:https://github.com/opencv/opencv/tree/3.0.0
教程:https://www.cnblogs.com/kanuore/p/7587434.html(这个是给python3安装opencv的,2同理)
下载源码,解压,进入目录,发现是cmake的项目,故创建build文件夹并在其中cmake。
mkdir build
cd build
执行cmake命令,如下图:

发现报错,如下图,一开始进入CMakeError.log文件中查看,发现有错误提示提到ffmpeg等。以为是缺包,因此安装缺少的包:http://blog.csdn.net/zhang_shuai12/article/details/52289825
sudo apt-get install cmake git libgtk2.0-dev pkg-config libavcodec-dev libavformat-dev libswscale-dev
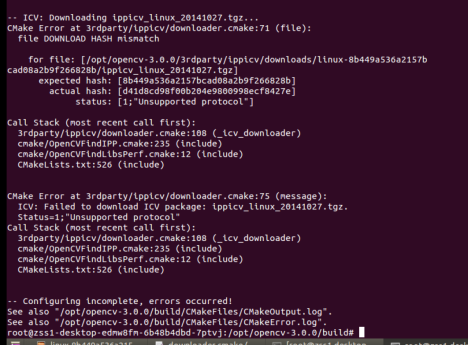
再次执行camke命令,还是报一样的错。
然后仔细阅读了错误提示中的内容,发现程序试图从一个被墙的网站下载ippicv_linux_20141027.tgz,下载不下来因此报错!
一定要仔细阅读错误提示!如果错误提示看不出什么的话再去看CMakeError.log文件。
根据上面的错误提示,查看3rdparty/ippicv/downloader.cmake文件,或者根据网上搜到的结果,发现需要手动下载ippicv_linux_20141027.tgz并放到指定位置(如下图)

于是从github上下载ippicv_linux_20141027.tgz,https://github.com/pkpp1233/ippicv,下载后解压得到所需压缩包,拷贝到指定文件夹中。
再次执行cmake命令,cmake通过,然后make,makeinstall,都成功了。
但是,因为我在cmake命令中指定了将opencv安装到anaconda中的python中,因此想要在python中看一下opencv是否安装成功
import cv2
结果import失败。这个包并没有被安装上。
回过头来思考,可能是cmake命令的选项出错了,因此仔细阅读了cmakelist,发现cmake命令中的的选项都在CMakeLists.txt中有解释,之前的cmake命令中好多选项写错了:

1、用ctrl查找,发现cublas是cuda的配置,应该不需要,去掉
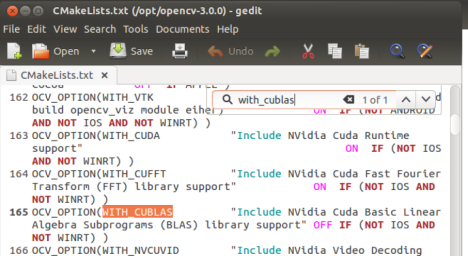
2、查找之前输入的选项,发现有几个选项查找不出来,则说明是选项名字错了,比如PYTHON_EXECUTEABLE应该为PYTHON2_EXECUTEABLE,PYTHON_LIBRARY应为PYTHON2_LIBRARIES……逐个选项修复

错误的cmake命令:
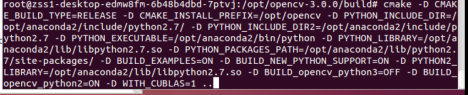
得到正确的cmake命令:

删掉生成的/opt/opencv,删掉编译目录build,重新mkdir build,cd build,执行正确的cmake命令,make,make install。都通过了。
然后测试import cv2,成功。
总结:
cmake命令安装的时候一定要仔细阅读cmakelist.txt文件
然后安装lmdb
源码:https://github.com/LMDB/lmdb
教程:
git clone https://github.com/LMDB/lmdb
cd lmdb/libraries/liblmdb
打开makefile文件,修改prefix字段
make && make install
(或使用make install DESTDIR=/root/_install_caffe_cpu/lmdb命令)
然后安装leveldb
源码:https://github.com/google/leveldb/tree/v1.10
教程:
解压,进入文件夹
make
make命令发现报错:
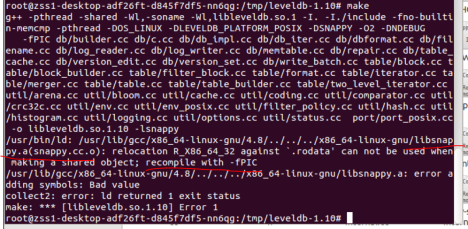
在github上发现了关于相似问题的讨论,只不过我们是snappy库报的错,它是gflags库报的错:https://github.com/BVLC/caffe/issues/2171
原来是当时安装snappy的时候应该先执行一句export CXXFLAGS='-fPIC',这样编译后才会生成share文件夹。
所以重新安装snappy:删除build文件夹,mkdir build,cd build,export CXXFLAGS='-fPIC',cmake -D CMAKE_INSTALL_PREFIX=/usr ..,make,make install
make install,发现报错,原来leveldb的工具包不支持make install(查看makefile文件,可以发现找不到install命令的定义)
所以需要手动将make出的.a和.so文件拷贝到/usr/lib下,将include文件夹拷贝到/usr/include下
最后,安装caffe:
解压,进入caffe-master,官方推荐使用make方式编译caffe,也可以使用cmake,这里我用make
复制一份Makefile.config.example,改名为Makefile.config
根据自己的需要,修改makefile.config,以下是我的配置:
## Refer to http://caffe.berkeleyvision.org/installation.html
# Contributions simplifying and improving our build system are welcome!
# cuDNN acceleration switch (uncomment to build with cuDNN).
# USE_CUDNN := 1不使用cudnn
# CPU-only switch (uncomment to build without GPU support).
CPU_ONLY := 1CPU版本
# uncomment to disable IO dependencies and corresponding data layers
USE_OPENCV := 1使用opencv
USE_LEVELDB := 1使用leveldb
USE_LMDB := 1使用lmdb
# uncomment to allow MDB_NOLOCK when reading LMDB files (only if necessary)
# You should not set this flag if you will be reading LMDBs with any
# possibility of simultaneous read and write
# ALLOW_LMDB_NOLOCK := 1
# Uncomment if you're using OpenCV 3
OPENCV_VERSION := 3opencv 3.0.0
# To customize your choice of compiler, uncomment and set the following.
# N.B. the default for Linux is g++ and the default for OSX is clang++
# CUSTOM_CXX := g++
# CUDA directory contains bin/ and lib/ directories that we need.
# CUDA_DIR := /usr/local/cuda
# On Ubuntu 14.04, if cuda tools are installed via
# "sudo apt-get install nvidia-cuda-toolkit" then use this instead:
# CUDA_DIR := /usr不使用cuda
# CUDA architecture setting: going with all of them.
# For CUDA < 6.0, comment the *_50 through *_61 lines for compatibility.
# For CUDA < 8.0, comment the *_60 and *_61 lines for compatibility.
# For CUDA >= 9.0, comment the *_20 and *_21 lines for compatibility.
#CUDA_ARCH := -gencode arch=compute_20,code=sm_20
# -gencode arch=compute_20,code=sm_21 不使用cuda,全都注释掉
# -gencode arch=compute_30,code=sm_30
# -gencode arch=compute_35,code=sm_35
# -gencode arch=compute_50,code=sm_50
# -gencode arch=compute_52,code=sm_52
# -gencode arch=compute_60,code=sm_60
# -gencode arch=compute_61,code=sm_61
# -gencode arch=compute_61,code=compute_61
# BLAS choice:
# atlas for ATLAS (default)
# mkl for MKL
# open for OpenBlas
BLAS := open使用openblas
# Custom (MKL/ATLAS/OpenBLAS) include and lib directories.
# Leave commented to accept the defaults for your choice of BLAS
# (which should work)!
BLAS_INCLUDE := /usr/includeopenblas安装路径为/usr,则配置其include和lib为/usr/include和/usr/lib
BLAS_LIB := /usr/lib
# Homebrew puts openblas in a directory that is not on the standard search path
# BLAS_INCLUDE := $(shell brew --prefix openblas)/include
# BLAS_LIB := $(shell brew --prefix openblas)/lib
# This is required only if you will compile the matlab interface.
# MATLAB directory should contain the mex binary in /bin.
# MATLAB_DIR := /usr/local
# MATLAB_DIR := /Applications/MATLAB_R2012b.app
# NOTE: this is required only if you will compile the python interface.
# We need to be able to find Python.h and numpy/arrayobject.h.
#PYTHON_INCLUDE := /usr/include/python2.7
# /usr/lib/python2.7/dist-packages/numpy/core/include
# Anaconda Python distribution is quite popular. Include path:
# Verify anaconda location, sometimes it's in root.
ANACONDA_HOME := /opt/anaconda2关键!!使用自己安装的anaconda的python,配置自己安装的anaconda的位置,下同
PYTHON_INCLUDE := $(ANACONDA_HOME)/include
$(ANACONDA_HOME)/include/python2.7
$(ANACONDA_HOME)/lib/python2.7/site-packages/numpy/core/include
# Uncomment to use Python 3 (default is Python 2)
# PYTHON_LIBRARIES := boost_python3 python3.5m
# PYTHON_INCLUDE:= /usr/include/python3.5m
# /usr/lib/python3.5/dist-packages/numpy/core/include
# We need to be able to find libpythonX.X.so or .dylib.
# PYTHON_LIB := /usr/lib
PYTHON_LIB := $(ANACONDA_HOME)/lib
# Homebrew installs numpy in a non standard path (keg only)
# PYTHON_INCLUDE += $(dir $(shell python -c 'import numpy.core; print(numpy.core.__file__)'))/include
# PYTHON_LIB += $(shell brew --prefix numpy)/lib
# Uncomment to support layers written in Python (will link against Python libs)
# WITH_PYTHON_LAYER := 1这个不知道开不开?先没开?
# Whatever else you find you need goes here.
INCLUDE_DIRS := $(PYTHON_INCLUDE) /usr/include /usr/local/include编译所用的库路径
LIBRARY_DIRS := $(PYTHON_LIB) /usr/lib /usr/local/lib
# If Homebrew is installed at a non standard location (for example your home directory) and you use it for general dependencies
# INCLUDE_DIRS += $(shell brew --prefix)/include
# LIBRARY_DIRS += $(shell brew --prefix)/lib
# NCCL acceleration switch (uncomment to build with NCCL)
# https://github.com/NVIDIA/nccl (last tested version: v1.2.3-1+cuda8.0)
# USE_NCCL := 1
# Uncomment to use `pkg-config` to specify OpenCV library paths.
# (Usually not necessary -- OpenCV libraries are normally installed in one of the above $LIBRARY_DIRS.)
# USE_PKG_CONFIG := 1
# N.B. both build and distribute dirs are cleared on `make clean`
BUILD_DIR := build
DISTRIBUTE_DIR := distribute
# Uncomment for debugging. Does not work on OSX due to https://github.com/BVLC/caffe/issues/171
# DEBUG := 1
# The ID of the GPU that 'make runtest' will use to run unit tests.
TEST_GPUID := 0
# enable pretty build (comment to see full commands)
Q ?= @
修改完成后,
make all
make pycaffe
make test
然后将caffe源码目录中的python文件夹配置到PYTHONPATH这个环境变量里面去(如下图)←注意别漏了这一步

make方式编译的caffe不需要install,直接使用解压的这个文件夹里的东西
测试一下caffe:
测试一下pycaffe:

成功!
参考:
opencv3.0 + cuda 8.0 error
http://blog.csdn.net/yuehanliushuang/article/details/52116926
/*
#include "precomp.hpp"
-#if !defined (HAVE_CUDA) || defined (CUDA_DISABLER)
+// GraphCut has been removed in NPP 8.0
+#if !defined (HAVE_CUDA) || defined (CUDA_DISABLER) || (CUDART_VERSION >= 8000)
void cv::cuda::graphcut(GpuMat&, GpuMat&, GpuMat&, GpuMat&, GpuMat&, GpuMat&, GpuMat&, Stream&) { throw_no_cuda(); }
void cv::cuda::graphcut(GpuMat&, GpuMat&, GpuMat&, GpuMat&, GpuMat&, GpuMat&, GpuMat&, GpuMat&, GpuMat&, GpuMat&, GpuMat&, Stream&) { throw_no_cuda(); }
*/
OpenBLAS install
http://www.tuicool.com/articles/vimi6v
Protobuf
Install protobuf 2.4.1
$ tar ¨Cxvf protobuf-2.4.1.tar.gz
$ cd protobuf-2.4.1
$ ./configure --prefix=/root/_install_caffe_cpu/protobuf-2.4.1
$ make -j16
$make check -j16
$ make install
export PATH=/HOME_ANACONDA_PATH/bin:PATH
#cd ./python
#python setup.py build
#python setup.py test
#python setup.py install
Boost
Install boost
./bootstrap.sh --prefix=/home/inf/web_demo/tools/_install_boost_1.58.0_anaconda/ --with-python=/home/inf/anaconda2/bin/ --with-python-root=/home/inf/anaconda2/
./b2
./b2 install
Install LMDB
git clone https://github.com/LMDB/lmdb
cd lmdb/libraries/liblmdb
make && make install DESTDIR=/root/_install_caffe_cpu/lmdb
Install glog-0.3.3
tar zxvf glog-0.3.3.tar.gz
cd glog-0.3.3
./configure ¨C-prefix=/root/_install_caffe_cpu/glog-0.3.3
make && make install
Install gflag
use master.zip
cd gflags-master
export CXXFLAGS="-fPIC"
cmake -D CMAKE_INSTALL_PREFIX=/root/_install_caffe_cpu/gflag .
make VERBOSE=1
make
make install
hdf5
tar -zxvf hdf5-1.8.3.tar.gz
$ ./configure --prefix=/usr/local/hdf5-1.8.3/
make
make check # run test suite.
make install
make check-install # verify installation.
snappy
http://blog.csdn.net/hairetz/article/details/18049257
1.去官网http://code.google.com/p/snappy/下载snappy-1.1.1.tar.gz安装包。
2.加压到指定目录
cd ~/snappy
tar -zxvf snappy-1.1.1.tar.gz
cd snappy-1.1.1
./configure -prefix=/home/tools/_install_snappy
make
make install
opencv 3
error:
cmake -D CMAKE_BUILD_TYPE=RELEASE -D CMAKE_INSTALL_PREFIX=/opt/opencv -D PYTHON_INCLUDE_DIR=/opt/anaconda2/include/python2.7/ -D PYTHON_INCLUDE_DIR2=/opt/anaconda2/include/python2.7 -D PYTHON_EXECUTABLE=/opt/anaconda2/bin/python -D PYTHON_LIBRARY=/opt/anaconda2/lib/libpython2.7.so -D PYTHON_PACKAGES_PATH=/opt/anaconda2/lib/python2.7/site-packages/ -D BUILD_EXAMPLES=ON -D BUILD_NEW_PYTHON_SUPPORT=ON -D PYTHON2_LIBRARY=/opt/anaconda2/lib/libpython2.7.so -D BUILD_opencv_python3=OFF -D BUILD_opencv_python2=ON -D WITH_CUBLAS=1 ..
true:
cmake -D CMAKE_BUILD_TYPE=RELEASE -D CMAKE_INSTALL_PREFIX=/opt/opencv -D PYTHON2_INCLUDE_DIR=/opt/anaconda2/include/python2.7/ -D PYTHON2_EXECUTABLE=/opt/anaconda2/bin/python2.7 -D PYTHON2_LIBRARIES=/opt/anaconda2/lib/libpython2.7.so -D PYTHON2_PACKAGES_PATH=/opt/anaconda2/lib/python2.7/site-packages/ -D BUILD_EXAMPLES=ON -D BUILD_NEW_PYTHON_SUPPORT=ON -D BUILD_opencv_python3=OFF -D BUILD_opencv_python2=ON ..
cmake -D CMAKE_BUILD_TYPE=RELEASE -D CMAKE_INSTALL_PREFIX=/home/tools/_install_opencv_3.0_anaconda/ -D PYTHON_INCLUDE_DIR=/home/tools/anaconda2/include/python2.7/ -D PYTHON_INCLUDE_DIR2=/home/tools/anaconda2/include/python2.7 -D PYTHON_EXECUTABLE=/home/tools/anaconda2/bin/python -D PYTHON_LIBRARY=/home/tools/anaconda2/lib/libpython2.7.so -D PYTHON_PACKAGES_PATH=/home/tools/anaconda2/lib/python2.7/site-packages/ -D BUILD_EXAMPLES=ON -dBUILD_NEW_PYTHON_SUPPORT=ON -D PYTHON2_LIBRARY=/home/tools/anaconda2/lib/libpython2.7.so -D BUILD_opencv_python3=OFF -D BUILD_opencv_python2=ON -D WITH_CUBLAS=1 ..
sudo route add -net 172.17.0.0/17 gw 192.168.43.1
sudo route del -net 172.17.0.0/23 gw 192.168.43.1