- 组件化开发思想
- 组件注册
- Vue调试工具用法
- 组件间数据交互
- 组件插槽
- 基于组件的案例
1. 组件化开发思想
- 标准:这些组件要想组合到一块,肯定要有统一的标准
- 分治:将不同的功能封装到不同的组件中,这样的话每个组件都可以进行独立的生产
- 重用:如果一个项目中某些组件已经不能使用了,这时只需要换一个组件即可
- 组合:组件之间的组合可以形成一个独立的产品
① 编程中的组件化思想体现
组件化开发的核心思想其实就是把不同的功能封装到不同的组件中,然后组件可以通过组合的方式形成一个完整的应用。
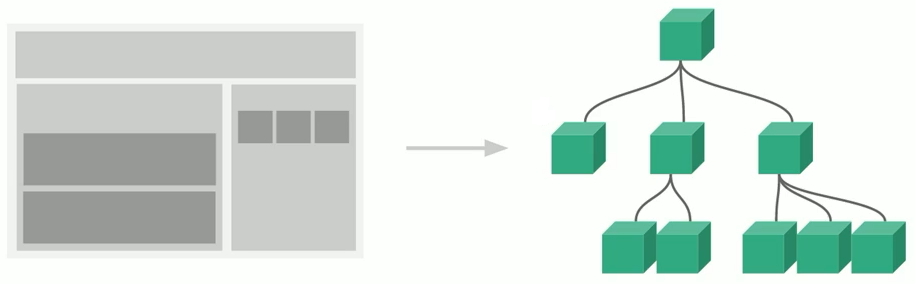
上图中每一块都可以看作是一个独立的组件,组件与组件之间是有一定的关系的,比如兄弟关系、父子关系
② 组件化规范: Web Components
- 我们希望尽可能多的重用代码
- 自定义组件的方式不太容易(html、 css和js)
- 多次使用组件可能导致冲突
Web Components 通过创建封装好功能的定制元素(自定义元素)解决上述问题。Vue部分实现了上述规范。
官网:https://developer.mozilla.org/zh-CN/docs/Web/Web_Components
2. 组件注册
① 全局组件注册语法
Vue.component(组件名称, {
    data: 组件数据,
    template: 组件模板内容
})
例如:
// 注册一个名为 button-counter 的新组件
Vue.component('button-counter', {
    data: function () {
        return {
            count: 0
        }
    },
    // template: '<button v-on:click="count++">点击了{{ count }}次.</button>'
    template: '<button @click="handle">点击了{{ count }}次.</button>',
    methods: {
        handle: function() {
            this.count += 2;
        }
    }
})
② 组件用法
<div id="app">
    <button-counter></button-counter>
</div>
<div id="app">
    <button-counter></button-counter>
    <button-counter></button-counter>
    <button-counter></button-counter>
</div>

注意:每个组件都是独立的,所以每一个button里面的数据都是独立的,相互不影响。
③ 组件注册注意事项
1)data必须是一个函数:data使用函数的话,会形成一个闭包的环境,这样会保证每一个组件都是拥有一份独立的数据。
注意:注册组件中的data是一个函数,但是注册普通的vue对象里面的data只是一个对象
/* 注册组件 */
Vue.component('test', {
    data: function() {
        return {
            count1: 0
        }
    }
})
/* 注册普通的vue对象 */
var vm = new Vue({
    el: '#app',
    data: {
        count2: 0
    }
})
2)组件模板内容必须是单个根元素:template里面必须要有一个根元素,如果是只有兄弟元素则会报错。
/* 没有根元素,只有兄弟节点会报错,最外层必须要包裹一个父元素 */
template: `
    <button>测试1</button>
    <button>测试2</button>
`
3)组件模板内容可以是模板字符串:模板字符串需要浏览器提供支持(ES6语法)
注意:模板字符串是使用反引号包裹,可以提高代码的可读性。
4)组件命名方式
- 短横线方式
Vue.component('my-component', { /* ... */ })
- 驼峰方式
Vue.component('MyComponent', { /* ... */ })
注意:如果使用驼峰式命名组件,那么在使用组件的时候,只能在字符串模板中使用驼峰的方式使用组件,但是在普通的标签模板中,必须使用短横线的方式使用组件。
/* 使用驼峰式命名法创建了一个HelloWorld组件 */
Vue.component('HelloWorld', {
    // 相应的逻辑代码
});

/* 在其他的组件的字符串模板中使用HelloWorld组件 */
Vue.component('test', {
    // 相应的逻辑代码
    // 在该test组件中使用HelloWorld组件
    template: `
        <HelloWorld></HelloWorld>
    `
});
<!-- 在普通的标签中使用HelloWorld组件,必须使用短横线的方式 -->
<div id="app">
    <hello-world></hello-world>
</div>
注意:上面的注册方式都是全局组件,在哪里都可以使用:普通的标签模板中或者是其他的组件的字符串模板中
④ 局部组件注册
var ComponentA = { /* ... */ }
var ComponentB = { /* ... */ }
var ComponentC = { /* ... */ }
new Vue({
    el: '#app'
    components: {
        'component-a': ComponentA,
        'component-b': ComponentB,
        'component-c': ComponentC,
    }
})
注意:局部注册的组件只能在注册它的父组件中使用,全局注册的组件不能使用局部组件
3. Vue调试工具用法
安装vue扩展程序:https://www.cnblogs.com/aisowe/p/11580623.html
如果安装出错的话试一下另一种方法:https://blog.csdn.net/yizufengdou/article/details/103985709
4. 组件间数据交互
① 父组件向子组件传值
1)组件内部通过props接收传递过来的值
Vue.component('menu-item', {
    props: ['title'],
    template: '<div>{{ title }}</div>'
})
2)父组件通过属性将值传递给子组件
<!-- 静态绑定title属性 -->
<menu-item title="来自父组件的数据"></menu-item>
<!-- 动态绑定title属性 -->
<menu-item :title="title"></menu-item>
例如下面这段完整的代码:
<div id="app">
    <div>{{pmsg}}</div>
    <menu-item title='来自父组件的值'></menu-item>
    <menu-item :title='ptitle' content='hello'></menu-item>
</div>
<script type="text/javascript" src="js/vue.js"></script>
<script type="text/javascript">
    /*
      父组件向子组件传值-基本使用
    */
    Vue.component('menu-item', {
      props: ['title', 'content'],
      data: function() {
        return {
          msg: '子组件本身的数据'
        }
      },
      template: '<div>{{msg + "----" + title + "-----" + content}}</div>'
    });
    var vm = new Vue({
      el: '#app',
      data: {
        pmsg: '父组件中内容',
        ptitle: '动态绑定属性'
      }
    });
</script>
3)props属性名规则
- 在props中使用驼峰形式,模板中需要使用短横线的形式。原因是DOM中的元素是不区分大小写的
- 字符串形式的模板中没有这个限制。 在字符串形式的模板和props属性中,我们可以使用驼峰的形式来命名,在组件的内部也使用驼峰的形式来接收。但是不能在普通的标签中不能使用驼峰式,必须使用短横线的方式。
Vue.component('menu-item', {
    // 在 JavaScript 中是驼峰式的
    props: ['menuTitle'],
    template: '<div>{{ menuTitle }}</div>'
})
<!-- 在html中是短横线方式的 -->
<menu-item menu-title="nihao"></menu-item>
4)props属性值类型
- 字符串 String
- 数值 Number
- 布尔值 Boolean
- 数组 Array
- 对象 Object
注意:数值类型和布尔类型必须要用v-bind绑定,否则是字符串类型
<menu-item :pnum='12' :pboo='true'></menu-item>
props传递数据原则:单向数据流。即只允许父组件向子组件传递数据,而不允许子组件直接操作props中的数据。虽然并没有禁止子组件操作父组件传递过来的数据,但是不推荐这样做。
例如下面这段代码:子组件接收父组件传递过来的parr属性后,点击按钮后页面中可以添加相应的数据,但是不推荐子组件直接操作父组件传递过来的数据。
Vue.component('menu-item', {
    props: ['parr'],
    template: `
        <div>
            <ul>
                <li :key='index' v-for='(item, index) in parr'>{{item}}</li>
                <button @click='parr.push("lemon")'>点击</button>
            </ul>
        </div>
    `
});
var vm = new Vue({
    el: '#app',
    data: {
        pmsg: '父组件中的内容'
        parr: ['apple', 'orange', 'banana']
    }
})
那如何解决呢?只能是子组件传值给父组件,然后让父组件做相应的操作。
② 子组件向父组件传值
1)子组件通过自定义事件向父组件传递信息
注意:$emit这个方法名是固定的,并且需要携带一个参数,参数名称就是自定义事件
<button v-on:click='$emit("enlarge-text") '>扩大字体</button>
2)父组件监听子组件的事件
<menu-item v-on:enlarge-text='fontSize += 0.1'></menu-item>
例如下面这段代码:
<div id="app">
    <menu-item @enlarge-text='handle'></menu-item>
</div>
<script type="text/javascript" src="js/vue.js"></script>
<script type="text/javascript">
    /*
      子组件向父组件传值-基本用法
      props传递数据原则:单向数据流
    */
    Vue.component('menu-item', {
      template: `
        <button @click='$emit("enlarge-text")'>扩大父组件中字体大小</button>
      `
    });
    var vm = new Vue({
      el: '#app',
      data: {
        fontSize: 10
      },
      methods: {
        handle: function(){
          // 扩大字体大小
          this.fontSize += 5;
        }
      }
    });
</script>
3)子组件通过自定义事件向父组件传递信息
<button v-on:click='$emit("enlarge-text", 0.1) '>扩大字体</button>
4)父组件监听子组件的事件
注意:$event是固定的,表示真实传递过来的值
<menu-item v-on:enlarge-text='fontSize += $event'></menu-item>
例如下面这段代码(携带参数):
<div id="app">
    <menu-item @enlarge-text='handle($event)'></menu-item>
</div>
<script type="text/javascript" src="js/vue.js"></script>
<script type="text/javascript">
    /*
      子组件向父组件传值-基本用法
      props传递数据原则:单向数据流
    */
    Vue.component('menu-item', {
      template: `
        <button @click='$emit("enlarge-text", 10)'>扩大父组件中字体大小</button>
      `
    });
    var vm = new Vue({
      el: '#app',
      data: {
        fontSize: 10
      },
      methods: {
        handle: function(val){
          // 扩大字体大小
          this.fontSize += val;
        }
      }
    });
</script>
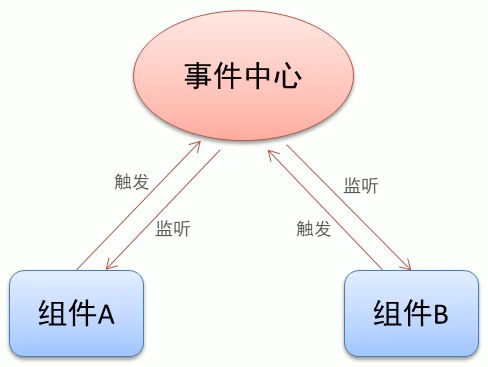
③ 兄弟之间传值(非父子组件间传值 ):
兄弟之间传值不能直接通信,需要一个事件中心做中转
1)单独的事件中心管理组件间的通信
var eventHub = new Vue()
2)监听事件与销毁事件
/* 监听事件 */
eventHub.$on('add-todo', addTodo)
/* 销毁事件 */
eventHub.$off('add-todo')
3)触发事件
eventHub.$emit('add-todo', id)
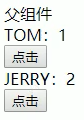
例如下面这段代码所实现的功能:点击TOM的按钮,JERRY会加2;点击JERRY的按钮,TOM会加1
<div id="app">
    <div>父组件</div>
    <div>
      <button @click='handle'>销毁事件</button>
    </div>
    <test-tom></test-tom>
    <test-jerry></test-jerry>
</div>
<script type="text/javascript" src="js/vue.js"></script>
<script type="text/javascript">
    /*
      兄弟组件之间数据传递
    */
    // 提供事件中心
    var hub = new Vue();

    Vue.component('test-tom', {
      data: function(){
        return {
          num: 0
        }
      },
      template: `
        <div>
          <div>TOM:{{num}}</div>
          <div>
            <button @click='handle'>点击</button>
          </div>
        </div>
      `,
      methods: {
        handle: function(){
      // 触发Jerry-event事件
          hub.$emit('jerry-event', 2);
        }
      },
      mounted: function() {
        // 监听事件
        hub.$on('tom-event', (val) => {
          this.num += val;
        });
      }
    });
    Vue.component('test-jerry', {
      data: function(){
        return {
          num: 0
        }
      },
      template: `
        <div>
          <div>JERRY:{{num}}</div>
          <div>
            <button @click='handle'>点击</button>
          </div>
        </div>
      `,
      methods: {
        handle: function(){
          // 触发兄弟组件的事件
          hub.$emit('tom-event', 1);
        }
      },
      mounted: function() {
        // 监听事件
        hub.$on('jerry-event', (val) => {
          this.num += val;
        });
      }
    });
    var vm = new Vue({
      el: '#app',
      data: {

      },
      methods: {
        handle: function(){
          hub.$off('tom-event');
          hub.$off('jerry-event');
        }
      }
    });
</script>
5. 组件插槽
注意:组件插槽传递的内容指的是模板的内容,前面分析的是数据data的交互
① 组件插槽的作用:父组件向子组件传递内容

② 组件插槽基本用法
1)插槽位置
注意:slot名字是固定写法
Vue.component('alert-box', {
    template: `
        <div class="demo-alert-box">
            <strong>Error:</strong>
            <slot></slot>
        </div>
`
})
2)插槽内容
<alert-box>Something bad happened.</alert-box>

插槽的内容是从组件标签的中间传递过来的。
<slot>默认内容</slot>
注意:如果组件标签中没有传递内容,那么slot中的内容会被默认显示,如果传递内容了,则会覆盖slot中的内容。
③ 具名插槽用法
1)插槽定义
<div class="container">
    <header>
        <slot name="header"></slot>
    </header>
    <main>
        <slot></slot>
    </main>
    <footer>
        <slot name="footer"></slot>
    </footer>
</div>
2)插槽内容:根据名称来匹配,没有名称的匹配给默认的插槽。
第一种用法:
<base-layout>
    <h1 slot="header">标题内容</h1>
    <p>主要内容1</p>
    <p>主要内容2</p>
    <p slot="footer">底部内容</p>
</base-layout>
第二种用法:
<base-layout>
    <template slot="header">
        <h1>标题内容1</h1>
        <h1>标题内容2</h1>
    </template>
    <p>主要内容1</p>
    <p>主要内容2</p>
    <template slot="footer">
        <p>底部内容1</p>
        <p>底部内容2</p>
    </template>
</base-layout>
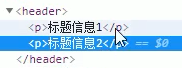
可以看到header中有两个p标签,但是并没有包含template标签。
template标签的作用只是临时性的包裹中间的内容,它最终并不会渲染到页面上。template名称是固定的,用于包裹多个标签。
应用场景是:将多条文本填充到一个插槽中。如果是把插槽名称标注到标签上的话,则只能标注一个标签。
④ 作用域插槽
应用场景:父组件对子组件的内容进行加工处理
1)插槽定义
<ul>
    <li v-for= "item in list" v-bind:key= "item.id" >
        <slot v-bind:item="item">
            {{item.name}}
        </slot>
    </li>
</ul>
2)插槽内容
在父组件中可以获取到子组件的数据,并且对这个数据进行一些加工和处理。获取数据的方式就是通过slot-scope这个属性获取,获取到的值就是在子组件中的slot属性中绑定的。注意,slotProps这个名字是自定义的。
<fruit-list v-bind:list= "list">
    <template slot-scope="slotProps">
        <strong v-if="slotProps.item.current">
        {{ slotProps.item.text }}
        </strong>
    </template>
</fruit-list>
例如下面这段完整的代码:给id为3的小li加上current样式。在字符串模板中通过info属性将内容传递过去,然后通过slot-scope接收。
<div id="app">
    <fruit-list :list='list'>
      <template slot-scope='slotProps'>
        <strong v-if='slotProps.info.id==3' class="current">{{slotProps.info.name}}</strong>
        <span v-else>{{slotProps.info.name}}</span>
      </template>
    </fruit-list>
</div>
<script type="text/javascript" src="js/vue.js"></script>
<script type="text/javascript">
    /*
      作用域插槽
    */
    Vue.component('fruit-list', {
      props: ['list'],
      template: `
        <div>
          <li :key='item.id' v-for='item in list'>
            <!-- slot里面的默认内容是{{item.name}},如果组件标签中没有传递值,则默认显示的就是该内容 -->
            <slot :info='item'>{{item.name}}</slot>
          </li>
        </div>
      `
    });
    var vm = new Vue({
      el: '#app',
      data: {
        list: [{
          id: 1,
          name: 'apple'
        },{
          id: 2,
          name: 'orange'
        },{
          id: 3,
          name: 'banana'
        }]
      }
    });
</script>
6. 基于组件的案例