今天在运行okexchaind命令的时候又遇到zsh: command not found: 的问题:
(先用 chsh -s /bin/bash 和 chsh -s /bin/sh 方法不管用)
解决方法:把 bash shell 中.bash_profile 全部环境变量加入zsh shell里就好
第一步,在终端执行
open ~/.zshrc
第二步,找到 "# User configuration",在其下面添加下面内容
source ~/.bash_profile
如果没有'# User configuration',就直接把上面内容添加到 ~/.zshrc 里面
第三步,在终端里执行
source ~/.zshrc
10.24
9月份的时候安装了iterm2,但没有安装命令提示。今天再加上:
Oh My Zsh安装
curl方式
curl -L https://raw.github.com/robbyrussell/oh-my-zsh/master/tools/install.sh | sh
wget方式
wget https://raw.github.com/robbyrussell/oh-my-zsh/master/tools/install.sh -O - | sh
安装完之后,关闭当前终端,并重新打开一个,oh my zsh的默认主题是robbyrussell
source .zshrc的时候报错:
-bash: ~/.oh-my-zsh/tools/check_for_upgrade.sh: line 31: syntax error near unexpected token `)'
-bash: ~/.oh-my-zsh/tools/check_for_upgrade.sh: line 31: `() {'
-bash: autoload: command not found
-bash: ~/.oh-my-zsh/oh-my-zsh.sh: line 39: syntax error near unexpected token `('
-bash: ~/.oh-my-zsh/oh-my-zsh.sh: line 39: `for plugin ($plugins); do'
查看当前已安装shells:
cat /etc/shells
mac os 系统默认的终端为bash,切换该终端为zsh,可以用以下命令
chsh -s /bin/zsh【重要:生效后打开新窗口】
更改zsh配置文件:
vim ~/.zshrc
更改完配置记得运行:
source ~/.zshrc
【重要:再改回去】
还原默认shell:
chsh -s /bin/bash
如果是item2 + oh-my-zsh + agnoster主题组合,cd到 ~/.oh-my-zsh/themes/然后 vim agnoster.zsh-theme,找到如下代码
# Context: user@hostname (who am I and where am I)
prompt_context() {
  if [[ "$USER" != "$DEFAULT_USER" || -n "$SSH_CLIENT" ]]; then
   # 修改如下代码,标灰色的地方可以自定义
   # prompt_segment black default "%(!.%{%F{yellow}%}.)$USER@%m"
   prompt_segment black default "%(!.%{%F{yellow}%}.)$USER@Mac"
  fi
}
修改打开终端的默认shell
- 打开VSCode的设置(Preferences>User Settings)
- 搜索terminal.integrated.shell.osx 的 并把它的值改 为 你的zsh 安装路径
安装PowerFonts
安装字体库需要首先将项目git clone至本地,然后执行源码中的install.sh。
在你习惯的位置新建一个文件夹,如:~/Desktop/OpenSource/
# git clone

git clone https://github.com/powerline/fonts.git --depth=1

# cd to folder

cd fonts

# run install shell

./install.sh安装配色方案
配色方案在使用VIM或Colorful Log时会变得非常有用,同时界面也不会一片黑绿一样死板。
同样使用git clone的方式下载源码进行安装:
cd ~/Desktop/OpenSource

git clone https://github.com/altercation/solarized

cd solarized/iterm2-colors-solarized/

open .
在打开的finder窗口中,双击Solarized Dark.itermcolors和Solarized Light.itermcolors即可安装明暗两种配色:
再次进入iTerm2 -> Preferences -> Profiles -> Colors -> Color Presets中根据个人喜好选择这两种配色中的一种即可:
Solarized Dark
Solarized Light安装主题
下载agnoster主题,执行脚本安装:
cd ~/Desktop/OpenSource

git clone https://github.com/fcamblor/oh-my-zsh-agnoster-fcamblor.git

cd oh-my-zsh-agnoster-fcamblor/

./install
安装高亮插件
这是oh my zsh的一个插件,安装方式与theme大同小异:
cd ~/.oh-my-zsh/custom/plugins/

git clone https://github.com/zsh-users/zsh-syntax-highlighting.git

vi ~/.zshrc
这时我们再次打开zshrc文件进行编辑。找到plugins,此时plugins中应该已经有了git,我们需要把高亮插件也加上:
请务必保证插件顺序,zsh-syntax-highlighting必须在最后一个。
然后在文件的最后一行添加:source ~/.oh-my-zsh/custom/plugins/zsh-syntax-highlighting/zsh-syntax-highlighting.zsh
按一下esc调出vi命令,输入:wq保存并退出vi模式。
执行命令使刚才的修改生效:
source ~/.zshrc
至此大功告成,请看最终效果图:
背景图片取自微软Surface Studio的4K壁纸(将近12MB大小),非常漂亮,需要的可以自取:
https://pan.baidu.com/s/1LKd4ghGyyNI6UwHhOHvfaA
提取码: snrd
更换背景图片方式:iTerm2 -> Preferences -> Profiles -> Window -> BackGround Image勾选图片即可。
可选择、命令补全
跟代码高亮的安装方式一样,这也是一个zsh的插件,叫做zsh-autosuggestion,用于命令建议和补全。
cd ~/.oh-my-zsh/custom/plugins/

git clone https://github.com/zsh-users/zsh-autosuggestions

vi ~/.zshrc
找到plugins,加上这个插件即可:
插件效果:
有同学说补全命令的字体不太清晰,与背景颜色太过相近,其实可以自己调整一下字体颜色。
Preferences -> Profiles -> Colors 中有Foreground是标准字体颜色,ANSI Colors中Bright的第一个是补全的字体颜色。
2020-09
1,下载
到官网
2,安装
解压zip,打开
3,配置
接下来就设置iterm2支持ssh不要输入密码登录
第一步: 创建shell命令文件,具体的路径自己放置,示例:/Users/yuml/bin/iterm2login.sh
#!/usr/bin/expect

set timeout 30
spawn ssh -p [lindex $argv 0] [lindex $argv 1]@[lindex $argv 2]
expect {
        "(yes/no)?"
        {send "yes
";exp_continue}
        "password:"
        {send "[lindex $argv 3]
"}
}
interact
shell文件是expect语言脚本,可以自动和网络交互,基本原理就是解析ssh的命令文本返回,根据文本内容匹配,执行对应的操作,send就是模拟人工输入。
可以丢到任意一个文件夹下面,其中[lindex $argv 0], [lindex $argv 1], [lindex $argv 2], [lindex $argv 3] 分别代表着端口号/用户名/服务器地址/ 密码4个参数。
有时候不需要指定端口,就可以在脚本中删除-p [lindex $argv 0],同时记得改后面argv的索引(argv1 => argv0)
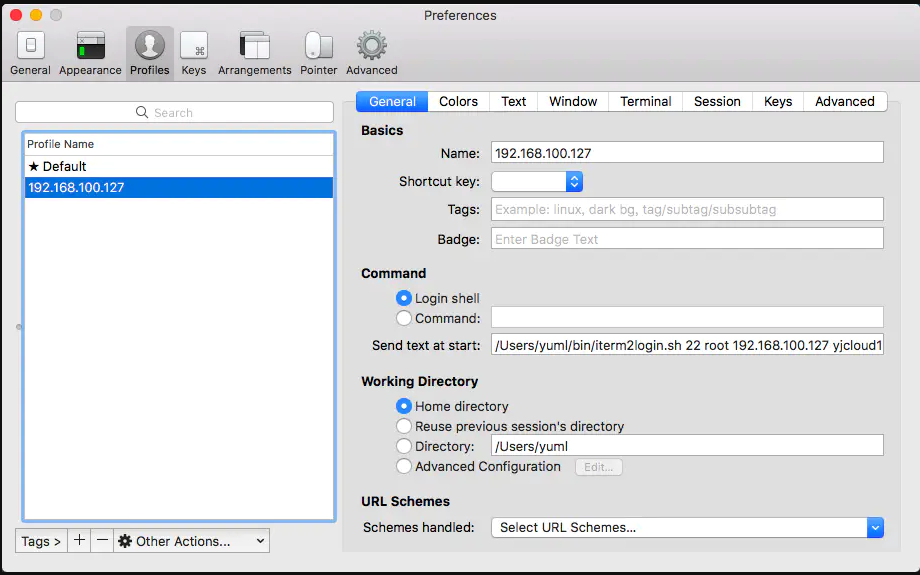
第二步: 设置iterm2,在profiles中建立一个新profile,配置如192.168.100.127中描述填写。
profile设置
Name: 填写便于记忆的名称
Login shell -> Send text at start: /Users/yuml/bin/iterm2login.sh 22 root 192.168.100.127 password
操作流程
- 将这个文件 item2login.sh 复制到 /usr/local/bin (任意路径)就可以了。 然后在iTerm2里面配置。
- 打开ITerm2的Profiles菜单并添加新的profile
- 在Command栏下的”Send text at start“处填入:item2login.sh 22 chenyuan 192.168.230.133 chenyuan
第三步: 运行profile, 在iterm2的顶部工具栏有一栏Profiles,就可以看到对应的profle,双击就可以了。