一. 创建镜像
1. 手工方式进行镜像创建
(1)和创建的镜像进行交互
[root@c720120 ~]# docker container run -it --name sample alpine /bin/sh
/ #
(2)安装我们需要安装的东西,本实例是安装Ping工具。
[root@c720120 ~]# docker container run -it --name sample alpine /bin/sh
/ #
(3)验证ping工具是否安装Ok.
/ # ping 127.0.0.1
PING 127.0.0.1 (127.0.0.1) 56(84) bytes of data.
64 bytes from 127.0.0.1: icmp_seq=1 ttl=64 time=0.130 ms
64 bytes from 127.0.0.1: icmp_seq=2 ttl=64 time=0.055 ms
(4)退出容器,并查看刚才创建的容器
[root@c720120 ~]# docker container ls -a | grep sample
92b45e3a16bb alpine "/bin/sh" 2 minutes ago Exited (0) 7 seconds ago sample
(5)查看容器更改前和更改后的具体信息
[root@c720120 ~]# docker container diff sample
C /bin
A /bin/ping
A /bin/ping6
A /bin/traceroute6
C /etc
C /etc/apk
C /etc/apk/world
C /lib
C /lib/apk/db
C /lib/apk/db/installed
C /lib/apk/db/lock
C /lib/apk/db/scripts.tar
C /lib/apk/db/triggers
C /root
A /root/.ash_history
C /usr
C /usr/lib
A /usr/lib/libcap.so.2
A /usr/lib/libcap.so.2.25
C /usr/sbin
A /usr/sbin/arping
A /usr/sbin/capsh
A /usr/sbin/clockdiff
A /usr/sbin/getcap
A /usr/sbin/getpcaps
A /usr/sbin/ipg
A /usr/sbin/rarpd
A /usr/sbin/rdisc
A /usr/sbin/setcap
A /usr/sbin/tftpd
A /usr/sbin/tracepath
A /usr/sbin/tracepath6
C /var
C /var/cache/apk
A /var/cache/apk/APKINDEX.5022a8a2.tar.gz
A /var/cache/apk/APKINDEX.70c88391.tar.gz
C /var/cache/misc
注解:A 代表added, C代表 changed, D代表Delete
(6)提交镜像,意味着保存我们创建的镜像改变
[root@c720120 ~]# docker container commit sample my-alpine
sha256:dd2e0b200d6d27f7fa2478fbc5d437b19adb61e1a2b4e9570fa1b8280ced5753
(7)再一次的查看创建的镜像信息
[root@c720120 ~]# docker image ls
REPOSITORY TAG IMAGE ID CREATED SIZE
my-alpine latest dd2e0b200d6d 41 seconds ago 5.65MB
(8)查看镜像的历史信息
[root@c720120 ~]# docker image history my-alpine
IMAGE CREATED CREATED BY SIZE COMMENT
dd2e0b200d6d About a minute ago /bin/sh 1.5MB
3fd9065eaf02 4 months ago /bin/sh -c #(nop) CMD ["/bin/sh"] 0B
<missing> 4 months ago /bin/sh -c #(nop) ADD file:093f0723fa46f6cdb… 4.15MB
2. 创建镜像,此次使用Dockerfiles的方式进行创建
(1)编辑Dockerfile文件
[root@c720120 docker]# vim Dockerfile
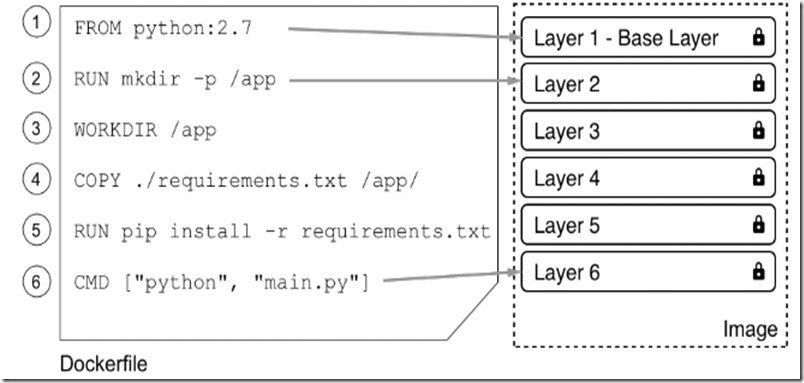
FROM python:2.7
RUN mkdir -p /app
WORKDIR /app
COPY ./requirements.txt /app/
RUN pip install -r requirements.txt
CMD ["python", "main.py"]
上面命令详解信息如下:
(2)使用Dockerfile文件,构建容器镜像
[root@c720120 docker]# docker image build -t pinger .
(3)运行容器执行Ping,可以看到使用Dockerfile构建容器,实现了用手工构建容器的同样效果,加快了速度 。
[root@c720120 docker]# docker container run --rm -it pinger
PING 8.8.8.8 (8.8.8.8): 56 data bytes
64 bytes from 8.8.8.8: seq=0 ttl=37 time=19.298 ms
64 bytes from 8.8.8.8: seq=1 ttl=37 time=27.890 ms
64 bytes from 8.8.8.8: seq=2 ttl=37 time=30.702 ms
(4) 如果我们想要覆盖在Dockerfile中定义的ENTRYPOINT的话,可以使用—entrypoint参数
[root@c720120 docker]# docker container run --rm -it --entrypoint /bin/sh pinger
3. 构建镜像案例1:
(1)创建文件夹,并切换到该文件夹下面
[root@c720120 ~]# mkdir ~/FundamentalsOfDocker
[root@c720120 ~]# cd ~/FundamentalsOfDocker/
[root@c720120 FundamentalsOfDocker]#
(2)创建子文件夹,并切换到该文件夹下面
[root@c720120 FundamentalsOfDocker]# mkdir sample1 && cd sample1
(3)编写Dockerfile文件
[root@c720120 sample1]# vim Dockerfile
FROM centos:7
RUN yum install -y wget
(4)构建镜像
[root@c720120 sample1]# docker image build -t my-centos .
或者执行以下命令,有相同的效果
[root@c720120 sample1]# docker image build -t my-centos –f Dockerfile .
4. 构建镜像案例2 (多个步骤的构建)
(1)编辑hello.c文件
[root@c720120 sample1]# vim hello.c
#include <stdio.h>
int main (void)
{
printf ("Hello, world! ");
return 0;
}
~
(2)编辑Dockerfile文件
[root@c720120 sample1]# vim Dockerfile
FROM alpine:3.7
RUN apk update && apk add --update alpine-sdk
RUN mkdir /app
WORKDIR /app
COPY . /app
RUN mkdir bin
RUN gcc -Wall hello.c -o bin/hello
CMD /app/bin/hello
(3)进行镜像的构建
[root@c720120 sample1]# docker image build -t hello-world .
5. 保存和加载镜像
第三种创建镜像的方式就是导入或者加载,具体请看下如下示例:
(1)导出镜像文件
[root@c720120 sample1]# docker image save -o ./backup/my-alpine.tar my-alpine
(2)加载镜像文件4
[root@c720120 sample1]# docker image load -i ./backup/my-alpine.tar
二. 共享和装载镜像
1. 镜像打标签
(1)拉取镜像叫做alpine
[root@c720120 ~]# docker image pull alpine
注意:默认拉取的镜像为alpine:latest
(2)拉取镜像alpine 标签为3.5的镜像
[root@c720120 ~]# docker image pull alpine:3.5
2. 镜像的命名空间,也叫做命名方式
(1)命名格式如下:
<registry URL>/<User or Org>/<name>:<tag>
(2)案例如下:
下面几个案例进行详细说明:
| Image | Description |
| alpine | Official alpine image on Docker Hub with the latest tag. |
| ubuntu:16.04 | Official ubuntu image on Docker Hub with the 16.04 tag or version |
| microsoft/nanoserver | nanoserver image of Microsoft on Docker Hub with the latest tag |
| acme/web-api:12.0 | web-api image version 12.0 accociated with the acme org. The image is on Docker Hub. |
| gcr.io/gnschenker/sample-app:1.1 | sample-app image with the 1.1 tag belonging to an individual with the gnschenker ID on Google’s container registry |
3. 推送镜像到registry.
(1) 对镜像进行命名:如
[root@c720120 ~]# docker image tag alpine:latest gnschenker/alpine:1.0
(2)在推送镜像之前 ,还需要进行登陆,认证
[root@c720120 ~]# docker login -u gnschenker -p <my secret password>
(3)认证成功后,进行镜像推送
[root@c720120 ~]# docker image push gnschenker/alpine:1.0
The push refers to repository [docker.io/gnschenker/alpine]
04a094fe844e: Mounted from library/alpine
1.0: digest: sha256:5cb04fce... size: 528
