在将 Windows 虚拟机 (VM) 从本地上传到 Azure 之前,必须准备好虚拟硬盘(VHD 或 VHDX)。 Azure 仅支持采用 VHD 文件格式且具有固定大小磁盘的第 1 代 VM。 VHD 允许的最大大小为 1,023 GB。 可以将第 1 代 VM 从 VHDX 文件系统转换成 VHD 文件系统,以及从动态扩展磁盘转换成固定大小磁盘, 但无法更改 VM 的代次。 有关详细信息,请参阅 Should I create a generation 1 or 2 VM in Hyper-V?(应该在 Hyper-V 中创建第 1 代还是第 2 代 VM?)。
有关 Azure VM 的支持策略的详细信息,请参阅 Microsoft 服务器软件支持 Azure VM。
Note
本文中的说明适用于 64 位版本的 Windows Server 2008 R2 以及更高版本的 Windows Server 操作系统。 若要了解如何在 Azure 中运行 32 位版本的操作系统,请参阅 Azure 虚拟机支持 32 位操作系统。
将虚拟磁盘转换为 VHD 和固定大小磁盘
如果要将虚拟磁盘转换为 Azure 所需的格式,请使用本部分所述的某种方法。 运行虚拟磁盘转换过程之前先备份 VM,并确保 Windows VHD 在本地服务器上正常运行。 尝试转换磁盘或将其上传到 Azure 之前,先解决 VM 本身内部的所有错误。
转换磁盘后,创建一个使用转换磁盘的 VM。 启动并登录到 VM,准备好 VM 进行上传。
使用 Hyper-V 管理器转换磁盘
- 打开 Hyper-V 管理器,在左侧选择本地计算机。 在计算机列表上方的菜单中,单击“操作” > “编辑磁盘”。
- 在“查找虚拟硬盘”屏幕上,找到并选择虚拟磁盘。
- 在“选择操作”屏幕上选择“转换”,然后选择“下一步”。
- 如果需要从 VHDX 进行转换,请选择“VHD”,然后单击“下一步”
- 如果需要从动态扩展磁盘进行转换,请选择“固定大小”,然后单击“下一步”
- 找到并选择新 VHD 文件的保存路径。
- 单击“完成” 。
Note
本文中的命令必须在提升权限的 PowerShell 会话中运行。
使用 PowerShell 转换磁盘
可以使用 Windows PowerShell 中的 Convert-VHD 命令转换虚拟磁盘。 启动 PowerShell 时选择“以管理员身份运行” 。
以下示例命令从 VHDX 转换为 VHD,从动态扩展磁盘转换为固定大小磁盘:
Convert-VHD -Path c: estMY-VM.vhdx -DestinationPath c: estMY-NEW-VM.vhd -VHDType Fixed
在此命令中,将“-Path”的值替换为要转换的虚拟硬盘的路径,并将“-DestinationPath”的值替换为转换后磁盘的新路径和名称。
从 VMware VMDK 磁盘格式转换
如果有 VMDK 文件格式的 Windows VM 映像,可以使用 Microsoft VM 转换器将其转换为 VHD。 有关详细信息,请参阅博客文章 How to Convert a VMware VMDK to Hyper-V VHD(如何将 VMware VMDK 转换为 Hyper-V VHD)。
设置 Azure 的 Windows 配置
在计划要上传到 Azure 的 VM 上,通过提升权限的命令提示符窗口运行以下步骤中的所有命令:
-
删除路由表中的所有静态持久性路由:
- 若要查看路由表,请在命令提示符处运行
route print。 - 请查看 持久性路由 部分。 如果有持久性路由,请使用 route delete 将它删除。
- 若要查看路由表,请在命令提示符处运行
-
删除 WinHTTP 代理:
PowerShellnetsh winhttp reset proxy -
将磁盘 SAN 策略设置为 Onlineall。
PowerShelldiskpart在打开的命令提示符窗口中键入以下命令:
DISKPARTsan policy=onlineall exit -
为 Windows 设置协调世界时 (UTC) 时间,并将 Windows 时间 (w32time) 服务的启动类型设置为“自动”:
PowerShellSet-ItemProperty -Path 'HKLM:SYSTEMCurrentControlSetControlTimeZoneInformation' -name "RealTimeIsUniversal" 1 -Type DWord Set-Service -Name w32time -StartupType Auto -
将电源配置文件设置为“高性能”:
PowerShellpowercfg /setactive SCHEME_MIN
查看 Windows 服务
确保下面的每个 Windows 服务均设置为 Windows 默认值。 这些是必须设置的最低数目的服务,目的是确保 VM 的连接性。 若要重置启动设置,请运行以下命令:
Set-Service -Name bfe -StartupType Auto
Set-Service -Name dhcp -StartupType Auto
Set-Service -Name dnscache -StartupType Auto
Set-Service -Name IKEEXT -StartupType Auto
Set-Service -Name iphlpsvc -StartupType Auto
Set-Service -Name netlogon -StartupType Manual
Set-Service -Name netman -StartupType Manual
Set-Service -Name nsi -StartupType Auto
Set-Service -Name termService -StartupType Manual
Set-Service -Name MpsSvc -StartupType Auto
Set-Service -Name RemoteRegistry -StartupType Auto
更新远程桌面注册表设置
请确保为远程桌面连接正确配置以下设置:
Note
在这些步骤中运行 Set-ItemProperty -Path 'HKLM:SOFTWAREPoliciesMicrosoftWindows NTTerminal Services -name <对象名称><值>时,可能会收到错误消息。 可以放心地忽略该错误消息。 它的意思只是域未将该配置推送到组策略对象。
-
已启用远程桌面协议 (RDP):
PowerShellSet-ItemProperty -Path 'HKLM:SYSTEMCurrentControlSetControlTerminal Server' -name "fDenyTSConnections" -Value 0 -Type DWord Set-ItemProperty -Path 'HKLM:SOFTWAREPoliciesMicrosoftWindows NTTerminal Services' -name "fDenyTSConnections" -Value 0 -Type DWord -
已正确设置 RDP 端口(默认端口为 3389):
PowerShellSet-ItemProperty -Path 'HKLM:SYSTEMCurrentControlSetControlTerminal ServerWinstationsRDP-Tcp' -name "PortNumber" 3389 -Type DWord部署 VM 时,默认规则是针对端口 3389 创建的。 若要更改端口号,请在 VM 部署到 Azure 以后再进行。
-
侦听器在每个网络接口中侦听:
PowerShellSet-ItemProperty -Path 'HKLM:SYSTEMCurrentControlSetControlTerminal ServerWinstationsRDP-Tcp' -name "LanAdapter" 0 -Type DWord -
配置用于 RDP 连接的“网络级别身份验证”模式:
PowerShellSet-ItemProperty -Path 'HKLM:SYSTEMCurrentControlSetControlTerminal ServerWinStationsRDP-Tcp' -name "UserAuthentication" 1 -Type DWord Set-ItemProperty -Path 'HKLM:SYSTEMCurrentControlSetControlTerminal ServerWinStationsRDP-Tcp' -name "SecurityLayer" 1 -Type DWord Set-ItemProperty -Path 'HKLM:SYSTEMCurrentControlSetControlTerminal ServerWinStationsRDP-Tcp' -name "fAllowSecProtocolNegotiation" 1 -Type DWord -
设置 keep-alive 值:
PowerShellSet-ItemProperty -Path 'HKLM:SOFTWAREPoliciesMicrosoftWindows NTTerminal Services' -name "KeepAliveEnable" 1 -Type DWord Set-ItemProperty -Path 'HKLM:SOFTWAREPoliciesMicrosoftWindows NTTerminal Services' -name "KeepAliveInterval" 1 -Type DWord Set-ItemProperty -Path 'HKLM:SYSTEMCurrentControlSetControlTerminal ServerWinstationsRDP-Tcp' -name "KeepAliveTimeout" 1 -Type DWord -
重新连接:
PowerShellSet-ItemProperty -Path 'HKLM:SOFTWAREPoliciesMicrosoftWindows NTTerminal Services' -name "fDisableAutoReconnect" 0 -Type DWord Set-ItemProperty -Path 'HKLM:SYSTEMCurrentControlSetControlTerminal ServerWinstationsRDP-Tcp' -name "fInheritReconnectSame" 1 -Type DWord Set-ItemProperty -Path 'HKLM:SYSTEMCurrentControlSetControlTerminal ServerWinstationsRDP-Tcp' -name "fReconnectSame" 0 -Type DWord -
限制并发连接数:
PowerShellSet-ItemProperty -Path 'HKLM:SYSTEMCurrentControlSetControlTerminal ServerWinstationsRDP-Tcp' -name "MaxInstanceCount" 4294967295 -Type DWord -
如果有任何自签名证书绑定到 RDP 侦听器,请删除这些证书:
PowerShellRemove-ItemProperty -Path 'HKLM:SYSTEMCurrentControlSetControlTerminal ServerWinStationsRDP-Tcp' -name "SSLCertificateSHA1Hash"这是为了确保在部署 VM 时一开始就可以连接。 也可在 VM 部署到 Azure 以后,根据需要在后期进行查看。
-
如果 VM 会成为域的一部分,请检查以下所有设置,确保未还原以前的设置。 必须检查的策略如下:
-
RDP 已启用:
计算机配置策略Windows 设置管理模板组件远程桌面服务远程桌面会话主机连接:
允许用户使用远程桌面进行远程连接
-
NLA 组策略:
设置管理模板组件远程桌面服务远程桌面会话主机安全性:
需要用户身份验证才能使用网络级别身份验证进行远程连接
-
Keep Alive 设置:
计算机配置策略Windows 设置管理模板Windows 组件远程桌面服务远程桌面会话主机连接:
配置 keep-alive 连接时间间隔
-
重新连接设置:
计算机配置策略Windows 设置管理模板Windows 组件远程桌面服务远程桌面会话主机连接:
自动重新连接
-
“限制连接数”设置:
计算机配置策略Windows 设置管理模板Windows 组件远程桌面服务远程桌面会话主机连接:
限制连接数
-
配置 Windows 防火墙规则
-
在三个配置文件(“域”、“标准”和“公共”)上启用 Windows 防火墙:
PowerShellSet-ItemProperty -Path 'HKLM:SYSTEMCurrentControlSetservicesSharedAccessParametersFirewallPolicyDomainProfile' -name "EnableFirewall" -Value 1 -Type DWord Set-ItemProperty -Path 'HKLM:SYSTEMCurrentControlSetservicesSharedAccessParametersFirewallPolicyPublicProfile' -name "EnableFirewall" -Value 1 -Type DWord Set-ItemProperty -Path 'HKLM:SYSTEMCurrentControlSetservicesSharedAccessParametersFirewallPolicyStandardprofile' -name "EnableFirewall" -Value 1 -Type DWord -
在 PowerShell 中运行以下命令,允许 WinRM 通过三个防火墙配置文件(“域”、“专用”和“公共”)并启用 PowerShell 远程服务:
PowerShellEnable-PSRemoting -force netsh advfirewall firewall set rule dir=in name="Windows Remote Management (HTTP-In)" new enable=yes netsh advfirewall firewall set rule dir=in name="Windows Remote Management (HTTP-In)" new enable=yes -
启用以下防火墙规则,允许 RDP 流量
PowerShellnetsh advfirewall firewall set rule group="Remote Desktop" new enable=yes -
启用“文件和打印机共享”规则,使 VM 能够在虚拟网络中响应 ping 命令:
PowerShellnetsh advfirewall firewall set rule dir=in name="File and Printer Sharing (Echo Request - ICMPv4-In)" new enable=yes -
如果 VM 会成为域的一部分,请检查以下设置,确保未还原以前的设置。 必须检查的 AD 策略如下:
-
启用 Windows 防火墙配置文件
计算机配置策略Windows 设置管理模板网络网络连接Windows 防火墙域配置文件Windows 防火墙:保护所有网络连接
计算机配置策略Windows 设置管理模板网络网络连接Windows 防火墙标准配置文件Windows 防火墙:保护所有网络连接
-
启用 RDP
计算机配置策略Windows 设置管理模板网络网络连接Windows 防火墙域配置文件Windows 防火墙:允许入站远程桌面异常
计算机配置策略Windows 设置管理模板网络网络连接Windows 防火墙标准配置文件Windows 防火墙:允许入站远程桌面异常
-
启用 ICMP-V4
计算机配置策略Windows 设置管理模板网络网络连接Windows 防火墙域配置文件Windows 防火墙:允许 ICMP 异常
计算机配置策略Windows 设置管理模板网络网络连接Windows 防火墙标准配置文件Windows 防火墙:允许 ICMP 异常
-
验证确保 VM 运行正常、安全并可使用 RDP 访问
-
若要确保磁盘运行状况正常且一致,请在下次重启 VM 时运行磁盘检查操作:
PowerShellChkdsk /f确保报告显示磁盘干净且运行状况正常。
-
设置引导配置数据 (BCD) 设置。
Note
确保在提升权限的 CMD 窗口上运行这些命令,不要在 PowerShell 上运行:
CMDbcdedit /set {bootmgr} integrityservices enable bcdedit /set {default} device partition=C: bcdedit /set {default} integrityservices enable bcdedit /set {default} recoveryenabled Off bcdedit /set {default} osdevice partition=C: bcdedit /set {default} bootstatuspolicy IgnoreAllFailures -
验证 Windows Management Instrumentation 存储库是否一致。 为此,请运行以下命令:
PowerShellwinmgmt /verifyrepository如果存储库已损坏,请参阅 WMI: Repository Corruption, or Not(WMI:存储库是否损坏?)。
-
确保任何其他应用程序未使用端口 3389。 此端口用于 Azure 中的 RDP 服务。 可以通过运行 netstat -anob 来查看哪些端口在 VM 上处于使用状态:
PowerShellnetstat -anob -
如果要上传的 Windows VHD 是域控制器,则请执行以下步骤:
A. 请执行这些额外的步骤来准备磁盘。
B. 请确保知道 DSRM 密码,因为有时候必须在 DSRM 下启动 VM。 若要设置 DSRM 密码,可访问此链接。
-
请确保知道内置的管理员帐户和密码。 可能需要重置当前的本地管理员密码,确保可以使用此帐户通过 RDP 连接登录 Windows。 此访问权限由“允许通过远程桌面服务登录”组策略对象控制。 可在以下目录的本地组策略编辑器中查看该对象:
计算机配置Windows 设置安全设置本地策略用户权限分配
-
检查以下 AD 策略,确保不是通过 RDP 或从网络阻止 RDP 访问:
-
计算机配置Windows 设置安全设置本地策略用户权限分配拒绝从网络访问这台计算机
-
计算机配置Windows 设置安全设置本地策略用户权限分配拒绝通过远程桌面服务登录
-
-
重启 VM,确保 Windows 仍可正常运行,并可使用 RDP 连接来访问。 此时,可能需要在本地 Hyper-V 中创建一个 VM,确保该 VM 完全启动,然后测试是否可以通过 RDP 来访问它。
-
删除所有其他的传输驱动程序接口筛选器,例如分析 TCP 数据包或额外防火墙的软件。 也可在 VM 部署到 Azure 以后,根据需要在后期进行查看。
-
卸载与物理组件相关的任何其他第三方软件和驱动程序,或卸载任何其他虚拟化技术。
安装 Windows 更新
理想的配置是让计算机的修补程序级别处于最新。 如果这不可能,请确保安装以下更新:
| 最低文件版本 x64 | ||||||
|---|---|---|---|---|---|---|
| 组件 | 二进制 | Windows 7 和 Windows Server 2008 R2 | Windows 8 和 Windows Server 2012 | Windows 8.1 和 Windows Server 2012 R2 | Windows 10 和 Windows Server 2016 RS1 | Windows 10 RS2 |
| 存储 | disk.sys | 6.1.7601.23403 - KB3125574 | 6.2.9200.17638 / 6.2.9200.21757 - KB3137061 | 6.3.9600.18203 - KB3137061 | - | - |
| storport.sys | 6.1.7601.23403 - KB3125574 | 6.2.9200.17188 / 6.2.9200.21306 - KB3018489 | 6.3.9600.18573 - KB4022726 | 10.0.14393.1358 - KB4022715 | 10.0.15063.332 | |
| ntfs.sys | 6.1.7601.23403 - KB3125574 | 6.2.9200.17623 / 6.2.9200.21743 - KB3121255 | 6.3.9600.18654 - KB4022726 | 10.0.14393.1198 - KB4022715 | 10.0.15063.447 | |
| Iologmsg.dll | 6.1.7601.23403 - KB3125574 | 6.2.9200.16384 - KB2995387 | - | - | - | |
| Classpnp.sys | 6.1.7601.23403 - KB3125574 | 6.2.9200.17061 / 6.2.9200.21180 - KB2995387 | 6.3.9600.18334 - KB3172614 | 10.0.14393.953 - KB4022715 | - | |
| Volsnap.sys | 6.1.7601.23403 - KB3125574 | 6.2.9200.17047 / 6.2.9200.21165 - KB2975331 | 6.3.9600.18265 - KB3145384 | - | 10.0.15063.0 | |
| partmgr.sys | 6.1.7601.23403 - KB3125574 | 6.2.9200.16681 - KB2877114 | 6.3.9600.17401 - KB3000850 | 10.0.14393.953 - KB4022715 | 10.0.15063.0 | |
| volmgr.sys | 10.0.15063.0 | |||||
| Volmgrx.sys | 6.1.7601.23403 - KB3125574 | - | - | - | 10.0.15063.0 | |
| Msiscsi.sys | 6.1.7601.23403 - KB3125574 | 6.2.9200.21006 - KB2955163 | 6.3.9600.18624 - KB4022726 | 10.0.14393.1066 - KB4022715 | 10.0.15063.447 | |
| Msdsm.sys | 6.1.7601.23403 - KB3125574 | 6.2.9200.21474 - KB3046101 | 6.3.9600.18592 - KB4022726 | - | - | |
| Mpio.sys | 6.1.7601.23403 - KB3125574 | 6.2.9200.21190 - KB3046101 | 6.3.9600.18616 - KB4022726 | 10.0.14393.1198 - KB4022715 | - | |
| Fveapi.dll | 6.1.7601.23311 - KB3125574 | 6.2.9200.20930 - KB2930244 | 6.3.9600.18294 - KB3172614 | 10.0.14393.576 - KB4022715 | - | |
| Fveapibase.dll | 6.1.7601.23403 - KB3125574 | 6.2.9200.20930 - KB2930244 | 6.3.9600.17415 - KB3172614 | 10.0.14393.206 - KB4022715 | - | |
| 网络 | netvsc.sys | - | - | - | 10.0.14393.1198 - KB4022715 | 10.0.15063.250 - KB4020001 |
| mrxsmb10.sys | 6.1.7601.23816 - KB4022722 | 6.2.9200.22108 - KB4022724 | 6.3.9600.18603 - KB4022726 | 10.0.14393.479 - KB4022715 | 10.0.15063.483 | |
| mrxsmb20.sys | 6.1.7601.23816 - KB4022722 | 6.2.9200.21548 - KB4022724 | 6.3.9600.18586 - KB4022726 | 10.0.14393.953 - KB4022715 | 10.0.15063.483 | |
| mrxsmb.sys | 6.1.7601.23816 - KB4022722 | 6.2.9200.22074 - KB4022724 | 6.3.9600.18586 - KB4022726 | 10.0.14393.953 - KB4022715 | 10.0.15063.0 | |
| tcpip.sys | 6.1.7601.23761 - KB4022722 | 6.2.9200.22070 - KB4022724 | 6.3.9600.18478 - KB4022726 | 10.0.14393.1358 - KB4022715 | 10.0.15063.447 | |
| http.sys | 6.1.7601.23403 - KB3125574 | 6.2.9200.17285 - KB3042553 | 6.3.9600.18574 - KB4022726 | 10.0.14393.251 - KB4022715 | 10.0.15063.483 | |
| vmswitch.sys | 6.1.7601.23727 - KB4022719 | 6.2.9200.22117 - KB4022724 | 6.3.9600.18654 - KB4022726 | 10.0.14393.1358 - KB4022715 | 10.0.15063.138 | |
| 核心 | ntoskrnl.exe | 6.1.7601.23807 - KB4022719 | 6.2.9200.22170 - KB4022718 | 6.3.9600.18696 - KB4022726 | 10.0.14393.1358 - KB4022715 | 10.0.15063.483 |
| 远程桌面服务 | rdpcorets.dll | 6.2.9200.21506 - KB4022719 | 6.2.9200.22104 - KB4022724 | 6.3.9600.18619 - KB4022726 | 10.0.14393.1198 - KB4022715 | 10.0.15063.0 |
| termsrv.dll | 6.1.7601.23403 - KB3125574 | 6.2.9200.17048 - KB2973501 | 6.3.9600.17415 - KB3000850 | 10.0.14393.0 - KB4022715 | 10.0.15063.0 | |
| termdd.sys | 6.1.7601.23403 - KB3125574 | - | - | - | - | |
| win32k.sys | 6.1.7601.23807 - KB4022719 | 6.2.9200.22168 - KB4022718 | 6.3.9600.18698 - KB4022726 | 10.0.14393.594 - KB4022715 | - | |
| rdpdd.dll | 6.1.7601.23403 - KB3125574 | - | - | - | - | |
| rdpwd.sys | 6.1.7601.23403 - KB3125574 | - | - | - | - | |
| “安全” | 由于 WannaCrypt | KB4012212 | KB4012213 | KB4012213 | KB4012606 | KB4012606 |
| KB4012216 | KB4013198 | KB4013198 | ||||
| KB4012215 | KB4012214 | KB4012216 | KB4013429 | KB4013429 | ||
| KB4012217 | KB4013429 | KB4013429 |
何时使用 sysprep
Sysprep 是一个可以在 Windows 安装过程中运行的进程,它会重置系统安装,并会删除所有个人数据和重置多个组件,从而为你提供“全新安装体验”。 通常情况下,这样做的前提是,需要创建一个模板,以便通过该模板部署多个具有特定配置的其他 VM。 这称为“通用化映像”。
相反,如果只需从一个磁盘创建一个 VM,则不需使用 sysprep。 这种情况下,只需从称之为“专用映像”的磁盘创建 VM 即可。
若要详细了解如何从专用磁盘创建 VM,请参阅:
- 从专用磁盘创建 VM
- Create a VM from a specialized VHD disk(从专用 VHD 磁盘创建 VM)
若要创建通用化映像,则需运行 sysprep。 有关 Sysprep 的详细信息,请参阅 How to Use Sysprep: An Introduction(如何使用 Sysprep:简介)。
并非每个安装在基于 Windows 的计算机上的角色或应用程序都支持该通用化。 因此,在运行此过程之前,请参阅以下文章,确保该计算机的角色受 sysprep 的支持。 有关详细信息,请参阅 Sysprep Support for Server Roles(Sysprep 对服务器角色的支持)。
通用化 VHD 的步骤
Note
按以下步骤运行 sysprep.exe 后,请关闭 VM,在 Azure 中从其创建一个映像,然后再重新打开该 VM。
- 登录到 Windows VM。
- 以管理员身份运行命令提示符。
- 将目录切换到 %windir%system32sysprep,并运行 sysprep.exe。
-
在“系统准备工具”对话框中,选择“进入系统全新体验(OOBE)”,确保已选中“通用化”复选框。
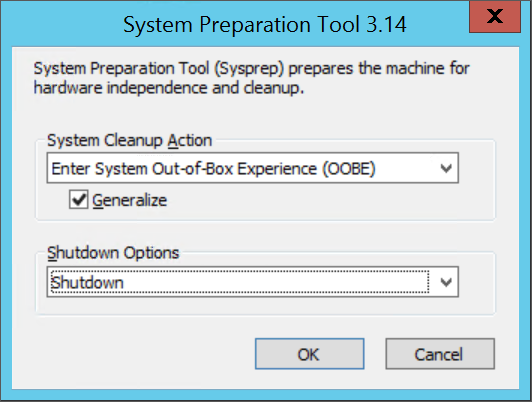
- 在“关机选项”中选择“关机”。
- 单击 “确定”。
- 当 Sysprep 完成后,关闭 VM。 请勿使用“重启”来关闭 VM。
- 现在,VHD 已准备就绪,可以上传了。 有关如何从通用化磁盘创建 VM 的详细信息,请参阅上传通用化 VHD 并使用它在 Azure 中创建新的 VM。
完成推荐配置
以下设置不影响 VHD 上传。 但是,强烈建议配置这些设置。
-
安装 Azure VM 代理。 然后即可启用 VM 扩展。 VM 扩展实现了可能需要用于 VM 的大多数关键功能,例如重置密码、配置 RDP 等。 有关详细信息,请参阅:
- VM Agent and Extensions - Part 1(VM 代理和扩展 - 第 1 部分)
- VM Agent and Extensions - Part 2(VM 代理和扩展 - 第 2 部分)
-
转储日志可帮助排查 Windows 崩溃问题。 启用转储日志收集:
PowerShellSet-ItemProperty -Path 'HKLM:SYSTEMCurrentControlSetControlCrashControl' -name "CrashDumpEnable" -Value "2" -Type DWord Set-ItemProperty -Path 'HKLM:SYSTEMCurrentControlSetControlCrashControl' -name "DumpFile" -Value "%SystemRoot%MEMORY.DMP" Set-ItemProperty -Path 'HKLM:SYSTEMCurrentControlSetControlCrashControl' -name "AutoReboot" -Value 0 -Type DWord New-Item -Path 'HKLM:SOFTWAREMicrosoftWindowsWindows Error ReportingLocalDumps' New-ItemProperty -Path 'HKLM:SOFTWAREMicrosoftWindowsWindows Error ReportingLocalDumps' -name "DumpFolder" -Value "c:CrashDumps" New-ItemProperty -Path 'HKLM:SOFTWAREMicrosoftWindowsWindows Error ReportingLocalDumps' -name "DumpCount" -Value 10 -Type DWord New-ItemProperty -Path 'HKLM:SOFTWAREMicrosoftWindowsWindows Error ReportingLocalDumps' -name "DumpType" -Value 2 -Type DWord Set-Service -Name WerSvc -StartupType Manual如果在执行本文中的任何过程步骤时收到错误,则意味着注册表项已存在。 在这种情况下,请改用以下命令:
PowerShellSet-ItemProperty -Path 'HKLM:SYSTEMCurrentControlSetControlCrashControl' -name "CrashDumpEnable" -Value "2" -Type DWord Set-ItemProperty -Path 'HKLM:SYSTEMCurrentControlSetControlCrashControl' -name "DumpFile" -Value "%SystemRoot%MEMORY.DMP" Set-ItemProperty -Path 'HKLM:SOFTWAREMicrosoftWindowsWindows Error ReportingLocalDumps' -name "DumpFolder" -Value "c:CrashDumps" Set-ItemProperty -Path 'HKLM:SOFTWAREMicrosoftWindowsWindows Error ReportingLocalDumps' -name "DumpCount" -Value 10 -Type DWord Set-ItemProperty -Path 'HKLM:SOFTWAREMicrosoftWindowsWindows Error ReportingLocalDumps' -name "DumpType" -Value 2 -Type DWord Set-Service -Name WerSvc -StartupType Manual -
在 Azure 中创建 VM 以后,建议将 pagefile 置于“临时驱动器”卷以改进性能。 可以将其设置如下:
PowerShellSet-ItemProperty -Path 'HKLM:SYSTEMCurrentControlSetControlSession ManagerMemory Management' -name "PagingFiles" -Value "D:pagefile"如果有数据磁盘附加到了 VM,则临时驱动器卷的驱动器号通常为“D”。 此指定可能会有所不同,具体取决于可用驱动器数以及所做的设置。