阶段介绍:
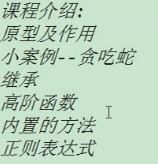
今天的内容:
一个常识:

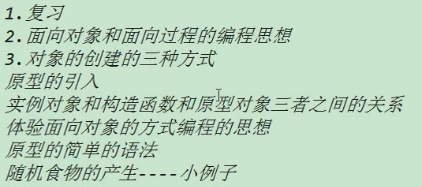
复习:


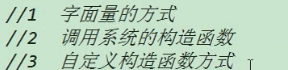
创建对象的三种方式:


 1 <!DOCTYPE html>
 2 <html lang="en">
 3     <head>
 4         <meta charset="UTF-8">
 5         <title>这是网页的标题</title>
 6     </head>
 7     <body>
 8
 9         <script src="js/common.js"></script>
10         <script>
11             // 1 使用字面量的方式
12             var person1 ={
13                 name:"tom",
14                 age:18,
15                 eat:function () {
16                     console.log("我爱吃东西");
17                 }
18             };
19             //2 使用系统的构造函数
20             var person2 = new Object();
21             person2.name = "alex";
22             person2.age = 30;
23             person2.eat =function () {
24                 console.log("我爱吃饭!");
25             };
26             //3 自定义构造函数
27             function Person(name, age) { //当名字是大写的时候就是类,小写的时候是函数
28                 this.name = name;
29                 this.age = age;
30                 this.eat = function () {
31                     console.log("我爱吃面!");
32                 };
33             }
34             var person3 = new Person("tom",18);
35             console.log(person3 instanceof Person);
36
37         </script>
38     </body>
39 </html>
第三种用的最多,也是最方便的方式。
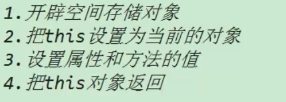
自定义构造函数 创建对象做的事情:
创建对象,也成实例化。
工厂方式创建对象:
 1 <!DOCTYPE html>
 2 <html lang="en">
 3     <head>
 4         <meta charset="UTF-8">
 5         <title>这是网页的标题</title>
 6     </head>
 7     <body>
 8
 9         <script src="js/common.js"></script>
10         <script>
11             //工厂方式创建对象  factory pattern
12             //通过工厂方式创建对象
13             function createObjByFactoryPattern(name,age) {
14                 var obj = new Object();
15                 obj.name = name;
16                 obj.age = age;
17                 obj.eat = function () {
18                     console.log("我爱吃饭");
19                 };
20                 return obj;
21             }
22             var p1 = createObjByFactoryPattern("tom",18);
23         </script>
24     </body>
25 </html>
工厂方式创建对象 和自定义构造函数方法创建对象 的区别:
 1 <!DOCTYPE html>
 2 <html lang="en">
 3     <head>
 4         <meta charset="UTF-8">
 5         <title>这是网页的标题</title>
 6     </head>
 7     <body>
 8
 9         <script src="js/common.js"></script>
10         <script>
11             //工厂方式创建对象  factory pattern
12             //通过工厂方式创建对象
13             function createObjByFactoryPattern(name,age) {
14                 var obj = new Object();
15                 obj.name = name;
16                 obj.age = age;
17                 obj.eat = function () {
18                     console.log("我爱吃饭");
19                 };
20                 return obj;
21             }
22             //自定义构造函数方式 创建对象
23             function Person(name, age) {
24                 this.name = name;
25                 this.age = age;
26                 this.eat = function () {
27                     console.log("我爱吃饭");
28                 };
29             }
30
31
32
33         </script>
34     </body>
35 </html>

注:我们一般都是使用自定义函数的方式来创建对象。其实可以将其理解为一个类,这里下面称之为类。
类(借用其他语言概念)和实例对象的关系:

是先有类,再有类的。
补:console.dir(obj) 可以将obj 的结构显示出来。
 1 <!DOCTYPE html>
 2 <html lang="en">
 3     <head>
 4         <meta charset="UTF-8">
 5         <title>这是网页的标题</title>
 6     </head>
 7     <body>
 8
 9         <script src="js/common.js"></script>
10         <script>
11             function Person(name,age) {
12                 this.name = name;
13                 this.age =age;
14                 this.eat = function () {
15                     console.log("我爱吃东西!");
16                 };
17             }
18             var p = new Person("tom",18);
19             console.dir(p);
20             console.dir(Person);
21
22             console.log(p.constructor == Person); //true   说明 p的构造器是 Person  .
23             console.log(p.__proto__.constructor == Person); //true
24             console.log(p.__proto__.constructor == Person.prototype.constructor) //true
25
26
27             console.log(Person.prototype.constructor == Person); //true ,说明Person的构造器是它自己。
28
29
30
31
32         </script>
33     </body>
34 </html>
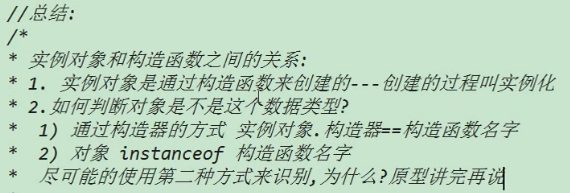
上面说的 构造函数也可以理解为 类。
原型prototype:
自定义构造函数创建对象带来的问题:
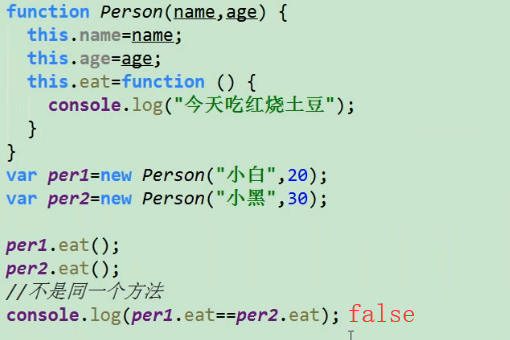
此时,如果这些方法都是完全相同的,这样就会浪费很多的内存空间。
此时也可以通过console.dir() 查看per1 和 per2的结构,如下图:
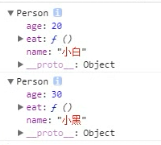
可以通过下面有名函数方式解决。
 1 <!DOCTYPE html>
 2 <html lang="en">
 3     <head>
 4         <meta charset="UTF-8">
 5         <title>这是网页的标题</title>
 6     </head>
 7     <body>
 8
 9         <script src="js/common.js"></script>
10         <script>
11             function func() {
12                 console.log("我爱吃东西");
13             }
14
15             function Person(name,age) {
16                 this.name = name;
17                 this.age =age;
18                 this.eat = func;
19             }
20             var p1= new Person("tom",18);
21             var p2= new Person("egon",45);
22             console.log(p1.eat == p2.eat ); //此时是 true
23
24
25
26
27         </script>
28     </body>
29 </html>
可是,这种方式并不好,容易造成命名冲突的问题。
如下代码所示的命名冲突:
 1 <!DOCTYPE html>
 2 <html lang="en">
 3     <head>
 4         <meta charset="UTF-8">
 5         <title>这是网页的标题</title>
 6     </head>
 7     <body>
 8
 9         <script src="js/common.js"></script>
10         <script>
11             function func() {
12                 console.log("我爱吃东西");
13             }
14             func = 15; //造成了命名冲突
15             function Person(name,age) {
16                 this.name = name;
17                 this.age =age;
18                 this.eat = func;
19             };
20             var p1= new Person("tom",18);
21             var p2= new Person("egon",45);
22             console.log(p1.eat == p2.eat ); //此时是 true
23
24
25
26
27         </script>
28     </body>
29 </html>
那么问题来了,该如何解决呢?
此时就要用到原型了。
原型 作用之一 就是用来解决 数据共享,节省内存空间 这种问题的。
以上就是原型的引入。
原型的使用:
 1 <!DOCTYPE html>
 2 <html lang="en">
 3     <head>
 4         <meta charset="UTF-8">
 5         <title>这是网页的标题</title>
 6     </head>
 7     <body>
 8
 9         <script src="js/common.js"></script>
10         <script>
11             function Person(name,age) {
12                 this.name = name;
13                 this.age =age;
14             }
15             //通过 原型(prototype )来添加方法 ,可以实现数据共享,节省内存空间。
16             Person.prototype.eat = function () {
17                 console.log("我爱吃东西!");
18             };
19             var p1= new Person("tom",18);
20             var p2= new Person("egon",45);
21             console.log(p1.eat == p2.eat ); //此时是 true
22
23             //查看 两个对象的结构
24             console.dir(p1);
25             console.dir(p2);
26
27         </script>
28     </body>
29 </html>
原型它其实是将方法放到了 构造函数Person.prototype中了。
Person 作为他们的类,为他们共有。
 1 <!DOCTYPE html>
 2 <html lang="en">
 3     <head>
 4         <meta charset="UTF-8">
 5         <title>这是网页的标题</title>
 6     </head>
 7     <body>
 8
 9         <script src="js/common.js"></script>
10         <script>
11             function Person(name,age) {
12                 this.name = name;
13                 this.age =age;
14             }
15             //通过 原型(prototype )来添加方法 ,可以实现数据共享,节省内存空间。
16             Person.prototype.eat = function () {
17                 console.log("我爱吃东西!");
18             };
19             var p1= new Person("tom",18);
20             var p2= new Person("egon",45);
21             console.log(p1.eat == p2.eat ); //此时是 true
22
23
24             console.dir(p1);
25             console.dir(p2);
26             console.dir(Person);
27             //p1 和 p2的 eat 方法,都是在   Person.prototype中的。
28
29         </script>
30     </body>
31 </html>
总结:可以将 相同的方法,放入到Person.prototype (类属性中),以达到节省空间的目的。
实例对象的proto是有 下划线的,类对象没有。

__proto__ IE8是不支持的,所以一般使用prototype就可以了。
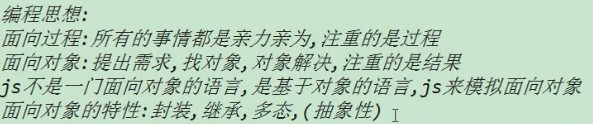
体会面向过程和面向对象的编程思想:
点击按钮,改变div 的背景颜色:
 1 <!DOCTYPE html>
 2 <html lang="en">
 3     <head>
 4         <meta charset="UTF-8">
 5         <title>这是网页的标题</title>
 6         <style>
 7             div{
 8                 width: 300px;
 9                 height: 400px;
10                 background-color: darkred;
11             }
12         </style>
13     </head>
14     <body>
15         <input type="button" value="点击" id="btn">
16         <div id="dv"></div>
17         <script>
18             //点击按钮,改变div 的背景颜色
19             document.getElementById("btn").onclick = function () {
20                 document.getElementById("dv").style.backgroundColor = "yellow";
21             };
22         </script>
23     </body>
24 </html>
 1 <!DOCTYPE html>
 2 <html lang="en">
 3     <head>
 4         <meta charset="UTF-8">
 5         <title>这是网页的标题</title>
 6         <style>
 7             div{
 8                 width: 300px;
 9                 height: 400px;
10                 background-color: darkred;
11             }
12         </style>
13     </head>
14     <body>
15         <input type="button" value="点击" id="btn">
16         <div id="dv"></div>
17         <script>
18             //点击按钮,改变div 的背景颜色
19             //1,面向过程的方法
20             // document.getElementById("btn").onclick = function () {
21             //     document.getElementById("dv").style.backgroundColor = "yellow";
22             // };
23
24             //2,初级面向对象方法
25             //按钮当做一个对象,div 当做一个对象 ,颜色是属性
26             function ChangeColor(btnId ,dvId,color) {
27                 this.btnObj = document.getElementById(btnId); //按钮对象
28                 this.dvObj = document.getElementById(dvId);   //div对象
29                 this.color = color;  //颜色属性
30             }
31             //数据共享函数
32             ChangeColor.prototype.func = function () {
33                 //点击 按钮改变div的颜色
34                 var dvObj = this.dvObj;
35                 var color = this.color;
36                 this.btnObj.onclick  = function () {
37                     dvObj.style.backgroundColor = color;
38                 };
39             };
40             var  obj = new ChangeColor("btn","dv","yellow");
41             obj.func();
42
43
44         </script>
45     </body>
46 </html>
点击按钮,改变div 的多个样式属性值:
 1 <!DOCTYPE html>
 2 <html lang="en">
 3     <head>
 4         <meta charset="UTF-8">
 5         <title>这是网页的标题</title>
 6         <style>
 7             div{
 8                 width: 300px;
 9                 height: 400px;
10                 background-color: darkred;
11             }
12             #dv2{
13                 background-color: cyan;
14             }
15         </style>
16     </head>
17     <body>
18         <input type="button" value="点击" id="btn">
19         <div id="dv"></div>
20         <div id="dv2"></div>
21         <script src="js/common.js"></script>
22         <script>
23             //点击按钮,改变div 的 多个样式属性值 。
24             //面向对象方法
25             function ChangeColor(btnObj ,dvObj,json) {
26                 this.btnObj = btnObj; //按钮对象
27                 this.dvObj = dvObj;   //div对象
28                 this.json = json;     //样式属性
29             }
30             //数据共享函数
31             ChangeColor.prototype.func = function () {
32                 var that = this;
33                 this.btnObj.onclick = function () {
34                     // for (var key in that.json){
35                     //     console.log(key); //输出的是三个string
36                     // }
37                     for (var key in that.json){
38                         that.dvObj.style[key] = that.json[key];
39                     }
40                 };
41             };
42
43
44             var myJson = {"backgroundColor":"blue","opacity":0.4,"width":"400px","height":"400px"};
45             new ChangeColor(getId$("btn"),getId$("dv"),myJson).func();
46
47             //如果此时想让 dv2 改变它的 样式属性值,也就很简单了
48             var myJson2 = {"backgroundColor":"yellow","opacity":0.7,"width":"100px","height":"100px"};
49             new ChangeColor(getId$("btn"),getId$("dv2"),myJson2).func();
50
51             //这就是面向对象方式的优势!!!
52
53
54
55         </script>
56     </body>
57 </html>
构造函数(类) + 原型 + 实例对象的关系:
实例对象是由构造函数创建的。
原型是构造函数的属性 prototype。
利用原型共享数据:

使用对象给原型赋值:
使用对象的方式,使用给原型赋值。
不过此时必须手动设置构造函数。(不用对象的方式会自动加上构造函数)
 1 <!DOCTYPE html>
 2 <html lang="en">
 3     <head>
 4         <meta charset="UTF-8">
 5         <title>这是网页的标题</title>
 6         <style>
 7         </style>
 8     </head>
 9     <body>
10         <script src="js/common.js"></script>
11         <script>
12             function Person(name,age) {
13                 this.name = name;
14                 this.age = age;
15             }
16             Person.prototype = {
17                 //此种写法必须手动设置 构造器的指向
18                 constructor:Person,
19                 height:"188",
20                 weight:"55Kg",
21                 eat:function () {
22                     console.log("吃饭啦....");
23                 }
24             };
25             var person = new Person("tom",18);
26             console.dir(person);
27             console.dir(Person);
28
29
30         </script>
31     </body>
32 </html>
原型中的方法:
![]()
原型中的方法也可以相互调用
原型中的方法:
属性和方法都是层层搜索的。
如果在实例对象中没找到的话,就会去Person.prototype(通过的是实例对象的__proto__)中找。
注: 通过实例对象的__proto__可以找到Person.prototype。
为内置 类 的prototype 中添加自己的方法:
 1 <!DOCTYPE html>
 2 <html lang="en">
 3     <head>
 4         <meta charset="UTF-8">
 5         <title>这是网页的标题</title>
 6         <style>
 7         </style>
 8     </head>
 9     <body>
10         <script src="js/common.js"></script>
11         <script>
12
13             var arr = [1,30,7,4,3,9,];
14             var ret = arr.join("|");
15             console.log(ret);
16             //arr这个实例对象中  是没有join()方法的,但是可以用它,
17             //说明 join()方法是在Array.prototype中的。
18             //String Date 也是如此
19
20             //下面我们要为 内置类 的 prototype中添加自己的方法。这其实相当于改变源码。
21             Array.prototype.mySort = function () {
22                 for (var i =0;i<this.length -1;++i){
23                     for (var j=0;j<this.length-i-1;++j){
24                         if(this[j]>this[j+1]){
25                             var temp = this[j];
26                             this[j] = this[j+1];
27                             this[j+1] = temp;
28                         }
29                     }
30                 }
31             };
32             arr.mySort();
33             console.log(arr);
34         </script>
35     </body>
36 </html>
把局部变量 变为 全局变量:
这个函数叫做 自调用的函数。
 1 <!DOCTYPE html>
 2 <html lang="en">
 3     <head>
 4         <meta charset="UTF-8">
 5         <title>这是网页的标题</title>
 6         <style>
 7         </style>
 8     </head>
 9     <body>
10         <script src="js/common.js"></script>
11         <script>
12             (function () {
13                 var num = 10;  //num是个局部变量
14             })();
15             console.log(num); //此时会报错。。。
16
17
18         </script>
19     </body>
20 </html>
我们如何将这个局部变量变为 全局变量呢?
 1 <!DOCTYPE html>
 2 <html lang="en">
 3     <head>
 4         <meta charset="UTF-8">
 5         <title>这是网页的标题</title>
 6         <style>
 7         </style>
 8     </head>
 9     <body>
10         <script src="js/common.js"></script>
11         <script>
12             (function (win) {
13                 var num = 10;  //num是个局部变量
14                 win.num = num;  //将局部变量num 添加到 window上去
15             })(window);
16             console.log(num); //此时,就不会报错了。因为num 已经放到window上了。
17
18             //其实标准的调用应该是
19             // console.log(window.num);
20         </script>
21     </body>
22 </html>
我们之所以可以通过 window.num = num 给其加上属性,是因为js是门 动态类型的语言的原因。
如果对象没有属性,只要通过.了,就有了。

把一个类变为全局变量:
 1 <!DOCTYPE html>
 2 <html lang="en">
 3     <head>
 4         <meta charset="UTF-8">
 5         <title>这是网页的标题</title>
 6         <style>
 7         </style>
 8     </head>
 9     <body>
10         <script src="js/common.js"></script>
11         <script>
12             // function Random() {
13             // }
14             // Random.prototype.getRandomNum = function () {
15             //     return Math.floor(Math.random()*5); // 0-4
16             // };
17             // window.Random = Random;
18             //
19             // var rd = new Random();
20             // console.log(rd.getRandomNum());
21
22             //上面的Random会一直存在于 内存中。
23             //下面的Random 自调用函数执行之后就会被释放, Random类的定义会存在于window中。
24             (function (win) { //自调用函数
25                 //类 Random
26                 function Random() {
27                 }
28                 Random.prototype.getRandomNum = function () {
29                     return Math.floor(Math.random()*5);  //0 -4的随机数
30                 };
31                 win.Random = Random; //随机数类Random做了window的属性
32             })(window);
33
34             var rd = new Random();
35             console.log(rd.getRandomNum());
36         </script>
37     </body>
38 </html>
上面产生的随机数是0-4
 1 <!DOCTYPE html>
 2 <html lang="en">
 3     <head>
 4         <meta charset="UTF-8">
 5         <title>这是网页的标题</title>
 6         <style>
 7         </style>
 8     </head>
 9     <body>
10         <script src="js/common.js"></script>
11         <script>
12             (function (win) { //自调用函数
13                 //类 Random
14                 function Random() {
15                 }
16                 Random.prototype.getRandomNum = function (min,max) {
17                     return Math.floor(Math.random()*(max - min +1 )+min );  //min -max的随机数
18                 };
19                 win.Random = Random; //随机数类Random做了window的属性
20             })(window);
21
22             var rd = new Random();
23             console.log(rd.getRandomNum(5,8));
24
25         </script>
26     </body>
27 </html>
注:Math.random()产生的是 (0,1)的小数。
要想产生 min - max 的整数需要 :
Math.floor( Math.random( )*(max-min) +min );
没必要背,就是试!
案例:
产生随机小方块:
 1 <!DOCTYPE html>
 2 <html lang="en">
 3     <head>
 4         <meta charset="UTF-8">
 5         <title>这是网页的标题</title>
 6         <style>
 7             .map{
 8                 width: 800px;
 9                 height: 600px;
10                 background-color: #ccc;
11                 position: relative;
12             }
13         </style>
14     </head>
15     <body>
16         <div class="map"></div>
17         <script src="js/common.js"></script>
18         <script>
19             //以选择器的方式 获取对象 。
20             var map = document.querySelector(".map");
21             //得到随机数对象  random 并绑定到 window上
22             (function (win) { //自调用函数
23                 //类 Random
24                 function Random() {
25                 }
26                 Random.prototype.getRandomNum = function (min,max) {
27                     return Math.floor(Math.random()*(max - min +1 )+min );  //[min ,max]的随机数
28                 };
29                 win.random = new Random(); //随机数对象 random做了window的属性
30             })(window);
31
32             // 得到小方块(食物)对象 并绑定到 window 上
33             (function (win) {
34                 //食物类
35                 function Food(width, height, color) {
36                     this.width = width || 20;
37                     this.height = height || 20;
38                     this.color = color || "green";
39                     this.x = 0; //横纵坐标是随机生成的,后面还会初始化它。
40                     this.y = 0;
41                     this.foodDiv = document.createElement("div"); //具体食物对象的div。
42                 }
43                 Food.prototype.init = function (map) {
44                     //设置食物的 样式
45                     var div = this.foodDiv;
46                     div.style.position = "absolute"; //脱离文档流
47                     div.style.width  = this.width +"px";
48                     div.style.height = this.height +"px";
49                     div.style.backgroundColor = this.color;
50                     //把食物放到地图中
51                     map.appendChild(div);
52                     //最后要初始化食物的位置。
53                     this.initPos(map);
54                     div.style.left = this.x + "px";
55                     div.style.top = this.y + "px";
56                 };
57                 //产生随机位置
58                 Food.prototype.initPos = function (map) {
59                     //随机产生 小方块的个数
60                     var x = random.getRandomNum(0,map.offsetWidth/this.width -1) * this.width;//[0,39]*this.width
61                     var y = random.getRandomNum(0,map.offsetHeight/this.height -1) * this.width;//[0,29]*this.width
62                     this.x = x;
63                     this.y = y;
64                 };
65                 window.Food = Food;
66             })(window);
67
68
69             var food = new Food(20,20,"green");
70             food.init(map);
71
72
73
74
75         </script>
76     </body>
77 </html>