一、《Spring Security开发安全的REST服务》视频笔记---part2:Spring Security部分
Spring Security核心功能:认证(你是谁)、授权(你能干什么)、攻击防护(防止伪造身份)
内容:Spring Security基本原理、实现用户名+密码认证、实现手机号+短信认证
1、Spring Security开发基于表单的认证
WebSecurityConfigurerAdapter是web安全应用的一个适配器,弄成表单登录配置以下即可(默认账号是user,密码随机生成):
@Configuration
public class BrowserSecurityConfig extends WebSecurityConfigurerAdapter{

	@Override
	protected void configure(HttpSecurity http) throws Exception {

		http.formLogin()
			.and()
			.authorizeRequests()
			.anyRequest()
			.authenticated();

	}

}
若是还是想用回最原始的弹出框输入账号密码登录,则这样写:
http.httpBasic()
			.and()
			.authorizeRequests()
			.anyRequest()
			.authenticated();
Spring Security基本原理(对应视频4-2):
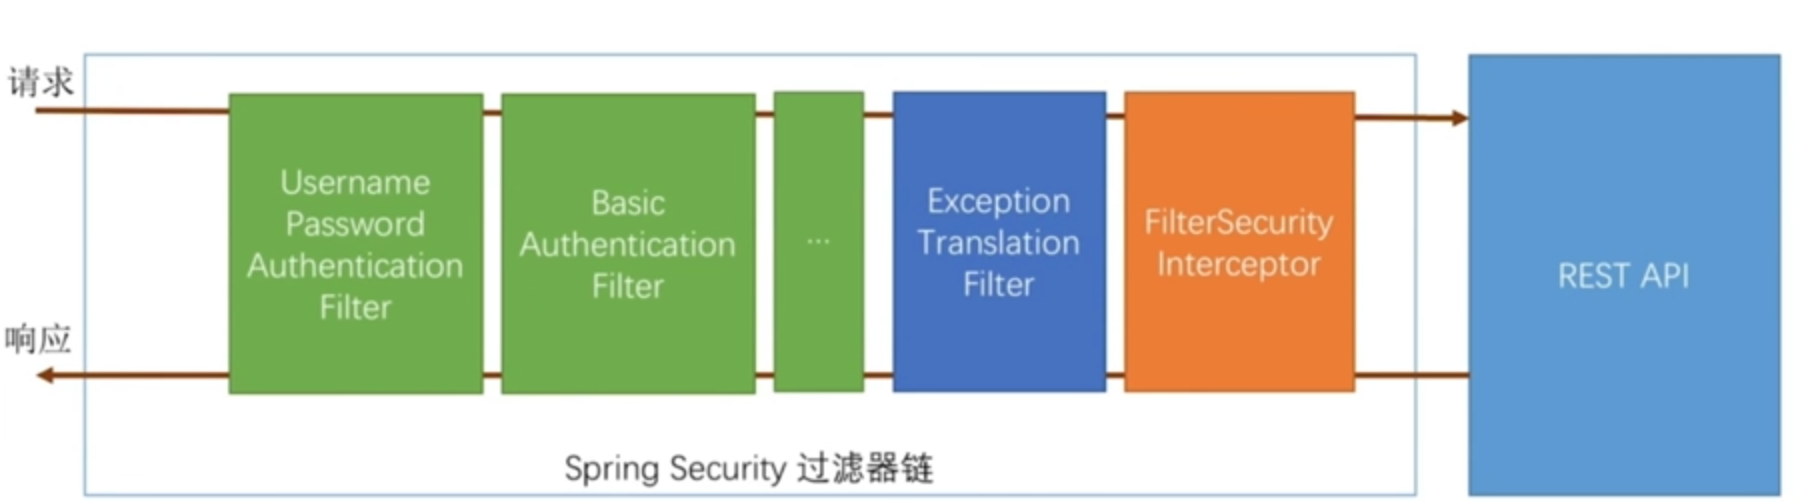
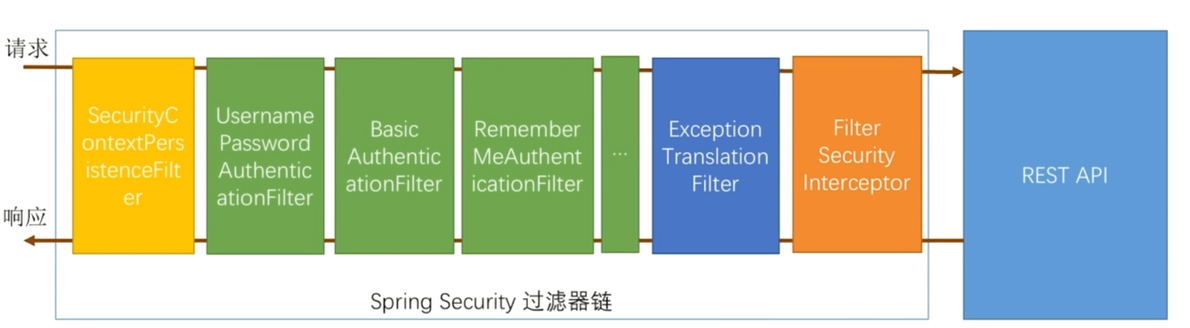
上面的第一个filter对应于配置中的http.formLogin(),第二个filter对应于配置中的http.httpBasic()(注意:如果不配置,则这些filter不会生效;除了绿色以外,其它颜色的过滤器无法控制,即一定会在过滤器链上),最后一个Interceptor是请求要经过的最后一个过滤器(用来做最终判断的),对应于配置中每个and()后面的内容,若不符合这些内容的要求,则靠响应过程中的第二个filter(即从右边开始数的第二个)来捕获异常,并根据是否有异常来决定是否引导用户回到前面的配置中登录(比如前面配了用户名密码登录,则引导回那里登录)。
2、自定义用户认证逻辑
有3个步骤:处理用户信息获取逻辑(比如从数据库获取)[UserDetailsService]、处理用户校验逻辑(比如用户有无被冻结)[UserDetails]、处理密码加密解密[PasswordEncoder]
(1)用户信息获取逻辑被SpringSecurity封装在一个接口中:UserDetailsService
public interface UserDetailsService {
    UserDetails loadUserByUsername(String var1) throws UsernameNotFoundException;
}
该接口只有一个loadUserByUsername方法,是根据用户名获取用户信息并将之封装到UserDetails接口的实现类中,SpringSecurity就拿着这个用户信息去做处理和校验,通过的话就放在session中;不通过就返回异常并有相应的错误提示。
下面用自己定义的类去实现UserDetailsService接口:
@Component
public class MyUserDetailsService implements UserDetailsService{

        logger...

        @override
        public UserDetails loadUserByUsername(String username) throws UsernameNotFoundException{

                logger.info("登录用户名:"+username);
                return new User(username, "123456", AuthorityUtils.commaSeparatedStringToAuthorityList("admin"));
        }

}
上面的User类是SpringSecurity提供的实现了UserDetails接口的类,该类的构造函数中第3个参数是权限集合,这里调用的方法是将逗号分隔的字符串转换成权限的方法(这里的权限会与上面配置类中需要的权限校验做对比,看看校验能否通过)。
(2)处理用户校验逻辑(主要有这些校验:密码是否正确、用户是否被冻结、密码是否过期)
校验用户的逻辑其实就放在UserDetails接口里的4个返回布尔值的方法:
public interface UserDetails extends Serializable {
    Collection<? extends GrantedAuthority> getAuthorities();

    String getPassword();

    String getUsername();

    boolean isAccountNonExpired();

    boolean isAccountNonLocked();

    boolean isCredentialsNonExpired();

    boolean isEnabled();
}
isAccountNonExpired返回true代表账号没有过期,isAccountNonLocked返回true代表账号没有被锁定(通常与业务中的用户冻结划等号), isCredentialsNonExpiredfanhtrue代表密码没有过期,isEnabled代表账号是否可用(通常与业务中的用户逻辑删除即假删除画等号)。
这里可以修改上面的User调用的构造函数:
return new User(username, "123456", true, true , true, true, AuthorityUtils.commaSeparatedStringToAuthorityList("admin"));
或者可以自己定义一个与实际用户实体业务结合的User类去实现UserDetails接口。
(3)处理密码加密解密
找到PasswordEncoder类(是crypto包下的类),
public interface PasswordEncoder {
    String encode(CharSequence var1);

    boolean matches(CharSequence var1, String var2);
}
encode方法用来将密码加密,matches方法用来判断用户提交上来的密码是否和用户的密码匹配。
配置一个实现了PasswordEncoder接口的BCryptPasswordEncoder类,也可以自定义实现。
@Configuration
public class BrowserSecurityConfig extends WebSecurityConfigurerAdapter{

	@Override
	protected void configure(HttpSecurity http) throws Exception {

		http.formLogin()
			.and()
			.authorizeRequests()
			.anyRequest()
			.authenticated();

	}

        @Bean
	public PasswordEncoder passwordEncoder() {
		return new BCryptPasswordEncoder();
	}

}
这时候刚刚那个User就需要提供加密后的密码参数:
return new User(username, passwordEncoder.encode("123456"), true, true , true, true, AuthorityUtils.commaSeparatedStringToAuthorityList("admin"));
3、个性化用户认证流程
有3个步骤:自定义登录页面、自定义登录成功处理、自定义登录失败处理
(1)自定义登录页面(在刚刚上面那个配置类补充一个loginPage方法调用),并在项目resources目录下再新建一个resources文件夹,里面放一个imooc-signIn.html
        @Override
	protected void configure(HttpSecurity http) throws Exception {

		http.formLogin()
                        .loginPage("/imooc-signIn.html")
			.and()
			.authorizeRequests()
			.anyRequest()
			.authenticated();

	}
但如果只是这样配置,进入这个登录页面会报错:重定向次数过多。这是因为现在的配置是:所有页面,包括这个登录页面,都需要身份认证,所以都要跳转到登录页面,即登录页面本身也需要身份认证也就需要再次跳转到自身。
所以代码改成如下:
@Override
	protected void configure(HttpSecurity http) throws Exception {

		http.formLogin()
                        .loginPage("/imooc-signIn.html")
			.and()
			.authorizeRequests()
                        .antMatchers("/imooc-signIn.html").permitAll()
			.anyRequest()
			.authenticated();

	}
imooc-signIn.html页面如下:
<!DOCTYPE html>
<html>
<head>
<meta charset="UTF-8">
<title>登录</title>
</head>
<body>
	<h2>标准登录页面</h2>
	<h3>表单登录</h3>
	<form action="/authentication/form" method="post">
		<table>
			<tr>
				<td>用户名:</td>
				<td><input type="text" name="username"></td>
			</tr>
			<tr>
				<td>密码:</td>
				<td><input type="password" name="password"></td>
			</tr>
			<tr>
				<td>图形验证码:</td>
				<td>
					<input type="text" name="imageCode">
					<img src="/code/image?width=200">
				</td>
			</tr>
			<tr>
				<td colspan='2'><input name="remember-me" type="checkbox" value="true" />记住我</td>
			</tr>
			<tr>
				<td colspan="2"><button type="submit">登录</button></td>
			</tr>
		</table>
	</form>

	<h3>短信登录</h3>
	<form action="/authentication/mobile" method="post">
		<table>
			<tr>
				<td>手机号:</td>
				<td><input type="text" name="mobile" value="13012345678"></td>
			</tr>
			<tr>
				<td>短信验证码:</td>
				<td>
					<input type="text" name="smsCode">
					<a href="/code/sms?mobile=13012345678">发送验证码</a>
				</td>
			</tr>
			<tr>
				<td colspan="2"><button type="submit">登录</button></td>
			</tr>
		</table>
	</form>
	<br>
	<h3>社交登录</h3>
	<a href="/qqLogin/callback.do">QQ登录</a>

	<a href="/qqLogin/weixin">微信登录</a>
</body>
</html>
注意:该登录页面的登录请求是提交到/authentication/form,而不是SpringSecurity提供的UsernamePasswordAuthenticationFilter类指定的/login路径,那么现在需要UsernamePasswordAuthenticationFilter类去处理这个新的路径,所以需要配置:
@Override
	protected void configure(HttpSecurity http) throws Exception {

		http.formLogin()
                        .loginPage("/imooc-signIn.html")
                        .loginProcessingUrl("/authentication/form")
			.and()
			.authorizeRequests()
                        .antMatchers("/imooc-signIn.html").permitAll()
			.anyRequest()
			.authenticated();

	}
按照这个配置,登录后会报另一个错误:Invalid CSRF Token 'null' was found on request parameter '_csrf' or header 'X-CSRF-TOKEN'
因为SpringSecurity在默认情况下会提供一个跨站请求伪造的一个防护,可以暂时禁止这个配置:
@Override
	protected void configure(HttpSecurity http) throws Exception {

		http.formLogin()
                        .loginPage("/imooc-signIn.html")
                        .loginProcessingUrl("/authentication/form")
			.and()
			.authorizeRequests()
                        .antMatchers("/imooc-signIn.html").permitAll()
			.anyRequest()
			.authenticated()
                        .and()
                        .csrf().disable();

	}
这样配置之后,登录逻辑可以走通,但是有2个不合理的地方:
①登录失败返回的是一个html页面而不是一个json字符串
②现在的配置是统一使用同一个登录页面,应该改成有自定义的登录页面就使用自定义的,没有的话才使用这个登录页面。
先看第一个地方怎么改:
目前的逻辑是当需要身份认证时跳到一个登录页面,应改成跳到一个自定义的Controller方法上:

Controller自定义方法如下:
@RestController
public class BrowserSecurityController {

	private Logger logger = LoggerFactory.getLogger(getClass());

	private RequestCache requestCache = new HttpSessionRequestCache();

	private RedirectStrategy redirectStrategy = new DefaultRedirectStrategy();

	@Autowired
	private SecurityProperties securityProperties;

	@Autowired
	private ProviderSignInUtils providerSignInUtils;

	/**
	 * 当需要身份认证时,跳转到这里
	 */
	@RequestMapping(SecurityConstants.DEFAULT_UNAUTHENTICATION_URL)
	@ResponseStatus(code = HttpStatus.UNAUTHORIZED)
	public SimpleResponse requireAuthentication(HttpServletRequest request, HttpServletResponse response)
			throws IOException {

		SavedRequest savedRequest = requestCache.getRequest(request, response);

		if (savedRequest != null) {
			String targetUrl = savedRequest.getRedirectUrl();
			logger.info("引发跳转的请求是:" + targetUrl);
			if (StringUtils.endsWithIgnoreCase(targetUrl, ".html")) {
				redirectStrategy.sendRedirect(request, response, securityProperties.getBrowser().getLoginPage());
			}
		}

		return new SimpleResponse("访问的服务需要身份认证,请引导用户到登录页");
	}

}
配置这些类:

让这些类生效:
@Configuration
@EnableConfigurationProperties(SecurityProperties.class)
public class SecurityCoreConfig {

}
配置如下:
@Override
	protected void configure(HttpSecurity http) throws Exception {

		http.formLogin()
                        .loginPage("/imooc-signIn.html")
                        .loginProcessingUrl("/authentication/form")
			.and()
			.authorizeRequests()
                        .antMatchers("/authentication/require", securityProperties.getBrowser().getLoginPage()).permitAll()
			.anyRequest()
			.authenticated()
                        .and()
                        .csrf().disable();

	}
(2)自定义登录成功处理
关键接口:AuthenticationSuccessHandler
自定义自己的ImoocAuthenticationSuccessHandler类实现AuthenticationSuccessHandler接口(或者也可以继承SavedRequestAwareAuthenticationSuccessHandler类---这是SpringSecurity默认的登录成功处理器)

然后在配置类BrowserSecurityConfig中注入上面的自定义类:
@Override
	protected void configure(HttpSecurity http) throws Exception {

		http.formLogin()
                        .loginPage("/imooc-signIn.html")
                        .loginProcessingUrl("/authentication/form")
                        .successHandler(imoocAuthenticationSuccessHandler)
			.and()
			.authorizeRequests()
                        .antMatchers("/authentication/require", securityProperties.getBrowser().getLoginPage()).permitAll()
			.anyRequest()
			.authenticated()
                        .and()
                        .csrf().disable();

	}
(3)自定义登录失败处理
关键接口:AuthenticationFailureHandler
自定义自己的ImoocAuthenticationFailureHandler类实现AuthenticationFailureHandler接口(或者也可以继承SimpleUrlAuthenticationFailureHandler类)
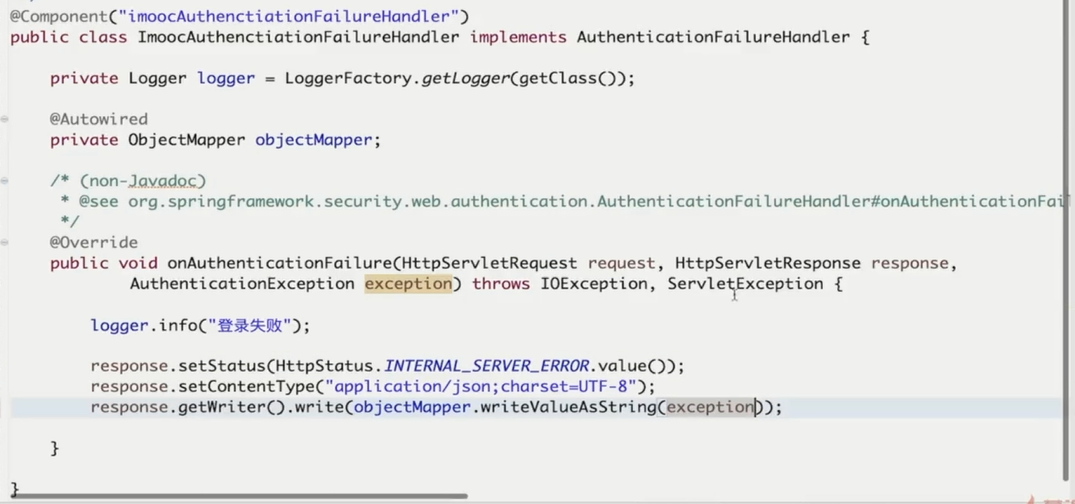
然后在配置类BrowserSecurityConfig中注入上面的自定义类:
@Override
	protected void configure(HttpSecurity http) throws Exception {

		http.formLogin()
                        .loginPage("/imooc-signIn.html")
                        .loginProcessingUrl("/authentication/form")
                        .successHandler(imoocAuthenticationSuccessHandler)
                        .failureHandler(imoocAuthenticationFailureHandler)
			.and()
			.authorizeRequests()
                        .antMatchers("/authentication/require", securityProperties.getBrowser().getLoginPage()).permitAll()
			.anyRequest()
			.authenticated()
                        .and()
                        .csrf().disable();

	}
4、认证流程源码级详解(把前面的内容可以联系起来理解)[对应视频4-6]
有3块内容:认证处理流程说明、认证结果如何在多个请求之间共享、获取认证用户信息
(1)认证处理流程说明
认证流程中核心的类:

(2)认证结果如何在多个请求之间共享
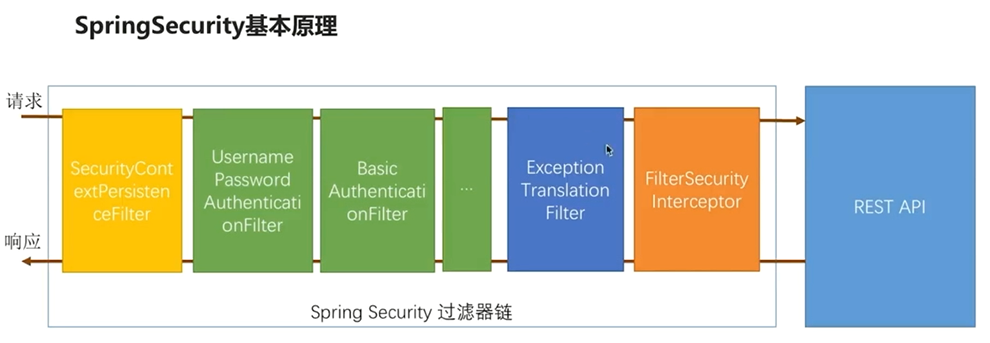
该SecurityContextPersistenceFilter是过滤器链第一个过滤器,请求时检查session,如果有SecurityContext就放到线程中;响应时检查线程,如果有SecurityContext就拿出来放到session中。这样不同的请求,就可以从同一个session拿到相同的认证信息。
(3)获取认证用户信息
        @GetMapping("/me")
	public Object getCurrentUser() {
		return SecurityContextHolder.getContext().getAuthentication();
	}
或者更简便的写法:
        @GetMapping("/me")
	public Object getCurrentUser(Authentication authentication) {
		return authentication;
	}
但是上面的写法是返回全部的authentication信息
如果只想知道authentication信息里的principal信息部分,这样写:
        @GetMapping("/me")
	public Object getCurrentUser(@AuthenticationPrincipal UserDetails user) {
		return user;
	}
5、实现图形验证码功能
有2步:开发生成图形验证码接口、在认证流程中加入图形验证码校验、重构代码
(1)生成图形验证码:根据随机数生成图片、将随机数存到session中、将生成的图片写到接口的响应中
验证码:
public class ValidateCode {

	private String code;

	private LocalDateTime expireTime;

	public ValidateCode(String code, int expireIn){
		this.code = code;
		this.expireTime = LocalDateTime.now().plusSeconds(expireIn);
	}

	public ValidateCode(String code, LocalDateTime expireTime){
		this.code = code;
		this.expireTime = expireTime;
	}

	public boolean isExpried() {
		return LocalDateTime.now().isAfter(expireTime);
	}

	public String getCode() {
		return code;
	}

	public void setCode(String code) {
		this.code = code;
	}

	public LocalDateTime getExpireTime() {
		return expireTime;
	}

	public void setExpireTime(LocalDateTime expireTime) {
		this.expireTime = expireTime;
	}

}
图片验证码:
public class ImageCode extends ValidateCode {

	private BufferedImage image;

	public ImageCode(BufferedImage image, String code, int expireIn){
		super(code, expireIn);
		this.image = image;
	}

	public ImageCode(BufferedImage image, String code, LocalDateTime expireTime){
		super(code, expireTime);
		this.image = image;
	}

	public BufferedImage getImage() {
		return image;
	}

	public void setImage(BufferedImage image) {
		this.image = image;
	}

}
控制器方法:
@RestController
public class ValidateCodeController {

	@Autowired
	private ValidateCodeProcessorHolder validateCodeProcessorHolder;

	/**
	 * 创建验证码,根据验证码类型不同,调用不同的 {@link ValidateCodeProcessor}接口实现
	 *
	 * @param request
	 * @param response
	 * @param type
	 * @throws Exception
	 */
	@GetMapping(SecurityConstants.DEFAULT_VALIDATE_CODE_URL_PREFIX + "/{type}")
	public void createCode(HttpServletRequest request, HttpServletResponse response, @PathVariable String type)
			throws Exception {
		validateCodeProcessorHolder.findValidateCodeProcessor(type).create(new ServletWebRequest(request, response));
	}

}
检查验证码的filter:
@Component("validateCodeFilter")
public class ValidateCodeFilter extends OncePerRequestFilter implements InitializingBean {

	/**
	 * 验证码校验失败处理器
	 */
	@Autowired
	private AuthenticationFailureHandler authenticationFailureHandler;
	/**
	 * 系统配置信息
	 */
	@Autowired
	private SecurityProperties securityProperties;
	/**
	 * 系统中的校验码处理器
	 */
	@Autowired
	private ValidateCodeProcessorHolder validateCodeProcessorHolder;
	/**
	 * 存放所有需要校验验证码的url
	 */
	private Map<String, ValidateCodeType> urlMap = new HashMap<>();
	/**
	 * 验证请求url与配置的url是否匹配的工具类
	 */
	private AntPathMatcher pathMatcher = new AntPathMatcher();

	/**
	 * 初始化要拦截的url配置信息
	 */
	@Override
	public void afterPropertiesSet() throws ServletException {
		super.afterPropertiesSet();

		urlMap.put(SecurityConstants.DEFAULT_LOGIN_PROCESSING_URL_FORM, ValidateCodeType.IMAGE);
		addUrlToMap(securityProperties.getCode().getImage().getUrl(), ValidateCodeType.IMAGE);

		urlMap.put(SecurityConstants.DEFAULT_LOGIN_PROCESSING_URL_MOBILE, ValidateCodeType.SMS);
		addUrlToMap(securityProperties.getCode().getSms().getUrl(), ValidateCodeType.SMS);
	}

	/**
	 * 讲系统中配置的需要校验验证码的URL根据校验的类型放入map
	 *
	 * @param urlString
	 * @param type
	 */
	protected void addUrlToMap(String urlString, ValidateCodeType type) {
		if (StringUtils.isNotBlank(urlString)) {
			String[] urls = StringUtils.splitByWholeSeparatorPreserveAllTokens(urlString, ",");
			for (String url : urls) {
				urlMap.put(url, type);
			}
		}
	}

	/*
	 * (non-Javadoc)
	 *
	 * @see
	 * org.springframework.web.filter.OncePerRequestFilter#doFilterInternal(
	 * javax.servlet.http.HttpServletRequest,
	 * javax.servlet.http.HttpServletResponse, javax.servlet.FilterChain)
	 */
	@Override
	protected void doFilterInternal(HttpServletRequest request, HttpServletResponse response, FilterChain chain)
			throws ServletException, IOException {

		ValidateCodeType type = getValidateCodeType(request);
		if (type != null) {
			logger.info("校验请求(" + request.getRequestURI() + ")中的验证码,验证码类型" + type);
			try {
				validateCodeProcessorHolder.findValidateCodeProcessor(type)
						.validate(new ServletWebRequest(request, response));
				logger.info("验证码校验通过");
			} catch (ValidateCodeException exception) {
				authenticationFailureHandler.onAuthenticationFailure(request, response, exception);
				return;
			}
		}

		chain.doFilter(request, response);

	}

	/**
	 * 获取校验码的类型,如果当前请求不需要校验,则返回null
	 *
	 * @param request
	 * @return
	 */
	private ValidateCodeType getValidateCodeType(HttpServletRequest request) {
		ValidateCodeType result = null;
		if (!StringUtils.equalsIgnoreCase(request.getMethod(), "get")) {
			Set<String> urls = urlMap.keySet();
			for (String url : urls) {
				if (pathMatcher.match(url, request.getRequestURI())) {
					result = urlMap.get(url);
				}
			}
		}
		return result;
	}

}
新配置:
        @Override
	protected void configure(HttpSecurity http) throws Exception {

                ValidCodeFilter validCodeFilter = new ValidCodeFilter();
                validCodeFilter.setAuthenticationFailureHandler(imoocAuthenticationFailureHandler);

		http.addFilterBefore(validCodeFilter, UsernamePasswordAuthenticationFilter.class)
                        .formLogin()
                        .loginPage("/imooc-signIn.html")
                        .loginProcessingUrl("/authentication/form")
                        .successHandler(imoocAuthenticationSuccessHandler)
                        .failureHandler(imoocAuthenticationFailureHandler)
			.and()
			.authorizeRequests()
                        .antMatchers("/authentication/require", securityProperties.getBrowser().getLoginPage()).permitAll()
			.anyRequest()
			.authenticated()
                        .and()
                        .csrf().disable();

	}
6、重构图形验证码接口(视频4-8)
重构内容:验证码基本参数可配置、验证码拦截接口可配置、验证码的生成逻辑可配置

7、添加“记住我”功能
“记住我”功能基本原理、“记住我”功能具体实现、“记住我”功能SpringSecurity源码解析
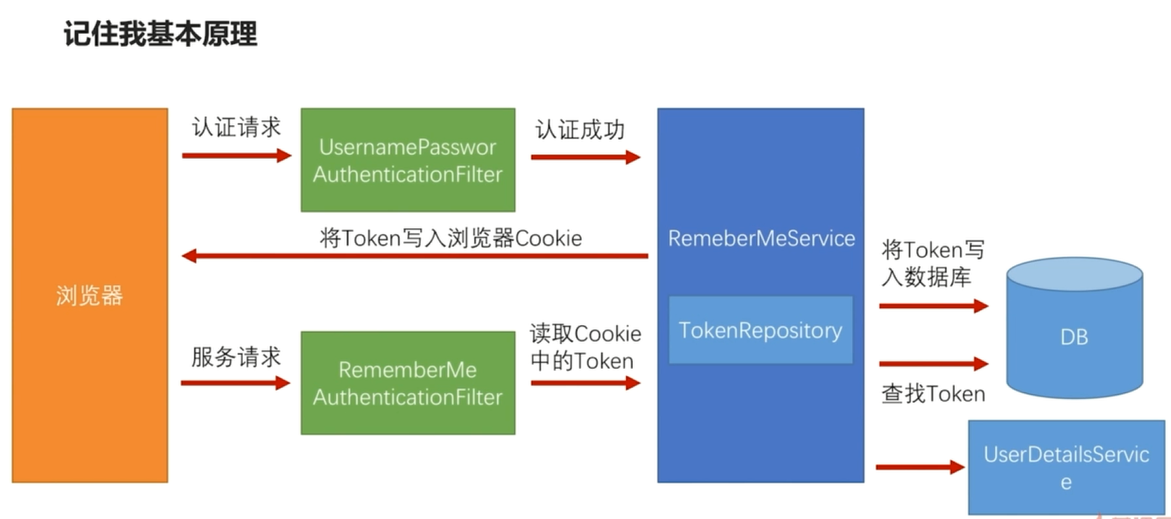
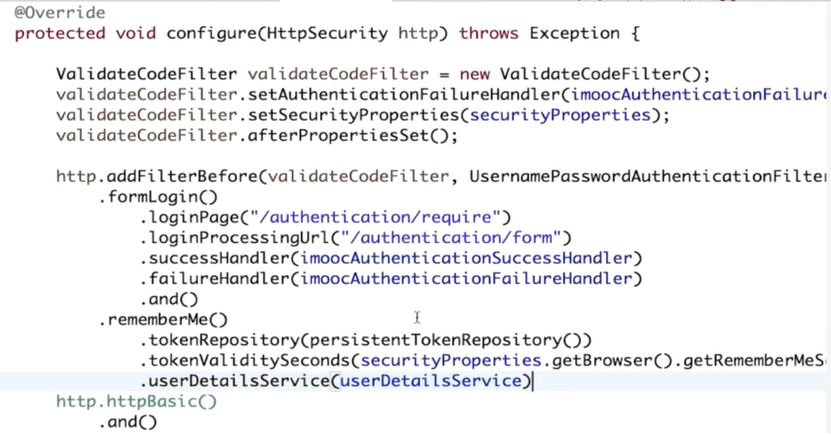
配置:
8、实现短信验证码登录(视频4-10 ~ 4-13)
开发短信验证码接口、校验短信验证码并登录、重构代码
登录页面:
<h3>短信登录</h3>
	<form action="/authentication/mobile" method="post">
		<table>
			<tr>
				<td>手机号:</td>
				<td><input type="text" name="mobile" value="13012345678"></td>
			</tr>
			<tr>
				<td>短信验证码:</td>
				<td>
					<input type="text" name="smsCode">
					<a href="/code/sms?mobile=13012345678">发送验证码</a>
				</td>
			</tr>
			<tr>
				<td colspan="2"><button type="submit">登录</button></td>
			</tr>
		</table>
	</form>
短信验证码生成接口略。
短信登录开发需要写一个SmsAuthenticationFilter和SmsAuthenticationProvider
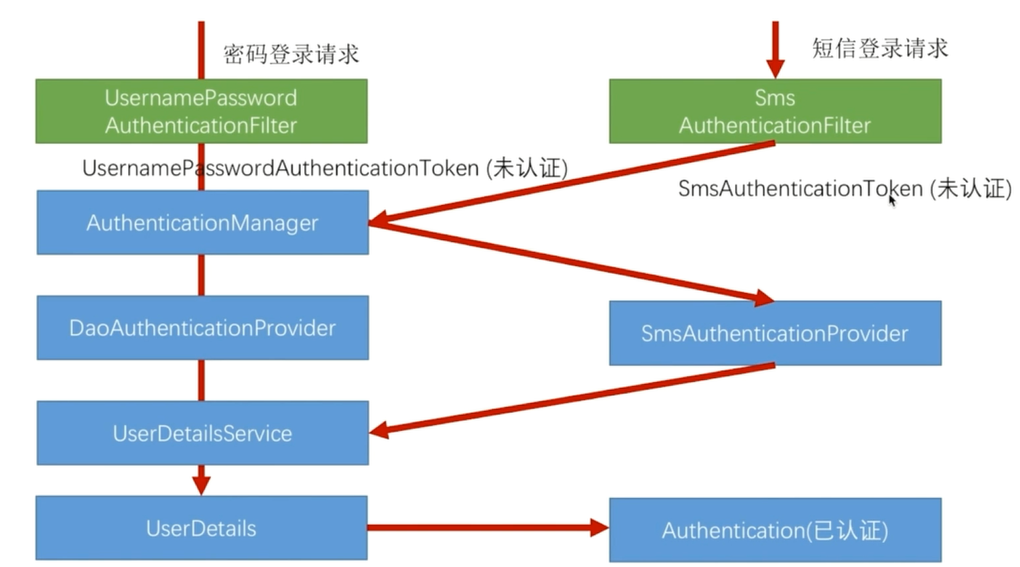
关键类:
