准备工作:
服务器192.168.96.12,centos7, jdk,mysql5.7,mycat1.6.x,navicat
搭建步骤:
1.在服务器192.168.96.12服务器上安装mysql数据库,并且使用GRANT REPLICATION SLAVE ON *.* to 'root'@'%' identified by '1328174';FLUSH PRIVILEGES;命令给mysql赋权,这样子才可远程访问mysql服务器. 为了保险,修改mysql配置文件,设置Mysql大小写不敏感,vi /etc/my.cnf,在[mysqld]后面添加:lower_case_table_names=1
2.在mysql服务器上安装三个分片数据库;
CREATE database db1;
CREATE database db2;
CREATE database db3;
3.修改mycat的server.xml配置
<?xml version="1.0" encoding="UTF-8"?>
<!-- - - Licensed under the Apache License, Version 2.0 (the "License");
- you may not use this file except in compliance with the License. - You
may obtain a copy of the License at - - http://www.apache.org/licenses/LICENSE-2.0
- - Unless required by applicable law or agreed to in writing, software -
distributed under the License is distributed on an "AS IS" BASIS, - WITHOUT
WARRANTIES OR CONDITIONS OF ANY KIND, either express or implied. - See the
License for the specific language governing permissions and - limitations
under the License. -->
<!DOCTYPE mycat:server SYSTEM "server.dtd">
<mycat:server xmlns:mycat="http://io.mycat/">
<!--设置四个线程跑程序,不是必须--><system>
<property name="processors">4</property>
</system><!--配置一个root账号,此账号必须要能访问mysql服务器-->
<user name="root">
<property name="password">1328174</property><!--设置一个逻辑库,名称叫TESTDB,它必须要与schema.xml中名称一致-->
<property name="schemas">TESTDB</property>
</user>
</mycat:server>
4. 修改mycat的schema.xml的配置
<?xml version="1.0"?>
<!DOCTYPE mycat:schema SYSTEM "schema.dtd">
<mycat:schema xmlns:mycat="http://io.mycat/"><!--逻辑库的名称-->
<schema name="TESTDB" checkSQLschema="false" sqlMaxLimit="100">
<!--表名,sharding-by-intfile是分库分表策略,详细信息要去rule.xml中去查看,然后就会发现它是按照employee表中的sharding_id字段来进行分片,而且体如何分片,则可在conf/partition-hash-int.txt配置--><table name="employee" primaryKey="ID" dataNode="dn1,dn2,dn3" rule="sharding-by-intfile" />
</schema><!---dataNode是节点,database是真实的mysql库->
<dataNode name="dn1" dataHost="localhost1" database="db1" />
<dataNode name="dn2" dataHost="localhost1" database="db2" />
<dataNode name="dn3" dataHost="localhost1" database="db3" />
<dataHost name="localhost1" maxCon="500" minCon="10" balance="0"
dbType="mysql" dbDriver="native"><!--心跳检测-->
<heartbeat>select user()</heartbeat><!--mysql服务器连接信息-->
<writeHost host="hostMaster" url="localhost:3306" user="root" password="1328174"></writeHost>
</dataHost>
</mycat:schema>
5. 启动mycat
bin/startup_nowrap.sh, 查看日志可以logs文件下.
6. 登录mycat
mysql -uroot -p1328174 -h192.168.96.12 -P8066 -DTESTDB
7. 创建employee表,然后插入数据
create table employee (id int not null primary key,name varchar(100),sharding_id int not null);
使用explain命令查看创建employee的信息:

插入数据:
insert into employee(id,name,sharding_id) values(1,'leader us',10000);
insert into employee(id,name,sharding_id) values(2, 'me',10010);
insert into employee(id,name,sharding_id) values(3, 'mycat',10000);
insert into employee(id,name,sharding_id) values(4, 'mydog',10010);
insert into employee(id,name,sharding_id) values(5, 'mimi',10020);
insert into employee(id,name,sharding_id) values(6, 'jetty',10020);
然后也可以使用explain查看insert的信息.
8.使用navicat查看数据
db1中有两条数据;
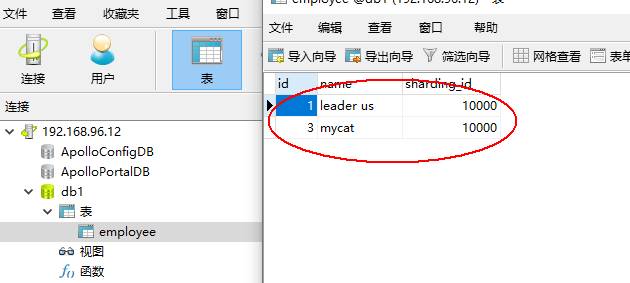
同样可以发现db2,db3中都有数据.达到了分库的目的.
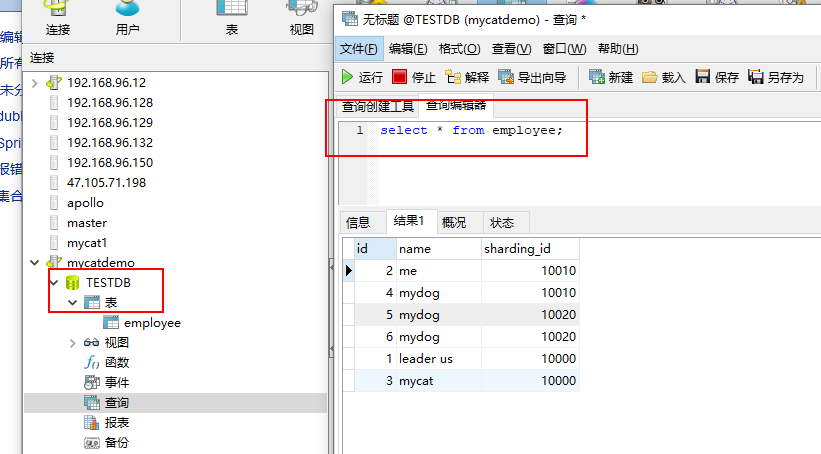
同时,我们在mycat的TESTDB逻辑库中,却可以查询出employee表中的所有数据来.
最后补上hash-int分区策略的配置文件partition-hash-int.txt
