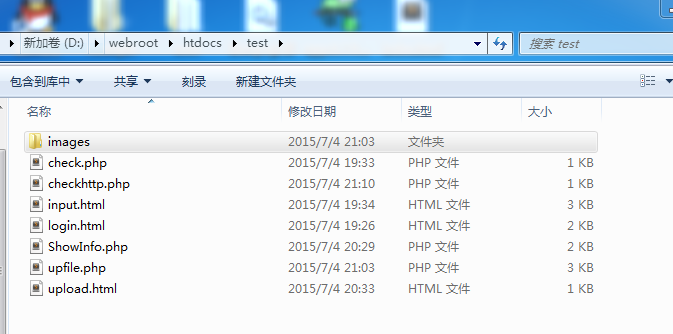
资料来源:《PHP和MySQL Web应用开发》
一、在PHP中接受和处理表单数据
input.html
<!DOCTYPE html PUBLIC "-//W3C//DTD XHTML 1.0 Transitional//EN" "http://www.w3.org/TR/xhtml1/DTD/xhtml1-transitional.dtd">
<html xmlns="http://www.w3.org/1999/xhtml">
<head>
<meta http-equiv="Content-Type" content="text/html; charset=utf-8" />
<title>无标题文档</title>
</head>

<script language="javascript">
function form_onsubmit(obj)
{
  if(obj.txtUserName.value == "") {
    alert("请输入用户名");
       return false;
  }
  if(obj.city.selectedIndex <0) {
    alert("请选择所在城市");
    return false;
  }
  return true;
}
</script>
<body>
<form id="form1" name="form1" method="post" action="ShowInfo.php">
  <table width="593" border="0">
    <tr>
      <td width="162">用户名</td>
      <td width="421"><label>
        <input name="txtUserName" type="text" id="txtUserName" value="" />
      </label></td>
    </tr>
    <tr>
      <td>用户密码</td>
      <td><label>
        <input type="password" name="txtUserPass" id="txtUserPass" />
      </label></td>
    </tr>
    <tr>
      <td>确认密码</td>
      <td><label>
        <input type="password" name="txtUserPass2" id="txtUserPass2" />
      </label></td>
    </tr>
    <tr>
      <td>性别</td>
      <td><label>
        <input name="radioSex" type="radio" id="Sex" value="男" checked="checked" />
        男
        <input name="radioSex" type="radio" id="radioSex2" value="女" />
      女</label></td>
    </tr>
    <tr>
      <td>兴趣爱好</td>
      <td><label>
        <input type="checkbox" name="C1" id="C1" />
      文艺
      <input type="checkbox" name="C2" id="C2" />
      体育
      <input type="checkbox" name="C3" id="C3" />
      电脑</label></td>
    </tr>
    <tr>
      <td>所在城市</td>
      <td><label>
        <select name="city" id="city">
          <option value="北京" selected="selected">北京</option>
          <option value="上海">上海</option>
          <option value="天津">天津</option>
          <option value="重庆">重庆</option>
        </select>
      </label></td>
    </tr>
    <tr>
      <td>自我介绍</td>
      <td><label>
        <textarea name="textarea" id="textarea" cols="45" rows="5"></textarea>
      </label></td>
    </tr>
  </table>
  <p>
    <label></label>
    <label>
    <input type="submit" name="submit" id="submit" value="提交" onclick="return form_onsubmit(this.form)"/>
    <input type="reset" name="reset" id="reset" value="重设" />
    </label>
  </p>
</form>
</body>
</html>
ShowInfo.php
<meta http-equiv="Content-Type" content="text/html; charset=utf-8" />
<?PHP
//error_reporting(E_ALL ^ E_DEPRECATED);
error_reporting(0);
    if($_POST['submit']) {
        echo("用户名:" . $_POST['txtUserName'] . "<BR>");
        echo("用户密码:" . $_POST['txtUserPass'] . "<BR>");
        echo("确认密码:" . $_POST['txtUserPass2'] . "<BR>");
        echo("性别:" . $_POST['radioSex'] . "<BR>");
        echo("兴趣爱好:");
        if($_POST['C1'] == 'on')
            echo("文艺  ");
        if($_POST['C2'] == 'on')
            echo("体育  ");
        if($_POST['C3'] == 'on')
            echo("电脑  ");
        echo("<BR>");
        echo("所在城市:" . $_POST['city'] . "<BR>");
        echo("自我介绍:") . $_POST['textarea'];
    }
    /*也可以使用GET来提交数据,if($_GET['submit'])
    但是GET提交方式存在如下不足:
    %--表单数据会出现在URL中,这是不安全的。因为有些数据(例如密码)是不希望被看到的。
    %--URL的数据长度是有限制的,不能用于传递大数据量的表单数据
    */

    /*PHP Notice: Undefined index: ... 问题的解决方法:
    http://blog.sina.com.cn/s/blog_62d8a2080100n1xu.html
    http://www.mycodes.net/74/2360.htm
    配置php.ini不行
    加  error_reporting(E_ALL ^ E_DEPRECATED);   也不行
    加  error_reporting(0);    解决了,不过要主要代码规范性
    加  @   解决,要加3个 @$_POST['C1']  @$_POST['C2'] @$_POST['C3']
    */
?>
二、用户身份认证
login.html
<html> <head> <meta http-equiv="Content-Type" content="text/html; charset=utf-8"> <title>用户名</title> </head> <script language="javascript"> function form_onsubmit(obj) { if(obj.txtUserName.value == "") { alert("请输入用户名"); return false; } if(obj.txtPwd.value == "") { alert("请输入密码"); return false; } return true; } </script> <body> <div align="center"> <hr color="#000080" size="3" width="80%"> <form method="POST" action="check.php"> <table border="0" width="35%" id="table1" style="line-height: 100%; margin-top: 6; margin-bottom: 6"> <tr> <td> <p style="margin-top: 12px; margin-bottom: 12px">用户名:</td> <td> <p style="margin-top: 12px; margin-bottom: 12px"> <input type="text" name="txtUserName" size="20"></td> </tr> <tr> <td> <p style="margin-top: 12px; margin-bottom: 12px">密码:</td> <td> <p style="margin-top: 12px; margin-bottom: 12px"> <input type="password" name="txtPwd" size="20"></td> </tr> <tr> <td colspan="2"> <p align="center" style="margin-top: 12px; margin-bottom: 12px"> <input type="submit" value="登 录" name="B1" style="font-size: 11pt; font-family: 宋体" onclick="return form_onsubmit(this.form)"> <input type="reset" value="重 置" name="B2" style="font-family: 宋体; font-size: 11pt"></td> </tr> </table> <p> </p> </form> <p> </div> </body> </html>
check.php
<?PHP
  //取输入的用户名和密码
  $UID=$_POST['txtUserName'];
  $PWD=$_POST['txtPwd'];
  // 验证用户名和密码

 if($UID == "admin" and $PWD == "pass")
   echo("您已经登录成功,欢迎光临。");
 else
   echo("登录失败,请返回重新登录。");
?>
使用HTTP认证机制的例子
checkhttp.php
<?PHP
   if (!isset( $_SERVER [ 'PHP_AUTH_USER' ])) {
     header ( 'WWW-Authenticate: Basic realm="My Realm"' );
     header ( 'HTTP/1.0 401 Unauthorized' );
    echo 'Text to send if user hits Cancel button' ;
    exit;
  } else {
    echo "<p>Hello { $_SERVER [ 'PHP_AUTH_USER' ]} .</p>" ;
    echo "<p>You entered { $_SERVER [ 'PHP_AUTH_PW' ]} as your password.</p>" ;
  }
?>
三、文件上传
upload.html
<form name="form1" method="post" action="upfile.php" enctype="multipart/form-data" >
<h1 align="center">上传文件的演示实例</h1>
<p align="center">选择上传的jpg图片文件</p>
<table width="80%" border="0" align=center>
<tr><td><input type="file" name="file1" style="80%" value=""></td></tr>
<tr><td align=center><input type="submit" name="Submit" value=" 上 传 "></td></tr>
</table>
</form>
upfile.php
<html>
<head>
<title>文件上传</title>
</head>
<body>
<font style='font-family: 宋体; font-size: 9pt'>
<?PHP
date_default_timezone_set('PRC');
    // 检查上传文件的目录
    $upload_dir = getcwd() . "\images\";
    // 如果目录不存在,则创建同级目录 images
    if(!is_dir($upload_dir))
        mkdir($upload_dir);
    // 此函数用于根据当前系统时间自动生成上传文件名
    function makefilename() {
        // 获取当前系统时间,生成文件名
        $curtime = getdate();
        $filename =$curtime['year'] . $curtime['mon'] . $curtime['mday'] . $curtime['hours'] . $curtime['minutes'] . $curtime['seconds'] . ".jpeg";

        Return $filename;
    }
    $newfilename = makefilename();
    $newfile = $upload_dir . $newfilename;
    if(file_exists($_FILES['file1']['tmp_name'])) {
        move_uploaded_file($_FILES['file1']['tmp_name'], $newfile);
    }
    else {
        echo("error");
    }
    echo("客户端文件名:" .    $_FILES['file1']['name'] . "<BR>");
    echo("文件类型:" . $_FILES['file1']['type'] . "<BR>");
    echo("文件大小:" . $_FILES['file1']['size'] . "<BR>");
    echo("服务器端临时文件名:" . $_FILES['file1']['tmp_name'] . "<BR>");
//    echo(    $_FILES['file1']['error'] . "<BR>");
    echo("上传后新的文件名:" . $newfile . "<BR>");
    /*
    Warning: getdate(): It is not safe to rely on the system's timezone settings.
    这里我们解决是在页头加   date_default_timezone_set('PRC');
    解决方案:http://www.shangxueba.com/jingyan/121682.html
    http://blog.sina.com.cn/s/blog_633ac4630100xb1a.html
    以下是三种方法(任选一种都行):
    一、在页头使用date_default_timezone_set()设置 date_default_timezone_set('PRC'); //东八时区 echo date('Y-m-d H:i:s'); 二、在页头使用 ini_set('date.timezone','Asia/Shanghai');
    三、修改php.ini。打开php5.ini查找date.timezone 去掉前面的分号修改成为:date.timezone =PRC ,重启http服务(如apache2或iis等)即可。
    XXX可以任意正确的值。对于我们国内来说:可以为以下值:Asia/Chongqing ,Asia/Shanghai ,Asia/Urumqi (依次为重庆,上海,乌鲁木齐)港台地区可用:Asia/Macao ,Asia/Hong_Kong ,Asia/Taipei (依次为澳门,香港,台北),还有新加坡:Asia/Singapore,当然PRC也行。
    */
?>
文件上传成功 [ <a href=# onclick=history.go(-1)>继续上传</a > ]
<!--
    history.go(-1)在谷歌浏览器好像不好用,要用history.go(-2),而且要双击那种
    http://blog.163.com/yiran_5467/blog/static/10821326201272212416782/
-->

<BR><BR>下面是上传的图片文件:<BR><BR>
<img border="0" src="images/<?PHP echo($newfilename); ?>">
</font>
</body>
</html>
截图:
