写在前面
RocketMQ Remoting模块也是整个代码中比较简单的一个模块,在掌握基本的Netty知识之后就可以尝试对源码进行简单的阅读分析,我也是结合源码分析来进行Netty应用的学习。
该模块主要有两个类 NettyRemotingServer 和 NettyRemotingClient 。分别对应服务端和客户端,服务端主要在Broker和NameService中使用。
本文是对NettyRemotingServer 的初始化和启动流程以及请求发送和处理的过程结合源码进行简单分析。第一次认真写博客,如有不足希望在评论里指出。
Server启动流程
初始化实例
初始化时首先实例化了 ServerBootstrap 以及publicExecutor,publicExecutor为负责处理请求业务的线程池。RocketMQ中NettyRemotingServer的使用的是 Reactor 多线程模型
this.serverBootstrap = new ServerBootstrap();
        this.nettyServerConfig = nettyServerConfig;
        this.channelEventListener = channelEventListener;
        int publicThreadNums = nettyServerConfig.getServerCallbackExecutorThreads();
        if (publicThreadNums <= 0) {
            publicThreadNums = 4;
        }
        this.publicExecutor = Executors.newFixedThreadPool(publicThreadNums, new ThreadFactory() {
            private AtomicInteger threadIndex = new AtomicInteger(0);

            @Override
            public Thread newThread(Runnable r) {
                return new Thread(r, "NettyServerPublicExecutor_" + this.threadIndex.incrementAndGet());
            }
        });
根据 useEpoll() 方法判断当前主机是否支持epoll,然后决定创建 EpollEventLoopGroup 或者 NioEventLoopGroup;
源码如下所示,并且通过实现ThreadFactory来自定义线程名。
 if (useEpoll()) {
            this.eventLoopGroupBoss = new EpollEventLoopGroup(1, new ThreadFactory() {
                private AtomicInteger threadIndex = new AtomicInteger(0);

                @Override
                public Thread newThread(Runnable r) {
                    return new Thread(r, String.format("NettyEPOLLBoss_%d", this.threadIndex.incrementAndGet()));
                }
            });
            this.eventLoopGroupSelector = new EpollEventLoopGroup(nettyServerConfig.getServerSelectorThreads(), new ThreadFactory() {
                private AtomicInteger threadIndex = new AtomicInteger(0);
                private int threadTotal = nettyServerConfig.getServerSelectorThreads();

                @Override
                public Thread newThread(Runnable r) {
                    return new Thread(r, String.format("NettyServerEPOLLSelector_%d_%d", threadTotal, this.threadIndex.incrementAndGet()));
                }
            });
        } else {
            this.eventLoopGroupBoss = new NioEventLoopGroup(1, new ThreadFactory() {
                private AtomicInteger threadIndex = new AtomicInteger(0);

                @Override
                public Thread newThread(Runnable r) {
                    return new Thread(r, String.format("NettyNIOBoss_%d", this.threadIndex.incrementAndGet()));
                }
            });
            this.eventLoopGroupSelector = new NioEventLoopGroup(nettyServerConfig.getServerSelectorThreads(), new ThreadFactory() {
                private AtomicInteger threadIndex = new AtomicInteger(0);
                private int threadTotal = nettyServerConfig.getServerSelectorThreads();

                @Override
                public Thread newThread(Runnable r) {
                    return new Thread(r, String.format("NettyServerNIOSelector_%d_%d", threadTotal, this.threadIndex.incrementAndGet()));
                }
            });
        }
最后会调用 loadSslContext() 方法,加载ssl信息..(这块暂时不管)
启动服务
首先初始化Work线程池,该线程负责 Netty ChannelHandler 执行
 this.defaultEventExecutorGroup = new DefaultEventExecutorGroup(nettyServerConfig.getServerWorkerThreads(), new ThreadFactory() {
            private AtomicInteger threadIndex = new AtomicInteger(0);

            @Override
            public Thread newThread(Runnable r) {
                return new Thread(r, "NettyServerCodecThread_" + this.threadIndex.incrementAndGet());
            }
        });
然后就是通过ServerBootStrap来构建Netty服务,并绑定端口开始监听连接
启动完成后会开启一个定时任务,来扫描并移除已超时的请求。延迟3秒启动,每一秒执行一次;
 this.timer.scheduleAtFixedRate(new TimerTask() {
            @Override
            public void run() {
                try {
                    NettyRemotingServer.this.scanResponseTable();
                } catch (Throwable e) {
                    log.error("scanResponseTable exception", e);
                }
            }
        }, 1000 * 3, 1000);
超时请求扫描。在每次请求时,会将ResponseFuture放入 responseTable Map中缓存,通过定时扫描该map中的value,根据 ResponseFuture记录的开始时间和超时时间来判断是否超时。
超时的请求会从响应表中移除,并执行其回调方法,防止调用的业务线程一直阻塞。
    public void scanResponseTable () {
            final List<ResponseFuture> rfList = new LinkedList<ResponseFuture>();
            Iterator<Entry<Integer, ResponseFuture>> it = this.responseTable.entrySet().iterator();
            while (it.hasNext()) {
                Entry<Integer, ResponseFuture> next = it.next();
                ResponseFuture rep = next.getValue();        //当前时间大于 请求开始时间 + 超时等待时间 + 1秒 则认为该请求已超时,然后释放资源并移除该元素
                if ((rep.getBeginTimestamp() + rep.getTimeoutMillis() + 1000) <= System.currentTimeMillis()) {
                    rep.release();
                    it.remove();
                    rfList.add(rep);
                    log.warn("remove timeout request, " + rep);
                }
            }    //执行被移除 ResponseFuture 的回调方法
            for (ResponseFuture rf : rfList) {
                try {
                    executeInvokeCallback(rf);
                } catch (Throwable e) {
                    log.warn("scanResponseTable, operationComplete Exception", e);
                }
            }
        }
业务处理
RemotingCommand
在RocketMQ中,所有的网络请求都会被封装为一个RemotingCommand对象。字段和含义如下表所示
|
Header字段 |
类型 |
Request说明 |
Response说明 |
|
code |
int |
请求操作码,应答方根据不同的请求码进行不同的业务处理 |
应答响应码。0表示成功,非0则表示各种错误 |
|
language |
LanguageCode |
请求方实现的语言 |
应答方实现的语言 |
|
version |
int |
请求方程序的版本 |
应答方程序的版本 |
|
opaque |
int |
相当于requestId,在同一个连接上的不同请求标识码,与响应消息中的相对应 |
应答不做修改直接返回 |
|
flag |
int |
区分是普通RPC还是onewayRPC得标志 |
区分是普通RPC还是onewayRPC得标志 |
|
remark |
String |
传输自定义文本信息 |
传输自定义文本信息 |
|
extFields |
HashMap<String, String> |
请求自定义扩展信息 |
响应自定义扩展信息 |
|
body |
byte[] |
消息主体数据 |
消息主体数据 |
传输内容主要可以分为以下4部分:
- 消息长度:总长度,四个字节存储,占用一个int类型;
- 序列化类型&消息头长度:同样占用一个int类型,第一个字节表示序列化类型,后面三个字节表示消息头长度;
- 消息头数据:经过序列化后的消息头数据;
- 消息主体数据:消息主体的二进制字节数据内容;
该类除了包含数据结构外,还包含了消息的编解码功能;详细可以参考源码,不多说
ResponseFuture
在每执行一次请求时,都会创建一个ResponseFuture对象,该对象根据名字就可以看出是和响应信息相关的。在该对象中记录了请求的一些基本信息以及响应信息,和回调方法等。
public class ResponseFuture {
    //一个对应于请求的序列号
    private final int opaque;
    //请求执行的Channel
    private final Channel processChannel;
    //请求超时时间
    private final long timeoutMillis;
    //回调接口
    private final InvokeCallback invokeCallback;
    //请求开始时间
    private final long beginTimestamp = System.currentTimeMillis();
    //对响应进行阻塞
    private final CountDownLatch countDownLatch = new CountDownLatch(1);
    //信号量资源
    private final SemaphoreReleaseOnlyOnce once;
    //判断是否回调方法已执行,避免重复调用
    private final AtomicBoolean executeCallbackOnlyOnce = new AtomicBoolean(false);
    //封装的响应信息
    private volatile RemotingCommand responseCommand;
    //记录是否请求发送成功
    private volatile boolean sendRequestOK = true;
    //异常信息
    private volatile Throwable cause;
发送信息
请求有三种模式:
- 同步请求:invokeSync
- 异步请求:invokeAsync
- 单向请求:invokeOneway
同步请求
请求执行的代码就比较直观,
首先是创建一个ResponseFuture对象,封装本次请求的相关信息。
然后将该对象放入 responseTable中,等接收到响应时,通过opaque来获取到对应的ResponseFuture,然后放入response信息并 唤醒等待 (通过调用 countDownLatch.down());
当前方法在发送请求后,会调用 responseFuture.waitResponse() 方法进行阻塞等待,直至响应返回或者等待超时。最后返回Response信息;
public RemotingCommand invokeSyncImpl(final Channel channel, final RemotingCommand request,
    final long timeoutMillis)
    throws InterruptedException, RemotingSendRequestException, RemotingTimeoutException {
    //对应每个请求的唯一ID,采用自增序列方式产生
    final int opaque = request.getOpaque();

    try {
        final ResponseFuture responseFuture = new ResponseFuture(channel, opaque, timeoutMillis, null, null);
        this.responseTable.put(opaque, responseFuture);
        final SocketAddress addr = channel.remoteAddress();
        channel.writeAndFlush(request).addListener(new ChannelFutureListener() {
            @Override
            public void operationComplete(ChannelFuture f) throws Exception {
                if (f.isSuccess()) {
                    responseFuture.setSendRequestOK(true);
                    return;
                } else {
                    responseFuture.setSendRequestOK(false);
                }

                responseTable.remove(opaque);
                responseFuture.setCause(f.cause());
                responseFuture.putResponse(null);
                log.warn("send a request command to channel <" + addr + "> failed.");
            }
        });

        RemotingCommand responseCommand = responseFuture.waitResponse(timeoutMillis);
        if (null == responseCommand) {
            if (responseFuture.isSendRequestOK()) {
                throw new RemotingTimeoutException(RemotingHelper.parseSocketAddressAddr(addr), timeoutMillis,
                    responseFuture.getCause());
            } else {
                throw new RemotingSendRequestException(RemotingHelper.parseSocketAddressAddr(addr), responseFuture.getCause());
            }
        }

        return responseCommand;
    } finally {
        this.responseTable.remove(opaque);
    }
}
异步请求
异步请求时,会使用信号量来限制异步请求数量,避免大量的异步请求等待导致内存占用过高; 对应 protected final Semaphore semaphoreAsync; 字段
异步请求时,ResponseFuture 由之前启动服务时创建的定时任务来定时判断是否等待超时,超时的会被移除并释放信号量资源
public void invokeAsyncImpl(final Channel channel, final RemotingCommand request, final long timeoutMillis,
    final InvokeCallback invokeCallback)
    throws InterruptedException, RemotingTooMuchRequestException, RemotingTimeoutException, RemotingSendRequestException {
    long beginStartTime = System.currentTimeMillis();
    final int opaque = request.getOpaque();
    //获取一个信号量
    boolean acquired = this.semaphoreAsync.tryAcquire(timeoutMillis, TimeUnit.MILLISECONDS);
    if (acquired) {
        final SemaphoreReleaseOnlyOnce once = new SemaphoreReleaseOnlyOnce(this.semaphoreAsync);
        long costTime = System.currentTimeMillis() - beginStartTime;
        if (timeoutMillis < costTime) {
            once.release();
            throw new RemotingTimeoutException("invokeAsyncImpl call timeout");
        }

        final ResponseFuture responseFuture = new ResponseFuture(channel, opaque, timeoutMillis - costTime, invokeCallback, once);
        this.responseTable.put(opaque, responseFuture);
        try {
            channel.writeAndFlush(request).addListener(new ChannelFutureListener() {
                @Override
                public void operationComplete(ChannelFuture f) throws Exception {
                    if (f.isSuccess()) {
                        responseFuture.setSendRequestOK(true);
                        return;
                    }
                    requestFail(opaque);
                    log.warn("send a request command to channel <{}> failed.", RemotingHelper.parseChannelRemoteAddr(channel));
                }
            });
        } catch (Exception e) {
            //请求发送失败则释放资源
            responseFuture.release();
            log.warn("send a request command to channel <" + RemotingHelper.parseChannelRemoteAddr(channel) + "> Exception", e);
            throw new RemotingSendRequestException(RemotingHelper.parseChannelRemoteAddr(channel), e);
        }
    } else {
        if (timeoutMillis <= 0) {
            throw new RemotingTooMuchRequestException("invokeAsyncImpl invoke too fast");
        } else {
            String info =
                String.format("invokeAsyncImpl tryAcquire semaphore timeout, %dms, waiting thread nums: %d semaphoreAsyncValue: %d",
                    timeoutMillis,
                    this.semaphoreAsync.getQueueLength(),
                    this.semaphoreAsync.availablePermits()
                );
            log.warn(info);
            throw new RemotingTimeoutException(info);
        }
    }
}
单向请求
丢出去就完事
public void invokeOneway(String addr, RemotingCommand request, long timeoutMillis) throws InterruptedException,
    RemotingConnectException, RemotingTooMuchRequestException, RemotingTimeoutException, RemotingSendRequestException {
    final Channel channel = this.getAndCreateChannel(addr);
    if (channel != null && channel.isActive()) {
        try {
            doBeforeRpcHooks(addr, request);
            this.invokeOnewayImpl(channel, request, timeoutMillis);
        } catch (RemotingSendRequestException e) {
            log.warn("invokeOneway: send request exception, so close the channel[{}]", addr);
            this.closeChannel(addr, channel);
            throw e;
        }
    } else {
        this.closeChannel(addr, channel);
        throw new RemotingConnectException(addr);
    }
}
处理请求
在start()方法里,启动netty服务时,注册了一个NettyServerHandler,该Handler就是负责处理请求的,在这之前,请求的数据经过decoder已经解码成为一个RemotingCommand对象。
解码操作时通过NettyDecoder类对请求数据进行解码,最终是调用的 RemotingCommand#decode方法。
NettyServerHandler是NettyRemotingServer的一个内部类。其实现的是SimpleChannelInboundHandler类。在channelRead0方法中调用NettyRemotingServer#processMessageReceived方法将请求分为了Request请求和Response请求;分别调用对应的方法进行处理;
public void processMessageReceived(ChannelHandlerContext ctx, RemotingCommand msg) throws Exception {
    final RemotingCommand cmd = msg;
    if (cmd != null) {
        // 传入命令的处理
        switch (cmd.getType()) {
            case REQUEST_COMMAND:
                processRequestCommand(ctx, cmd);
                break;
            case RESPONSE_COMMAND:
                processResponseCommand(ctx, cmd);
                break;
            default:
                break;
        }
    }
}
处理过程大致流程和线程模型如下图所示。(参考官方文档的线程模型图,进行了一些删改)
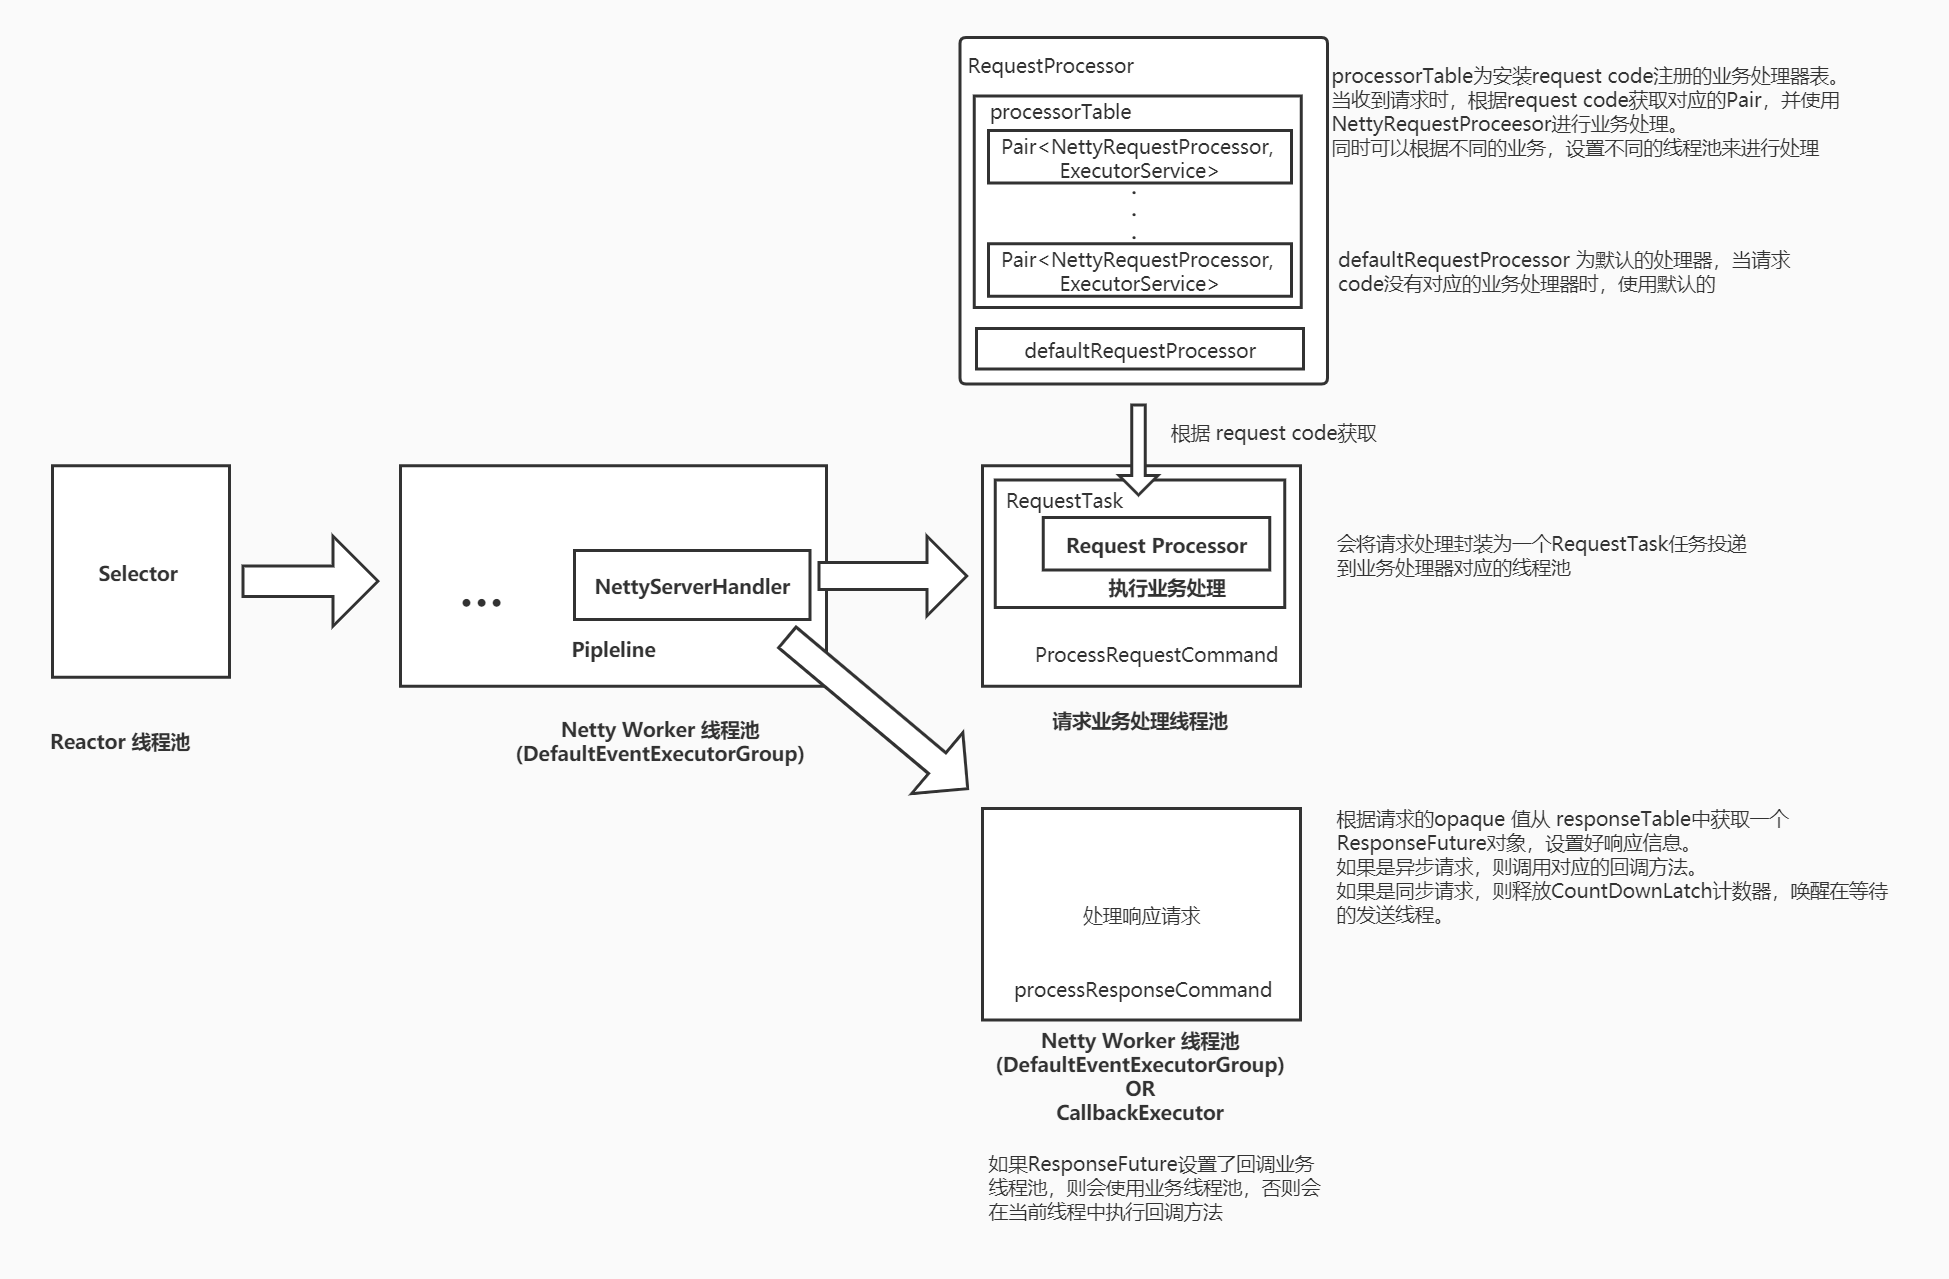
Request请求处理(NettyRemotingAbstract#processRequestCommand)
请求处理器 (Pair<NettyRequestProcessor, ExecutorService>)
对应每个请求 RemotingCommand 都有一个固定的code来标明对应不同的业务类型,可以在下面这个字段中注册不同业务类型的处理器,Pair<NettyRequestProcessor, ExecutorService>;
protected final HashMap<Integer/* request code */, Pair<NettyRequestProcessor, ExecutorService>> processorTable = new HashMap<Integer, Pair<NettyRequestProcessor, ExecutorService>>(64);
NettyRequestProcessor 即为业务处理对象,ExecutorService为该业务类型处理的线程池。
可以通过NettyRemotingServer#registerProcessor 方法来注册处理器实例。
  public void registerProcessor ( int requestCode, NettyRequestProcessor processor, ExecutorService executor){
            ExecutorService executorThis = executor;
            if (null == executor) {
                executorThis = this.publicExecutor;
            }
            Pair<NettyRequestProcessor, ExecutorService> pair = new Pair<NettyRequestProcessor, ExecutorService>(processor, executorThis);
            this.processorTable.put(requestCode, pair);
        }
默认处理器
protected Pair<NettyRequestProcessor, ExecutorService> defaultRequestProcessor;
该处理器为默认请求处理器,当请求的code在 processrTable中找不到对应的处理器时,则使用该默认处理器来执行请求。该实例通过 NettyRemotingServer#registerDefaultProcessor 方法进行注册。
处理过程
大致处理过程:首先根据code获取Pair对象,获取处理器对象。
        //根据请求代码获取对应的处理器来处理该请求
        final Pair<NettyRequestProcessor, ExecutorService> matched = this.processorTable.get(cmd.getCode());
        // 如果没有匹配的处理程序,则使用默认的处理程序
        final Pair<NettyRequestProcessor, ExecutorService> pair = null == matched ? this.defaultRequestProcessor : matched;
然后处理器对请求进行处理并返回Response信息,调用回调方法将Response返回给请求端。如果是异步处理器,则是异步处理之后调用回调方法,同步方法则是同步等待执行结束并调用回调方法。该过程是使用获取的Pair对象中的线程池进行处理的,而不是在netty'的Channel处理线程中。RocketMQ使用的是多线程 Reactor模型。
业务执行源码如下:
Runnable run = new Runnable() {
    @Override
    public void run() {
        try {
            doBeforeRpcHooks(RemotingHelper.parseChannelRemoteAddr(ctx.channel()), cmd);
            //初始化回调接口,如果是异步请求处理器处理,则执行完后调用该回调接口
            final RemotingResponseCallback callback = new RemotingResponseCallback() {
                @Override
                public void callback(RemotingCommand response) {
                    doAfterRpcHooks(RemotingHelper.parseChannelRemoteAddr(ctx.channel()), cmd, response);
                    if (!cmd.isOnewayRPC()) {
                        if (response != null) {
                            response.setOpaque(opaque);
                            response.markResponseType();
                            try {
                                ctx.writeAndFlush(response);
                            } catch (Throwable e) {
                               ...
                            }
                        } else {
                        }
                    }
                }
            };
            // 如果是Netty异步请求处理器,处理请求命令
            if (pair.getObject1() instanceof AsyncNettyRequestProcessor) {
                AsyncNettyRequestProcessor processor = (AsyncNettyRequestProcessor)pair.getObject1();
                processor.asyncProcessRequest(ctx, cmd, callback);
            } else {
                NettyRequestProcessor processor = pair.getObject1();
                RemotingCommand response = processor.processRequest(ctx, cmd);
                doAfterRpcHooks(RemotingHelper.parseChannelRemoteAddr(ctx.channel()), cmd, response);
                callback.callback(response);
            }
        } catch (Throwable e) {
            log.error("process request exception", e);
            log.error(cmd.toString());
            //如果是非单向请求,当业务处理发生异常时,则返回一个包含异常信息的响应命令
            if (!cmd.isOnewayRPC()) {
                final RemotingCommand response = RemotingCommand.createResponseCommand(RemotingSysResponseCode.SYSTEM_ERROR,
                    RemotingHelper.exceptionSimpleDesc(e));
                response.setOpaque(opaque);
                ctx.writeAndFlush(response);
            }
        }
    }
};
该Runnable 对象会被封装为一个RequestTask任务,然后提交到线程池执行
final RequestTask requestTask = new RequestTask(run, ctx.channel(), cmd);
pair.getObject2().submit(requestTask);
如果没有对应code的处理器,且没有配置默认请求处理器,则会返回一个无法处理该请求的响应信息
if (pair != null) {
    ...
} else {
    String error = " request type " + cmd.getCode() + " not supported";
    final RemotingCommand response =
        RemotingCommand.createResponseCommand(RemotingSysResponseCode.REQUEST_CODE_NOT_SUPPORTED, error);
    response.setOpaque(opaque);
    ctx.writeAndFlush(response);
    log.error(RemotingHelper.parseChannelRemoteAddr(ctx.channel()) + error);
}
Response请求处理(processResponseCommand)
response响应处理的逻辑比较简单,根据响应信息里面的opaque找到 responseTable中缓存的ResponseFuture,然后进行相应的处理。源码逻辑很清晰明了
public void processResponseCommand(ChannelHandlerContext ctx, RemotingCommand cmd) {
    final int opaque = cmd.getOpaque();
    final ResponseFuture responseFuture = responseTable.get(opaque);
    if (responseFuture != null) {
        responseFuture.setResponseCommand(cmd);

        responseTable.remove(opaque);
        //如果该ResponseFuture对象回调方法不为空,则执行其回调方法
        if (responseFuture.getInvokeCallback() != null) {
            executeInvokeCallback(responseFuture);
        } else {
            //设置响应信息,并唤醒等待线程
            responseFuture.putResponse(cmd);
            responseFuture.release();
        }
    } else {
        log.warn("receive response, but not matched any request, " + RemotingHelper.parseChannelRemoteAddr(ctx.channel()));
        log.warn(cmd.toString());
    }
}
执行回调方法
private void executeInvokeCallback(final ResponseFuture responseFuture) {
    boolean runInThisThread = false;
    ExecutorService executor = this.getCallbackExecutor();
    if (executor != null) {
        try {
            executor.submit(new Runnable() {
                @Override
                public void run() {
                    try {
                        responseFuture.executeInvokeCallback();
                    } catch (Throwable e) {
                        log.warn("execute callback in executor exception, and callback throw", e);
                    } finally {
                        responseFuture.release();
                    }
                }
            });
        } catch (Exception e) {
            runInThisThread = true;
            log.warn("execute callback in executor exception, maybe executor busy", e);
        }
    } else {
        runInThisThread = true;
    }

    if (runInThisThread) {
        try {
            responseFuture.executeInvokeCallback();
        } catch (Throwable e) {
            log.warn("executeInvokeCallback Exception", e);
        } finally {
            responseFuture.release();
        }
    }
}
写在后面
NettyRemotingServer和NettyRemotingClient请求的发送和处理,最终都是通过其继承的NettyRemotingAbstract类里面的方法实现的,NettyRemotingClient在调用时,还需要处理一些其它信息,不过大体的过程和Server类似,因此不额外去将Client。
当然,在处理过程中还涉及到一些其它的扩展功能,可以具体去看一下源码。了解完Remoting模块后,再去学习其它模块时也会相对容易一些。