1.如何实现多线程
1.1实现Runnable接口,实现run()方法。
public class Main4 implements Runnable {

    public static void main(String[] args) {
        Main4 m = new Main4();
        new Thread(m).start();
    }

    @Override
    public void run() {
        for (int i = 0; i < 10; i++) {
            System.out.println(i);
        }
    }
}
1.2继承Thread接口,重写run()方法。
public class Main4 extends Thread {

    public static void main(String[] args) {
        new Main4().start();
    }

    @Override
    public void run() {
        for (int i = 0; i < 10; i++) {
            System.out.println(i);
        }
    }
}
1.3实现Callable接口,实现call()方法。
public class Main4 implements Callable {

    public static void main(String[] args) throws ExecutionException, InterruptedException {
        Callable c = new Main4();
        FutureTask<Integer> ft = new FutureTask<>(c);
        new Thread(ft).start();
        System.out.println(ft.get());
    }

    @Override
    public Integer call() throws Exception {
        int i = 0;
        for (i = 0; i < 10; i++) {}
        return i;
    }
}
2.Runnable、Thread、Callable三种方式实现多线程的区别
2.1Runnable
@FunctionalInterface
public interface Runnable {
    public abstract void run();
}
Runnable接口很简单,里面只有一个抽象方法run()。run()方法里面的是这个线程要执行的内容。
2.2Thread
public class Thread implements Runnable {

    public Thread() {
        init(null, null, "Thread-" + nextThreadNum(), 0);
    }

    public Thread(Runnable target) {
        init(null, target, "Thread-" + nextThreadNum(), 0);
    }

    Thread(Runnable target, AccessControlContext acc) {
        init(null, target, "Thread-" + nextThreadNum(), 0, acc);
    }

    public Thread(ThreadGroup group, Runnable target) {
        init(group, target, "Thread-" + nextThreadNum(), 0);
    }

    public Thread(String name) {
        init(null, null, name, 0);
    }

    public Thread(ThreadGroup group, String name) {
        init(group, null, name, 0);
    }

    public Thread(ThreadGroup group, String name) {
        init(group, null, name, 0);
    }

    public Thread(Runnable target, String name) {
        init(null, target, name, 0);
    }

    public Thread(ThreadGroup group, Runnable target, String name) {
        init(group, target, name, 0);
    }

    public Thread(ThreadGroup group, Runnable target, String name,
                  long stackSize) {
        init(group, target, name, stackSize);
    }
}
Thread类实现了Runnable接口,因此我们继承Thread,实际上也是间接的实现了Runnable接口。
Thread中一共有9个构造函数,但是里面实际调用的分别是:
init(ThreadGroup g, Runnable target, String name, long stackSize)
init(ThreadGroup g, Runnable target, String name, long stackSize, AccessControlContext acc)
我们查看了第一个init()方法源码,在内部其实是调用了第二个init方法,将最后一个参数置空。因此我们只要详细看5个参数的init()方法即可。
    private void init(ThreadGroup g, Runnable target, String name,
                      long stackSize) {
        init(g, target, name, stackSize, null); //内部其实调用了另一个init方法
    }

    private void init(ThreadGroup g, Runnable target, String name,
                      long stackSize, AccessControlContext acc) {
        if (name == null) {throw new NullPointerException("name cannot be null");
        }

        this.name = name; //指定线程名称

        Thread parent = currentThread(); //获取当前线程
        SecurityManager security = System.getSecurityManager();
        if (g == null) {
            /* Determine if it's an applet or not */

            /* If there is a security manager, ask the security manager
               what to do. */
            if (security != null) {
                g = security.getThreadGroup(); //使用安全管理器要求的线程组
            }

            /* If the security doesn't have a strong opinion of the matter
               use the parent thread group. */
            if (g == null) {
                g = parent.getThreadGroup(); //安全性没有明确的要求,可以使用父类线程组。
            }
        }

        /* checkAccess regardless of whether or not threadgroup is
           explicitly passed in. */
        g.checkAccess();

        /*
         * Do we have the required permissions?
         */
        if (security != null) {
            if (isCCLOverridden(getClass())) {
                security.checkPermission(SUBCLASS_IMPLEMENTATION_PERMISSION);
            }
        }

        g.addUnstarted();

        this.group = g; //线程组
        this.daemon = parent.isDaemon(); //是否守护线程
        this.priority = parent.getPriority(); //优先级
        if (security == null || isCCLOverridden(parent.getClass())) //上下文类加载器
            this.contextClassLoader = parent.getContextClassLoader();
        else
            this.contextClassLoader = parent.contextClassLoader;
        this.inheritedAccessControlContext =
                acc != null ? acc : AccessController.getContext();
        this.target = target; //将被执行的目标线程
        setPriority(priority); //设置优先级(1-10),不在范围内则抛出异常。由于线程组的最大优先级可以设置,参数大于线程组的最大优先级,取线程组最大优先级。
        if (parent.inheritableThreadLocals != null)
            this.inheritableThreadLocals =
                ThreadLocal.createInheritedMap(parent.inheritableThreadLocals);
        /* Stash the specified stack size in case the VM cares */
        this.stackSize = stackSize;

        /* Set thread ID */
        tid = nextThreadID(); //线程的唯一id
    }
2.3Callable
@FunctionalInterface
public interface Callable<V> {

    V call() throws Exception;
}
Callable接口也很简单,里面只有一个方法call()。
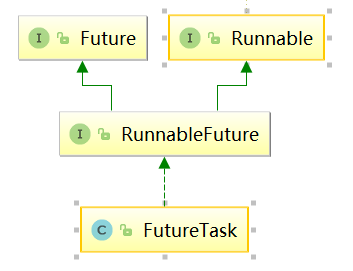
使用Callable时,需要使用FutureTask类进行调用。
查看FutureTask类的继承关系,可知其最上面也是实现了Runnable接口。
查看FutureTask的构造函数,一共有两个。
FutureTask(Callable<V> callable):futureTask内部有一个私有变量Callable,令其等于传入的callable。
FutureTask(Runnable runnable, V result):调用Executors的静态方法,创建内部一个实现了callable接口的内部类,call()方法执行Runnable的run(),执行成功后返回result。
源码如下:
    public FutureTask(Callable<V> callable) {
        if (callable == null)
            throw new NullPointerException();
        this.callable = callable;
        this.state = NEW;       // ensure visibility of callable
    }

    public FutureTask(Runnable runnable, V result) {
        this.callable = Executors.callable(runnable, result); //见下方
        this.state = NEW;       // ensure visibility of callable
    }
    public static <T> Callable<T> callable(Runnable task, T result) {
        if (task == null)
            throw new NullPointerException();
        return new RunnableAdapter<T>(task, result);
    }

    static final class RunnableAdapter<T> implements Callable<T> {
        final Runnable task;
        final T result;
        RunnableAdapter(Runnable task, T result) {
            this.task = task;
            this.result = result;
        }
        public T call() {
            task.run();
            return result;
        }
    }
在FutureTask中定义了运行状态一共有7种(注意它们各自的数值,会经常使用>=、<=等方式来处理逻辑走向):
    /*
     * NEW -> COMPLETING -> NORMAL 新建->执行->完成
     * NEW -> COMPLETING -> EXCEPTIONAL 新建->执行->异常
     * NEW -> CANCELLED 新建->取消
     * NEW -> INTERRUPTING -> INTERRUPTED 新建->中断运行->中断状态
     */
    private volatile int state;
    private static final int NEW          = 0;
    private static final int COMPLETING   = 1;
    private static final int NORMAL       = 2;
    private static final int EXCEPTIONAL  = 3;
    private static final int CANCELLED    = 4;
    private static final int INTERRUPTING = 5;
    private static final int INTERRUPTED  = 6;
FutureTask的run()方法,内部核心代码是调用了callable.call()。如果顺利执行,会执行set(result)方法,将结果保存到成员变量private Object outcome中。
    public void run() {
        if (state != NEW ||
            !UNSAFE.compareAndSwapObject(this, runnerOffset,
                                         null, Thread.currentThread()))
            return;
        try {
            Callable<V> c = callable;
            if (c != null && state == NEW) {
                V result;
                boolean ran;
                try {
                    result = c.call();
                    ran = true;
                } catch (Throwable ex) {
                    result = null;
                    ran = false;
                    setException(ex);
                }
                if (ran)
                    set(result);
            }
        } finally {
            // runner must be non-null until state is settled to
            // prevent concurrent calls to run()
            runner = null;
            // state must be re-read after nulling runner to prevent
            // leaked interrupts
            int s = state;
            if (s >= INTERRUPTING)
                handlePossibleCancellationInterrupt(s);
        }
    }
FutureTask的get()方法,在线程t1中调用线程t2的get()方法,可见如果t2的run()仍未执行完成,则会一直等待执行完成后,获取返回值,才会继续往下执行t1。
    public V get() throws InterruptedException, ExecutionException {
        int s = state;
        if (s <= COMPLETING)
            s = awaitDone(false, 0L); //如果线程刚被新建,或正在运行,等待执行完成。
        return report(s); //返回run()方法中保存的outcome
    }

    private int awaitDone(boolean timed, long nanos)
        throws InterruptedException {
        final long deadline = timed ? System.nanoTime() + nanos : 0L; //在线程类中,0通常用来代表不限制时间
        WaitNode q = null;
        boolean queued = false;
        for (;;) {
            if (Thread.interrupted()) {
                removeWaiter(q);
                throw new InterruptedException();
            }

            int s = state;
            if (s > COMPLETING) {
                if (q != null)
                    q.thread = null;
                return s;
            }
            else if (s == COMPLETING) // cannot time out yet
                Thread.yield(); //仍在执行中,令当前线程让出cpu资源。因为通常是在一个线程t1里调用另一个线程t2的get()方法,即令t1让出cpu,t2可以参与竞争
            else if (q == null)
                q = new WaitNode();
            else if (!queued)
                queued = UNSAFE.compareAndSwapObject(this, waitersOffset,
                                                     q.next = waiters, q);
            else if (timed) {
                nanos = deadline - System.nanoTime();
                if (nanos <= 0L) {
                    removeWaiter(q);
                    return state;
                }
                LockSupport.parkNanos(this, nanos);
            }
            else
                LockSupport.park(this);
        }
    }
3总结
实际上不论是使用哪一种方式实现,最后调用时都是需要使用Thread类的start()方法进行调用。因此,线程的主要类,我们研究Thread类即可。
线程的状态state,在Thread类中以内部枚举的形式存在
    public enum State {
        NEW, //新建状态,尚未执行start方法
        RUNNABLE, //可运行状态,已经执行start方法,竞争cpu资源
        BLOCKED, //阻塞状态,等待获取锁进入代码块
        WAITING, //等待状态,线程进入此状态只有三种方法:wait()、join()、park(),注意这些方法都没有参数,即不会由于超时问题而重新变为可运行或执行状态
        TIMED_WAITING, //定时等待状态,进入此方法的方式与waiting类似,但是该方法有时间限制,当达到指定时间后会重新变为Runnable,如sleep、wait(long)等
        TERMINATED; //终止状态,线程已经执行完毕
    }
几种常用方法介绍:
yield():当前线程暂停执行,让出cpu,重新竞争。有可能仍然是该线程竞争到cpu。
sleep(long):当前线程暂停执行(不释放锁),休眠指定毫秒数,其他线程竞争cpu,当指定时间过去,当前线程继续执行。
interrupt():中断当前线程,通常用来让内部是while(!Thread.currentThread().isInterrupt())的run()方法中断运行。
wait():令当前线程进入等待状态(释放锁),只能使用在synchronized块中。因此,当线程执行wait方法的时候一定是取得了锁。可以通过notify()或notifyAll()方法重新唤醒
join():通常是在一个线程t1里面调用另一个线程t2的join方法,当t1执行到这里的时候,会获取t2的锁并执行t2,直到t2执行完毕,再继续执行t1下面的步骤。
join(long):与join()类似,不同处在于t1最多只会等待long秒,当时间到达后,如果t2仍没有执行完毕,那么t1也会继续执行下面的步骤。
join()方法例子:
public class Main4 extends Thread {

    public static void main(String[] args) throws ExecutionException, InterruptedException {
        Main4 m1 = new Main4();
        Main4 m2 = new Main4();
        m1.start();
        m1.join();
        System.out.println("---------------main---------------");
        m2.start();
    }

    @Override
    public void run() {
        int i = 0;
        for (i = 0; i < 10; i++) {
            System.out.println(Thread.currentThread().getName() + "[i="+i+"]");
            try {
                Thread.sleep(1000);
            } catch (InterruptedException e) {
                e.printStackTrace();
            }
        }
    }
}
如上程序,控制台会先打印m1线程的0-9,然后再打印"---main---",最后打印m2线程的0-9.
如果我们将m1.join()改为m1.join(1000),那么会先打印m1的0,这时达到参数1000ms,main线程会继续并行往下执行,打印"---main---",然后启动m2线程,m1与m2争夺cpu竞相打印。
需要注意的是,join(0)不是等待0ms,而是等价于join()方法。源码中join()内部只有一行代码:join(0)。
_