主要分为两大步骤:1、zookeeper安装;2、ck集群配置
===========================一、zookeeper安装========================
1、安装包下载
https://www.apache.org/dyn/closer.lua/zookeeper/zookeeper-3.6.1/apache-zookeeper-3.6.1-bin.tar.gz
2、解压并配置
a) tar -zxvf apache-zookeeper-3.6.1-bin.tar.gz -C /usr/java

b)cp zoo_sample.cfg  zoo.cfg

c)vim zoo.cfg ,添加以下三个并修改dataDir目录

dataDir=/usr/java/zookeeper36/data
server.1=hadoop101:2888:3888
server.2=hadoop102:2888:3888
server.3=hadoop103:2888:3888

d)每台机器都要创建并修改myid文件,具体的值对应与server.x
    echo 1  > dataDir=/usr/java/zookeeper36/data/myid

e) scp -r zookeeper36 hadoop102:/usr/java

3、每台机器运行zk
a)每台机器运行
./bin/zkServer.sh start

b)查看每台机器的节点状态
./bin/zkServer.sh status


如图显示,则表示成功安装!!!!
===========================二、clickhouse安装========================
1、首先单机安装,具体安装看下面链接
2、修改配置文件/etc/clickhouse-server/config.xml ;
listen_host 表示能监听的主机,:: 表示任意主机都可以访问
<listen_host>::</listen_host>
3、同步修改的配置文件
scp /etc/clickhouse-server/config.xml hadoop102:/etc/clickhouse-server/

scp /etc/clickhouse-server/config.xml hadoop103:/etc/clickhouse-server/
4、添加配置文件vim /etc/metrika.xml ,具体的主机名和端口按照自己的去修改。
注意:9000端口为/etc/clickhouse-server/config.xml文件中的tcp_port端口
<yandex>
    <clickhouse_remote_servers>
        <!-- 3分片1副本 -->
        <nx_clickhouse_3shards_1replicas>
            <shard>
                <!-- 数据自动同步 -->
                <internal_replication>true</internal_replication>
                    <replica>
                        <host>hadoop101</host>
                        <port>9000</port>
                    </replica>
            </shard>

            <shard>
                <internal_replication>true</internal_replication>
                <replica>
                    <host>hadoop102</host>
                    <port>9000</port>
                </replica>
            </shard>

            <shard>
                <internal_replication>true</internal_replication>
                <replica>
                    <host>hadoop103</host>
                    <port>9000</port>
                </replica>
            </shard>

        </nx_clickhouse_3shards_1replicas>
    </clickhouse_remote_servers>

    <!-- zookeeper 自动同步 -->
    <zookeeper-servers>
        <node index="1">
            <host>hadoop101</host>
            <port>2181</port>
        </node>

        <node index="2">
            <host>hadoop102</host>
            <port>2181</port>
        </node>

        <node index="3">
            <host>hadoop103</host>
            <port>2181</port>
        </node>
    </zookeeper-servers>

    <!-- 配置文件中macros若省略,则建复制表时每个分片需指定zookeeper路径及副本名称,同一分片 上路径相同,副本名称不同;若不省略需每个分片不同配置 -->
    <macros>
        <replica>hadoop102</replica>
    </macros>
    <networks>
        <ip>::/0</ip>
    </networks>

    <!-- 配置压缩 -->
    <clickhouse_compression>
        <case>
            <min_part_size>10000000000</min_part_size>
            <min_part_size_ratio>0.01</min_part_size_ratio>
            <method>lz4</method>
        </case>
    </clickhouse_compression>
</yandex>
5、同步添加的配置文件
scp  /etc/metrika.xml hadoop102:/etc/
scp  /etc/metrika.xml hadoop103:/etc/
6、分别启动这三台clickhouse-service
service clickhouse-server start
7、进入客户端,查看集群配置
1、clickhouse-client -m

2、select * from system.clusters;
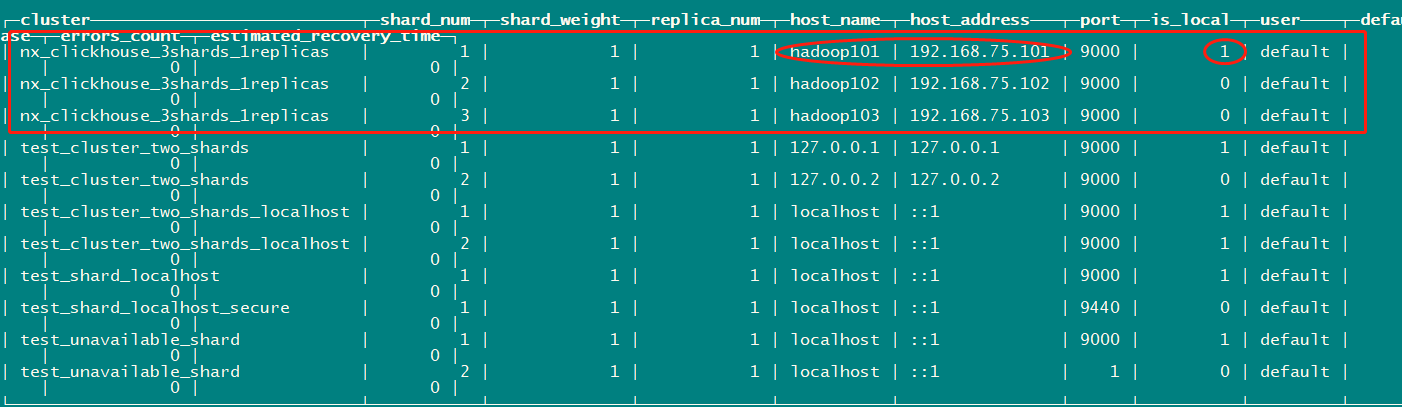
如图所示,表示成功,也可查看其他机器的配置
8、查看错误日志
/var/log/clickhouse-server
===========================三、clickhouse集群测试========================
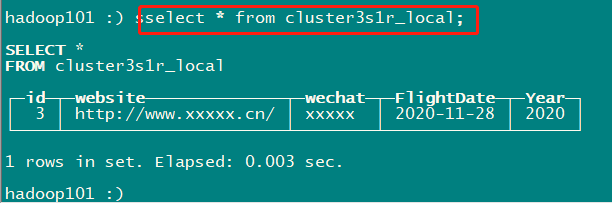
1、在三个节点分别创建本地表cluster3s1r_local
CREATE TABLE default.cluster3s1r_local
(
    `id` Int32,
    `website` String,
    `wechat` String,
    `FlightDate` Date,
    Year UInt16
)
ENGINE = MergeTree(FlightDate, (Year, FlightDate), 8192);
2、在第一节点创建分布式表
CREATE TABLE default.cluster3s1r_all AS cluster3s1r_local
ENGINE = Distributed(nx_clickhouse_3shards_1replicas, default, cluster3s1r_local, rand());
3、往分布式表cluster3s1r_all中插入数据,cluster3s1r_all 会随机插入到三个节点的本地表(cluster3s1r_local)中
INSERT INTO default.cluster3s1r_all (id,website,wechat,FlightDate,Year)values(1,'https://niocoder.com/','java干货','2020-11-28',2020);
INSERT INTO default.cluster3s1r_all (id,website,wechat,FlightDate,Year)values(2,'http://www.merryyou.cn/','javaganhuo','2020-11-28',2020);
INSERT INTO default.cluster3s1r_all (id,website,wechat,FlightDate,Year)values(3,'http://www.xxxxx.cn/','xxxxx','2020-11-28',2020);
4、可以查看三个节点本地表的数据和分布式表的数据
# 查询总量查分布式表
select * from cluster3s1r_all;


#各机器节点的本地表
select * from cluster3s1r_local;


FAQ
如果出现下面的错误:
2021.01.26 11:00:38.392034 [ 6633 ] {} <Trace> Application: The memory map of clickhouse executable has been mlock'ed
2021.01.26 11:00:38.392351 [ 6633 ] {} <Error> Application: DB::Exception: Effective user of the process (root) does not match the owner of the data (clickhouse). Run under 'sudo -u clickhouse'.
2021.01.26 11:00:38.392383 [ 6633 ] {} <Information> Application: shutting down
2021.01.26 11:00:38.392389 [ 6633 ] {} <Debug> Application: Uninitializing subsystem: Logging Subsystem
2021.01.26 11:00:38.462977 [ 6636 ] {} <Trace> BaseDaemon: Received signal -2
2021.01.26 11:00:38.463026 [ 6636 ] {} <Information> BaseDaemon: Stop SignalListener thread
2021.01.26 11:02:00.469399 [ 6777 ] {} <Information> SentryWriter: Sending crash reports is disabled
2021.01.26 11:02:00.470907 [ 6777 ] {} <Trace> Pipe: Pipe capacity is 1.00 MiB
2021.01.26 11:02:00.509282 [ 6777 ] {} <Information> : Starting ClickHouse 20.8.3.18 with revision 54438, no build id, PID 6777
2021.01.26 11:02:00.509359 [ 6777 ] {} <Information> Application: starting up
2021.01.26 11:02:00.512996 [ 6777 ] {} <Trace> Application: Will mlockall to prevent executable memory from being paged out. It may take a few seconds.
2021.01.26 11:02:00.633075 [ 6777 ] {} <Trace> Application: The memory map of clickhouse executable has been mlock'ed
2021.01.26 11:02:00.633349 [ 6777 ] {} <Error> Application: DB::Exception: Effective user of the process (root) does not match the owner of the data (clickhouse). Run under 'sudo -u clickhouse'.
2021.01.26 11:02:00.633365 [ 6777 ] {} <Information> Application: shutting down
2021.01.26 11:02:00.633368 [ 6777 ] {} <Debug> Application: Uninitializing subsystem: Logging Subsystem
2021.01.26 11:02:00.682722 [ 6780 ] {} <Trace> BaseDaemon: Received signal -2
2021.01.26 11:02:00.682755 [ 6780 ] {} <Information> BaseDaemon: Stop SignalListener thread
解决方法:
1、暴力方法:
  卸载这台机器clickhouse,重新安装、重新配置该机器的集群设置

  具体卸载方法:
  可以看 https://www.cnblogs.com/ywjfx/p/14305405.html

2、切换成clickhouse用户启动(我测试过,但是不奏效,所以才使用了暴力方法)
     sudo -u clickhouse clickhouse-server --config-file=/etc/clickhouse-server/config.xml