FTP
1.匿名用户的FTP
1.1服务端口:
1.1.1挂载光盘
[root@server ~]# mount /dev/sr0 /media/cdrom
mount: block device /dev/sr0 is write-protected, mounting read-only
1.1.2安装vsftpd
[root@server ~]# yum -y install vsftpd
[root@server ~]# rpm -qa vsftpd
vsftpd-2.2.2-11.el6_4.1.x86_64
1.1.3共享目录pub
[root@server ~]# cd /var/ftp
[root@server ftp]# ls
pub
1.1.4把ftp(程序用户设置成它的属主)
[root@server ftp]# ll
total 4
drwxr-xr-x. 2 root root 4096 Mar  1  2013 pub
[root@server ftp]# chown ftp pub
[root@server ftp]# ll
total 4
drwxr-xr-x. 2 ftp root 4096 Mar  1  2013 pub
1.1.5查看它的配置文件
[root@server ftp]# cd /etc/vsftpd
[root@server vsftpd]# ls
ftpusers  user_list  vsftpd.conf  vsftpd_conf_migrate.sh
1.1.6备份文件
[root@server vsftpd]# cp vsftpd.conf{,.bak}
[root@server vsftpd]# ls
ftpusers  user_list  vsftpd.conf  vsftpd.conf.bak  vsftpd_conf_migrate.sh
1.1.7进入
[root@server vsftpd]# head -32 vsftpd.conf | tail -6
anon_upload_enable=YES   #开启匿名用户上传权限
anon_umask=022           #手动添加匿名用户的权限掩码
# Uncomment this if you want the anonymous FTP user to be able to create
# new directories.
anon_mkdir_write_enable=YES    #开启匿名用户新建目录的权限
anon_other_write_enable=YES    #手动添加匿名用户的其他写入
1.1.8启动ftp服务
[root@server vsftpd]# /etc/init.d/vsftpd start
Starting vsftpd for vsftpd:                                [  OK  ]
1.1.9打开一个服务,确定一下它是否有端口
[root@server vsftpd]# netstat -antup | grep vsftpd
tcp      0      0 0.0.0.0:21    0.0.0.0:*     LISTEN    1426/vsftpd
1.1.10已知共享目录pub目录下有一个文件yang,有一个目录wenbo
[root@server pub]# pwd
/var/ftp/pub
[root@server pub]# ls
wenbo  yang
1.1.11传文件时,关闭防火墙
[root@server pub]# service iptables stop
iptables: Setting chains to policy ACCEPT: filter          [  OK  ]
iptables: Flushing firewall rules:                         [  OK  ]
iptables: Unloading modules:                               [  OK  ]
1.2客户端口:
1.2.1装包ftp
[root@client ~]# yum -y install ftp
[root@client ~]# rpm -qa ftp
ftp-0.17-54.el6.x86_64
1.2.2已知客户端目录yunwei里有以下文件
[root@client yunwei]# pwd
/root/yunwei
[root@client yunwei]# ls
xiaohong  xiaoming
1.2.3进入ftp
[root@client yunwei]# ftp 192.168.200.58   #也可以理解为服务端的IP地址
Connected to 192.168.200.58 (192.168.200.58).
220 (vsFTPd 2.2.2)
Name (192.168.200.58:root): ftp   #匿名用户通用名
331 Please specify the password.
Password:          #不用输密码,直接按“回车”即可
230 Login successful.
Remote system type is UNIX.
Using binary mode to transfer files.
ftp>
1.2.4查看

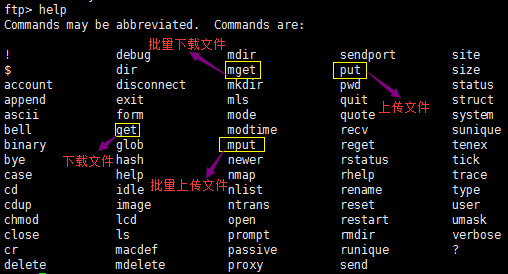
1.2.5help显示帮助
1.2.6进入共享目录pub里
ftp> cd pub
250 Directory successfully changed.
ftp> ls
227 Entering Passive Mode (192,168,200,58,45,17).
150 Here comes the directory listing.
drwxr-xr-x    2 0        0            4096 Sep 03 10:10 wenbo
-rw-r--r--    1 0        0               0 Sep 03 10:10 yang
226 Directory send OK.
ftp>
1.2.7下载文件
(1)下载单一文件
ftp> get yang
local: yang remote: yang
227 Entering Passive Mode (192,168,200,58,132,204).
150 Opening BINARY mode data connection for yang (0 bytes).
226 Transfer complete.

[root@client yunwei]# ls
xiaohong  xiaoming  yang
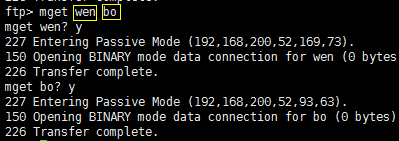
(2)下载多个文件

1.2.8上传文件

1.2.9退出

2.搭建本地用户的FTP
2.1服务端
2.1.1查看它的配置文件
[root@server ftp]# cd /etc/vsftpd
[root@server vsftpd]# ls
ftpusers  user_list  vsftpd.conf  vsftpd_conf_migrate.sh
2.1.2备份文件
[root@server vsftpd]# cp vsftpd.conf{,.bak}
[root@server vsftpd]# ls
ftpusers  user_list  vsftpd.conf  vsftpd.conf.bak  vsftpd_conf_migrate.sh
2.1.3进入
[root@server vsftpd]# sed -n '12p;96p' vsftpd.conf
anonymous_enable=NO     #关掉匿名用户
chroot_local_user=YES   #开启本地用户家目录的锁定
2.1.4平滑重启vsftpd
[root@server vsftpd]# /etc/init.d/vsftpd reload
Shutting down vsftpd:                                      [  OK  ]
Starting vsftpd for vsftpd:                                [  OK  ]
2.1.5挑选一个本地用户
[root@server vsftpd]# id yunwei
uid=500(yunwei) gid=500(yunwei) groups=500(yunwei)
2.1.6已知本地用户的家目录如下
[root@server yunwei]# pwd
/home/yunwei
[root@server yunwei]# ls
xiaoming  yangwenbo
2.2客户端
2.2.1进入ftp
[root@client /]# ftp 192.168.200.58
Connected to 192.168.200.58 (192.168.200.58).
220 (vsFTPd 2.2.2)
Name (192.168.200.58:root): yunwei
331 Please specify the password.
Password:
500 OOPS: cannot change directory:/home/yunwei
Login failed.
ftp>
2.2.2如果进去看不见东西
ftp> ls
421 Service not available, remote server has closed connection
2.2.3那就执行(服务端执行)
(1)找到这个
[root@server /]# getsebool -a | grep ftp
allow_ftpd_anon_write --> off
allow_ftpd_full_access --> off
allow_ftpd_use_cifs --> off
allow_ftpd_use_nfs --> off
ftp_home_dir --> off       #找到这个设置成on
ftpd_connect_db --> off
ftpd_use_fusefs --> off
ftpd_use_passive_mode --> off
httpd_enable_ftp_server --> off
tftp_anon_write --> off
tftp_use_cifs --> off
tftp_use_nfs --> off
(2)打开
[root@server /]# setsebool -P ftp_home_dir=on
(3)重新查看
[root@server /]# getsebool -a | grep ftp
allow_ftpd_anon_write --> off
allow_ftpd_full_access --> off
allow_ftpd_use_cifs --> off
allow_ftpd_use_nfs --> off
ftp_home_dir --> off       #找到这个设置成on
ftpd_connect_db --> off
ftpd_use_fusefs --> off
ftpd_use_passive_mode --> off
httpd_enable_ftp_server --> off
tftp_anon_write --> off
tftp_use_cifs --> off
tftp_use_nfs --> off
2.2.4重新查看共享目录(如果还看不到,就重新登录)
ftp> ls
227 Entering Passive Mode (192,168,200,58,113,183).
150 Here comes the directory listing.
drwxr-xr-x    2 0        0            4096 Sep 03 13:30 xiaoming
-rw-r--r--    1 0        0               0 Sep 03 13:25 yangwenbo
226 Directory send OK.
3.虚拟账号的FTP
3.1服务端:
3.1.1进入ftp的配置文件内,并在在当前创建一个虚拟文件
[root@server vsftpd]# pwd
/etc/vsftpd
[root@server vsftpd]# cat vusers.list
yang    #账号
123     #密码

wen     #账号
456     #密码

bo      #账号
789     #密码
3.1.2把这个文件转换成数据文件,给它加密
[root@server vsftpd]# db_load -T -t hash -f vusers.list vusers.db
[root@server vsftpd]# ls
ftpusers   vsftpd.conf      vsftpd_conf_migrate.sh  vusers.list
user_list  vsftpd.conf.bak  vusers.db #加密文件

[root@server vsftpd]# file vusers.db
vusers.db: Berkeley DB (Hash, version 9, native byte-order)
3.1.3给加密文件加上600权限
[root@server vsftpd]# chmod 600 vusers.*
[root@server vsftpd]# ll vusers.*
-rw-------. 1 root root 12288 Sep  5 02:50 vusers.db
-rw-------. 1 root root    24 Sep  5 02:47 vusers.list
3.1.4创建FTP根目录,并赋予它755权限
[root@server vsftpd]# chmod 755 /var/ftproot
[root@server vsftpd]# ll -d /var/ftproot
drwxr-xr-x. 2 root root 4096 Sep  5 02:55 /var/ftproot
3.1.5创建一个虚拟账号
[root@server vsftpd]# useradd -d /var/ftproot/ -s /sbin/nologin virtual

3.1.6修改FTP根目录的属主与属组
[root@server vsftpd]# chown virtual:virtual /var/ftproot/
[root@server vsftpd]# ll -d /var/ftproot/
drwxr-xr-x. 2 virtual virtual 4096 Sep  5 02:55 /var/ftproot/
3.1.7创建一个pam.d认证文件
[root@server pam.d]# pwd
/etc/pam.d
[root@server pam.d]# cat vsftpd.vu
auth required pam_userdb.so db=/etc/vsftpd/vusers
account required pam_userdb.so db=/etc/vsftpd/vusers
3.1.8修改配置文件
[root@server vsftpd]# pwd
/etc/vsftpd
[root@server vsftpd]# cat -n /etc/vsftpd/vsftpd.conf | sed -n '23p;117p;118p;119p'
    23	anon_umask=022           #手动添加此行
   117	pam_service_name=vsftpd.vu   #在其末尾添加.vu
   118	guest_enable=YES         #手动添加此行
   119	guest_username=virtual   #手动添加此行
3.1.9平滑重启vsftpd
[root@server vsftpd]# /etc/init.d/vsftpd reload
Shutting down vsftpd:                                      [  OK  ]
Starting vsftpd for vsftpd:                                [  OK  ]
3.1.10给/var/ftproot/目录下创建一个共享文件(实验用的)
[root@server vsftpd]# touch /var/ftproot/yangwenbo
[root@server vsftpd]# ls /var/ftproot/
yangwenbo
3.1.11依次使用加密文件里的账号登录ftp验证
[root@server vsftpd]# cat vusers.list
yang
123
wen
456
bo
789
3.2客户端
3.2.1 关闭CLinux
[root@server ~]# setenforce 0
[root@client ~]# setenforce 0
3.2.2 客户端依次使用加密文件里的账号登录ftp验证
[root@client ~]# ftp 192.168.200.58
Connected to 192.168.200.58 (192.168.200.58).
220 (vsFTPd 2.2.2)
Name (192.168.200.58:root): yang
331 Please specify the password.
Password:           #之前设置的密码“123”
230 Login successful.
Remote system type is UNIX.
Using binary mode to transfer files.
ftp> ls
227 Entering Passive Mode (192,168,200,58,57,153).
150 Here comes the directory listing.
-rw-r--r--    1 0        0               0 Sep 05 13:04 yangwenbo
226 Directory send OK.
[root@client ~]# ftp 192.168.200.58
Connected to 192.168.200.58 (192.168.200.58).
220 (vsFTPd 2.2.2)
Name (192.168.200.58:root): wen
331 Please specify the password.
Password:            #之前设置的密码“456”
230 Login successful.
Remote system type is UNIX.
Using binary mode to transfer files.
ftp> ls
227 Entering Passive Mode (192,168,200,58,226,45).
150 Here comes the directory listing.
-rw-r--r--    1 0        0               0 Sep 05 13:04 yangwenbo
226 Directory send OK.
[root@client ~]# ftp 192.168.200.58
Connected to 192.168.200.58 (192.168.200.58).
220 (vsFTPd 2.2.2)
Name (192.168.200.58:root): bo
331 Please specify the password.
Password:            #之前设置的密码“789”
230 Login successful.
Remote system type is UNIX.
Using binary mode to transfer files.
ftp> ls
227 Entering Passive Mode (192,168,200,58,106,202).
150 Here comes the directory listing.
-rw-r--r--    1 0        0               0 Sep 05 13:04 yangwenbo
226 Directory send OK.